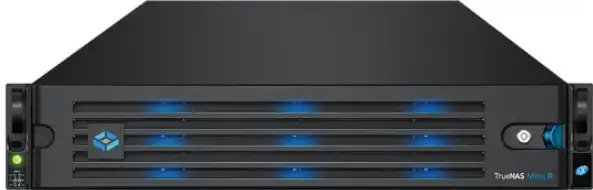
TrueNAS Mini R Basic Rack
مقدمة
- TrueNAS Mini R عبارة عن صفيف تخزين 2U يحتوي على اثني عشر (12) فتحة محرك أقراص قابلة للتبديل السريع مقاس 3.5 بوصة وخيار للاختيار بين حامل أو تثبيت سطح المكتب.
- يأتي نظامك مزودًا بنظام تشغيل TrueNAS مُحمل مسبقًا.
- Review اعتبارات ومتطلبات السلامة قبل التعامل مع Mini R أو تثبيتها على الرف.
أمان
- تحذير: The TrueNAS Mini products use a Closed Cap style CMOS battery, which is a non-consumer replaceable part due to regulatory requirements.
- Replacement should be performed by a qualified individual in a child-free environment. Contact our support services via support@truenas.com إذا كان هناك حاجة إلى الاستبدال.
- قم بإزالة البطاريات المستعملة وإعادة تدويرها أو التخلص منها على الفور وفقًا للوائح المحلية واحفظها بعيدًا عن متناول الأطفال. لا تتخلص من البطاريات في سلة المهملات المنزلية أو تحرقها.
- حتى البطاريات المستعملة قد تسبب إصابات خطيرة أو الوفاة.
- اتصل بمركز مكافحة السموم المحلي للحصول على معلومات العلاج.
- نوع البطارية المتوافق (CR2032).
- المجلد الاسميtagهـ 3 فولت.
- لا يجوز إعادة شحن البطاريات غير القابلة لإعادة الشحن.
- Do not force recharge, disassemble, heat above (Manufacturer’s specified temperature rating) or incinerate. Doing so may result in injury due to venting, leaking or explosion resulting in chemical burns.
- نوصي شخصين على الأقل برفع نظام TrueNAS.
- تحذير: Never attempt to lift a TrueNAS system loaded with drives! Install the system in a rack before adding drives. Remove drives before unracking the system.
- امسك النظام من الجانبين أو من أسفل كلما أمكن ذلك. كن دائمًا على دراية بالكابلات أو الموصلات غير المحكمة وتجنب الضغط على هذه العناصر أو ارتطامها كلما أمكن ذلك.
- يستخدم هذا المستند "يسار" و "يمين" وفقًا لمنظورك عند مواجهة الجزء الأمامي من النظام أو الرف.
متطلبات
- We recommend these tools when installing a Mini R system in a rack.
- # 2 مفك رأس فيليبس
- مستوى
System Specifications and Compliance
| Mini R Specifications | |
| الأبعاد (الطول × العرض × الارتفاع) | 3.43 in x 17.2 in x 25.5 in (87 mm x 438 mm x 647.7 mm) |
| الوزن الصافي (محملة بالكامل) | 50 lbs (23 kg) |
| درجة حرارة التشغيل | 41°F – 95°F (5°C – 35°C) |
| درجة الحرارة غير التشغيلية | -40°F – 158°F (-40°C – 70°C) |
| رطوبة التشغيل (عدم التكثيف) | 8% – 90% |
| حجم العرضtage | 100-240VAC, 10-5A 50-60 Hz |
The TrueNAS Mini R is a network storage servers intended for use in home, home‑lab, and small office environments.
The apparatus is designed to be operated:
- In indoor residential or office environments, within the specified ranges for temperature, humidity, and supply voltage
- In properly grounded electrical installations, in accordance with local electrical codes
- On a stable, well‑ventilated surface or shelf, with unobstructed airflow around the chassis
- In accordance with the TrueNAS software documentation, including configuration, operation, and maintenance instructions
This product is not designed or intended for:
- Use in professional or industrial environments with demanding environmental conditions (e.g., heavy vibration, conductive dust, or exposure to chemicals)
- Use in situations requiring specialized environmental controls (e.g., clean rooms, high-temperature, or high-humidity installations)
- Any application outside the conditions and purposes described in this manual and the TrueNAS software documentation
- For detailed configuration and operational guidance, refer to the TrueNAS software documentation provided with the product and available from TrueNAS.
The Mini R is FCC/CE-marked and complies with:
- FCC 47 CFR Part 15, Class A – Radiated and conducted emissions limits for commercial IT equipment (EMI/EMC)
- حجم منخفضtage Directive (LVD) 2014/35/EU – Electrical safety
- Electromagnetic Compatibility (EMC) Directive 2014/30/EU – Electromagnetic interference and immunity
- RoHS Directive 2011/65/EU, as amended by (EU) 2015/863 – Restriction of hazardous substances
- WEEE Directive 2012/19/EU – Waste electrical and electronic equipment
- For regulatory or compliance-related queries, contact compliance@truenas.com.
- EU Authorized Representative: Obelis S.A. – Boulevard Général Wahis 53, B-1030 Brussels, BELGIUM
Important – Battery Information
- This product contains a lithium coin cell (CMOS battery) used to maintain system settings. Do not dispose of the battery with household waste.
- Used batteries must be collected and disposed of separately in accordance with local regulations and the EU Battery Directive 2006/66/EC.
- The crossed-out wheeled bin symbol indicates that the battery must be taken to an appropriate collection facility for recycling.
مكونات النظام
- يتم تعبئة وحدات TrueNAS وشحنها بعناية مع شركات نقل موثوق بها للوصول في حالة ممتازة.
- If there is any shipping damage or missing parts, please take photos and contact TrueNAS Support immediately at support@truenas.com, 1-855-GREP4-iX (1-855-473-7449), or 14089434100.
- يرجى تحديد وتسجيل الأرقام التسلسلية للجهاز على الجزء الخلفي من كل هيكل للرجوع إليها بسرعة.
قم بإخراج صناديق الشحن بعناية وحدد موقع المكونات التالية:
- صفيف التخزين الصغير R

- ميني آر مدي

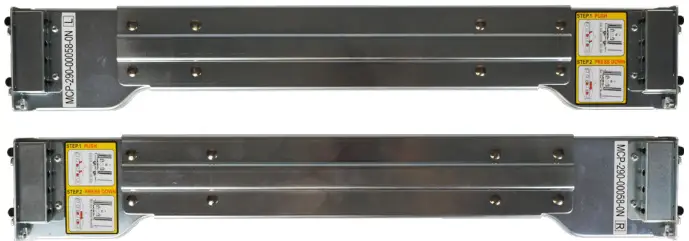
- Set of standard rack mount rails with hardware.
- اثنا عشر (12) درجًا مقاس 3.5 بوصة مع ما يصل إلى اثني عشر (12) محركًا ، اعتمادًا على العدد الذي اشتريته.
مجموعة من الإكسسوارات:
- سلك طاقة واحد (1) C13 إلى 5-15P
- عدد (2) كابلات إيثرنت
- كيس واحد (1) من براغي الأقراص الصلبة
- اثنان (2) مفتاحا مدي
- أربعة (4) أقدام مطاطية.
- كيس واحد (1) من براغي طقم السكك الحديدية

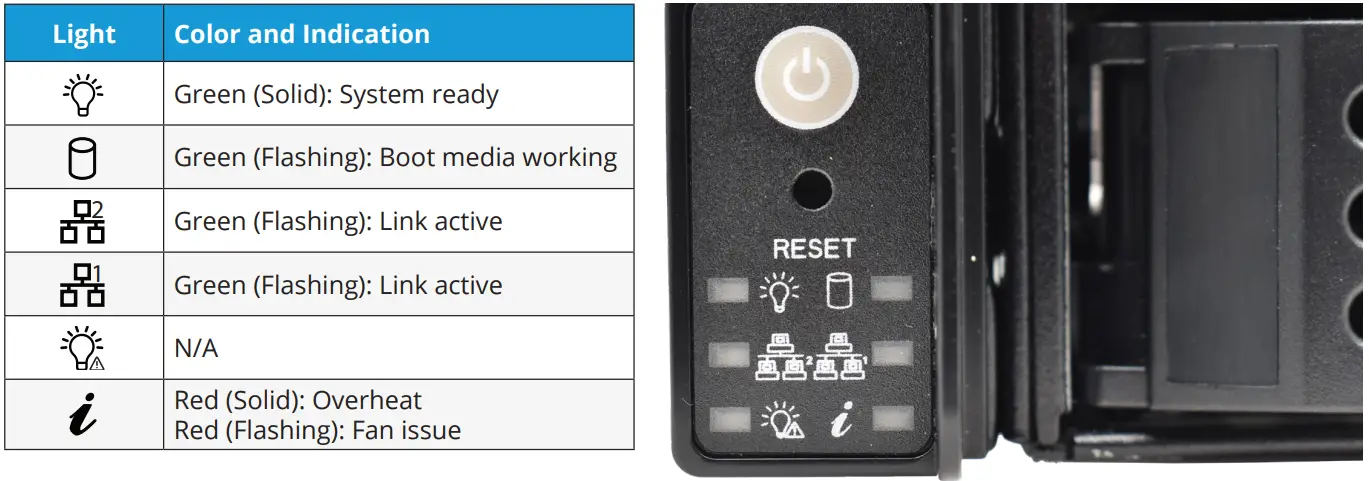
المؤشرات الأمامية
- يحتوي Mini R على أزرار اللوحة الأمامية للطاقة وإعادة ضبط النظام. كما أن لديها أضواء مؤشرات للطاقة ونشاط وسائط التمهيد ونشاط واجهة الشبكة ومعلومات النظام.
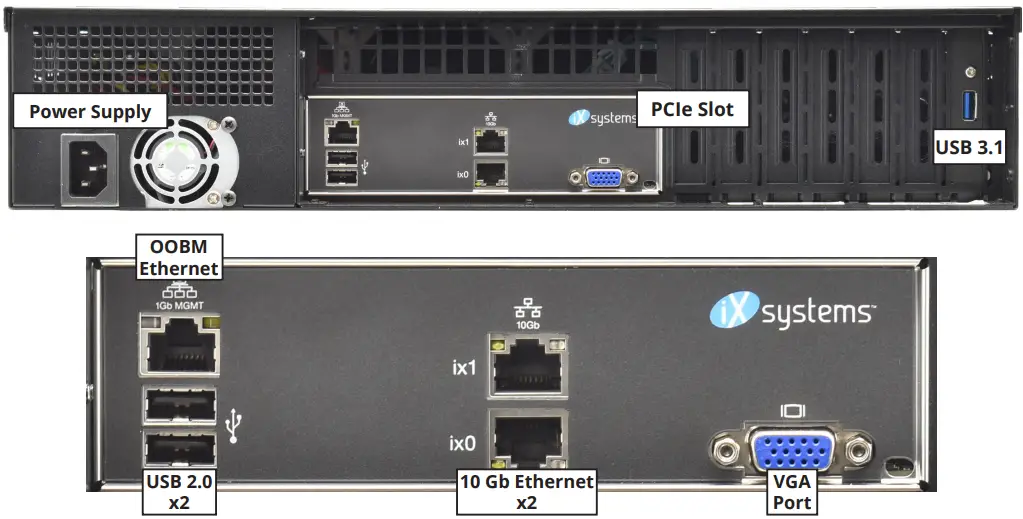
المكونات والمنافذ الخلفية
- يحتوي Mini R على مصدر طاقة واحد وفتحة PCIe واحدة ومنافذ توصيل وشبكات مختلفة.
- If you are mounting the Mini R on a desktop instead of in a rack, skip to “4 Install Rubber Feet.
ارفف سيارة ميني آر
- The Mini R requires an EIA-310 compliant rack and comes with a standard or extended rail kit based on your order.
- The standard rails support racks 19.2” – 26.6” (48.8 cm – 67.6 cm) deep.
- The extended rails support racks 26.6” – 36.5” (67.7 cm – 92.7 cm) deep.
قم بتركيب قضبان الهيكل
- يجب عليك إزالة سكة الهيكل من سكة الحامل قبل تركيبها على النظام. حرِّك سكة الهيكل للخارج حتى يوقفها المزلاج المعدني. ادفع مزلاج التحرير وحرك قضيب الهيكل خارج سكة الحامل حتى يتحرر.

- Align the chassis rail on the side of the system designated by the stickers and ensure they are right-side-up.
- Place the rail slots over the chassis tabs, then slide the rail toward the front of the system until it clicks into place. Secure the rail to the system using one of the low profile # 6 مسامير للسكك الحديدية. كرر هذه العملية للسكك الحديدية الأخرى.

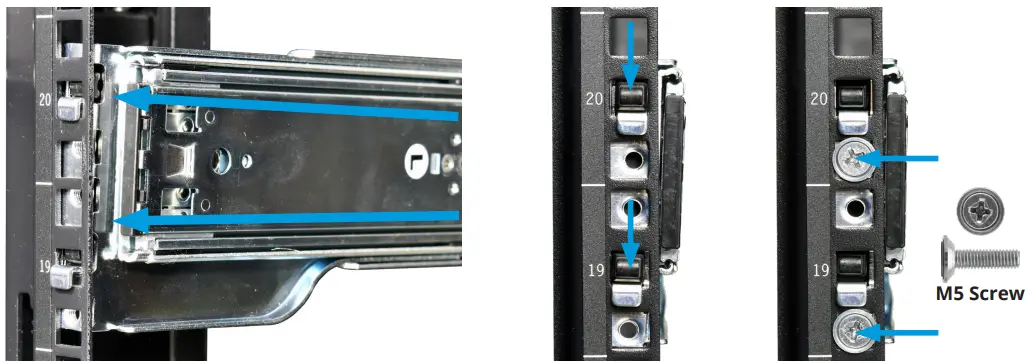
قم بتثبيت قضبان الرف
- Align a rack rail with the yellow sticker toward the front of the rack. The flat side must face outside the rack, and the empty inner rail must face inside the rack.
- Place the front tabs and black retaining buttons just above the center holes of each U you are mounting the rail in. Push the tabs into them until the black buttons fully depress, then slide the tabs down.
- Place two M5 machine screws with flush washers in the top and bottom threaded holes.
- مع تثبيت الجزء الأمامي من القضيب ، قم بتمديد الجزء الخلفي من سكة الحامل باتجاه نقاط التثبيت المكافئة على عمود الرف الخلفي. تأكد من بقاء القضيب مستويًا من الأمام إلى الخلف. اتبع هذه العملية لتثبيت سكة الحامل الأخرى.
قم بتثبيت Mini R في الرف
- تحذير – Pinch Point
- The Mini R can pinch or crush fingers when sliding the rail sleeves onto the rack rails.
- Team-lift the system and align the chassis rails with the rack rails. Slide the ends of the chassis rails into the rack rails and push the Mini R forward until the safety catches lock.
- Press the catch releases down and keep sliding the system forward until it is flush with the front of the rack.
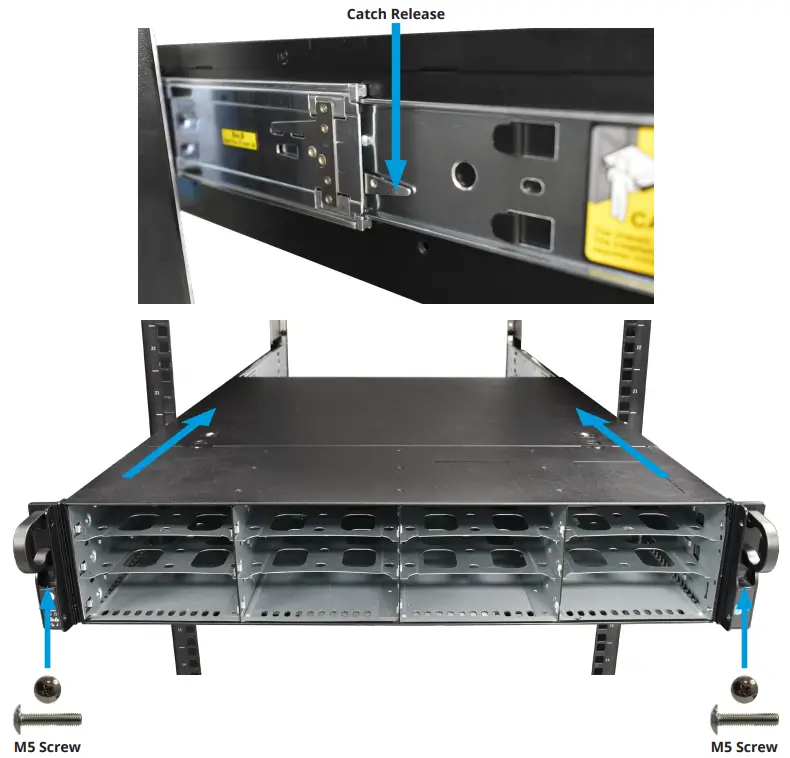
برغي M5
- أدخل مسمار M5 طويلًا عبر الفتحات الموجودة على كل أذن لتأمين Mini R بالحامل.
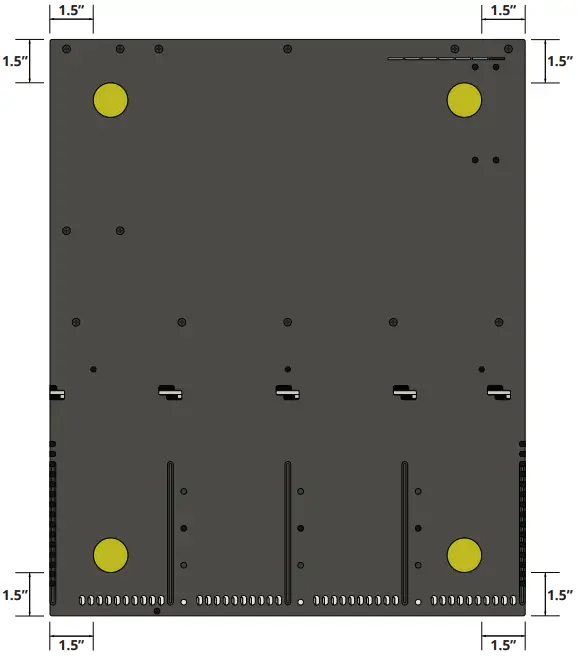
قم بتثبيت أقدام مطاطية
- يأتي جهاز Mini R مزودًا بأقدام مطاطية لاصقة مقاس 1 بوصة لتركيب النظام على سطح المكتب بدلاً من الرف.
- يوضح الرسم البياني أدناه الموضع الأمثل للقدم في الجزء السفلي من Mini R.
قم بتثبيت محركات الأقراص الثابتة
- The Mini R supports TrueNAS‑qualified hard drives up to 18 TB. The Mini R also requires hard drives designed for Network Attached Storage (NAS). These drives run cooler and quieter than desktop drives.
- Please see the Drive Compatibility List available at https://www.truenas.com/truenas-mini1.
- عند الطلب بدون محركات أقراص ثابتة ، يتم شحن صواني محرك الأقراص مع إدراجات حشو واقية. إذا لم تملأ كل الخلجان بمحركات الأقراص الثابتة ، فاحتفظ بالحشوات في الأدراج الفارغة لحمايتها.
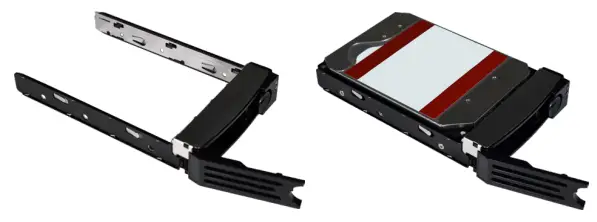
قم بإزالة صواني محرك الأقراص
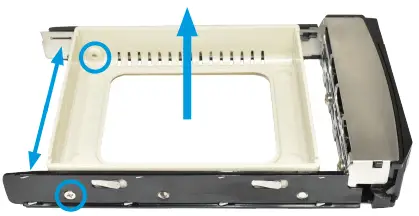
- حرر ذراع القفل بالضغط على الزر الدائري الكبير جهة اليمين. افتح ذراع القفل بالكامل ، ثم امسك الجزء العلوي والسفلي من الدرج برفق وقم بإزالته.

إزالة حشوات محرك الأقراص
- قم بفك المسمارين الخلفيين اللذين يحملان مادة الحشو. افرد جانبي الدرج برفق بعيدًا عن الحشو حتى تتحرر الدبابيس ، ثم أزل المادة المالئة.
ضع محركات الأقراص في الصواني
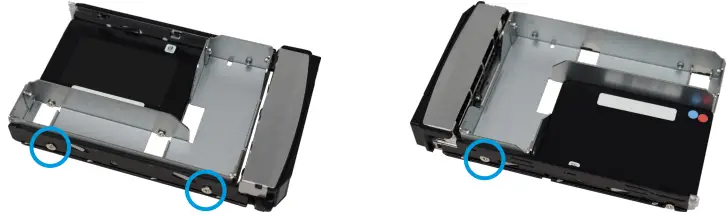
- ضع القرص الصلب في الدرج وثبته بأربعة مسامير.

3.5 "إلى 2.5" محولات SSD
- يمكن للمستخدمين تحويل صواني محرك الأقراص الثابتة Mini R مقاس 3.5 بوصة إلى صواني SSD مقاس 2.5 بوصة مع محولات.
- Attach an SSD to the adapter using two of the SSD screws that came with the adapter. Ensure the SSD connector faces outside the adapter. Place the adapter in a drive tray and use the last SSD screw to secure the SSD to the tray.
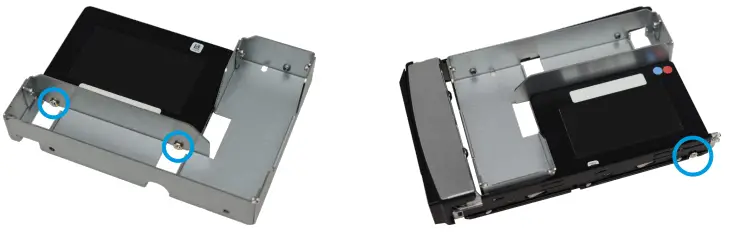
- استخدم ثلاثة براغي للقرص الصلب لتوصيل المحول و SSD بدرج محرك الأقراص.
- لتثبيت الدرج في النظام ، اتبع التعليمات الموجودة في "5.5 تثبيت صواني محرك الأقراص" في الصفحة 10. تأكد من توصيل SSD بالمهايئ بحيث يكون الموصل مواجهًا للنظام.
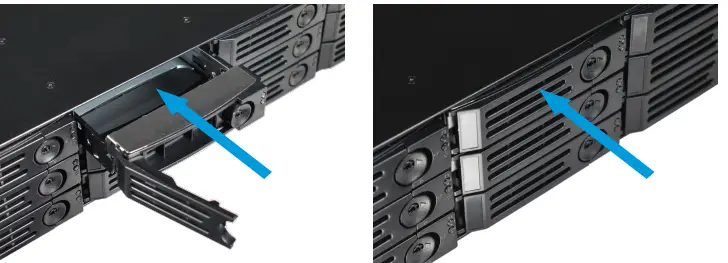
تركيب صواني القيادة
- أدخل درجًا برفق في حاوية محرك الأقراص حتى يتوقف. أغلق ذراع القفل حتى يتم قفله. كرر ذلك مع جميع محركات الأقراص الثابتة ، ثم قم بتحميل الأدراج بالحشوات في الأجزاء الفارغة المتبقية.
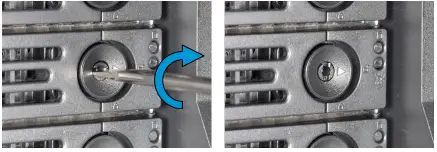
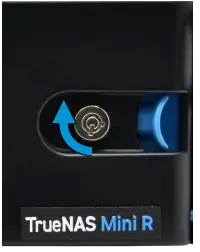
- For extra security, you can lock the drive tray into the system. The tray button is unlocked when the inner slot is horizontal and locked when the slot is vertical.
- To lock a tray, insert a flat‑head screwdriver into the center button slot and gently turn it ninety degrees clockwise until the slot is vertical.
إرفاق الحافة
(خياري)
- حرك الجانب الأيسر من الإطار نحو نقاط التثبيت على الأذن اليسرى ، ثم ادفع الجانب الأيمن من الإطار إلى مزلاج الأذن الأيمن حتى يتم قفله.
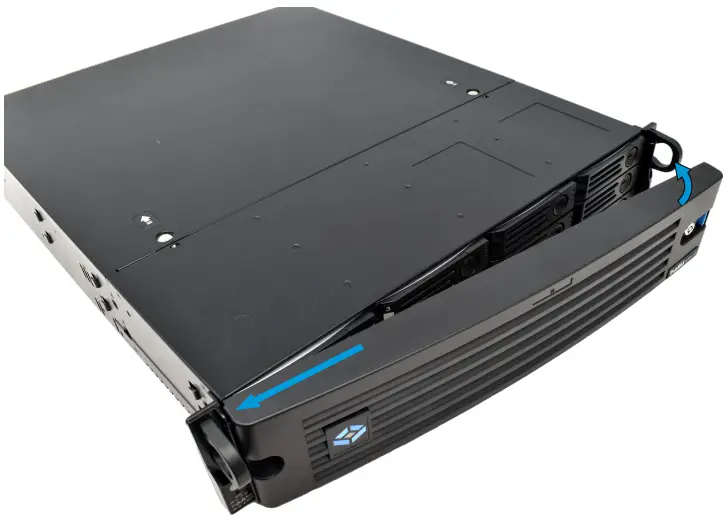
- يمكنك قفل الإطار لمزيد من الأمان. للقيام بذلك ، أدخل مفتاحًا في القفل وأدره تسعين درجة في اتجاه عقارب الساعة.
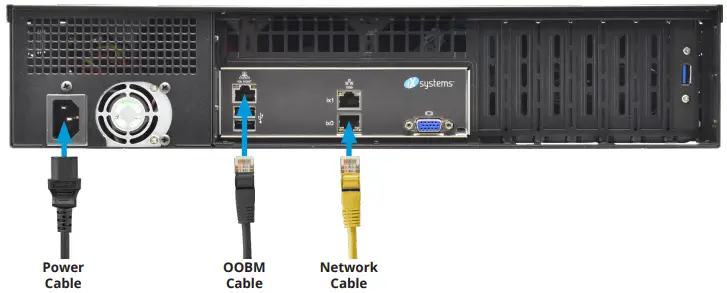
قم بتوصيل الشبكة وكابلات الطاقة
- قم بتوصيل كبلات الشبكة من جهاز التوجيه أو التبديل إلى منفذ شبكة جيجابت ومنفذ إيثرنت OOBM.
- قم بتوصيل كابل الطاقة في Mini R ، ثم بمأخذ طاقة.
تشغيل جهاز TrueNAS Mini
- The Power and Reset buttons control the power state of the TrueNAS Mini. These buttons behave in the same manner as standard PC power and reset buttons. When the system is off, pressing the power button turns the system on.
- Pressing and holding the power button while the system is running performs a hard power off. The reset button reboots the system.
- بشكل افتراضي ، يتم تشغيل Mini بمجرد توصيل الكبل بمصدر طاقة مباشر. في حالة فقدان الطاقة ، يتم تشغيل Mini R أيضًا بمجرد استعادة الطاقة.
Warning – Grounded Connection
- Always connect power cords to properly grounded connections.
ملاحظة: أجهزة USB عالية السحب
- The current draw on the Mini power supply +5Vsb line can exceed specifications if you leave high‑draw USB devices attached to the rear USB ports when the Mini R is powered off.
- Unplug high‑draw devices (such as bus‑powered USB hard drives) before powering off your Mini R.
إعداد وحدة التحكم
- You can connect a VGA monitor and USB keyboard for console access, but they are not required. If a monitor and keyboard are attached, you can see the Console Setup Menu.
- For more details about the Console options, see https://www.truenas.com/docs/scale/gettingstarted/install/consolesetupmenuscale/2.
- إذا كنت تريد إدارة خارج النطاق عن بُعد (OOBM) عبر IPMI ، فقم بتوصيل كبل الشبكة بمنفذ IPMI. راجع قسم "2.2 المكونات والمنافذ الخلفية" في الصفحة 4 للعثور على منفذ Mini IPMI.
تحذير - البرامج الثابتة BIOS وIPMI
- تم تجهيز نظامك بـ BIOS الأمثل والبرامج الثابتة IPMI خارج الصندوق.
- لا تقم بترقية BIOS الخاص بنظامك والبرامج الثابتة IPMI.
- نوصي بأن يكون IPMI على شبكة منفصلة وآمنة دون الوصول إلى الإنترنت. يرجى الاتصال بالدعم إذا كنت بحاجة إلى ترقية BIOS الخاص بالنظام أو البرنامج الثابت IPMI.
ترو ناس Web الواجهة
- يستخدم TrueNAS خدمة Multicast DNS ، والمعروفة أيضًا باسم Bonjour أو mDNS ، لإتاحة الوصول إلى النظام على معظم الشبكات دون إعداد إضافي.
- افتح web متصفح على جهاز كمبيوتر آخر على نفس الشبكة. افتح ملف TrueNAS web الواجهة بالانتقال إلى truenas.local (أو عنوان Mini R IP الخاص بك).
Connect to the TrueNAS Interface
- TrueNAS web interface uses default credentials for first‑time logins.
- اسم المستخدم: مسؤل
- كلمة المرور: اي بي سي دي 1234
- بعد تسجيل الدخول، قم بتغيير كلمة مرور حساب المسؤول في بيانات الاعتماد > المستخدمون المحليون لزيادة أمان النظام.
- إذا كان لديك أكثر من جهاز TrueNAS متصل بالشبكة، فقد يواجه mDNS تعارضات في الأسماء.
- لتغيير اسم المضيف في web UI، انتقل إلى الشبكة وانقر فوق الإعدادات في أداة التكوين العام.
إدارة خارج النطاق
- عمليات تسجيل الدخول خارج النطاق لها بيانات اعتماد منفصلة عن TrueNAS web واجهه المستخدم. يتم اختيار بيانات الاعتماد بشكل عشوائي وإرفاقها بالجزء الخلفي من هيكل TrueNAS Mini R. لمزيد من التفاصيل ، انظر https://www.truenas.com/docs/sb-3273.
- For more on Mini R Out-of-band Management, see: https://www.truenas.com/docs/files/MiniX+OOBM25011.pdf4.
تغيير إصدارات TrueNAS
- If you want to upgrade or run a different version of TrueNAS, you can find new and legacy versions at https://www.truenas.com/download-truenas-community-edition5 (حجم).
- After downloading your desired version, you must use image utility like balenaEtcher or Rufus to flash the ISO file إلى محرك أقراص USB.
- Plug the flashed USB drive into a USB port on your Mini and select it from the boot menu during system startup. Follow the install instructions on our Documentation Hub.

الموارد الإضافية
- يحتوي TrueNAS Documentation Hub على تكوين كامل للبرنامج وإرشادات الاستخدام. انقر فوق دليل في TrueNAS web واجهة أو انتقل مباشرة إلى: https://www.truenas.com/docs
- توجد أدلة ومقالات إضافية للأجهزة في قسم أجهزة مركز الوثائق: https://www.truenas.com/docs/hardware
- توفر منتديات TrueNAS فرصًا للتفاعل مع مستخدمي TrueNAS الآخرين ومناقشة تكويناتهم: https://forums.truenas.com
اتصل بنا
- Having issues? Please contact TrueNAS Enterprise Support to ensure a smooth resolution.
| طريقة الاتصال | خيارات الاتصال |
| Web | https://www.truenas.com/support |
| بريد إلكتروني | support@truenas.com |
| الهاتف | Monday‑Friday, 6:00AM to 6:00PM Pacific Standard Time:
• الرقم المجاني في الولايات المتحدة فقط: 18554737449 الخيار 2 • محليًا ودوليًا: 14089434100 الخيار 2 |
| الهاتف | الهاتف بعد ساعات العمل (24 × 7 دعم المستوى الذهبي فقط):
• الرقم المجاني في الولايات المتحدة فقط: 18554995131 • دولي: 1408-8783140 (سيتم تطبيق أسعار المكالمات الدولية) |
| عنوان | iXsystems, Inc. dba TrueNAS ‑ 541 Division St, Campبيل ، كاليفورنيا 95008 ، الولايات المتحدة الأمريكية |

- يدعم: 8554737449 أو 14089434100
- بريد إلكتروني: support@truenas.com
امتثال
يتوافق هذا الجهاز مع الجزء 15 من قواعد لجنة الاتصالات الفيدرالية. ويخضع التشغيل للشرطين التاليين:
- لا يجوز أن يسبب هذا الجهاز تداخلاً ضارًا.
- يجب أن يقبل هذا الجهاز أي تداخل يتم استقباله، بما في ذلك التداخل الذي قد يتسبب في تشغيل غير مرغوب فيه.
اسم الموديل:
- TrueNAS Model Mini E+:
- علبة ICES-3 (أ) / NMB-3 (أ)
- المجلدTAGE: 100-240 فولت تيار متردد
- Current 10-5A Max
- تحذير: To remove all hazardous voltag،افصل جميع أسلاك الطاقة.

- التردد: 50/60 هرتز
- اتصال: support@iXsystems.com
- www.iXsystems.com
- 18554737449
المستندات / الموارد
 |
TrueNAS Mini R Basic Rack [بي دي اف] دليل المستخدم Mini R Basic Rack, Mini R, Basic Rack, Rack |