1. المقدمة
Thank you for choosing the NEOECO Transformer SJ85 Dual-Action Airbrush Kit. This manual provides essential information for the safe and effective use, setup, operation, and maintenance of your new airbrush. Please read these instructions thoroughly before first use and retain them for future reference.
2. انتهى المنتجview والمكونات
The NEOECO Transformer SJ85 is a versatile dual-action airbrush designed for precision and broad coverage. It features a patented Quick-Shift technology for instant spray pattern changes and an ergonomic grip for comfort during extended use. Below is an illustration of the kit components:
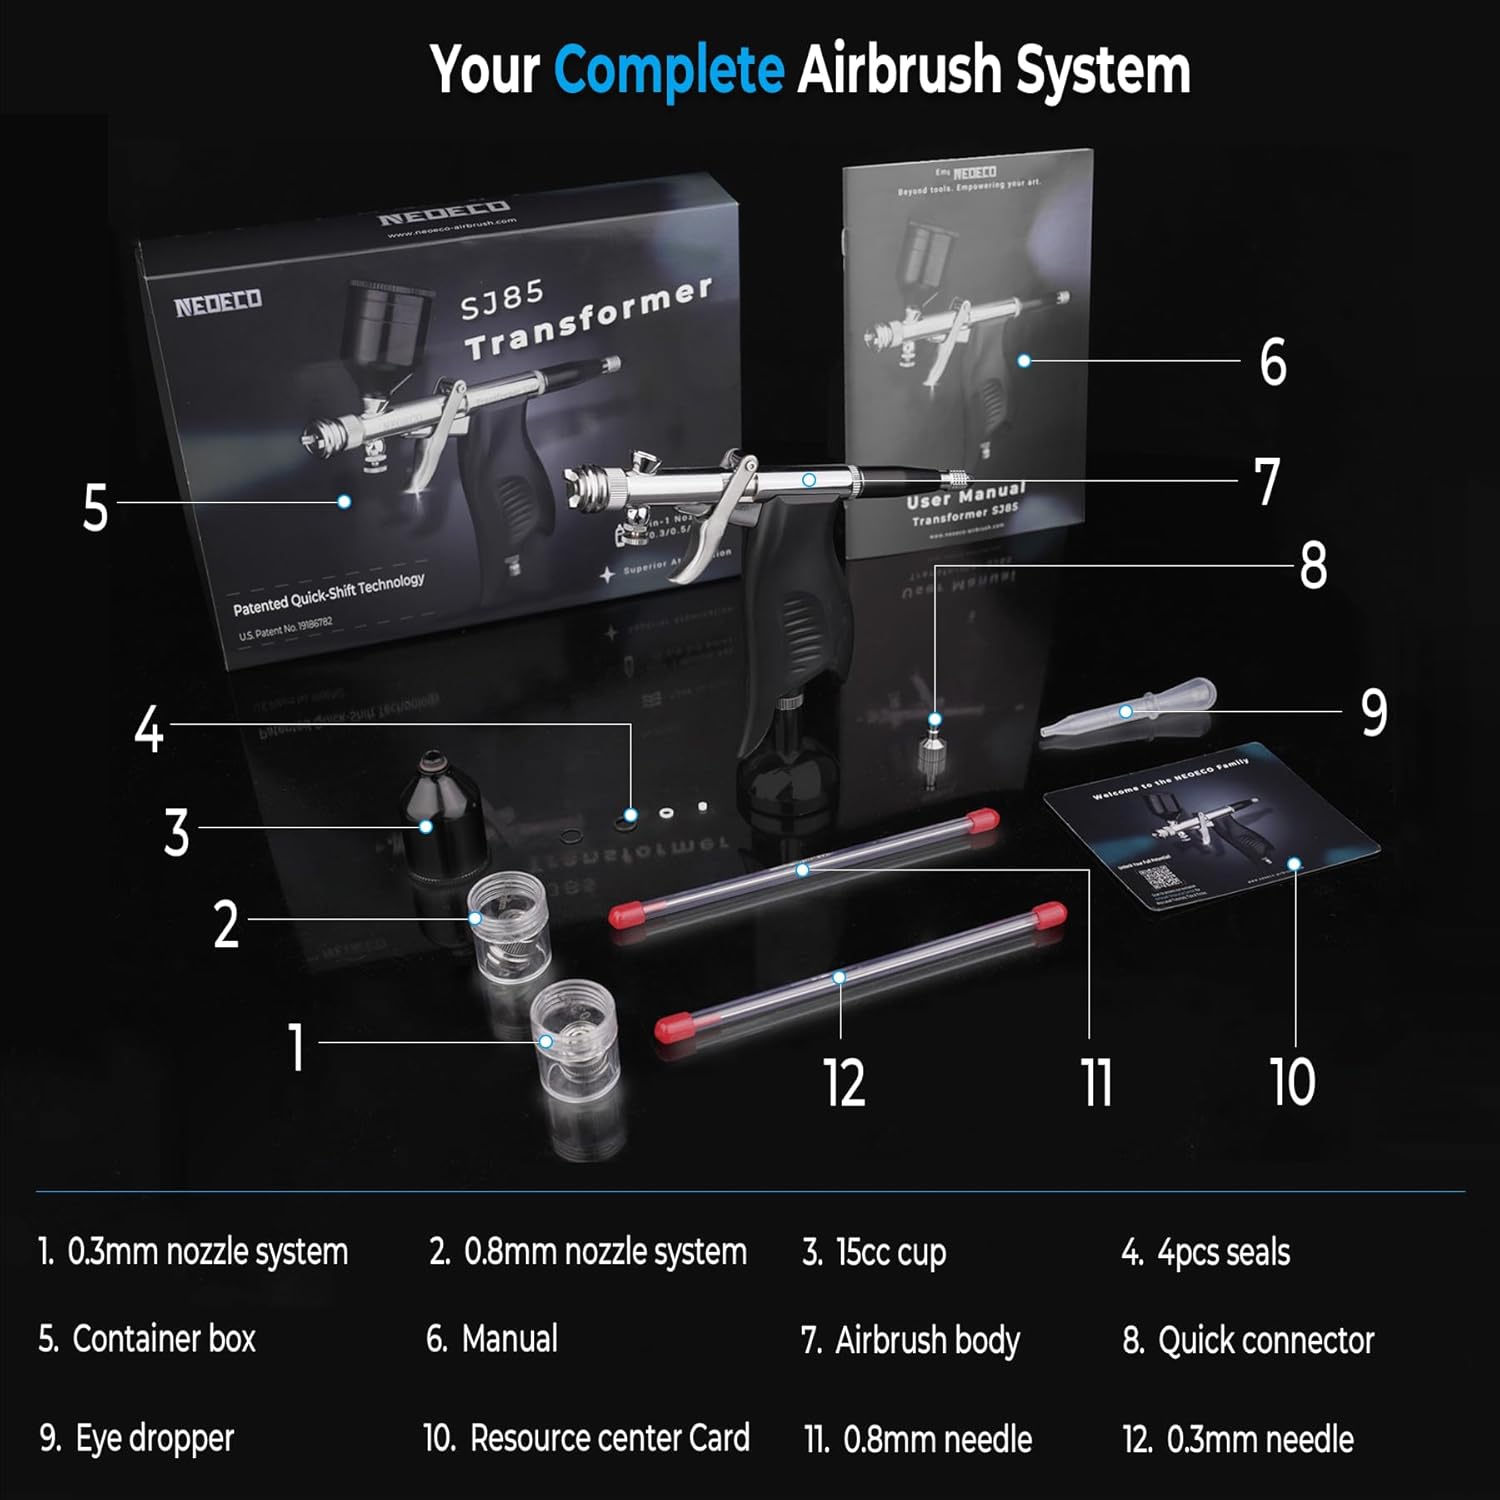
صورة: NEOECO Transformer SJ85 Airbrush Kit with all included components labeled numerically.
محتويات المجموعة:
- 0.3mm Nozzle System
- 0.8mm Nozzle System
- كوب 15 سم مكعب
- 4pcs Seals (Spare O-rings)
- Container Box
- دليل المستخدم
- هيئة البخاخة
- موصل سريع
- قطارة العين
- Resource Center Card
- إبرة 0.8 مم
- إبرة 0.3 مم
- Pre-installed: 0.5mm Nozzle System and Needle
3. الميزات الرئيسية
3.1 قبضة مريحة
The Transformer SJ85 features an enlarged, extended ergonomic grip designed to fit the natural shape of your palm. A dedicated finger rest groove provides stability, and the non-slip matte texture ensures a secure hold, reducing fatigue during prolonged use.
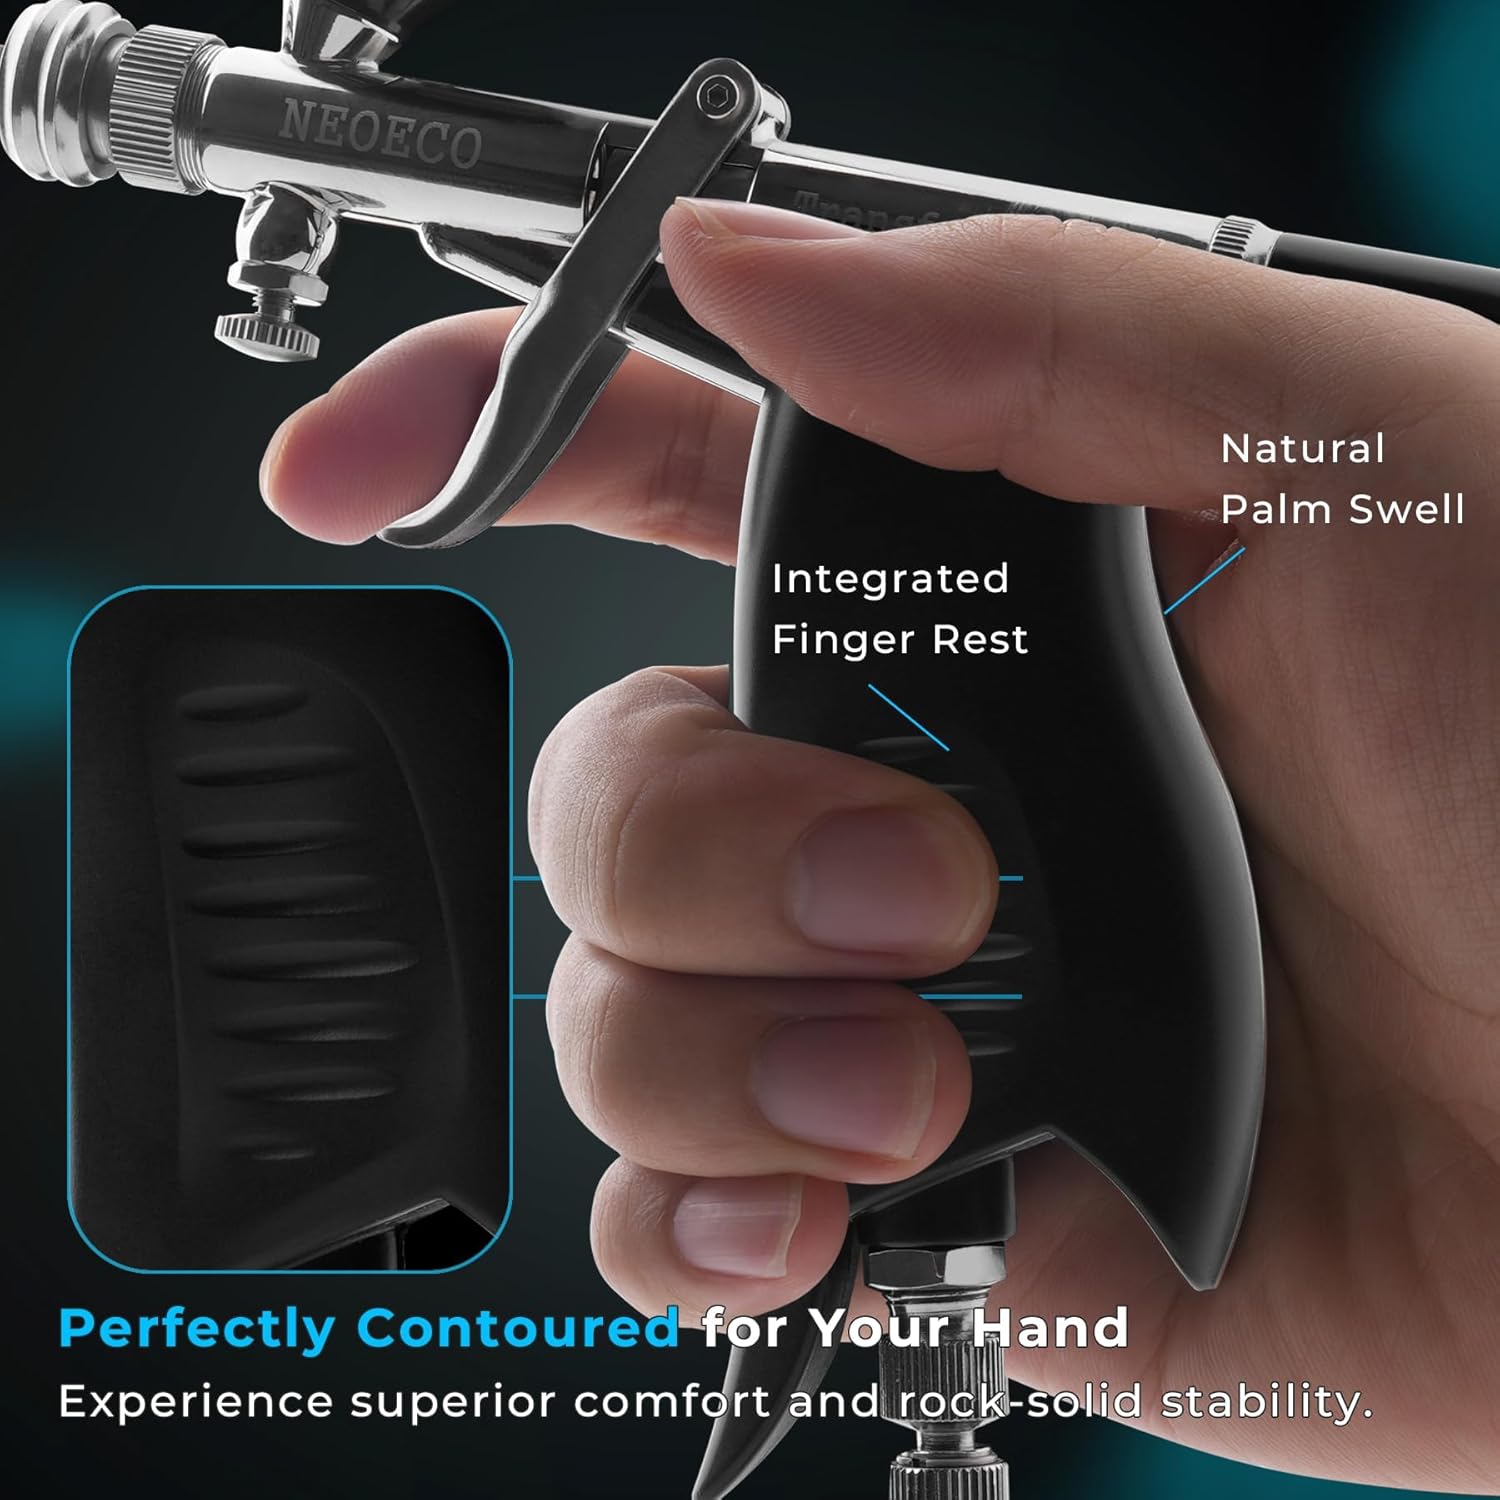
صورة: Close-up of the airbrush handle highlighting the integrated finger rest and natural palm swell for ergonomic comfort.
3.2 Patented Quick-Shift Technology
This patented technology allows for an instant switch between a wide Fan Pattern for base coats and a precision Round Pattern for fine details. The 360° rotating head provides full control without the need for tools or disassembly.

صورة: Diagram illustrating the Quick-Shift mechanism, showing how to pull to shift between Round Pattern and Fan Pattern.
فيديو: Official product video demonstrating the NEOECO Transformer SJ85 airbrush, including the Quick-Shift feature and various nozzle sizes.
3.3 Self-Centering Drop-In Nozzle System
The innovative drop-in self-centering nozzle eliminates fragile threads, ensuring perfect alignment and consistent atomization. The oversized design with a removal groove simplifies cleaning and part swapping.


الصور: Steps for removing and inserting the self-centering nozzle and needle for maintenance.
3.4 Multiple Nozzle Sizes
The kit includes 0.3mm, 0.5mm (pre-installed), and 0.8mm nozzle sets, allowing for versatility across various applications from intricate details to broad coverage.

صورة: Visual representation of the three nozzle sizes (0.3mm, 0.5mm, 0.8mm) and their recommended uses.
3.5 Airflow and Paint Flow Control
The airbrush features an integrated MAC valve for on-the-fly air pressure adjustments and a pre-set handle for accurate paint flow limiting, ensuring consistent results.

صورة: Close-up showing the on-the-fly airflow control (MAC valve) and the precision paint flow limiter on the airbrush.
4. الإعداد
4.1 Connecting to an Air Source
- تأكد من إيقاف تشغيل ضاغط الهواء لديك وإزالة الضغط منه.
- Attach the quick connector (8) to your air hose.
- Connect the quick connector to the airbrush body's air inlet. Ensure a secure fit.
- Turn on your air compressor and set it to the desired operating pressure.
4.2 Installing/Changing Nozzles and Needles
The airbrush comes with a 0.5mm nozzle system pre-installed. To change or install a different size:
- Unscrew the needle chucking guide at the rear of the airbrush and carefully remove the needle.
- Unscrew the nozzle cap at the front of the airbrush.
- Gently twist and pull the existing nozzle system out.
- Insert the desired nozzle system (0.3mm, 0.5mm, or 0.8mm) into the airbrush body. Ensure it seats correctly.
- Screw the nozzle cap back on, hand-tightening only.
- Carefully reinsert the corresponding needle (0.3mm, 0.5mm, or 0.8mm) through the rear of the airbrush until it stops.
- Screw the needle chucking guide back on, ensuring the needle is secure but can still move freely when the trigger is pulled back.
4.3 تحميل برنامج الرسام
- Ensure your paint is properly thinned for airbrushing. Use the included eye dropper (9) if needed.
- Open the lid of the 15cc cup (3).
- Pour the prepared paint into the cup. Do not overfill.
- Close the cup lid securely to prevent spills and maintain paint consistency.
5. تعليمات التشغيل
5.1 Basic Operation (Dual-Action Trigger)
- انطلق أولاً: Press down on the trigger to release air. This ensures air is flowing before paint, preventing splattering.
- الطلاء الثاني: أثناء الضغط على الزناد، اسحبه للخلف لإطلاق الطلاء. كلما سحبته للخلف أكثر، زادت كمية الطلاء المنطلقة.
- Release Paint First: When finishing a stroke, release the trigger forward to stop paint flow before releasing the downward pressure to stop air flow. This prevents paint from drying on the needle tip.
5.2 Using Quick-Shift Technology
To switch between spray patterns:
- Locate the Quick-Shift mechanism at the front of the airbrush, just behind the nozzle cap.
- لتفعيل نمط المروحة, pull the mechanism forward until it clicks into place.
- لتفعيل Round Pattern, push the mechanism backward until it clicks into place.
- You can rotate the Quick-Shift head 360° to adjust the orientation of the fan spray.

صورة: Visual comparison of the spray patterns: Round Pattern for focused work (e.g., pre-shading) and Fan Pattern for effortless coverage (e.g., priming).
5.3 Adjusting Airflow and Paint Flow
- Airflow Control (MAC Valve): The integrated MAC valve, located near the air inlet, allows you to fine-tune air pressure directly from the airbrush. Turn it clockwise to decrease airflow and counter-clockwise to increase airflow.
- Paint Flow Limiter: The knob at the rear of the airbrush (needle chucking guide) acts as a paint flow limiter. Turning it clockwise restricts how far the needle can retract, limiting the maximum paint flow. This helps achieve consistent lines and repeatable results.
6. الصيانة
Proper cleaning and maintenance are crucial for the longevity and performance of your airbrush. Clean your airbrush immediately after each use, especially when changing colors or finishing a session.
6.1 Basic Cleaning After Each Use
- قم بإفراغ أي طلاء متبقي من الكأس.
- Add a small amount of appropriate cleaner (e.g., airbrush cleaner, water for acrylics, solvent for enamels) to the paint cup.
- Back-flush: Cover the nozzle cap with your finger or a cap and press the trigger down to release air. This will force air back into the cup, bubbling and cleaning the inside.
- Spray the cleaner through the airbrush onto a paper towel until it sprays clear.
- Repeat steps 2-4 until no paint residue is visible.
6.2 Deep Cleaning (Periodically or for Clogs)
- Disassemble the airbrush: Remove the needle, nozzle cap, and nozzle system as described in Section 4.2.
- Clean all removed parts with appropriate cleaner and a soft brush or cotton swab. Pay special attention to the nozzle and needle tip.
- Clean the paint cup and the airbrush body's internal channels.
- Inspect O-rings (seals) for wear or damage. Replace if necessary using the included spare O-rings (4).
- Reassemble the airbrush carefully, ensuring all parts are correctly seated and tightened appropriately (hand-tighten only for delicate parts).
7. استكشاف الأخطاء وإصلاحها
| مشكلة | السبب المحتمل | حل |
|---|---|---|
| لا يوجد تدفق للطلاء | Clogged nozzle/needle, paint too thick, needle not pulled back, air pressure too low. | Clean nozzle/needle, thin paint, pull trigger back, increase air pressure. |
| Splattering/Inconsistent spray | Paint too thin/thick, clogged nozzle, damaged needle tip, air pressure too high/low, loose nozzle. | Adjust paint consistency, clean nozzle, inspect/replace needle, adjust air pressure, tighten nozzle. |
| فقاعات الهواء في كوب الطلاء | Loose nozzle, damaged nozzle, clogged nozzle. | Tighten nozzle, replace nozzle, clean nozzle. |
| الزناد الالتصاق | طلاء جاف في الآلية، نقص في التشحيم. | Deep clean airbrush, apply airbrush lubricant to moving parts. |
8. المواصفات
- أبعاد المنتج: 6.69 × 1.18 × 6.69 بوصة
- رقم موديل المنتج: NCT-SJ85 TRANSFORMER
- ASIN: B0FRSMMHGP
- وزن السلعة: 1.08 رطل
- الشركة المصنعة: نيويكو
- أحجام الفوهات المتوفرة: 0.3 ملم، 0.5 ملم، 0.8 ملم
- أنماط الرش: Round, Fan (via Patented Quick-Shift)
- التحكم في الهواء: Integrated MAC Valve
- Paint Control: Precision Paint Flow Limiter
- سعة الكوب: 15 سم مكعب
9. الضمان والدعم
NEOECO products are manufactured to high-quality standards. For warranty information, technical support, or replacement parts, please refer to the Resource Center Card included in your kit or visit the official NEOECO webالموقع. احتفظ بإيصال الشراء كإثبات للشراء.


