1. المقدمة
Thank you for choosing the YESOUL Indoor Exercise Bike A6EV. This stationary bike is designed to provide an effective and engaging indoor cycling experience. Featuring silent magnetic resistance, a self-powered design, and smart app connectivity, it offers a versatile workout solution for your home.
This manual provides essential information for the safe assembly, operation, maintenance, and troubleshooting of your exercise bike. Please read it thoroughly before use and retain it for future reference.

Image 1.1: The YESOUL Indoor Exercise Bike A6EV.
2. معلومات السلامة
Before using the YESOUL Indoor Exercise Bike, please observe the following safety precautions:
- استشر طبيبك قبل البدء في أي برنامج تمارين رياضية.
- تأكد من تجميع جميع الأجزاء وإحكام ربطها بشكل صحيح قبل كل استخدام.
- أبقِ الأطفال والحيوانات الأليفة بعيدًا عن الجهاز أثناء التشغيل.
- Place the bike on a stable, level surface.
- ارتدي الأحذية والملابس الرياضية المناسبة.
- لا تتجاوز الحد الأقصى لوزن المستخدم وهو 300 رطلاً (136.08 كجم).
- Use the emergency stop function (push-to-stop resistance knob) if you feel unwell or need to stop quickly.
3. الإعداد والتجميع
Follow these steps to assemble your YESOUL Indoor Exercise Bike. Ensure you have enough space around the installation site.
3.1. Install Front and Rear Stabilizers
- Take out Tool D-Allen Key, 4x Hexagon socket flat round head screws M10*16(35), and 4x Washer 10(36) from the tool kit.
- Place the Rear Stabilizer (6) and align it with the fixing holes on the frame. Secure it to the frame with Tool D, Hexagon socket flat round head screw M10*16(35), and the Washer 10(36).
- Place the Front Stabilizer (7) and align it with the fixing holes on the frame. Secure it to the frame with Tool D, Hexagon socket flat round head screw M10*16(35), and the Washer 10(36).
3.2. Install Left & Right Pedals
- Remove the left Hexagonal nut (102) on the left pedal (56) and the right Hexagonal nut (99) on the right pedal (40) respectively with Tool B #19 and put them aside.
- Install the left pedal (56) by vertically aligning it with the left crank hole. Rotate the left pedal (56) 3 turns by hand towards the direction of the flywheel, and then lock the pedal with the Tool A #15. Finally, install the removed Hexagonal nut (102) back onto the pedal with Tool B #19.
- Install the right pedal (40) in the same way. Note that the direction of tightening is toward the flywheel.
3.3. Install Seat Post
- Lightly turn the knob (29) 3 turns to fix it on the frame.
3.4. Install Seat Slider and Seat
- Take out Seat Slider Assembly from the inner package. Remove the Carriage screw (26), Washer (74), and Lock Knob (24) and put them aside.
- Place assembled Seat (9) on the Seat Post (2), and then use carriagescrew (26) & Washer (74) & Lock Knob (24) to lock it. Make sure the front of the seat is facing straight ahead when locking.
3.5. Install Sensor Middle Wire and Handlebar Post
- Pull the uppermost end of the steel wire to drive the Sensor Middle Wire (95) through out the inside of the Handlebar Post (4) to the top and hold it in place.
- Untie the steel wire fixed at the bottom of the Handlebar Post (4). Secure the Sensor Middle Wire (95) with the end of the steel wire.
- Hold the Knob (29) Handle and pull it outward while installing the Handlebar Post (4) into the MainFrame (1) to the proper position. And rotate the knob (29) to lock the Handlebar Post (4).
3.6. Install Handlebar
- Remove the 4x Hexagon Socket Head Cap Screw (10) and Washer (17) and put them aside for using.
- Pull the steel wire to bring the Sensor middle wire (95) connector passes through the slot in the center of the Handlebar mounting piece.
- Place Handlebar (5) on Handlebar Post (4). Make sure the holes are aligned. Secure it by using Tool D #6, Hexagon socket head capscrews (10) and Washers (17).
3.7. Install iPad Holder Support Tube and iPad Holder
- Take out the IPAD Holder Support Tube (8) from the inner package, and remove the 2X Hexagon socket flat round head screws (101) on the tube and the 2x Hexagon socket flat round head screws (12) at the backward of the tube and put them aside.
- Place the IPAD Holder Support Tube (8) on the Handlebar (5). Then lock it by using Tool C and Hexagon socket flat round head screws (101).
- Align the holes in the back of the IPAD Holder (11) with the holes on the top of the IPAD Holder Support Tube (8). Then secure it by using Tool C and Hexagon socket head capscrews (12), Elastic pad (13), and Washers (14).
3.8. Install Bottle Holder
- Align the screw holes on the Bottle holder (16) with the screw holes on the IPAD Holder Support Tube (8). Then tighten the Bottle holder by using the removed Hexagon Socket Head Flat Round Head Screw (12) in Step 7 and Tool C.
3.9. قم بتركيب البطاريات
- Remove the back cover by hand, then prepare the batteries and install two 2A batteries. And install the back cover to complete the battery installation.
- Plug the wire from the backward of the Monitor Decoration Cover (98) and the Sensorwire (95) coming out of the Handlebar (5). Then snap the Monitor Decoration Cover (98) onto the Handlebar.
Video 3.1: Detailed installation guide for the YESOUL S26 Exercise Bike.
4. تعليمات التشغيل
Your YESOUL Indoor Exercise Bike is designed for intuitive use, offering various features to enhance your workout.
4.1. ضبط المقعد والمقود
- تعديل المقعد: The seat can be adjusted in four ways (up/down, forward/backward) to ensure optimal comfort and posture. Loosen the adjustment knobs, slide the seat to your desired position, and tighten securely.
- تعديل المقود: The handlebars can be adjusted up and down. Loosen the adjustment knob, move the handlebars to a comfortable height, and tighten firmly.
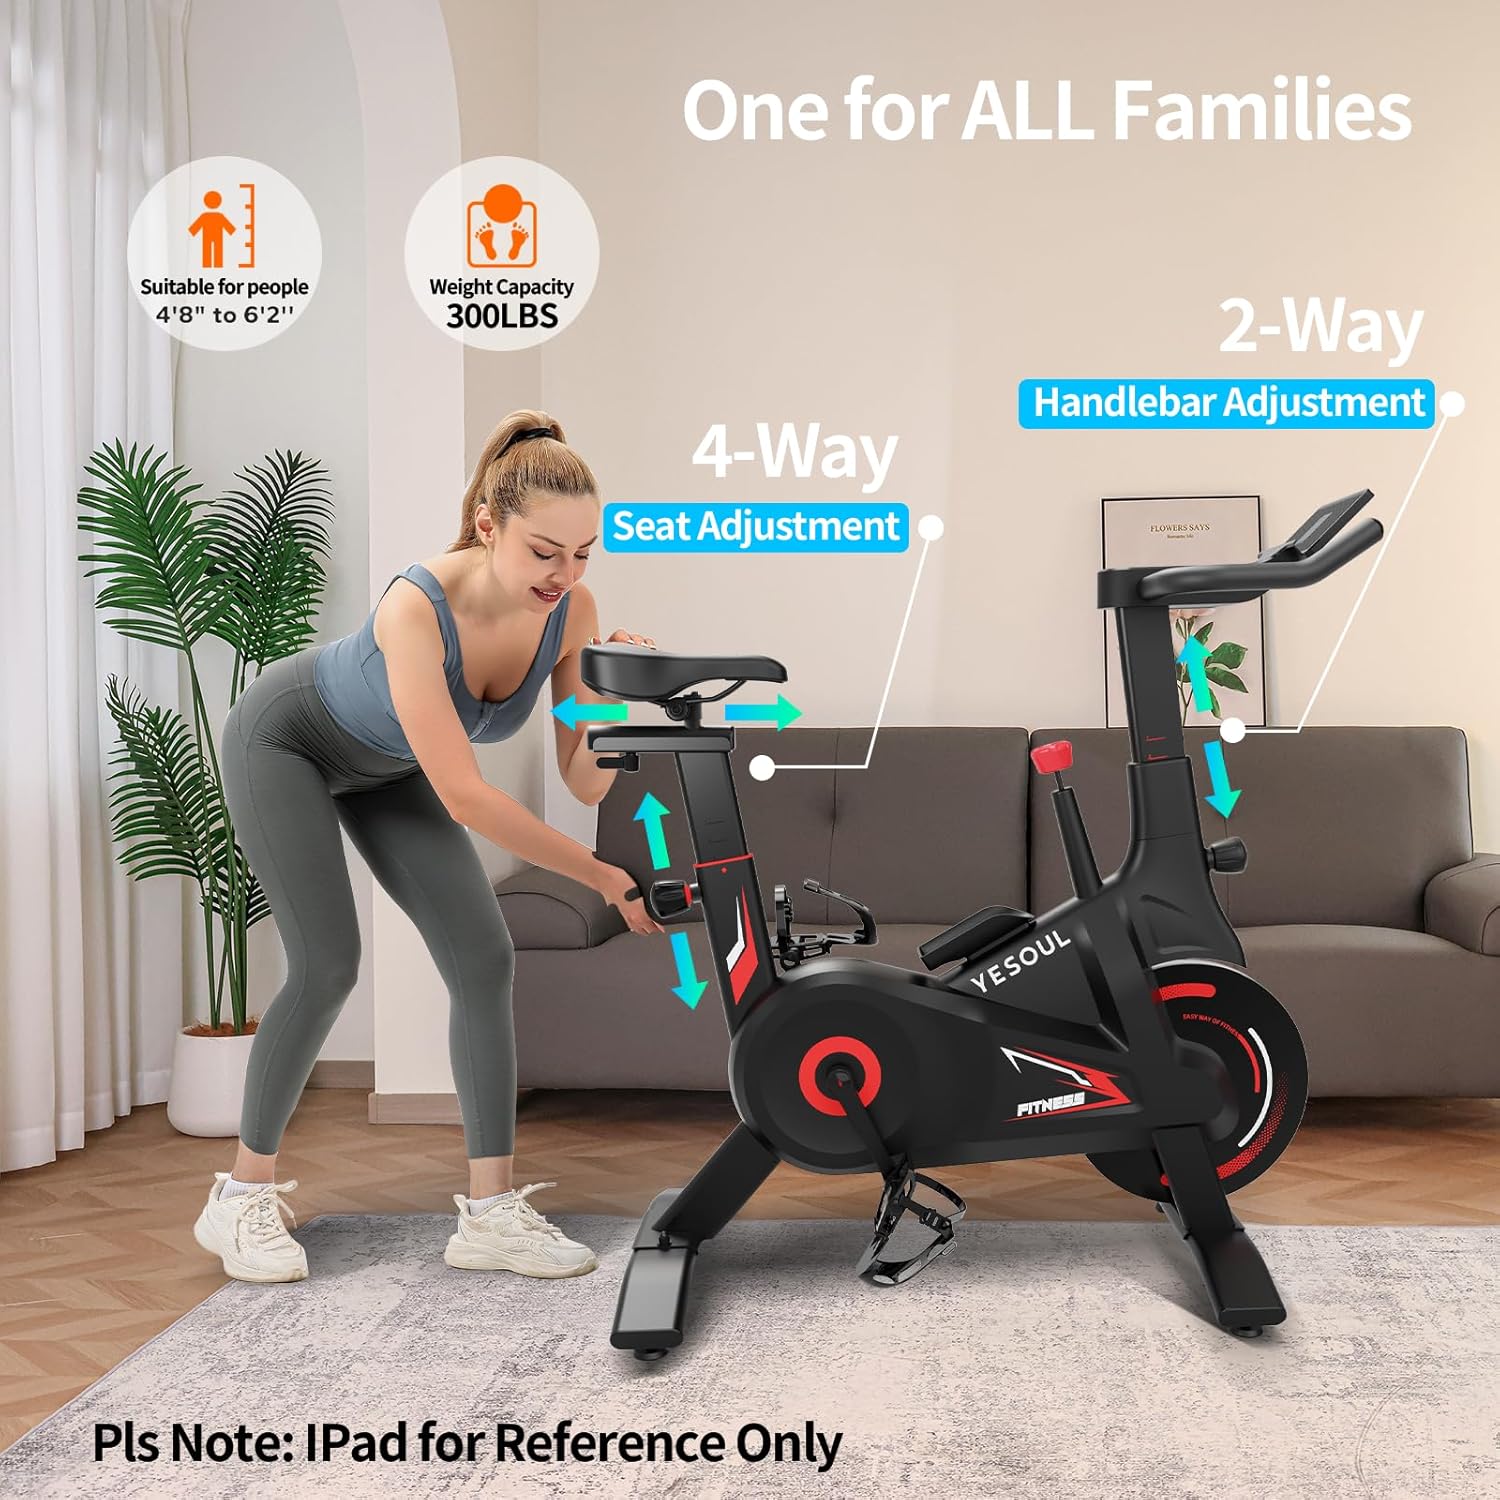
Image 4.1: Adjusting the seat and handlebars for a personalized fit.
4.2. Resistance Control
The bike features 100 levels of silent magnetic resistance. Rotate the red knob located on the frame to increase or decrease resistance. Turn clockwise for higher resistance, counter-clockwise for lower resistance. Press the knob down firmly to activate the emergency stop function.
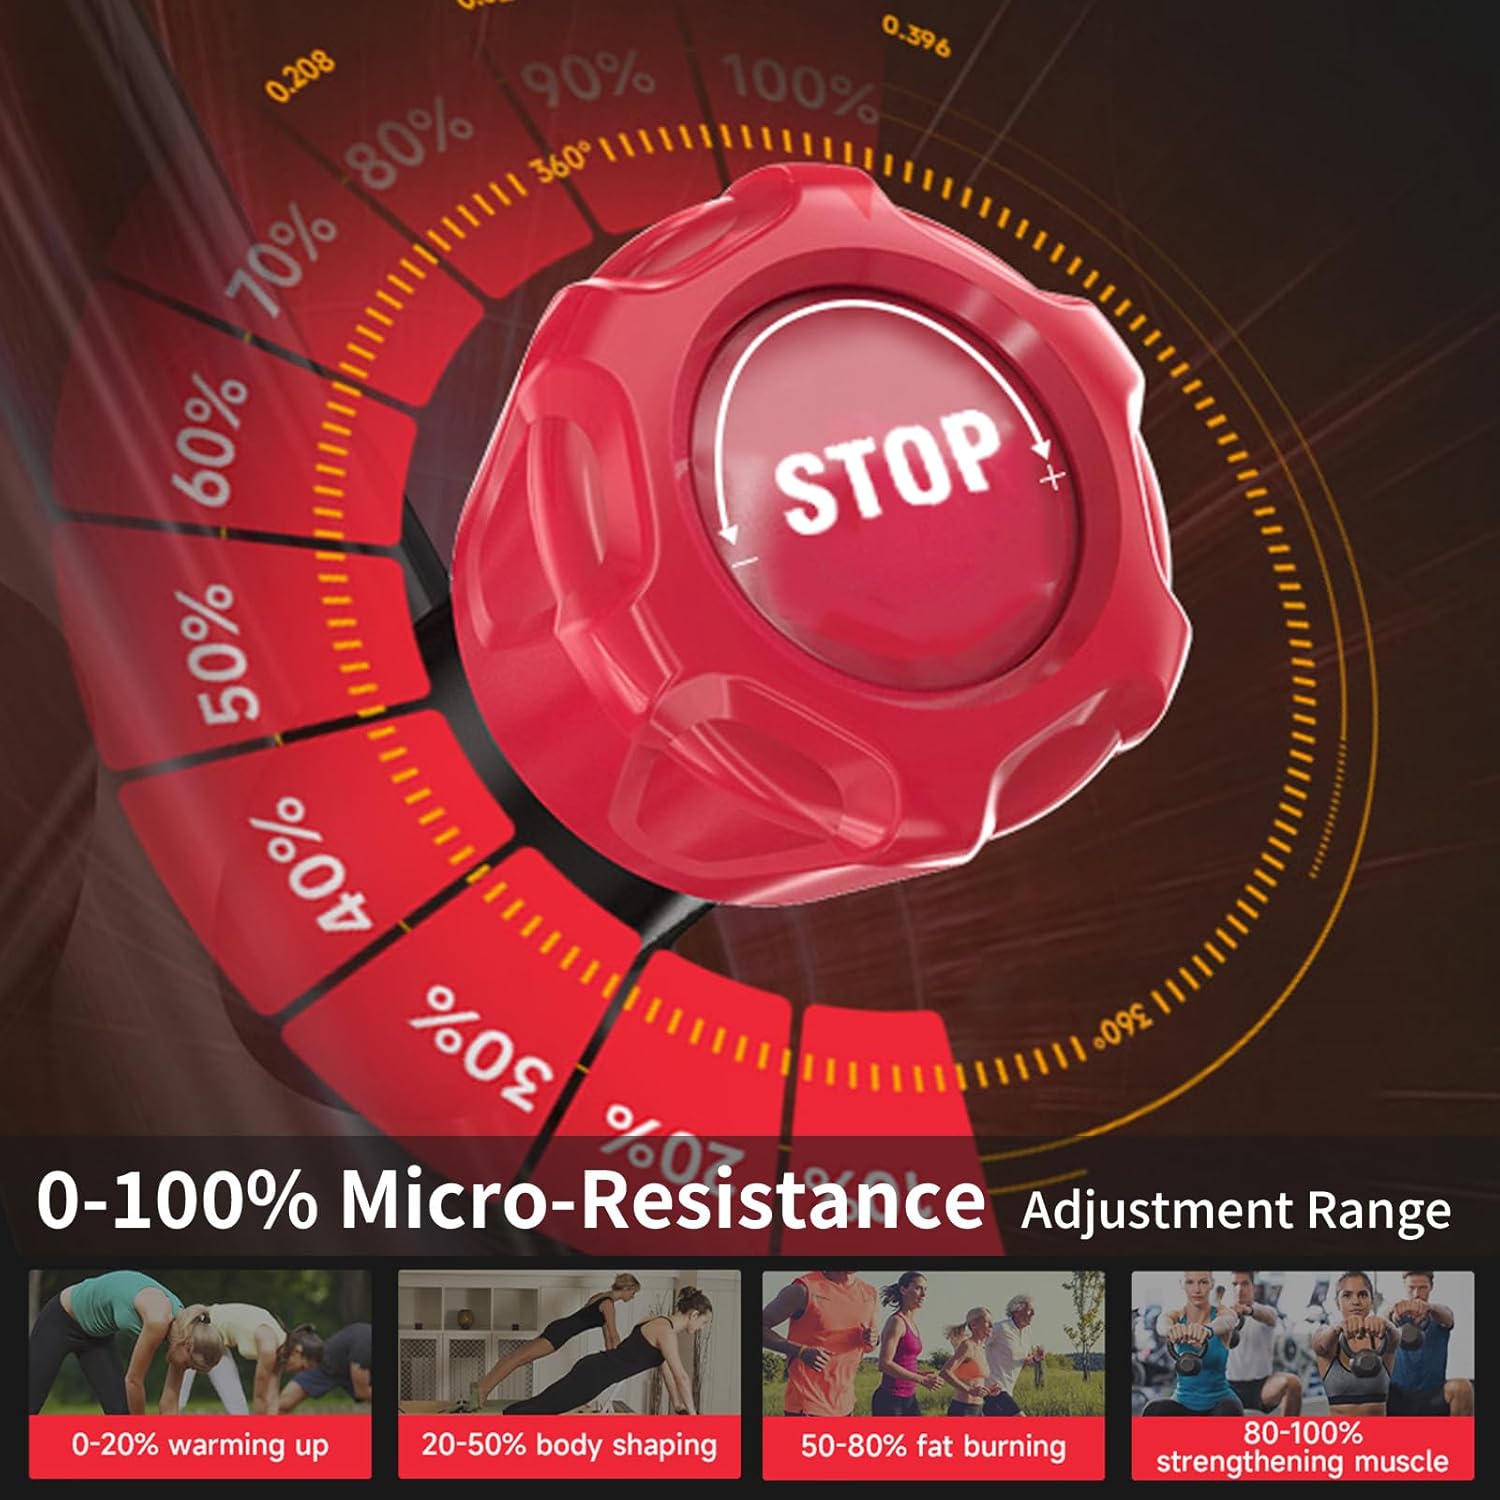
Image 4.2: The resistance adjustment knob and its range.
4.3. LCD Screen and App Connectivity
The integrated LCD screen displays key workout metrics such as distance, calories burned, and resistance level. For an enhanced experience, connect your bike to the YESOUL Fitness App via Bluetooth.
- YESOUL Fitness App: The app offers scenic global routes, professional coaching programs, and live studio classes. Track your performance, compete on leaderboards, and join interactive community rides.
- Self-Powered Design: The bike generates its own power as you pedal, eliminating the need for external power outlets. This also activates dynamic LED lights that illuminate as you ride.

Image 4.3: The YESOUL Smart Fitness Center app interface.
فيديو 4.1: إعادةview عرضasing the features and app integration of the YESOUL S26 Exercise Bike.
5. الصيانة
تضمن الصيانة المنتظمة طول عمر وأداء الدراجة الرياضية الخاصة بك على النحو الأمثل.
- تنظيف: امسح الدراجة بالإعلانamp امسح بقطعة قماش بعد كل استخدام لإزالة العرق والغبار. تجنب المنظفات الكاشطة.
- التحقق من الاتصالات: Periodically check all bolts, nuts, and moving parts to ensure they are secure. Tighten as necessary.
- الدواسات: تأكد من تثبيت الدواسات بشكل آمن على أذرع الكرنك.
- محرك الحزام: The silent belt drive system requires minimal maintenance. Avoid exposing it to excessive moisture or debris.
6. استكشاف الأخطاء وإصلاحها
If you encounter any issues with your YESOUL Indoor Exercise Bike, refer to the following common solutions:
- لا يوجد عرض على شاشات الكريستال السائل: تأكد من تركيب البطاريات بشكل صحيح وشحنها بشكل كافٍ. استبدلها إذا لزم الأمر.
- دراجة غير مستقرة: Ensure the bike is placed on a flat surface. Adjust the leveling feet on the stabilizers to eliminate wobbling.
- قضايا المقاومة: If resistance is not changing or feels inconsistent, check the resistance knob for proper function and ensure no debris is obstructing the magnetic system.
- مشاكل اتصال التطبيق: Ensure Bluetooth is enabled on your device and the YESOUL Fitness App is updated. Restart both the app and your device if issues persist.
- الضوضاء أثناء التشغيل: Check for any loose parts and tighten them. Ensure pedals are securely attached.
7. المواصفات
| ميزة | التفاصيل |
|---|---|
| أبعاد المنتج | 93.98 x 19.05 x 60.96 cm (37 x 7.5 x 24 inches) |
| رقم موديل العنصر | A6EV |
| لون | Led-black |
| نظام القيادة | حزام |
| مادة | Kohlenstoffstahl (Carbon Steel) |
| مصدر الطاقة | Battery Powered (Self-generating) |
| المميزات الخاصة | Full Filled Solid Flywheel, Heavy Duty, Magnetic Resistance, Reinforce the Anti-loosening Nuts of the Pedals |
| الحد الأقصى لوزن السعة | 300 رطل (136.08 كجم) |
| وزن العنصر | 22 كجم (48.5 رطل) |
| آلية المقاومة | مغناطيسي |
8. الضمان والدعم
For warranty information, product support, or to purchase replacement parts, please visit the official YESOUL store or contact customer service.
Official YESOUL Store: Visit the YESOUL Store on Amazon
Please have your model number (A6EV) and purchase date ready when contacting support.


