مقدمة وأكثرview
Thank you for choosing the ALLSTAND 7-Tier Rotating Shoe Rack Tower. This innovative storage solution is designed to optimize space and provide easy access to your items with its 360-degree rotating function. Crafted from high-quality steel rods and solid boards, it offers exceptional stability and durability. This manual provides detailed instructions for the assembly, operation, and maintenance of your new rotating rack, ensuring a long-lasting and satisfying experience.

Image: The ALLSTAND 7-Tier Rotating Shoe Rack Tower, showcasing its capacity for shoes, bags, and various decorative items in a home environment.
مميزات المنتج
- 360° Rotating Design: Allows for effortless access to all items stored on the rack, eliminating the need to bend or strain. The smooth spinning mechanism ensures convenience and protects your back.
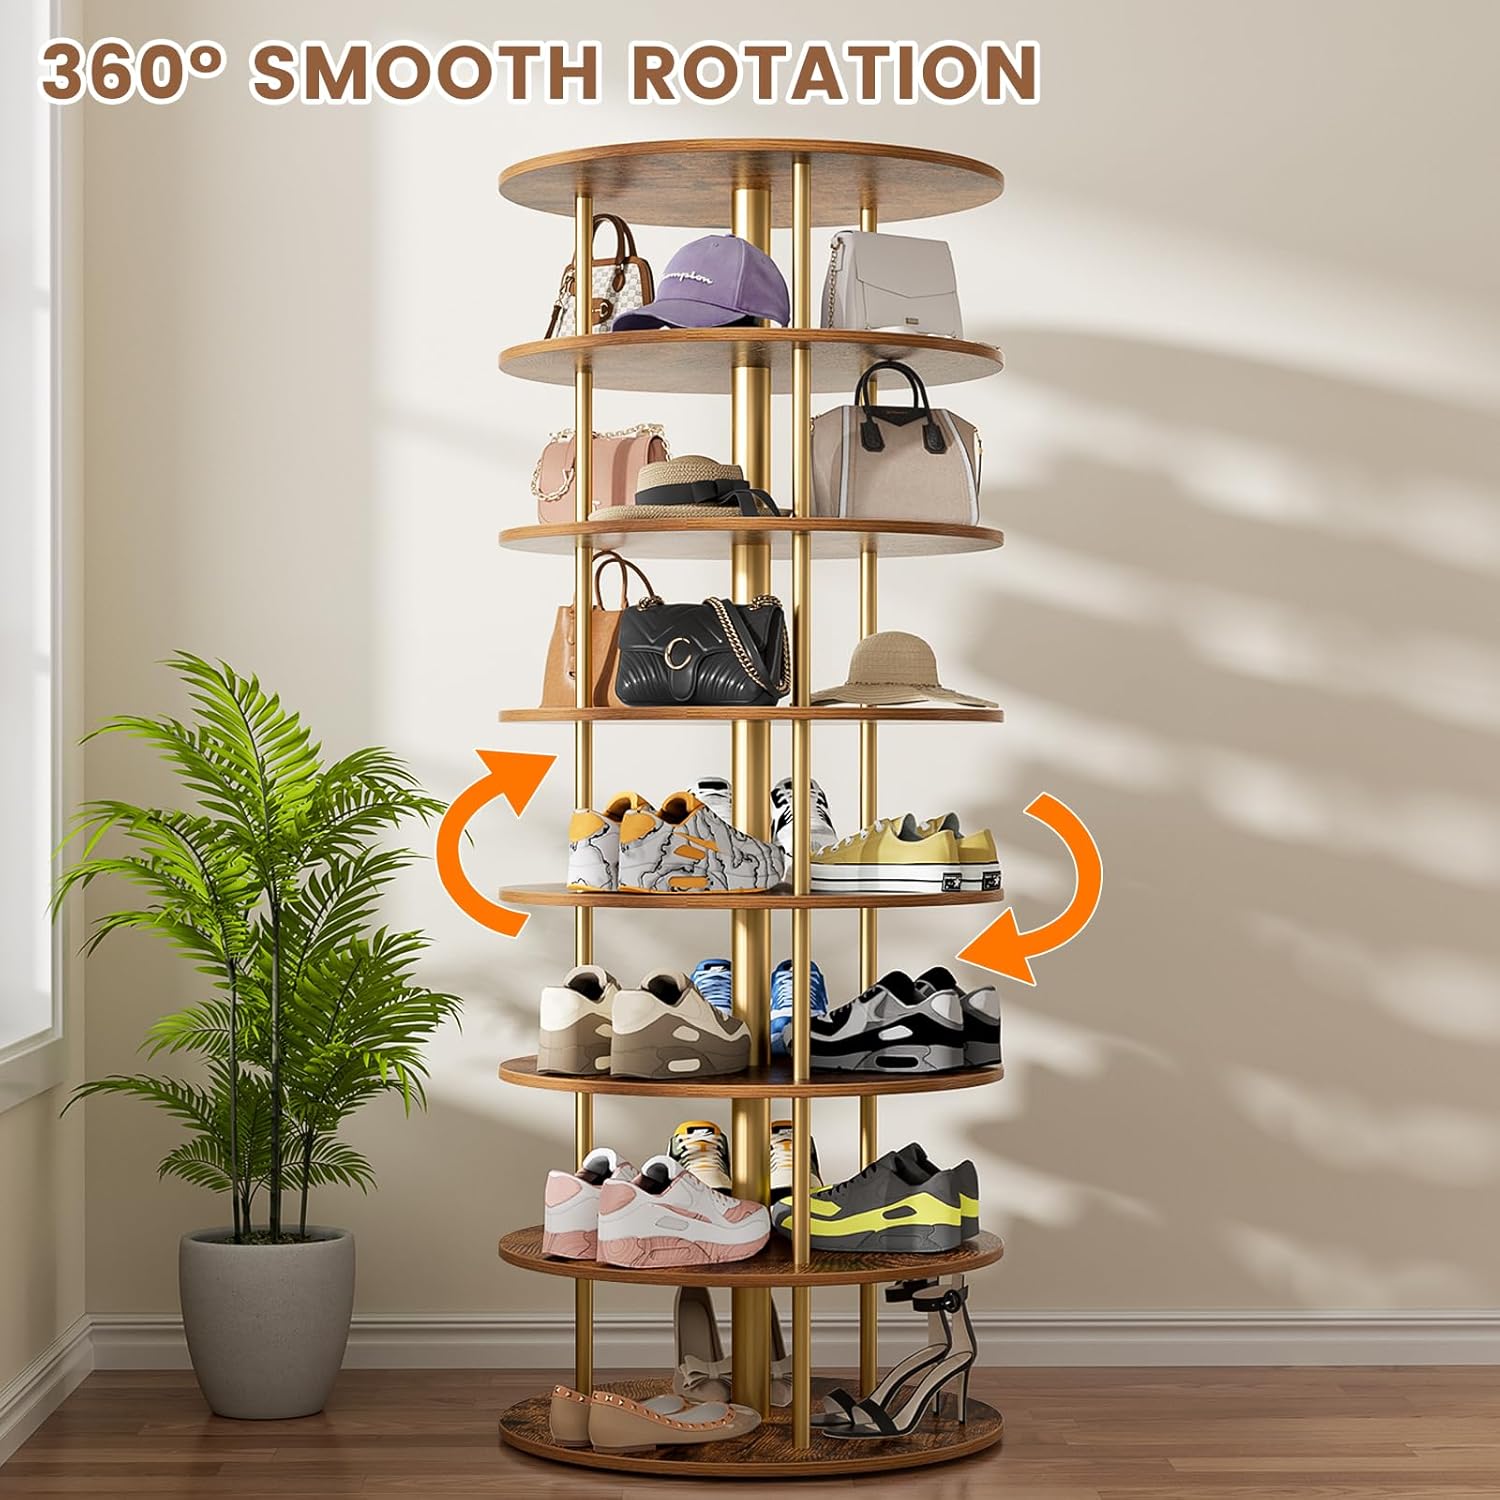
Image: Demonstrates the 360-degree smooth rotation feature of the shoe rack, highlighting its ease of use.
- Optimized Steel Rod Structure: Unlike traditional dividers, this design utilizes sturdy steel pipes, enhancing stability and durability. This structure accommodates various shoe sizes without squeezing or deforming them, making it easier to find items.

Image: Illustrates the transition from plastic partitions to a more robust steel column design, emphasizing enhanced stability and space.
- Stylish and Versatile Design: While ideal for shoes, this tower can also store bags, hats, accessories, and other items. Its modern aesthetic seamlessly integrates into any room, including bedrooms, closets, hallways, or entryways.
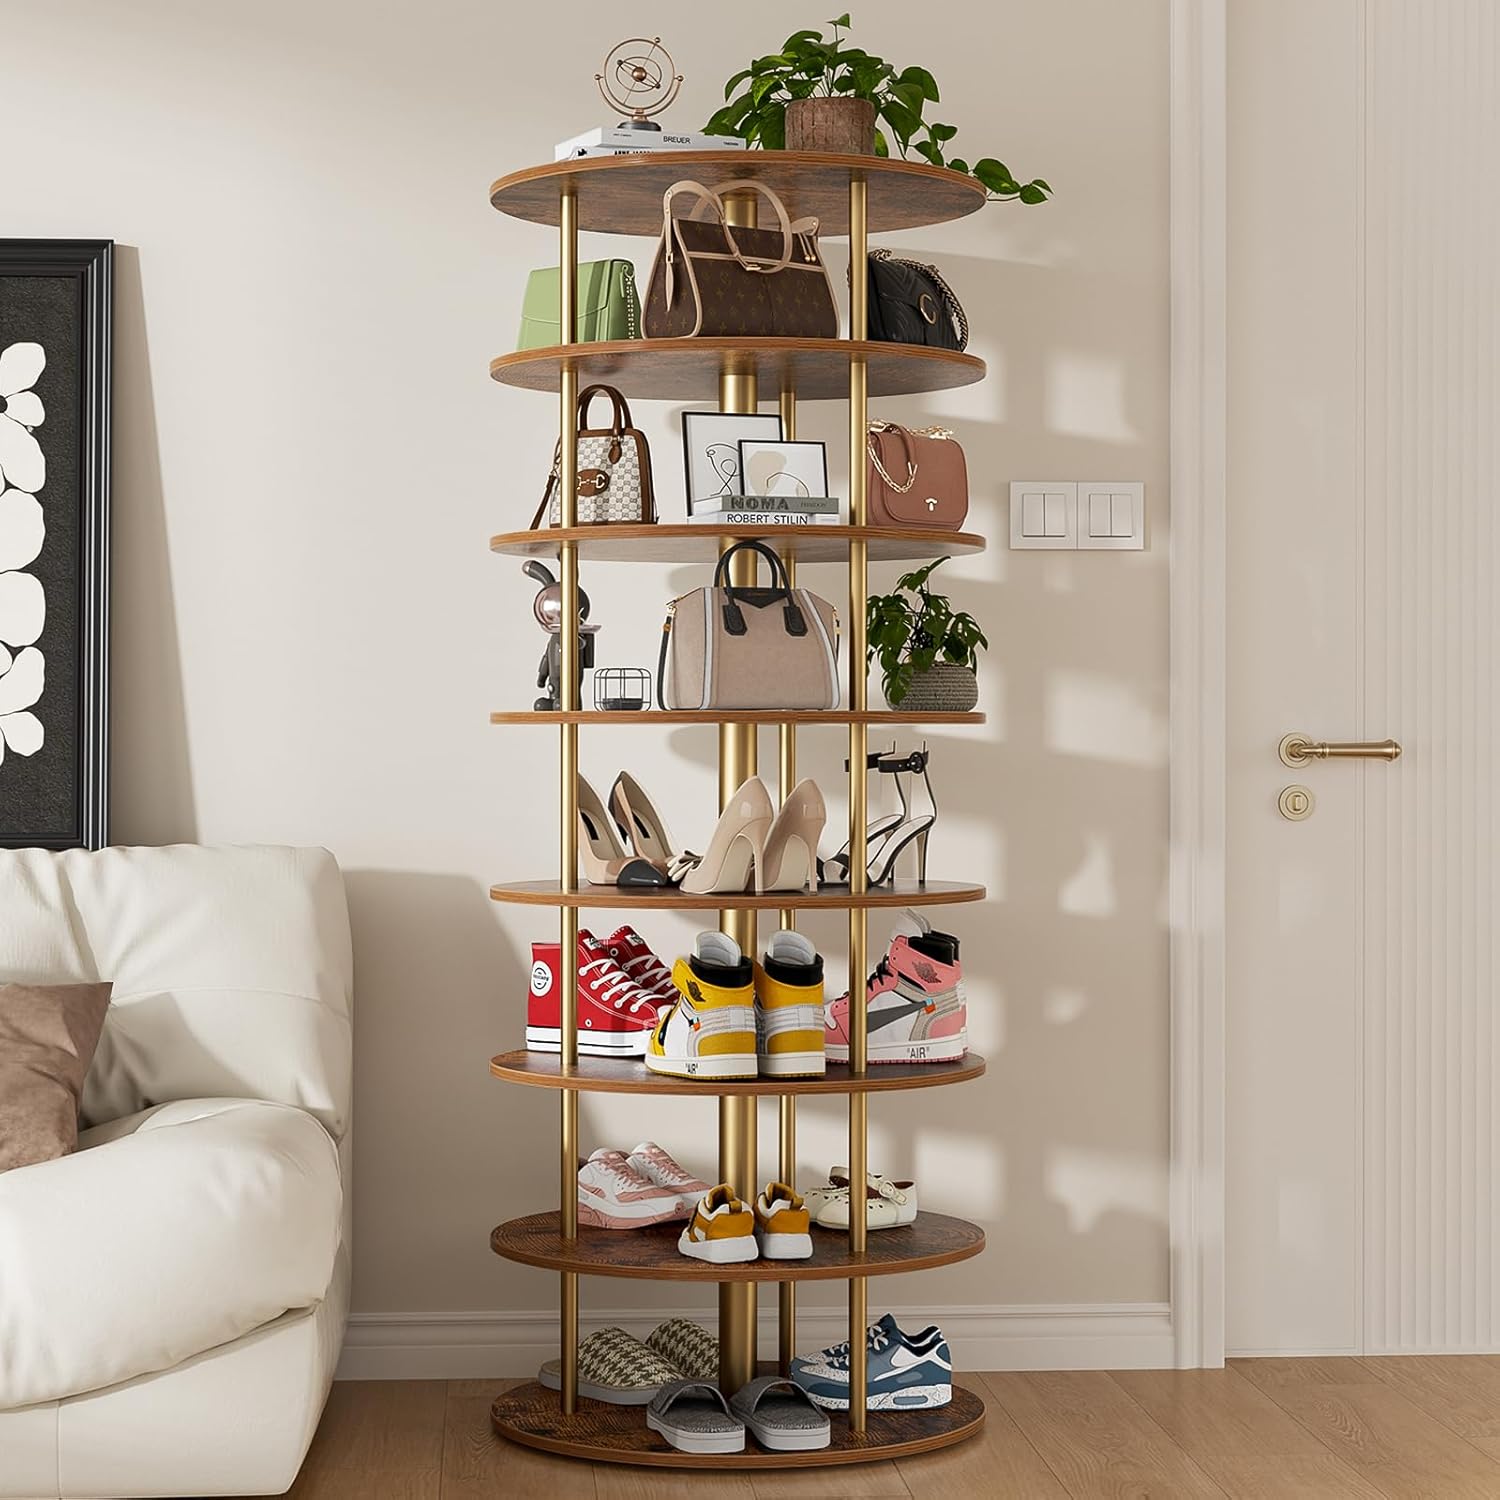
Image: The shoe rack as a functional and decorative piece in a living room, demonstrating its ability to hold more than just shoes.
- Durable Construction with Anti-tip Fitting: Constructed from high-quality steel rods and solid boards, ensuring long-term use without warping or damage. Includes anti-tip fitting features for enhanced safety and stability, preventing accidental tipping.
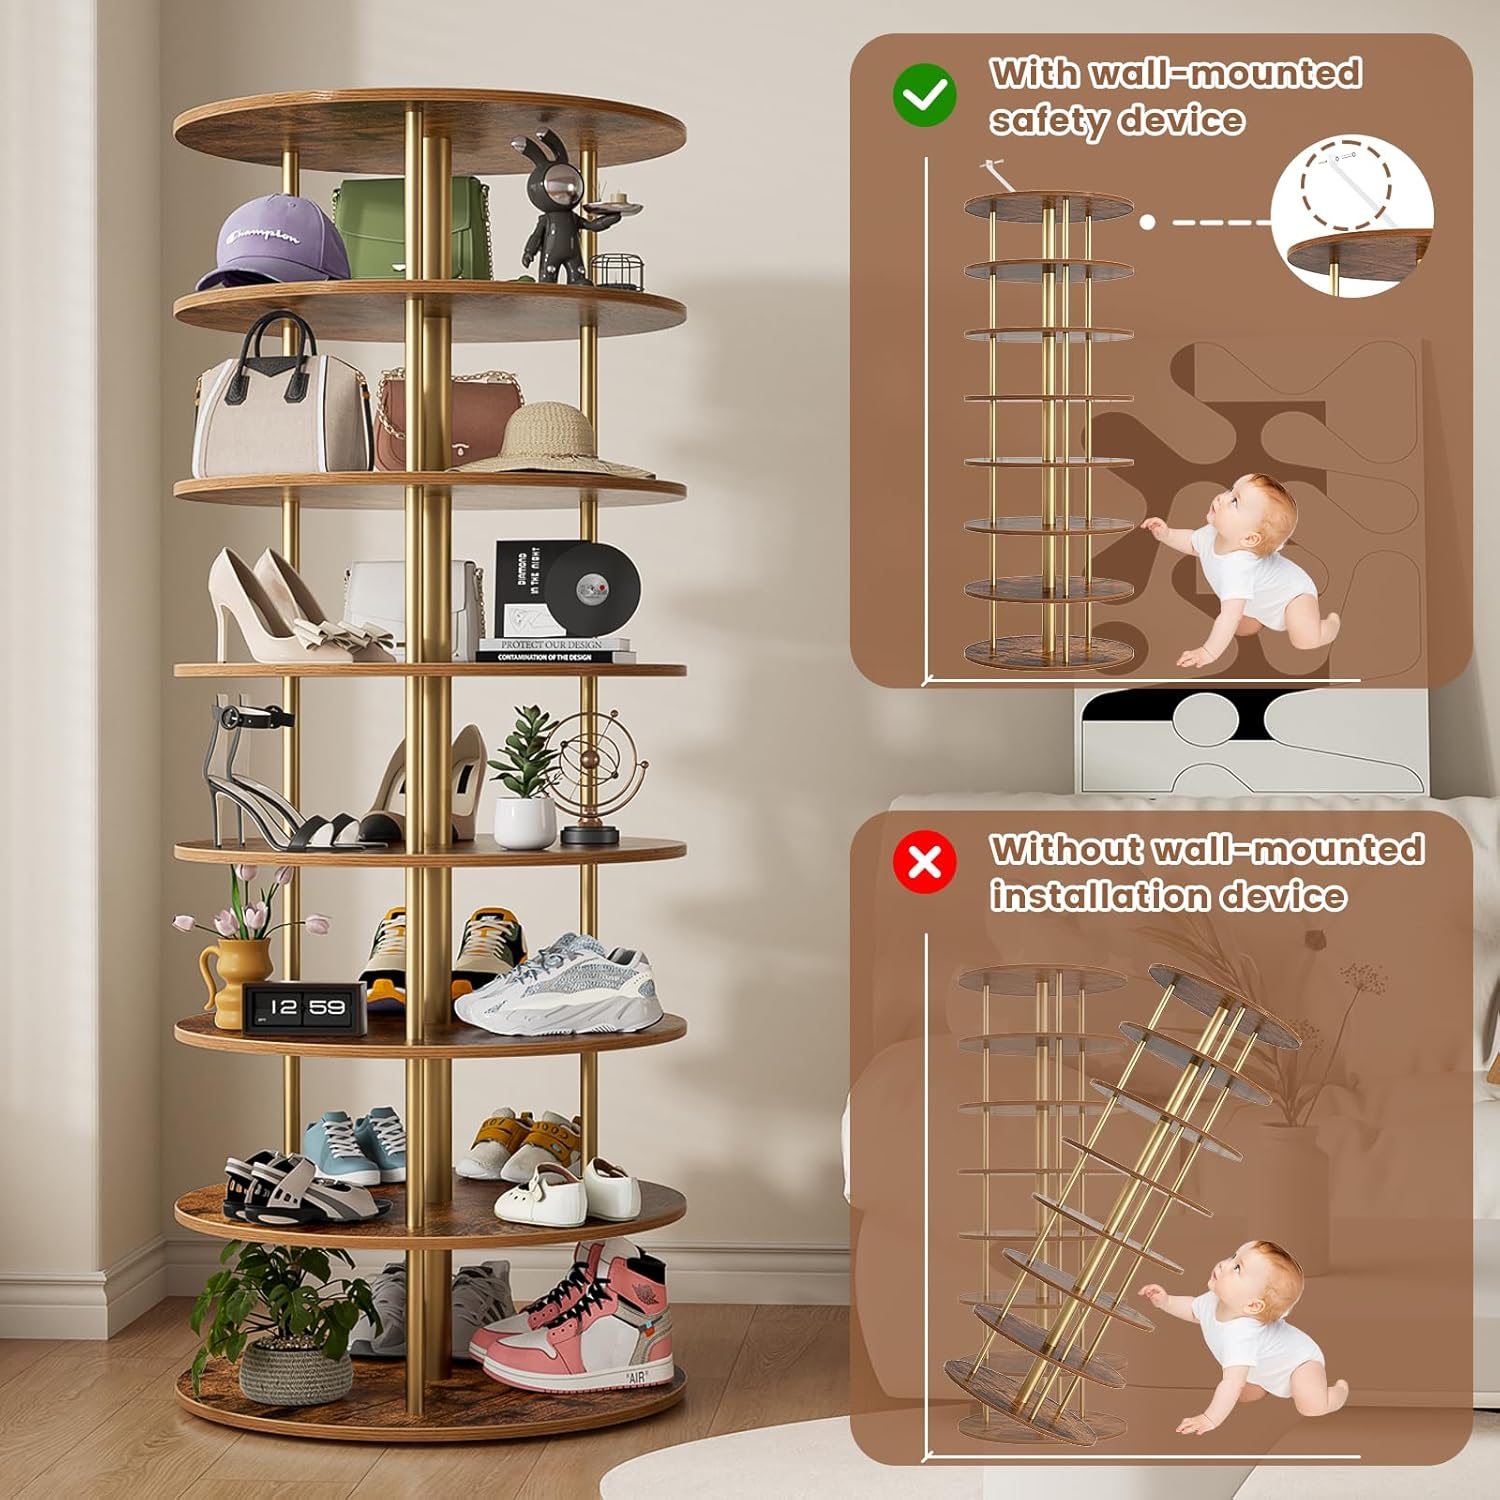
Image: Highlights the crucial anti-tip fitting, illustrating how it secures the tower to the wall for safety, especially in homes with children.
- سهلة التجميع: The assembly process is straightforward, with each layer following identical steps. This simplifies construction, allowing for quick and hassle-free setup.
تحديد
| يصف | التفاصيل |
|---|---|
| ماركة | أولستاند |
| اسم الموديل | shoe rack-456 (Item model number: 123) |
| نوع الغرفة | الحمام، غرفة النوم، غرفة المعيشة |
| عدد الرفوف | 7 |
| ميزة خاصة | قابل للتعديل ودائم |
| أبعاد المنتج | 23.62 بوصة عمق × 23.62 بوصة عرض × 64.05 بوصة ارتفاع |
| أسلوب | حديث |
| نوع التشطيب | مصقول |
| تعليمات العناية بالمنتج | امسح باستخدام D.amp قطعة قماش |
| مقاس | 7-المستوى |
| الوزن المحدد | 150 رطل |
| مطلوب التجميع | نعم |
| الاستخدامات الموصى بها للمنتج | Shoes, Storage |
| المكونات المضمنة | الأجهزة |
| وزن العنصر | 50 رطل |
| تشطيب الأثاث | الخشب الهندسي |
| نوع التثبيت | قائما بذاته |
| استخدامات محددة للمنتج | Bags, Shoes |
الإعداد (تعليمات التجميع)
Assembly of your ALLSTAND 7-Tier Rotating Shoe Rack Tower is designed to be straightforward. Please ensure all components listed in the hardware package are present before beginning.
الأدوات المطلوبة (غير مدرجة):
- فيليبس رئيس مفك
- Hammer (optional, for wall anchors)
- Drill (for wall-mounted safety device)
خطوات التجميع:
- فكّ وحدد المكونات: Carefully unpack all parts and lay them out. Refer to the included hardware list to identify each piece (shelves, steel rods, base, top, screws, anti-tip fitting).

Image: A dimensional diagram of the shoe rack, useful for identifying the main structural components during assembly.
- تجميع القاعدة: Attach the first set of steel rods to the base shelf using the provided screws. Ensure they are securely fastened.
- Stack Subsequent Tiers: Place the next shelf onto the installed rods. Secure it by attaching the next set of steel rods to the top of this shelf. Repeat this process for each subsequent tier. The design ensures consistent assembly for every layer.
- Install the Top Shelf: Once all tiers are stacked, attach the final top shelf to the uppermost set of steel rods.
- Install Anti-tip Fitting: For safety and stability, it is highly recommended to install the included anti-tip fitting. Secure one end to the top of the rack and the other to a wall stud using appropriate hardware. This prevents accidental tipping, especially important in households with children or pets.
- التحقق النهائي: Gently test the stability of the assembled rack and ensure all connections are tight. Verify that the rotation mechanism operates smoothly.
If you encounter any difficulties during assembly, please refer to the detailed instructions provided in your product packaging or contact customer support.
تعليمات التشغيل
The ALLSTAND 7-Tier Rotating Shoe Rack Tower is designed for simple and efficient use.
- تحميل العناصر: Place shoes, bags, accessories, or other desired items onto the shelves. Distribute weight evenly across the shelves to maintain balance and smooth rotation. The maximum weight capacity for the entire unit is 150 pounds.
- Rotating the Rack: To access items, gently push or pull any part of the shelves to initiate rotation. The 360-degree spinning mechanism allows you to easily bring any section of the rack to the front.
- الموقع: Position the rack in a location where its rotation will not be obstructed. Ensure there is sufficient clearance around the unit for full 360-degree movement.
صيانة
Proper maintenance will ensure the longevity and continued smooth operation of your ALLSTAND Rotating Shoe Rack Tower.
- تنظيف: Wipe the surfaces of the shelves and steel rods with a soft, damp قطعة قماش. تجنب استخدام المواد الكيميائية القاسية أو المنظفات الكاشطة، لأنها قد تتلف الطبقة الخارجية.
- الغبار: Regularly dust the rack to prevent buildup, which can affect the smoothness of the rotation.
- فحص الاتصالات: افحص جميع البراغي والوصلات بشكل دوري للتأكد من إحكام ربطها. أعد ربطها إذا لزم الأمر للحفاظ على الثبات.
- توزيع الوزن: Avoid overloading any single shelf or section. Distribute items evenly to prevent strain on the rotating mechanism and maintain the rack's structural integrity.
استكشاف الأخطاء وإصلاحها
If you encounter any issues with your rotating shoe rack, please refer to the following common problems and solutions:
| مشكلة | السبب المحتمل | حل |
|---|---|---|
| Rack does not rotate smoothly or is difficult to turn. |
|
|
| يبدو الرف غير مستقر أو متذبذب. |
|
|
| Items fall off shelves during rotation. |
|
|
If the problem persists after attempting these solutions, please contact ALLSTAND customer support for further assistance.


