1. المقدمة
This manual provides comprehensive instructions for the assembly, operation, and maintenance of your SCULPFUN S9 Laser Engraver with Rotary Roller. Designed for precision engraving and cutting, this machine offers advanced features for various materials. Please read this manual thoroughly before use to ensure safe and optimal performance.
2. انتهى المنتجview
الميزات الرئيسية
- 5.5W Diode Laser with 90W CO2 Laser Effect: Ultra-fine 0.08mm laser focus for deep cutting.
- Cutting Capability: Up to 15mm wood and 10mm acrylic.
- مواد النقش: Ceramics, stainless steel, dark stone, wood, acrylic.
- Rotary Roller Included: For engraving cylindrical objects with a diameter range of 6-150mm.
- التركيز السريع: Fixed focus lens and sliding rail design for rapid setup.
- دقة عالية: Ultra-fine 0.1mm engraving line.
- تصميم السلامة: Laser filter blocks 98% of UV light, emergency stop switch, A4 steel pad for table protection.
- التوافق الواسع: Supports LiteFire, GrblController, Benboc, LightBurn, Laser GRBL.
- File التنسيقات: KPG, BMP, NC, G-code, SVG, DXF, PNG.
- أنظمة التشغيل: Compatible with Windows and Mac.
- التوصيل والتشغيل: 100% pre-installed for easy setup.
صور المنتج

Figure 2.1: SCULPFUN S9 Laser Engraver with included rotary roller and exampعدد قليل من العناصر المنقوشة.

Figure 2.2: The SCULPFUN S9 in operation, demonstrating cylindrical engraving using the rotary roller.

الشكل 2.3: مفصل view of the S9 laser head, highlighting its 90W CO2 laser effect and beam shaping technology.

الشكل 2.4: مثالamples of the S9's cutting depth on 15mm wood, 10mm plywood, and 10mm acrylic.
ما هو المشمول

Figure 2.5: All components included in the SCULPFUN S9 Laser Engraver package.
- مكون واحد للمحور السيني
- 2 x X-profiles
- 2 x Y-profiles
- مكون واحد من مكونات صندوق التحكم
- 3 × ساق داعمة
- مكون ليزر واحد
- 1 x 12V 5A power adapter
- 1 × كابل الطاقة
- 1 × كابل يو اس بي
- 10 × ربطات عنق
- شنومكس x فرشاة
- 1 x Anti-laser goggles
- 1 x 10x10 cm 3mm thick wood chip
- 1 x 10x10 cm wood piece
- 1 x A4 size protective steel pad
- 1 x Mounting kit with screws for steps 1 to 5
- حزام واحد
- 1 x M5 T-type hexagonal wrench
- 1 x M4 L-type hexagonal wrench
- 1 x M3 L-type hexagonal wrench
- 1 x 8 to 10 mm wrench
3. الإعداد
The SCULPFUN S9 Laser Engraver is designed for quick and easy setup, with many components pre-installed. The rotary roller is also 100% pre-assembled for plug-and-play functionality.
التجميع الأولي
- Follow the detailed instructions provided in the included manual for assembling the main frame components (X-axis, Y-profiles, support legs).
- Utilize the separated screw kits and included wrenches for a smooth assembly process.
تركيب وحدة الليزر
- Carefully attach the laser component to the X-axis.
- تأكد من أن جميع التوصيلات آمنة.
Rotary Roller Connection

Figure 3.1: Steps for connecting the SCULPFUN Rotary Roller, highlighting its pre-installed nature.
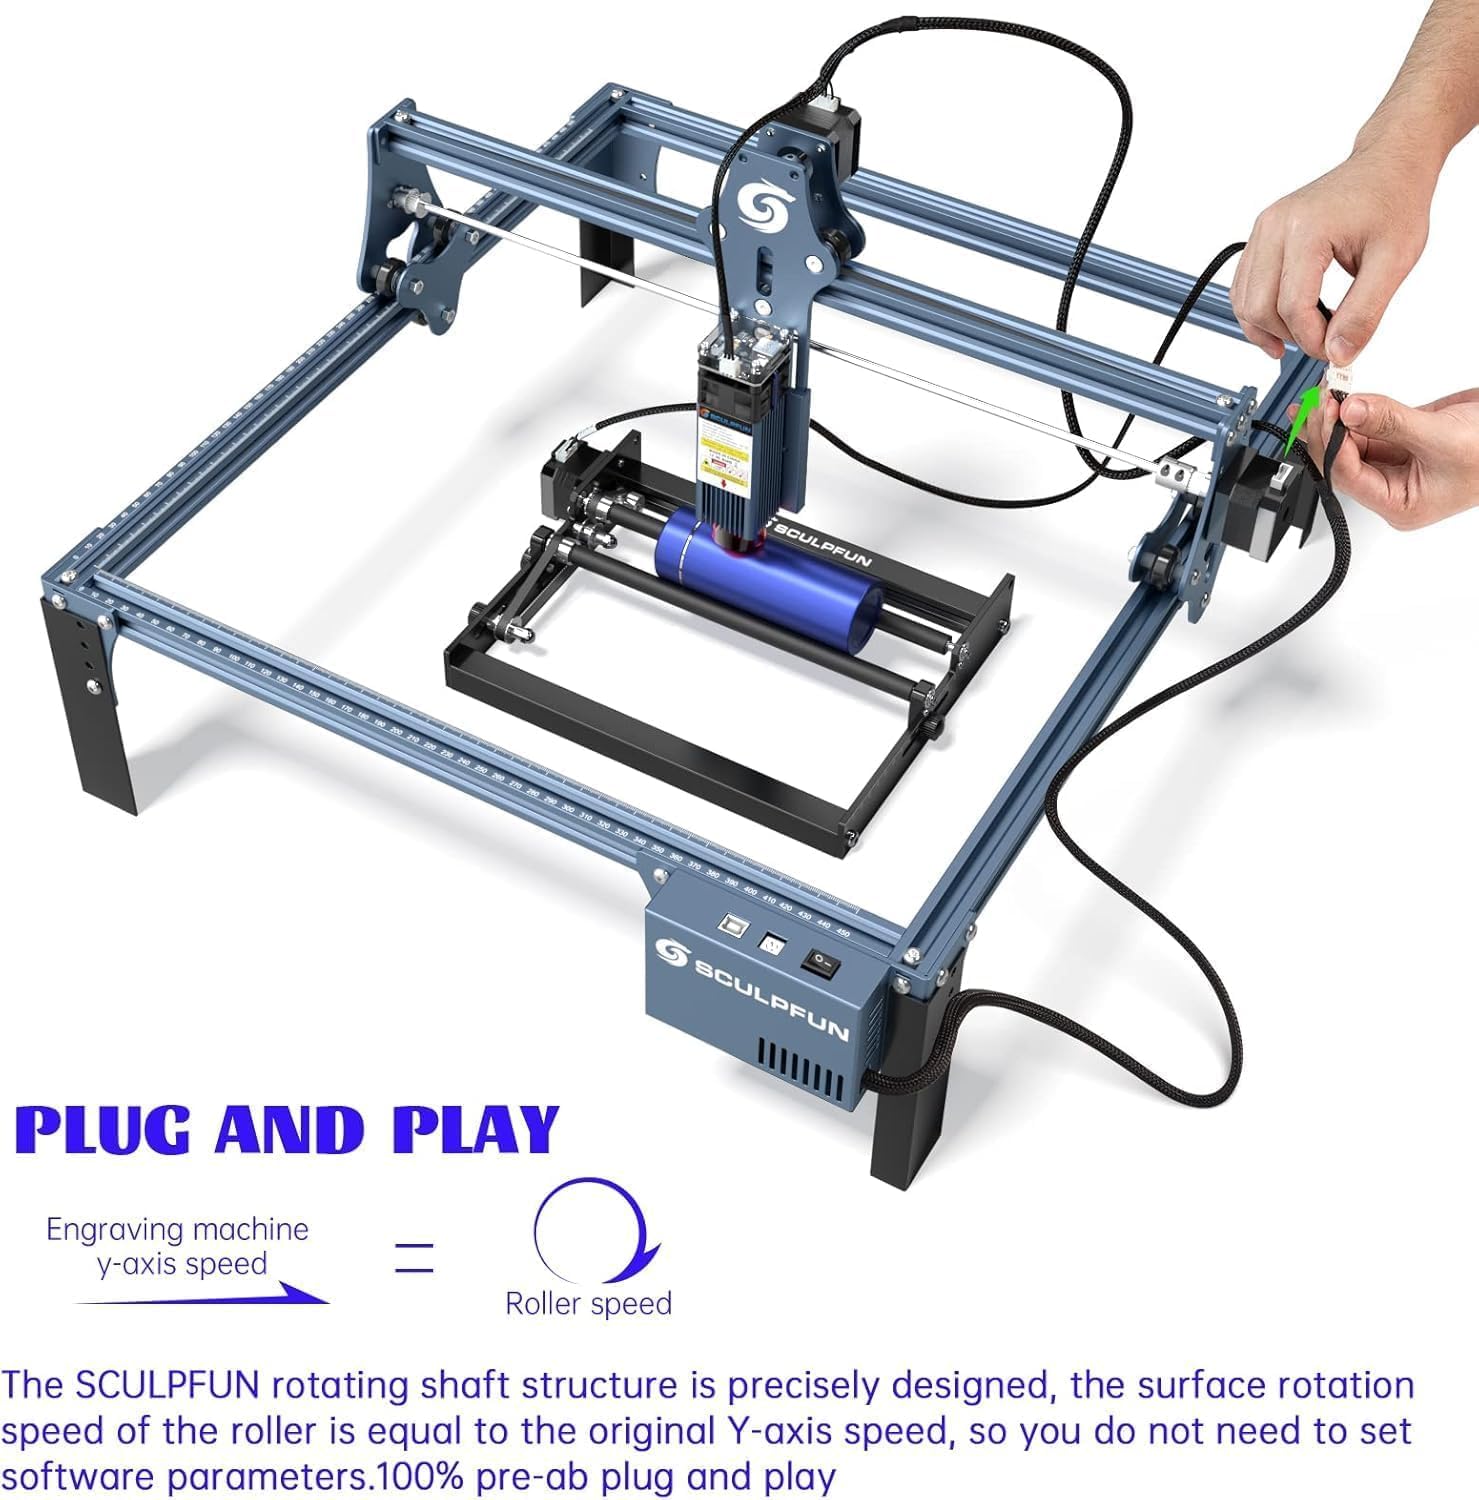
Figure 3.2: The S9 and rotary roller are designed for plug-and-play functionality, simplifying setup.
Connect the rotary roller's adapter cable to the X-axis or Y-axis stepper motor wiring of the laser engraving machine. No additional software settings are required for the rotary roller as its surface rotation speed is precisely designed to match the original Y-axis speed.
Power and USB Connection
Connect the power adapter and USB cable to the machine and your computer.
تثبيت البرامج
Install your preferred engraving software (e.g., LightBurn, Laser GRBL) on your Windows or Mac computer.
4. تعليمات التشغيل
إعداد المواد

Figure 4.1: The rotary roller provides a larger engraving space for various cylindrical objects.

Figure 4.2: The rotary roller features a sliding adjustment for quick and easy distance setting.

الشكل 4.3: المزايا الرئيسيةtages of the SCULPFUN Rotary Roller for cylindrical engraving.
Place the material to be engraved or cut on the working surface. For flat materials, use the protective steel pad to prevent damage to your table. For cylindrical objects, position them securely on the rotary roller.
ضبط التركيز

Figure 4.4: Adjusting the laser focus by sliding the module up or down.
The S9 features a fixed-focus lens. To adjust focus, slide the laser module along its rail and tighten the screws until the laser beam is optimally focused on the material surface. This ensures a precise 0.08mm ultra-fine laser spot.
تشغيل البرمجيات

Figure 4.5: The S9 is compatible with popular laser engraving software like Laser GRBL and LightBurn.

Figure 4.6: The S9's engraving area can be expanded for larger projects.

Figure 4.7: A wide range of materials and objects can be engraved, including pens, cups, flowerpots, and rings.
Open your chosen engraving software (e.g., LightBurn, Laser GRBL). Import your design file (KPG, BMP, NC, G-code, SVG, DXF, PNG formats are supported). Adjust engraving parameters such as power, speed, and passes according to the material type and desired effect. For rotary engraving, ensure the software settings are configured for cylindrical objects, though the S9 rotary roller is designed for plug-and-play speed matching.
احتياطات السلامة

Figure 4.8: The circular protective cover allows for observation while providing eye protection.
- Always wear the provided anti-laser goggles when the machine is operating.
- The laser filter on the S9 can block 98% of UV rays, allowing for observation without goggles, but wearing them is highly recommended for maximum safety.
- Ensure the emergency stop switch is easily accessible during operation.
- Keep pets and children away from the operating machine.
- Operate in a well-ventilated area to dissipate fumes from engraving.
5. الصيانة
Regular maintenance ensures the longevity and optimal performance of your SCULPFUN S9 Laser Engraver.
- تنظيف: Regularly clean the laser lens and the machine's rails to ensure optimal performance and prevent dust buildup. Use a soft, lint-free cloth.
- تشحيم: Periodically lubricate the moving parts of the X and Y axes to ensure smooth operation.
- التوتر حزام: Check the tension of the belts and adjust if necessary to maintain engraving accuracy.
- فحص وحدة الليزر: Inspect the laser module for any signs of damage or wear. If the laser output appears weak or inconsistent, consult the manufacturer's support.
6. استكشاف الأخطاء وإصلاحها
يوفر هذا القسم حلولاً للمشكلات الشائعة التي قد تواجهها.
- الجهاز لا يعمل:
- Check power cable connections to the machine and the outlet.
- تأكد من أن محول الطاقة يعمل بشكل صحيح.
- الليزر لا يعمل/إخراج ضعيف:
- Verify laser module connection.
- Check focus adjustment.
- Ensure laser power settings in software are correct.
- نظف عدسة الليزر.
- Engraving Inaccuracy/Skipped Steps:
- Check belt tension on X and Y axes.
- Ensure all screws and connections are tight.
- Verify material is securely placed and not moving during operation.
- Check software settings for speed and acceleration.
- مشاكل الاتصال بالبرامج:
- تأكد من توصيل كابل USB بشكل آمن.
- أعد تشغيل البرنامج والجهاز.
- Check device manager for proper driver installation.
7. المواصفات
| ميزة | مواصفة |
|---|---|
| الشركة المصنعة | سكالبفن |
| نموذج | S9+roller |
| نوع مصدر الطاقة | AC |
| المجلدtage | 240 فولت |
| طاقة خرج الليزر | 5.5W (90W CO2 effect) |
| منطقة العمل | 410 × 420 ملم |
| تركيز الليزر | 0.08 ملم |
| Engraving Line Precision | 0.1 ملم |
| Cylindrical Engraving Diameter Range | 6-150 ملم |
| Cylindrical Engraving Length | 0-230 ملم |
| أبعاد الحزمة | 61.6 × 35.2 × 18.5 سم |
| وزن الحزمة | 6.08 كجم |
| متاح منذ | 26 أغسطس 2024 |
8. الضمان والدعم
معلومات الضمان
The product may be eligible for extended warranty plans (e.g., 12-month or 24-month extended warranty against failures and defects) available at the time of purchase. Please refer to your purchase documentation for specific warranty terms and conditions.
دعم العملاء
For technical assistance, troubleshooting, or inquiries, please visit the official SCULPFUN store on Amazon or contact SCULPFUN customer support directly. You can find more information and contact details at: SCULPFUN Amazon Store.
9. مقاطع فيديو رسمية للمنتج
No official product videos with 'Seller' as creator type and specific URLs were provided in the product data to embed in this manual.


