1. المقدمة
This user manual provides comprehensive instructions for the proper installation, operation, and maintenance of the SmallRig ZV-E10 II Cage Kit. Please read this manual thoroughly before using the product to ensure optimal performance and safety.
The SmallRig ZV-E10 II Cage Kit 4867 is specifically designed to enhance the functionality and protection of the Sony ZV-E10 II camera. It features a hollow design to maintain access to camera functions, an ergonomic grip, and multiple mounting points for accessories.
2. ماذا يوجد في الصندوق
تأكد من وجود كافة المكونات قبل المتابعة بالتثبيت.
- قفص × 1
- كابل HDMI Clamp × 1

3. المواصفات
| ميزة | التفاصيل |
|---|---|
| أبعاد المنتج | 150 × 85.7 × 57.3 ملم (6.0 × 85.7 × 57.3 بوصة) |
| وزن العنصر | 124 ± 5.0 جرام (4.4 ± 0.2 أونصة) |
| التوافق | For Sony ZV-E10 II |
| المواد) | سبائك الألومنيوم والفولاذ المقاوم للصدأ |
| رقم الموديل | 4867-سي اف |
4. الإعداد والتثبيت
4.1 Attaching the Cage to the Camera
- Ensure your Sony ZV-E10 II camera is powered off and the battery is removed.
- Align the camera with the cage. The cage secures the camera via a 1/4"-20 screw on the bottom and M2.5 screws on both sides.
- Carefully slide the camera into the cage. Ensure the built-in all-round protective gasket is properly positioned to prevent scratching the camera body.
- Tighten the 1/4"-20 screw on the bottom of the cage into the camera's tripod socket.
- Secure the camera further by tightening the M2.5 screws on both sides of the cage. This three-point locking mechanism prevents camera deflection and lens shake.

4.2 Installing the HDMI Cable Clamp
The HDMI cable clamp helps protect the camera's HDMI interface and ensures stable signal transmission.
- Locate the dedicated hand-twisted cable clamp for HDMI.
- قم بإرفاق الكلamp to the designated mounting point on the cage, typically near the HDMI port.
- Insert your HDMI cable into the camera's port, then secure it within the clamp by tightening the hand-twisted screws. No additional tools are required for this step.

5. تشغيل مجموعة القفص
5.1 Access to Camera Functions
The cage is designed with a hollow structure to ensure full access to all camera buttons, ports, and the battery compartment. The battery compartment features an opening and closing wrench for quick battery changes without removing the cage.

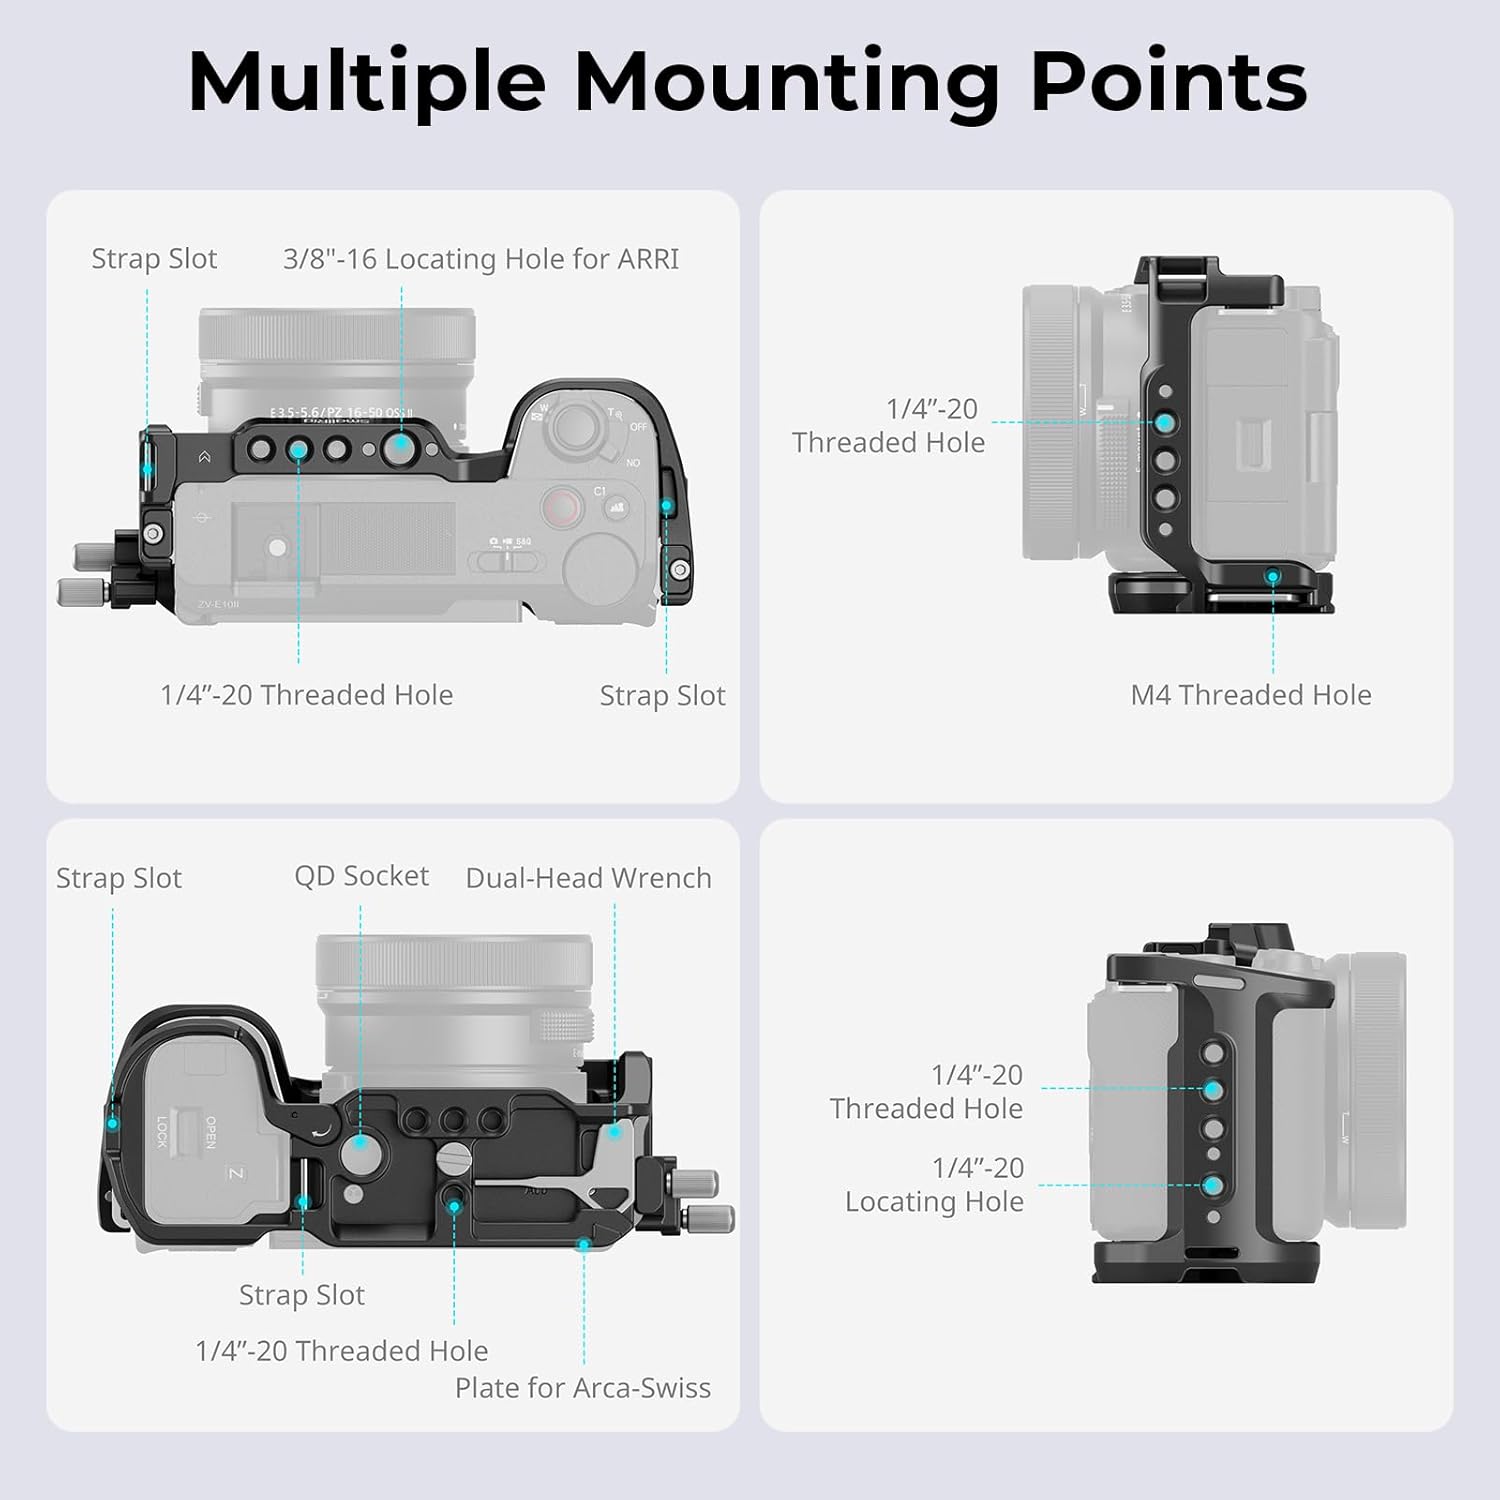
5.2 Utilizing Multiple Mounting Points
The cage provides various mounting points for expanding your camera setup:
- 1/4"-20 ثقوب ملولبة: For attaching various accessories like magic arms, small lights, or monitors.
- ARRI Locating Hole: Provides a secure, anti-twist mounting point for ARRI-compatible accessories.
- الحذاء البارد: Ideal for mounting microphones, LED lights, or other cold shoe compatible accessories.
- Shoulder/Wrist Strap Slot: For attaching camera straps for added security and portability.
- مقبس QD: For quick attachment and detachment of QD (Quick Detach) sling swivels.

5.3 Integrated Arca-Type Quick Release Plate
The bottom of the cage features a built-in Arca-Swiss quick release plate, allowing for rapid transitions between different shooting setups.
- التوافق: Directly compatible with DJI RS 2 / RSC 2 / RS 3 / RS 3 Pro / RS 4 / RS 4 Pro stabilizers and Arca-type tripods.
- ملحوظة: When using with the DJI RS 3 Mini stabilizer, ensure to first attach the quick release plate for DJI RS Mini to the base of the cage.

5.4 Enhanced Grip Experience
The cage's design improves the camera's ergonomics, providing a more comfortable and secure grip, especially for users with larger hands. This enhances stability during handheld shooting.
5.5 الملحقات الموصى بها
To further expand the functionality of your SmallRig ZV-E10 II Cage Kit, consider the following compatible accessories:
- SmallRig Top Handheld 4757
- SmallRig Side Handle 4755
- SmallRig Monitor Mount 2903B
- SmallRig Wrist Strap 3848
- SmallRig Cooling System (ID: 4348)
- NP-F Battery (ID: 4469)
- Dummy Battery Cable (ID: 2922)

6. الصيانة
- تنظيف: Wipe the cage with a soft, dry cloth to remove dust and fingerprints. Avoid using abrasive cleaners or solvents.
- تخزين: Store the cage in a dry, cool place away from direct sunlight and extreme temperatures when not in use.
- تقتيش: Periodically check all screws and mounting points for tightness. Re-tighten if necessary to ensure the camera remains secure.
- Built-in Magnetic Wrench: The cage includes a built-in magnetic wrench for convenient adjustments. Ensure it is securely stored in its designated slot when not in use.
7. استكشاف الأخطاء وإصلاحها
| مشكلة | السبب المحتمل | حل |
|---|---|---|
| Camera not secure in cage | مسامير فضفاضة. | Ensure the 1/4"-20 bottom screw and both M2.5 side screws are fully tightened. |
| HDMI cable is loose or signal unstable | كابل clamp not properly secured. | Re-adjust and tighten the hand-twisted screws on the HDMI cable clamp. |
| Difficulty accessing camera ports/buttons | Camera not correctly seated in cage. | Remove camera and re-install, ensuring proper alignment with the cage's cutouts. |
8. الضمان والدعم
للحصول على معلومات الضمان والدعم الفني، يرجى الرجوع إلى موقع SmallRig الرسمي webالموقع أو تواصل مع خدمة العملاء مباشرةً. احتفظ بإيصال الشراء كإثبات للشراء في حال وجود أي مطالبات بالضمان.
دليل المستخدم الرسمي (PDF): تنزيل ملف PDF
Visit the SMALLRIG Store: SMALLRIG Amazon Store


