1. المقدمة
The Audio-Technica AT-LP70X is a fully automatic belt-drive turntable designed for high-fidelity audio playback from vinyl records. It features an integrated AT-VM95C cartridge, a J-shaped tonearm engineered to minimize tracking errors, and a built-in switchable phono preamplifier for versatile connectivity. The turntable's three-piece, anti-resonance chassis is designed to reduce unwanted noise, ensuring clear and warm analog sound reproduction.
2. معلومات السلامة
Please read and understand all safety instructions before operating this product. Keep this manual for future reference. Always disconnect the power cord from the outlet before cleaning or performing any maintenance. Do not expose the unit to rain or moisture. Avoid placing the unit near heat sources or in direct sunlight. Ensure proper ventilation around the turntable.
3. محتويات العبوة
Verify that all items are present before setup:
- AT-LP70X Automatic Turntable
- Dust Cover with Hinges
- طبق كبير
- Drive Belt (pre-installed on platter)
- فيلت حصيرة
- AT-VM95C Cartridge (pre-installed on tonearm)
- محول 45 RPM
- RCA Audio Cable (dual RCA male to dual RCA male with ground wire)
- محول التيار المتردد
- دليل البدء السريع (هذا الدليل)
4. انتهى المنتجview
The AT-LP70X features a sleek design with intuitive controls for an optimal vinyl listening experience.

الشكل 1: الجزء العلوي view of the Audio-Technica AT-LP70X Automatic Turntable with the dust cover open, showcasing the platter, tonearm, and control buttons.
المكونات الرئيسية:
- طبق: السطح الدوار الذي توضع عليه الأسطوانات.
- تونيرم: Holds the cartridge and stylus, tracking the record grooves.
- Cartridge (AT-VM95C): يحول اهتزازات الأخدود إلى إشارات كهربائية.
- القلم: الإبرة التي تقرأ أخاديد الأسطوانة.
- محدد السرعة: Allows switching between 33-1/3 and 45 RPM.
- أزرار التشغيل/الإيقاف: Controls automatic playback initiation and cessation.
- المدمج في قبلamp: Switchable phono/line output for connecting to various audio systems.
- غطاء الغبار: يحمي القرص الدوار من الغبار والحطام.
5. الإعداد
5.1 فك العبوة والوضع الأولي
Carefully remove all components from the packaging. Place the turntable on a stable, level surface away from direct sunlight, heat sources, and strong vibrations.
5.2 تركيب القرص والحزام
The drive belt is typically pre-installed on the platter. Gently place the platter onto the turntable spindle. Ensure the drive belt is correctly positioned around the motor pulley, which can be accessed through an opening in the platter.
Video 1: This video demonstrates the setup process for the Audio-Technica AT-LP70X turntable, including platter and belt installation. It shows how to correctly position the drive belt around the motor pulley for proper operation.
5.3 Cartridge and Stylus Preparation
The AT-VM95C cartridge is pre-installed on the J-shaped tonearm. Before use, carefully remove the clear stylus protector by sliding it forward. Handle the stylus with care to avoid damage.

الشكل 2: لقطة مقربة view of the J-shaped tonearm and the pre-installed AT-VM95C cartridge on the Audio-Technica AT-LP70X turntable.
5.4 الاتصال بنظام صوتي
The AT-LP70X features a built-in switchable phono preamplifier, allowing connection to various audio components.
- إخراج فونو: إذا كان لديك amplifier has a dedicated PHONO input, set the PHONO/LINE switch on the turntable's rear panel to "PHONO". Connect the RCA audio cable to the PHONO input on your amplifier and the ground wire to the amplifier's ground terminal.
- خط الإخراج: إذا كان لديك amplifier or powered speakers do not have a PHONO input, set the PHONO/LINE switch to "LINE". Connect the RCA audio cable to any available LINE input (e.g., AUX, CD, TAPE) on your amplifier or directly to powered speakers.
- اتصال بلوتوث: The turntable can connect wirelessly to Bluetooth-enabled speakers or headphones. Press and hold the Bluetooth button on the front panel until the indicator light flashes, then pair with your desired device.
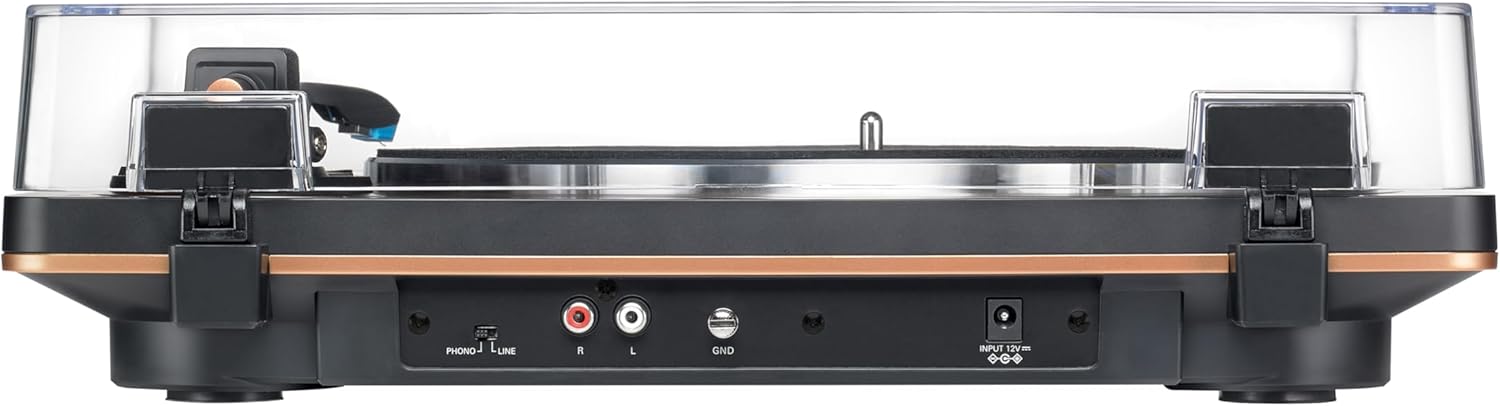
Figure 3: Rear panel of the AT-LP70X, illustrating the RCA output jacks, ground terminal, PHONO/LINE switch, and power input.
5.5 Dust Cover Installation
Attach the hinges to the dust cover and then insert the hinges into the slots on the rear of the turntable. The dust cover can be easily removed if preferred.
6. تعليمات التشغيل
6.1 تشغيل/إيقاف التشغيل
Connect the AC adapter to the turntable and a power outlet. The turntable is ready for operation when the power indicator light is on.
6.2 Playing a Record (Automatic Operation)
- ضع سجلاً على الطبق.
- Select the appropriate speed (33 or 45 RPM) using the SPEED button.
- Press the START button. The tonearm will automatically move to the beginning of the record and lower the stylus.
- At the end of the record, the tonearm will automatically return to its rest position, and the platter will stop spinning.
Video 2: This video provides an introduction to the Audio-Technica AT-LP70X Automatic Turntable, highlighting its automatic playback features and ease of use.
6.3 Stopping Playback
To stop playback at any time, press the STOP button. The tonearm will lift, return to its rest position, and the platter will stop.
6.4 Manual Operation (Cueing)
While the AT-LP70X is fully automatic, you can manually cue the tonearm. Use the tonearm lift lever to raise and lower the tonearm. Gently position the tonearm over the desired track on the record, then lower it using the lever.
7. الصيانة
7.1 التنظيف
- هيكل القرص الدوار: Wipe with a soft, dry cloth. Do not use harsh chemicals or abrasive cleaners.
- القلم: استخدم فرشاة ناعمة مصممة لتنظيف قلم اللمس، وقم بالتنظيف بلطف من الخلف إلى الأمام.
- غطاء الغبار: Clean with a soft cloth and mild, non-abrasive cleaner.
7.2 استبدال قلم اللمس
The AT-VM95C cartridge allows for easy stylus replacement. When the stylus wears out (typically after 300-500 hours of playback), it can be replaced with any stylus from the Audio-Technica VM95 Series (e.g., AT-VMN95E, AT-VMN95ML, AT-VMN95SH). Refer to the stylus replacement instructions provided with the new stylus.
8. استكشاف الأخطاء وإصلاحها
| مشكلة | حل |
|---|---|
| لا يوجد صوت أو مستوى صوت منخفض | Check audio cable connections. Ensure PHONO/LINE switch is set correctly. Verify amplifier/speaker volume. |
| صوت متقطع أو مشوه | Clean the record and stylus. Ensure the turntable is on a level surface. Check for stylus wear. |
| الطبق لا يدور | Check power connection. Ensure drive belt is correctly installed around the motor pulley. |
| مشاكل اتصال البلوتوث | Ensure Bluetooth device is in pairing mode and within range. Disconnect and re-pair. |
9. المواصفات
| ميزة | التفاصيل |
|---|---|
| رقم الموديل | ايه تي-LP70X |
| طريقة القيادة | محرك الحزام |
| نوع المحرك | محرك التيار المستمر |
| السرعات | 33-1 / 3 دورة في الدقيقة ، 45 دورة في الدقيقة |
| مادة طبق | الألومنيوم |
| نوع خرطوشة | AT-VM95C (conical stylus) |
| نوع ذراع النغمة | على شكل J |
| قبل-ampالقمامة | Built-in, switchable Phono/Line |
| الإخراج موصلات | RCA (L/R) with ground |
| الأبعاد (العرض × العمق × الارتفاع) | 15.75 × 12.99 × 4.33 بوصة |
| وزن | 6.4 رطل |
| مادة | Aluminum, Metal, Plastic |
10. الضمان والدعم
For warranty information and customer support, please refer to the official Audio-Technica webالموقع الإلكتروني أو تواصل مع قسم خدمة العملاء. احتفظ بإيصال الشراء لأي مطالبات بالضمان.


