1. المقدمة
The Mastech MS8233B is a compact, handheld digital multimeter designed for measuring AC/DC voltage, DC current, resistance, diode, continuity, and temperature. It features a 2000-count display, data hold function, and low battery indication, making it suitable for various electrical testing applications in domestic and electronics environments.
2. معلومات السلامة
To ensure safe operation and service of the meter, please read this manual thoroughly before use. Failure to observe safety warnings can result in severe injury or death.
- تأكد دائمًا من أن العداد في حالة عمل جيدة قبل الاستخدام.
- لا تستخدم أكثر من الحجم المقدرtage, which is 600V CAT III.
- توخ الحذر عند العمل مع المجلدtagيجب ألا تتجاوز البطاريات 30 فولت تيار متردد جذر متوسط التربيع، أو 42 فولت ذروة، أو 60 فولت تيار مستمر، لأنها تشكل خطر صدمة كهربائية.
- افصل أسلاك الاختبار عن الدائرة دائمًا قبل تغيير الوظائف.
- استبدل البطارية فور ظهور مؤشر انخفاض مستوى البطارية.
- لا تقم بتشغيل الجهاز إذا لم يكن غطاء البطارية مغلقًا بشكل صحيح.
- الالتزام بقوانين السلامة المحلية والوطنية.
3. انتهى المنتجview
The Mastech MS8233B Digital Multimeter features a clear display, a rotary function switch, and dedicated input jacks for various measurements.

الشكل 3.1: أمام view of the Mastech MS8233B Digital Multimeter. This image displays the LCD screen, rotary function switch, input jacks, and control buttons.
3.1 مكونات
- شاشة LCD: يعرض قراءات القياس والوحدات ومؤشرات الوظائف.
- مفتاح دوار وظيفي: Used to select the desired measurement function (e.g., V~, V-, A-, Ω, Diode, Continuity, Temp).
- زر الأنتظار: تجميد القراءة الحالية على الشاشة.
- زر الإضاءة الخلفية: يقوم بتفعيل الإضاءة الخلفية للشاشة لتحسين الرؤية في ظروف الإضاءة المنخفضة.
- مقبس إدخال VΩmA: مدخلات إيجابية للحجمtagقياسات المقاومة، والديود، والاستمرارية، والتيار حتى 200 مللي أمبير.
- مقبس إدخال COM: مدخل مشترك (سلبي) لجميع القياسات.
- مقبس إدخال 10 أمبير: Positive input for high current measurements (up to 10A).
4. الإعداد
4.1 تركيب البطارية
The MS8233B requires 2 LR44 batteries for operation. Ensure the batteries are installed correctly before first use or when replacing them.
- أطفئ جهاز القياس المتعدد وافصل جميع أسلاك الاختبار.
- حدد مكان حجرة البطارية في الجزء الخلفي من العداد.
- استخدم مفك براغي لفتح غطاء حجرة البطارية.
- Insert the 2 LR44 batteries, observing the correct polarity (+ and -).
- استبدل غطاء حجرة البطارية وثبته بالمسمار.
5. تعليمات التشغيل
قبل إجراء أي قياسات، تأكد من توصيل أسلاك الاختبار بشكل صحيح بالعداد والدائرة قيد الاختبار.
5.1 التشغيل العام
- Turn the rotary switch from the "OFF" position to the desired measurement function.
- Connect the test leads to the appropriate input jacks and the circuit.
- اقرأ قيمة القياس على شاشة LCD.
- To turn off the meter, rotate the switch back to the "OFF" position.
5.2 العاصمة المجلدtagالقياس الإلكتروني (V-)
- اضبط المفتاح الدوار على جهد التيار المستمر المطلوبtagنطاق e (على سبيل المثال، 200 مللي فولت، 2 فولت، 20 فولت، 200 فولت، 600 فولت).
- قم بتوصيل سلك الاختبار الأحمر بمقبس VΩmA وسلك الاختبار الأسود بمقبس COM.
- قم بتوصيل أسلاك الاختبار عبر المكون أو الدائرة المراد قياسها.
5.3 أس فولtagالقياس الإلكتروني (V~)
- اضبط المفتاح الدوار على جهد التيار المتردد المطلوبtagنطاق e (على سبيل المثال، 200 فولت، 600 فولت).
- قم بتوصيل سلك الاختبار الأحمر بمقبس VΩmA وسلك الاختبار الأسود بمقبس COM.
- قم بتوصيل أسلاك الاختبار عبر جهد التيار المترددtagالمصدر هـ.
5.4 قياس التيار المستمر (A-)
- اضبط المفتاح الدوار على نطاق التيار المستمر المطلوب (على سبيل المثال، 200 ميكرو أمبير، 2 مللي أمبير، 20 مللي أمبير، 200 مللي أمبير، 10 أمبير).
- For currents up to 200mA, connect the red test lead to the VΩmA jack. For currents up to 10A, connect the red test lead to the 10A jack. Always connect the black test lead to the COM jack.
- Connect the meter in series with the circuit to measure the current.
- حذر: Do not attempt to measure currents exceeding 200mA through the VΩmA jack or 10A through the 10A jack.
5.5 قياس المقاومة (Ω)
- اضبط المفتاح الدوار على نطاق المقاومة المطلوب (على سبيل المثال، 200Ω، 2kΩ، 20kΩ، 200kΩ، 2MΩ).
- قم بتوصيل سلك الاختبار الأحمر بمقبس VΩmA وسلك الاختبار الأسود بمقبس COM.
- Connect the test leads across the resistor or component to be measured. Ensure the circuit is de-energized.
5.6 اختبار الصمام الثنائي
- اضبط المفتاح الدوار على رمز الصمام الثنائي.
- قم بتوصيل سلك الاختبار الأحمر بمقبس VΩmA وسلك الاختبار الأسود بمقبس COM.
- قم بتوصيل سلك الاختبار الأحمر بالأنود وسلك الاختبار الأسود بالكاثود للدايود. ستعرض الشاشة جهد التيار الأماميtagه قطرة.
- Reverse the leads. An open circuit (OL) reading indicates a good diode. A reading in both directions or no reading indicates a faulty diode.
5.7 اختبار الاستمرارية
- اضبط المفتاح الدوار على رمز الاستمرارية.
- قم بتوصيل سلك الاختبار الأحمر بمقبس VΩmA وسلك الاختبار الأسود بمقبس COM.
- Connect the test leads across the circuit or component. If the resistance is less than approximately 60Ω, the buzzer will sound, indicating continuity.
5.8 قياس درجة الحرارة
While the product title mentions temperature, the MS8233B model's detailed specifications do not explicitly list a temperature function. If your specific unit includes this feature, typically you would:
- Set the rotary switch to the Temperature function (usually marked with °C or °F).
- Connect a K-type thermocouple (if included) to the VΩmA and COM jacks, observing polarity.
- ضع مسبار المزدوجة الحرارية عند النقطة التي يلزم قياس درجة حرارتها.
5.9 وظيفة الاحتفاظ بالبيانات
- Press the "HOLD" button to freeze the current reading on the display.
- Press the "HOLD" button again to release the reading and resume live measurements.
5.10 وظيفة الإضاءة الخلفية
- Press the backlight button (often marked with a sun symbol) to turn on the display backlight.
- Press the button again to turn off the backlight.
6. الصيانة
6.1 استبدال البطارية
When the low battery indicator appears on the display, replace the batteries as described in Section 4.1. Always use 2 new LR44 batteries.
6.2 التنظيف
امسح الحالة بالإعلانamp استخدم قطعة قماش ومنظفًا معتدلًا. لا تستخدم مواد كاشطة أو مذيبات. تأكد من جفاف الجهاز تمامًا قبل الاستخدام.
7. استكشاف الأخطاء وإصلاحها
- لا يوجد عرض/عرض خافت: تأكد من تركيب البطارية وشحنها. استبدل البطاريات إذا لزم الأمر.
- يظهر الرمز "OL" أو "1" على الشاشة: Indicates an over-range condition or open circuit. Select a higher range or check connections.
- قراءات خاطئة: Ensure correct function selection, proper lead connection, and that the circuit is de-energized for resistance/diode tests.
- لا يوجد جرس استمرارية: Check if the resistance is above 60Ω or if the function is correctly selected.
8. المواصفات
The following table outlines the technical specifications for the Mastech MS8233B Digital Multimeter.
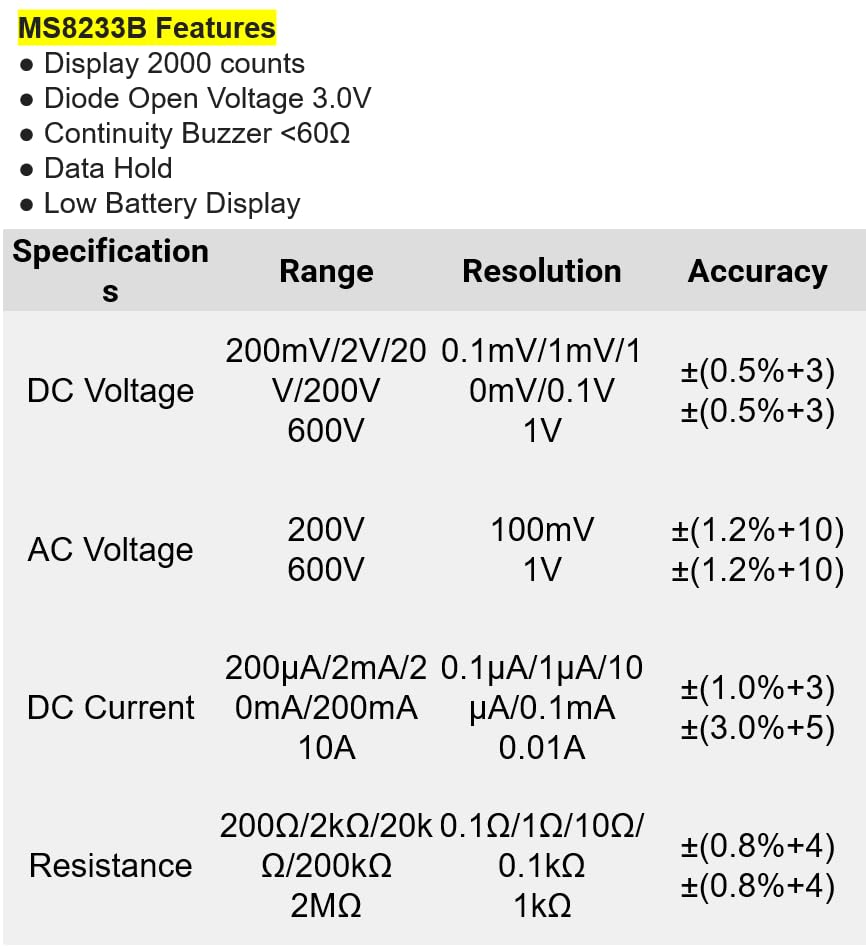
الشكل 8.1: Detailed specifications for the Mastech MS8233B, including ranges, resolutions, and accuracies for various measurements.
| مواصفة | قيمة |
|---|---|
| عرض | 2000 عدد |
| جهد فتح الصمام الثنائيtage | 3.0 فولت |
| الاستمرارية الجرس | <60 درجة |
| الاحتفاظ بالبيانات | نعم |
| انخفاض عرض البطارية | نعم |
| المجلد العاصمةtage المدى | 200 مللي فولت، 2 فولت، 20 فولت، 200 فولت، 600 فولت |
| المجلد ACtage المدى | 200 فولت، 600 فولت |
| نطاق التيار المستمر | 200µA, 2mA, 20mA, 200mA, 10A |
| مدى المقاومة | 200Ω, 2kΩ, 20kΩ, 200kΩ, 2MΩ |
| تصنيف السلامة | CAT III 600 فولت |
| مصدر الطاقة | بطاريتان من نوع LR44 (مرفقتان) |
| أبعاد المنتج | 20 × 15 × 25 سم |
| وزن العنصر | 1 كيلوجرام |
| الشركة المصنعة | MASTECH |
| رقم موديل العنصر | YQ-MS8233B |
| بلد المنشأ | تايوان |

الشكل 8.2: A comparison table showing features across various Mastech digital multimeter models, including the MS8233B.
9. الضمان والدعم
For warranty information, technical support, or service inquiries, please refer to the documentation provided with your purchase or contact your retailer. Keep your purchase receipt as proof of purchase for any warranty claims.


