مقدمة
This user manual provides comprehensive instructions for the installation, operation, and maintenance of your Kolink Unity Arena Mid-Tower PC Case. Please read this manual carefully before beginning assembly to ensure proper setup and to maximize the performance and longevity of your system. Keep this manual for future reference.
المنتج انتهىview
The Kolink Unity Arena is a mid-tower PC case designed for high-performance gaming systems. It features a borderless glass side panel for an unobstructed view of internal components and comes with four pre-installed Kolink Umbra X ARGB/PWM fans for efficient cooling and customizable lighting. The spacious interior supports E-ATX motherboards and large graphics cards up to 420mm, including NVIDIA RTX 40 series. It also accommodates up to three radiators for advanced liquid cooling solutions and includes a dedicated half PSU shroud for clean cable management.

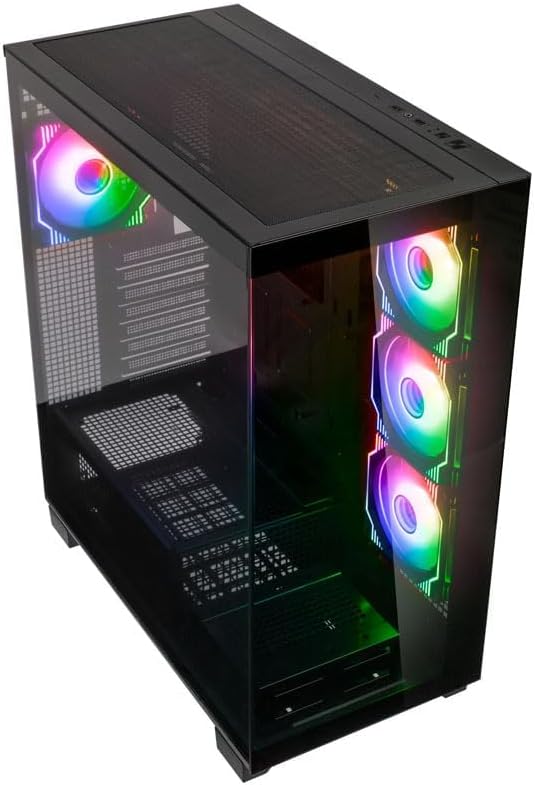
صورة: اليسار الأمامي view of the Kolink Unity Arena PC case, showcasing the borderless glass side panel and three pre-installed RGB fans on the front.
- تصميم البرج المتوسط: Optimized for a balance of size and component compatibility.
- Borderless Glass Panels: Provides an uninterrupted view of your internal hardware.
- Extensive Hardware Support: Compatible with E-ATX motherboards and GPUs up to 420mm, including NVIDIA RTX 40 series.
- التبريد المتقدم: Supports up to three radiators and includes four pre-installed Kolink Umbra X ARGB/PWM fans.
- غطاء PSU مخصص: A half power supply shroud helps maintain a clean and organized interior.
تحديد
| ماركة | كولينك |
| اسم الموديل | Unity Arena |
| رقم الموديل | UNITYARENABLK |
| لون | أسود |
| نوع الحالة | البرج الاوسط |
| مادة | سبائك الفولاذ |
| التوافق مع اللوحة الأم | تمديد ATX |
| المميزات الخاصة | RGB Lighting, Pre-installed Fans |
| الأجهزة المتوافقة | High-performance gaming components |
| الاستخدامات الموصى بها | الألعاب |
| نوع تركيب مصدر الطاقة | التركيب السفلي |
| طريقة التبريد | هواء |
| حجم المروحة | 120 مليمتر |
الإعداد والتثبيت
Follow these steps to properly set up and install your components into the Kolink Unity Arena PC case.
1. التفريغ والتحضير
- قم بإزالة علبة الكمبيوتر الشخصي من عبوتها بعناية.
- ضع العلبة على سطح ثابت ومستوٍ.
- Identify the accessory box, which contains screws, zip ties, and other small parts.
صورة: زاوية من أعلى إلى أمامي view of the Kolink Unity Arena PC case, highlighting the top ventilation and the illuminated RGB fans visible through the front glass panel.
2. Removing Panels
- Glass Side Panel: The borderless glass side panel is typically secured with thumbscrews at the rear. Unscrew these and carefully slide or lift the panel off. Place it on a soft, non-abrasive surface to prevent scratches.
- Solid Side Panel: The solid right-side panel (behind the motherboard tray) is also usually secured with thumbscrews. Remove these to access the cable management area.
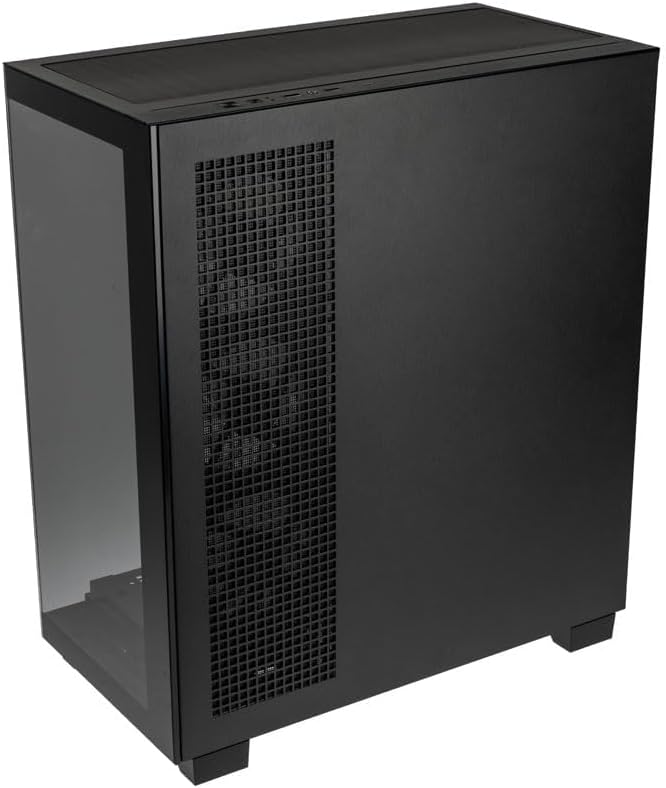
صورة: ورا يمين view of the Kolink Unity Arena PC case, showing the solid right side panel and the rear exhaust fan area.
3. تركيب اللوحة الأم
- Install the I/O shield (if not pre-attached to your motherboard).
- Align your E-ATX or smaller motherboard with the standoffs inside the case.
- قم بتثبيت اللوحة الأم باستخدام البراغي المناسبة من مجموعة الملحقات.

صورة: الداخلية view of the Kolink Unity Arena PC case from the front, displaying the motherboard tray, the three front-mounted fans, and the PSU shroud at the bottom.
4. تثبيت بطاقة الرسومات (GPU)
- قم بإزالة أغطية فتحة PCIe الضرورية الموجودة في الجزء الخلفي من العلبة.
- أدخل بطاقة الرسومات الخاصة بك في فتحة PCIe الرئيسية على اللوحة الأم.
- ثبّت وحدة معالجة الرسومات (GPU) باستخدام البراغي. يدعم هذا الهيكل وحدات معالجة الرسومات التي يصل طولها إلى 420 مم.
5. تركيب أجهزة التخزين (HDDs/SSDs)
Refer to the case's internal layout for specific drive bay locations and mounting mechanisms. Typically, 2.5" SSDs mount on the back of the motherboard tray, and 3.5" HDDs are installed in a drive cage near the PSU shroud.
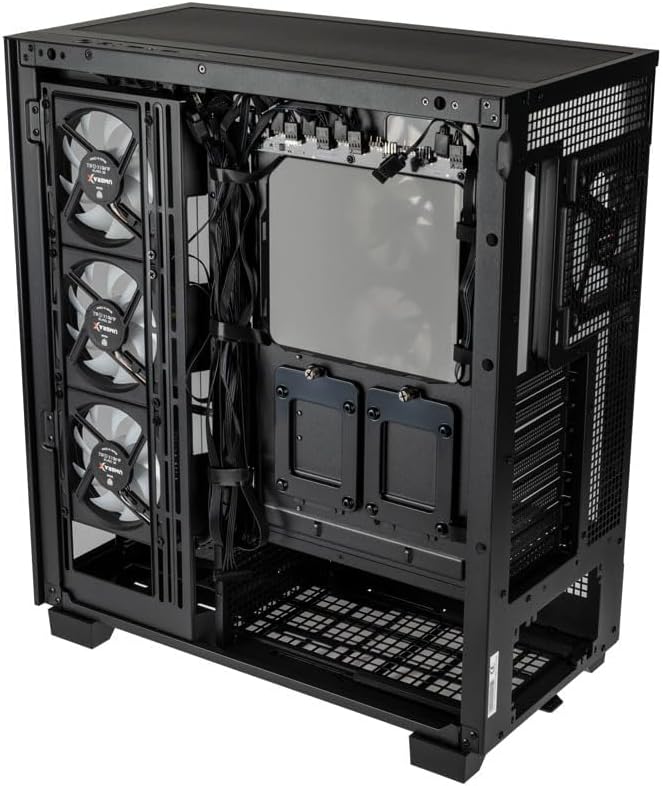
صورة: الجزء الداخلي الخلفي view of the Kolink Unity Arena PC case, focusing on the cable management area behind the motherboard tray and drive mounts.
6. تركيب وحدة إمداد الطاقة (PSU)
- Mount your ATX power supply into the dedicated half PSU shroud at the bottom rear of the case.
- قم بتثبيته بالمسامير من الجزء الخلفي من العلبة.
7. تركيب المروحة والرادياتير
- The case comes with four pre-installed Kolink Umbra X ARGB/PWM fans.
- Additional fans or radiators can be installed at the top, front, or rear depending on your cooling needs. The case supports up to three radiators.

صورة: Close-up of the three pre-installed Kolink Umbra X fans mounted at the front of the Kolink Unity Arena PC case, highlighting their design.
8. توصيل منافذ الإدخال/الإخراج الأمامية
قم بتوصيل كابلات اللوحة الأمامية (USB، الصوت، مفتاح الطاقة، مفتاح إعادة التشغيل، مؤشرات LED) بالمنافذ المناسبة على اللوحة الأم. راجع دليل اللوحة الأم لمعرفة مواقع المنافذ بالتحديد.

صورة: Close-up of the top I/O panel of the Kolink Unity Arena PC case, featuring USB ports, audio jacks, and power/reset buttons.
9. إدارة الكابلات
استخدم فتحات توجيه الكابلات ونقاط التثبيت خلف لوحة الأم لتنظيم الكابلات. هذا يحسن تدفق الهواء والمظهر العام.
تعليمات التشغيل
تشغيل الطاقة
Once all components are installed and connected, ensure the power supply switch is in the 'ON' position. Press the power button on the front I/O panel to start your system.
رغب التحكم في الإضاءة
The pre-installed Kolink Umbra X fans feature ARGB lighting. The case includes a built-in controller with a SATA power input. Connect this controller to your power supply. If your motherboard does not support ARGB control, you can typically manage the lighting effects using the reset button on the front I/O panel, which often doubles as an RGB mode switch when connected to the case's controller.
صيانة
تساعد الصيانة المنتظمة على ضمان الأداء الأمثل وإطالة عمر مكونات جهاز الكمبيوتر الخاص بك.
- فلاتر الغبار: The Kolink Unity Arena case is equipped with dust filters. Periodically remove and clean these filters (e.g., top, front, bottom) to prevent dust buildup inside the case. Use compressed air or wash them gently with water and allow them to dry completely before reinstallation.
- التنظيف الداخلي: With the system powered off and unplugged, carefully open the side panels and use compressed air to remove dust from internal components, especially heatsinks and fan blades.
- تنظيف المروحة: Gently clean the blades of the pre-installed fans with a soft brush or compressed air to maintain efficient airflow.
استكشاف الأخطاء وإصلاحها
إذا واجهت مشاكل أثناء التجميع أو بعده، فضع في اعتبارك خطوات استكشاف الأخطاء وإصلاحها الشائعة التالية:
- النظام لا يعمل:
- تأكد من توصيل كابل الطاقة بشكل آمن بكل من وحدة تزويد الطاقة ومأخذ الحائط.
- تأكد من أن مفتاح PSU في وضع التشغيل.
- Check all power connections to the motherboard (24-pin ATX, 8-pin CPU) and GPU.
- Confirm the front panel power switch cable is correctly connected to the motherboard header.
- المراوح لا تدور / إضاءة RGB لا تعمل:
- تحقق من توصيلات الطاقة الخاصة بالمروحة باللوحة الأم أو وحدة التحكم بالمروحة.
- Ensure ARGB cables are properly connected to the motherboard's ARGB header or the case's integrated controller.
- If using the case's controller, verify it is receiving SATA power.
- لا يوجد إخراج للعرض:
- Ensure your monitor cable is connected to the graphics card, not the motherboard's integrated graphics port (unless you are using integrated graphics).
- أعد تركيب بطاقة الرسومات في فتحة PCIe الخاصة بها.
- Check GPU power connections.
الضمان والدعم
For warranty information, please refer to the documentation provided with your purchase or contact your retailer. Kolink's official website may also provide details regarding product support and warranty terms.
- توفر قطع الغيار: المعلومات غير متوفرة.
- تحديثات البرامج مضمونة حتى: المعلومات غير متوفرة.
For technical assistance or further inquiries, please visit the official Kolink support webالموقع أو الاتصال بقسم خدمة العملاء.


