1. المقدمة
This manual provides detailed instructions for the installation, configuration, and operation of your Hikvision DS-7104HGHI-K1 4-Channel Digital Video Recorder (DVR). Please read this manual thoroughly before using the product to ensure correct and safe operation. Keep this manual for future reference.
2. انتهى المنتجview والميزات
The Hikvision DS-7104HGHI-K1 is a 4-channel 1080p Lite DVR designed for reliable surveillance recording. It supports various camera types and features advanced video compression technology.

الشكل 2.1: قمة view of the Hikvision DS-7104HGHI-K1 DVR, showing its compact design and branding.
المميزات الرئيسية:
- 4-Channel Video Input: Supports up to 4 analog cameras.
- 1080p Lite Recording: Provides high-definition recording at 1080p Lite resolution.
- ضغط H.265+: Advanced video compression technology for efficient storage and reduced bandwidth usage.
- Multi-format Input: Compatible with HDTVI, AHD, CVI, CVBS, and up to 5 IP camera inputs (up to 2MP).
- مخرج HDMI/VGA: للمراقبة المحلية.
- الوصول عن بعد: يدعم التحكم عن بعد viewing via Hik-Connect app.

الشكل 2.2: الامامي والخلفي views of the Hikvision DVR, highlighting various ports and connectivity options, along with icons representing H.265 Pro, Mobile access, 5-in-1 compatibility, and IP/Analog XVR capabilities.
H.265+ Compression Benefits:
H.265+ compression significantly reduces the required storage space and bandwidth compared to older compression standards like H.264, without compromising video quality.

الشكل 2.3: A bar graph illustrating the reduction in 24-hour recording file size (GB) when using H.265+ compression compared to H.264 and H.265, showing up to an 83% gap in storage requirements.
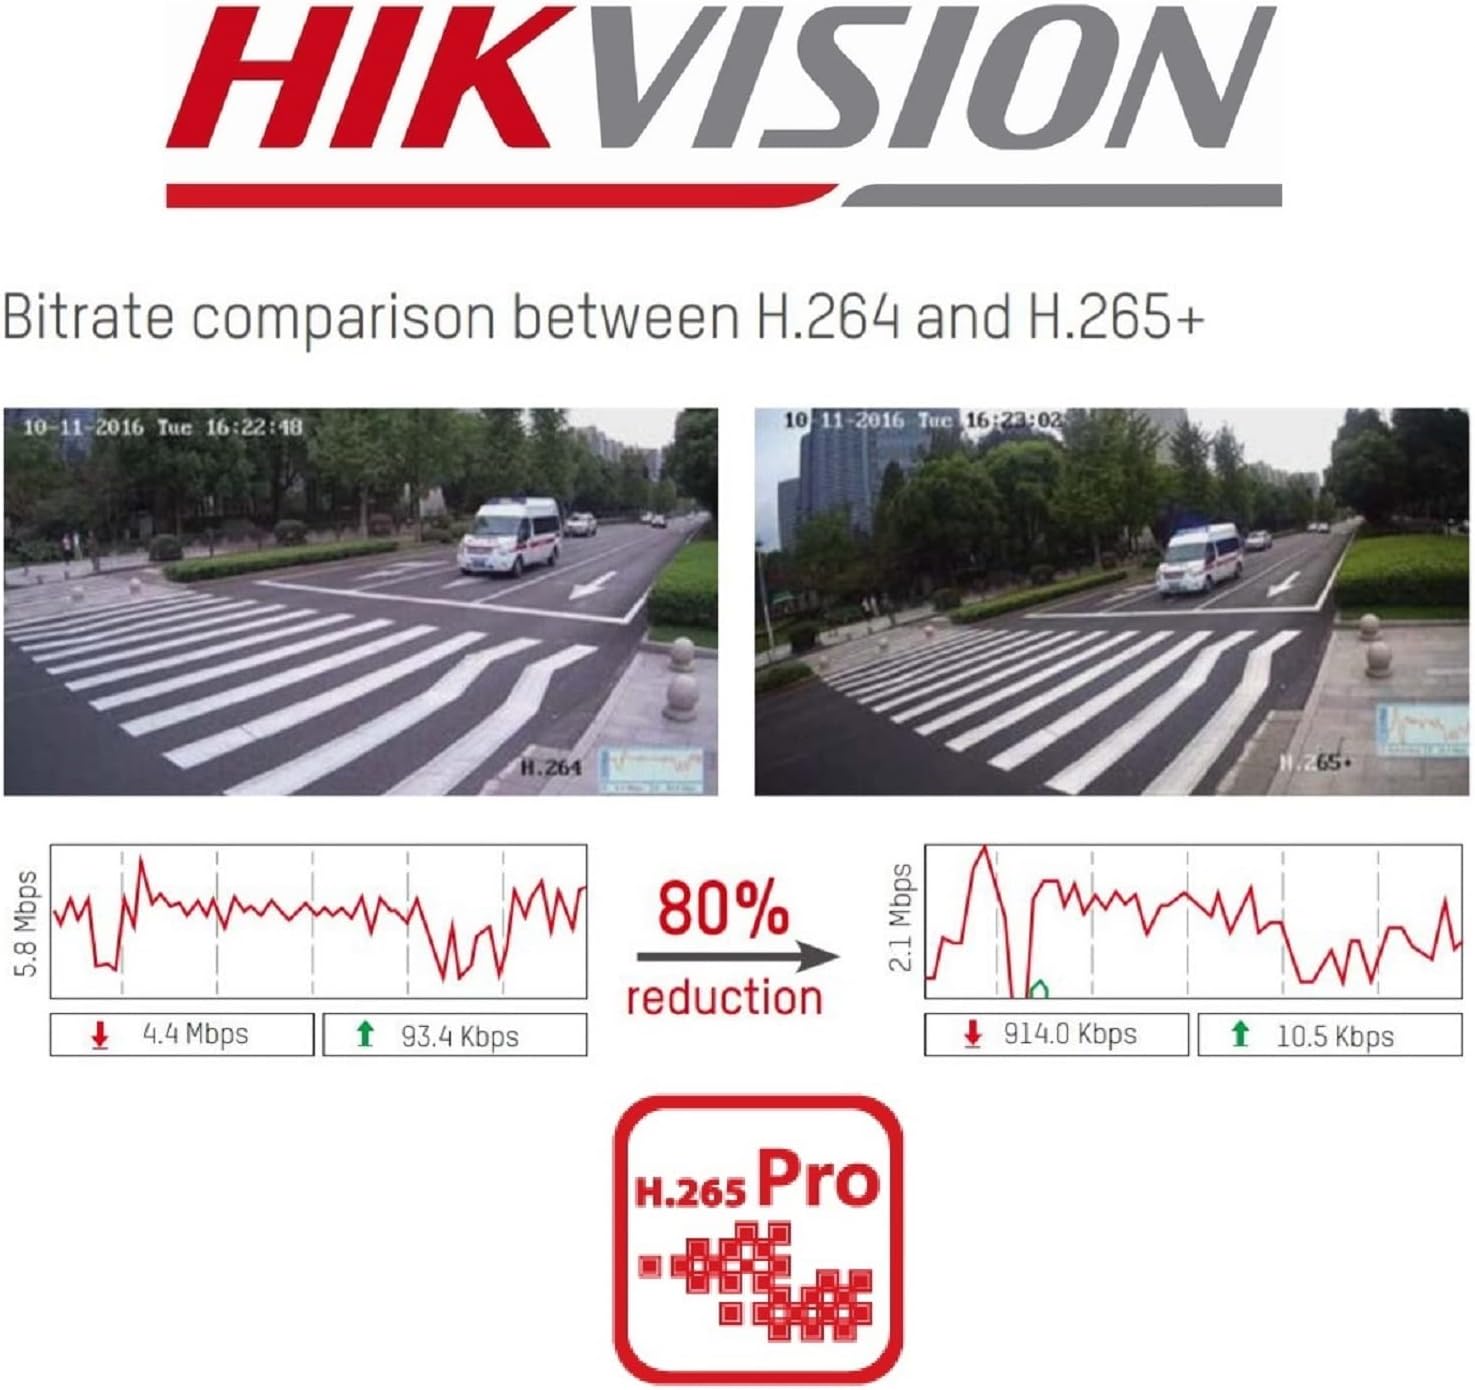
الشكل 2.4: A visual comparison of bitrate usage between H.264 and H.265+ compression, demonstrating an 80% reduction in bitrate with H.265+ while maintaining similar video quality in sample surveillance footage.
3. محتويات العبوة
تأكد من وجود جميع العناصر في الحزمة الخاصة بك:
- Hikvision DS-7104HGHI-K1 DVR Unit
- محول الطاقة
- ماوس USB
- كابلات SATA (لتوصيل القرص الصلب)
- دليل البدء السريع
- Note: Hard drive is not included and must be purchased separately.
4. معلومات السلامة
- Ensure the power supply matches the DVR's requirements.
- Do not expose the DVR to water or moisture.
- Avoid placing the DVR in direct sunlight or near heat sources.
- تأكد من التهوية المناسبة لمنع ارتفاع درجة الحرارة.
- استخدم فقط الملحقات المحددة من قبل الشركة المصنعة.
5. الإعداد
5.1 تركيب الأجهزة
- Hard Drive Installation (HDD not included):
- قم بفك وإزالة الغطاء العلوي لجهاز التسجيل الرقمي.
- Connect the SATA power and data cables from the DVR to the hard drive.
- Secure the hard drive inside the DVR using the provided screws.
- أعد تركيب الغطاء العلوي وثبته بالمسامير.
- ربط الكاميرات: Connect your analog cameras to the BNC video input ports on the rear panel of the DVR.
- توصيل الشاشة: قم بتوصيل شاشة بمنفذ إخراج HDMI أو VGA.
- ربط الشبكة: قم بتوصيل كابل إيثرنت من منفذ LAN الخاص بجهاز التسجيل الرقمي (DVR) إلى جهاز التوجيه أو محول الشبكة.
- قم بتوصيل فأرة USB: قم بتوصيل فأرة USB بمنفذ USB الموجود على جهاز التسجيل الرقمي (DVR).
- تشغيل الطاقة: قم بتوصيل محول الطاقة بجهاز التسجيل الرقمي ثم بمأخذ كهربائي. سيتم تشغيل جهاز التسجيل الرقمي تلقائيًا.
5.2 التكوين الأولي
- First-Time Startup: Upon first boot, the DVR will guide you through a setup wizard.
- ضبط كلمة السر: Create a strong password for the admin user. This is crucial for security.
- إعدادات الشبكة: قم بضبط إعدادات الشبكة (عادةً ما يكون بروتوكول DHCP كافيًا لمعظم الشبكات المنزلية).
- تهيئة القرص الصلب: The DVR will prompt you to initialize the newly installed hard drive. This step is necessary for recording.
- التاريخ والوقت: اضبط التاريخ والوقت الصحيحين.
6. التشغيل
6.1 مباشر View
بعد الإعداد الأولي، سيعرض جهاز التسجيل الرقمي البث المباشر view from connected cameras on the monitor. You can switch between single-camera view وشبكة متعددة الكاميرات view باستخدام عناصر التحكم التي تظهر على الشاشة أو الماوس.
6.2 التسجيل
The DVR is typically configured to record continuously by default once the HDD is initialized. You can customize recording schedules, motion detection recording, and alarm recording settings through the DVR's menu:
- اذهب الى القائمة > تسجيل > جدولة to adjust recording times.
- اذهب الى القائمة > الإنذار > كشف الحركة to configure motion-triggered recording.
6.3 التشغيل
ل view تم تسجيل فوtage:
- اذهب الى القائمة > التشغيل.
- حدد الكاميرا (الكاميرات) ونطاق التاريخ/الوقت الذي ترغب في إعادة تسجيلهview.
- استخدم عناصر التحكم في التشغيل (تشغيل، إيقاف مؤقت، تقديم سريع، ترجيع) للتنقل بين مقاطع الفيديوtage.
6.4 الوصول عن بعد (Hik-Connect)
The Hik-Connect app allows you to view يعيش فوtage, play back recordings, and receive alerts on your smartphone or tablet from anywhere with an internet connection.

الشكل 6.1: The Hik-Connect application icon alongside a smartphone displaying a multi-camera live view, illustrating the remote monitoring capabilities of the DVR system.
- Download the Hik-Connect app from your device's app store.
- Create a Hik-Connect account.
- Add your DVR to the app by scanning the QR code on the DVR or manually entering its serial number.
- Ensure your DVR is connected to the internet and Hik-Connect service is enabled in the DVR's network settings.
7. الصيانة
- التنظيف المنتظم: Keep the DVR free from dust. Use a soft, dry cloth for cleaning.
- تحديثات البرامج الثابتة: تحقق بشكل دوري من موقع هيكفيجن الرسمي webموقع للحصول على تحديثات البرامج الثابتة لضمان الأداء والأمان الأمثل.
- النسخ الاحتياطي للبيانات: Regularly back up important recordings to an external storage device.
- أمان كلمة المرور: Change your DVR password periodically to enhance security.
8. استكشاف الأخطاء وإصلاحها
- لا يوجد مخرج فيديو:
- تحقق من توصيلات كابل HDMI/VGA.
- تأكد من تشغيل الشاشة وضبطها على الإدخال الصحيح.
- لا تسجيل:
- Verify that a hard drive is installed and initialized.
- Check recording schedules and ensure they are active.
- Ensure cameras are properly connected and functioning.
- لا يمكن الوصول عن بُعد:
- Ensure the DVR is connected to the internet.
- Check network settings and Hik-Connect status on the DVR.
- Verify your Hik-Connect account and device binding in the app.
- DVR Unresponsive:
- Restart the DVR by disconnecting and reconnecting the power.
- If issues persist, consider a factory reset (note: this will erase configurations).
9. المواصفات
| ميزة | التفاصيل |
|---|---|
| رقم الموديل | DS-7104HGHI-K1 |
| مدخل الفيديو | 4-channel BNC (HDTVI/AHD/CVI/CVBS) + up to 5 IP channels (up to 2MP) |
| ضغط الفيديو | H.265 Pro+/H.265+/H.265/H.264+/H.264 |
| قرار الترميز | 1080p Lite @ 25/30 fps |
| مخرج الفيديو | 1 HDMI, 1 VGA (simultaneous output) |
| مدخل الصوت | 1 قناة RCA |
| مخرج الصوت | 1 قناة RCA |
| دعم القرص الصلب | واجهة SATA واحدة، بسعة تصل إلى 4 تيرابايت |
| واجهة الشبكة | واجهة إيثرنت ذاتية التكيف RJ45 بسرعة 10/100 ميجابت في الثانية |
| واجهة USB | 2 واجهات USB 2.0 |
| الأبعاد (الطول × العرض × الارتفاع) | 20 × 20 × 4.5 سم |
| وزن | 1.01 كجم (بدون محرك الأقراص الثابتة) |
10. الضمان والدعم
للحصول على معلومات الضمان والدعم الفني، يرجى الرجوع إلى موقع هيكفيجن الرسمي. website or contact your authorized Hikvision dealer. Keep your purchase receipt as proof of purchase.


