1. المقدمة
Thank you for choosing the ETA Falco Smart Robot Vacuum Cleaner with Mopping Function. This manual provides essential information for the safe and efficient operation, maintenance, and troubleshooting of your device. Please read this manual thoroughly before using the product and keep it for future reference.
معلومات هامة حول السلامة
- Always ensure the robot is placed on a stable, level surface.
- احفظ الجهاز بعيدًا عن الماء والرطوبة.
- لا تسمح للأطفال أو الأشخاص غير المصرح لهم بتشغيل الروبوت.
- Use only the original charging adapter and accessories provided.
- Before cleaning or maintenance, ensure the robot is powered off and unplugged from the charging station.
- Avoid operating the robot near open flames or flammable materials.
2. انتهى المنتجview
المكونات والضوابط
Familiarize yourself with the main parts and controls of your ETA Falco Smart robot vacuum cleaner.
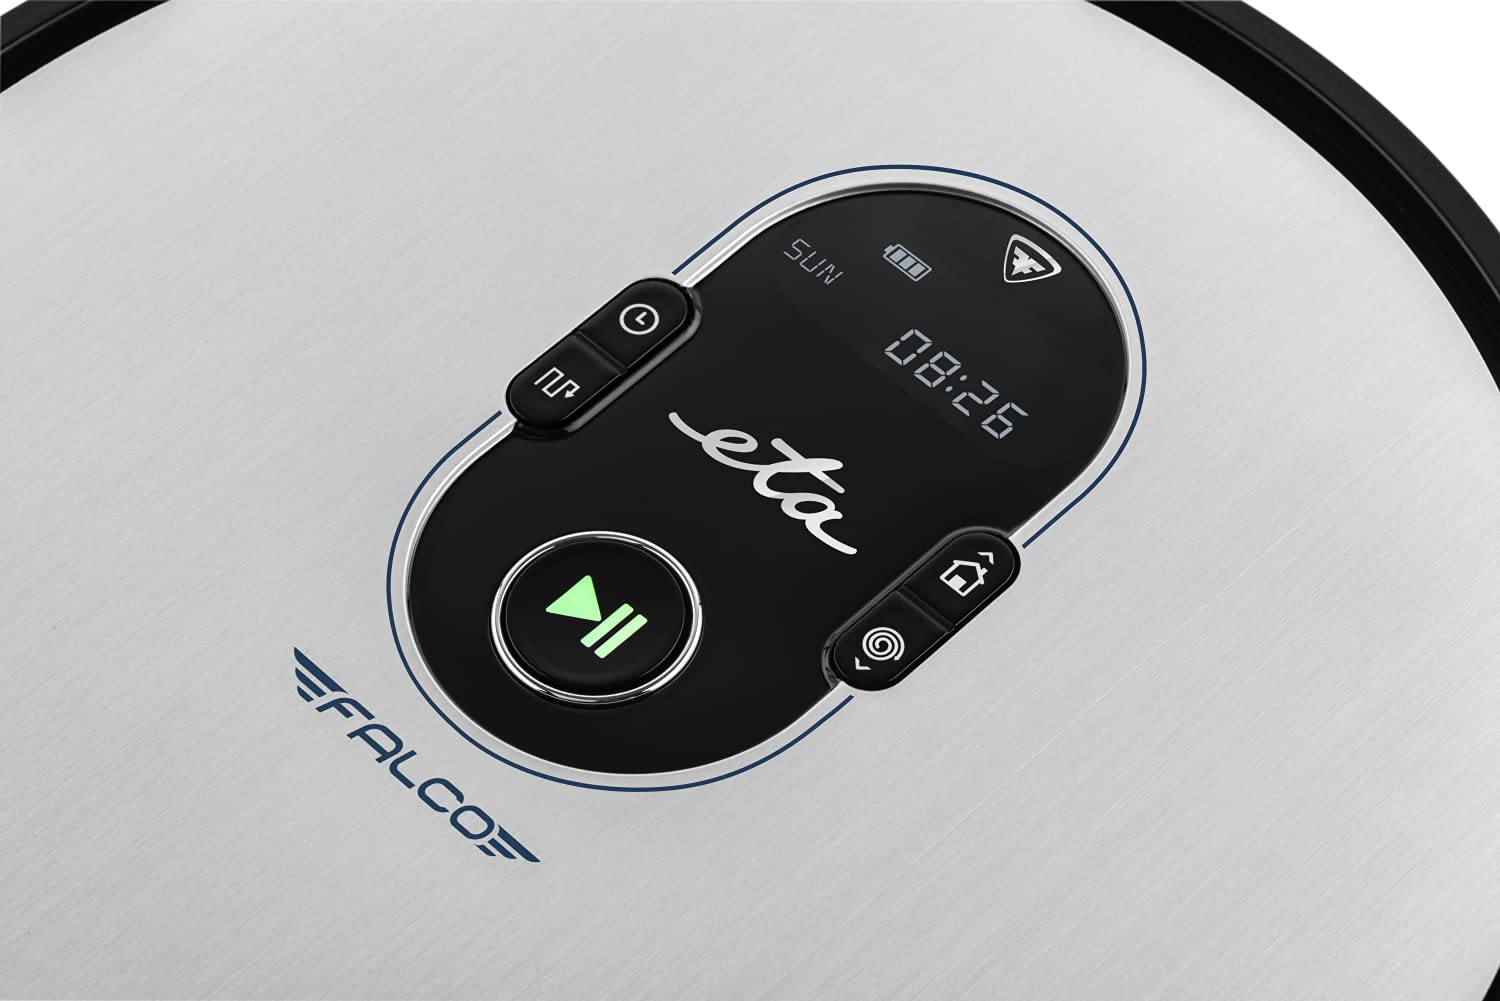
الصورة 2.1: Top panel controls. This image shows the main control panel on the top of the robot, including buttons for power, scheduling, and return to charging station, along with a digital display.

الصورة 2.2: الجانب السفلي view. This image displays the bottom of the robot, highlighting the main brush, two side brushes, and the mop attachment.

الصورة 2.3: Underside diagram. This diagram labels the key components on the robot's underside, including the side brushes, main brush, and mop attachment.
3. محتويات العبوة
عند تفريغ الأمتعة، يرجى التأكد من وجود جميع العناصر التالية:
- ETA Falco Smart Robot Vacuum Cleaner
- محطة شحن
- محول الشحن
- جهاز التحكم عن بعد
- 2x Spare Side Brushes
- Special Rotary and Lamella Brush
- 2x Cleaning Cloths (Mop Pads)
- فلتر HEPA احتياطي
- Mop Attachment with 300 ml Water Tank
- الجدار الافتراضي
4. الإعداد
4.1 الشحن الأولي
- ضع محطة الشحن على الحائط في منطقة مفتوحة، مع التأكد من عدم وجود عوائق في نطاق متر واحد على الجانبين ومترين في الأمام.
- Connect the charging adapter to the charging station and plug it into a power outlet.
- Place the robot vacuum cleaner on the charging station. Ensure the charging contacts align. The robot will begin charging automatically. A full charge takes approximately 5 hours.
4.2 تركيب الفرش الجانبية
Attach the side brushes to the designated posts on the underside of the robot by pressing them down until they click into place. Ensure the 'L' and 'R' markings on the brushes match the corresponding markings on the robot.
4.3 Connecting to the ETA SMART App
The ETA SMART app enhances the functionality of your robot. Download the app from your smartphone's app store. Follow the in-app instructions to connect your robot to your home Wi-Fi network and pair it with the app.
4.4 Setting up the Virtual Wall
The virtual wall creates an invisible barrier to restrict the robot's access to certain areas. Place the virtual wall device on the floor where you want to create a boundary. Ensure the infrared beam is directed towards the area you wish to block. The robot will detect this beam and avoid crossing it.

الصورة 4.1: Robot with charging station and virtual wall. This image shows the robot positioned near its charging station, with a virtual wall device placed nearby to illustrate its function.
5. تعليمات التشغيل
5.1 أوضاع التنظيف
The ETA Falco Smart offers four distinct cleaning modes:
- ذكي: General cleaning mode for optimal coverage.
- كلاسيكي: Standard cleaning pattern.
- حافة: تنظيف على طول الجدران وحواف الأثاث.
- بقعة: Concentrated cleaning in a specific area.
You can select these modes via the ETA SMART app or the remote control.
5.2 جدولة التنظيف
Use the ETA SMART app to set a cleaning schedule for your robot. You can program specific times and days for the robot to automatically start cleaning.
5.3 التحكم اليدوي
You can manually control the robot's movement and functions using the remote control or the ETA SMART app. The app also allows you to monitor cleaning activity, battery charge, and view cleaning routes.

الصورة 5.1: ETA Smart App features. This image displays the ETA Smart App interface on a smartphone, highlighting features such as remote control, cleaning history, activity monitoring, battery status, cleaning modes (SMART, CLASSIC, EDGE, SPOT), cleaning schedule, mopping intensity control, and suction power adjustment.
5.4 وظيفة التنظيف
- Fill the 300 ml water tank with clean water. Do not use detergents or cleaning solutions that are not approved for robot vacuums.
- Attach a clean mop pad to the mop attachment.
- Slide the mop attachment into the designated slot on the underside of the robot.
- ابدأ دورة التنظيف. سيقوم الروبوت بالتنظيف بالمكنسة الكهربائية والمسح في آن واحد.
6. الصيانة
تضمن الصيانة المنتظمة الأداء الأمثل وتطيل عمر مكنسة الروبوت الخاصة بك.
6.1 Cleaning the Dust Bin and Filter
- اضغط على زر تحرير حاوية الغبار وقم بإزالة سلة الغبار.
- افتح صندوق الغبار وأفرغ محتوياته في سلة المهملات.
- Remove the HEPA filter and primary filter. Tap them gently to remove dust. If washable, rinse under running water and allow to air dry completely before reinserting.
- Wipe the inside of the dust bin with a dry cloth.
- Reassemble the filters and dust bin, then reinsert into the robot.
6.2 تنظيف الفرشاة الرئيسية
- اقلب الروبوت.
- قم بإزالة غطاء الفرشاة الرئيسي بالضغط على ألسنة التحرير.
- ارفع الفرشاة الرئيسية.
- Use the cleaning tool (if provided) or scissors to remove hair and debris tangled around the brush.
- Clean the brush compartment.
- أعد إدخال الفرشاة الرئيسية وثبت الغطاء.
6.3 تنظيف الفرش الجانبية
Periodically check the side brushes for tangled hair or debris. If necessary, remove them by gently pulling upwards and clean them. Replace worn or damaged brushes with the spare ones provided.
6.4 تنظيف وسادة الممسحة وخزان المياه
After each mopping session, remove the mop pad and wash it thoroughly. Empty any remaining water from the water tank and rinse it. Allow both to air dry completely before storing or reusing.
6.5 تنظيف أجهزة الاستشعار
Wipe the anti-drop sensors, bumper sensors, and charging contacts on the robot and charging station with a clean, dry cloth to ensure proper function.
7. استكشاف الأخطاء وإصلاحها
إذا واجهت مكنسة الروبوت الخاصة بك مشكلة، فراجع المشاكل والحلول الشائعة التالية:
| مشكلة | السبب المحتمل | حل |
|---|---|---|
| الروبوت لا يعمل | بطارية منخفضة؛ قم بإيقاف تشغيل الطاقة | اشحن الروبوت؛ تأكد من أن مفتاح الطاقة في وضع التشغيل. |
| الروبوت لا يشحن | Charging contacts dirty; Charging station unplugged | نظّف نقاط التلامس الخاصة بالشحن؛ وتأكد من توصيل محطة الشحن بالكهرباء. |
| أداء التنظيف الضعيف | سلة المهملات ممتلئة؛ الفرش متشابكة؛ الفلتر مسدود | أفرغ حاوية الغبار؛ نظف الفرش؛ نظف/استبدل الفلتر |
| الروبوت يتعطل بشكل متكرر | عوائق على الأرض؛ أجهزة استشعار متسخة | Clear floor of cables/small items; Clean sensors |
| Virtual wall not working | Virtual wall batteries low; Incorrect placement | Replace batteries; Adjust virtual wall position |
إذا استمرت المشكلة بعد تجربة هذه الحلول، فيرجى الاتصال بدعم العملاء.
8. المواصفات
Technical specifications for the ETA Falco Smart Robot Vacuum Cleaner (Model ETA251590000):
| ميزة | التفاصيل |
|---|---|
| الشركة المصنعة | الوقت المتوقع للوصول |
| أبعاد المنتج (الطول × العرض × الارتفاع) | 32.5 × 33.5 × 7.5 سم |
| وزن | 250 جرام |
| رقم موديل العنصر | ETA251590000 (T2261) |
| لون الموديل | أزرق |
| مادة | بلاستيك |
| نوع الطاقة | تعمل بالبطارية |
| المجلدtage | 3 Volts (14.4V Li-ion battery, 2400 mAh) |
| عدد العناصر في العبوة | 1 |
| المميزات الخاصة | Pet brush compatibility, Smart App control, Floating brush system, HEPA filter, Virtual wall |
| المكونات المضمنة | Battery, Filter, Charging station, Adapter, Remote control, Side brushes, Rotary brush, Cleaning cloths, Mop attachment, Virtual wall |
| تكوين البطارية | ليثيوم أيون |
| عمر البطارية | حتى 120 دقيقة |
| وقت الشحن | حوالي 5 ساعات |
| توصية السطح | صفح |
| نوع وحدة التحكم | التحكم في التطبيق |
| توافر قطع الغيار | معلومات غير متوفرة عن قطع الغيار |
9. الضمان والدعم
For warranty information, product support, or to inquire about spare parts, please refer to the warranty card included with your purchase or visit the official ETA webالموقع. احتفظ بإثبات الشراء الخاص بك لتقديم مطالبات الضمان.


