مقدمة
This user manual provides detailed instructions for the installation, operation, and maintenance of your CREATE WINDCALM Ceiling Fan. Please read this manual thoroughly before installation and use to ensure safe and efficient operation.
معلومات السلامة
Always disconnect power at the main circuit breaker before installing, cleaning, or performing any maintenance on the ceiling fan. Ensure all electrical connections comply with local codes and ordinances. If you are unsure about any part of the installation, consult a qualified electrician.
WARNING: To reduce the risk of electric shock, ensure the electricity has been turned off at the circuit breaker or fuse box before beginning.
محتويات الحزمة
Before beginning installation, check that all components listed below are present and undamaged:
- تزايد شريحة
- سائق
- جهاز التحكم عن بعد
- LED Plate (for models with light)
- غلاف المحرك
- شفرات المروحة (3x)
- Screws for Mounting Bracket + Motor
- Screws for Decorative Element + Motor
- محطة كتلة
- مجموعة موازنة
- غطاء زخرفي
- مسامير للغطاء
- Coupling for Cover
- Extension Screws (for concrete ceilings)
- Wood Screws (for wooden ceilings)

الشكل 1: انتهىview من جميع المكونات المضمنة في الحزمة.
دليل التثبيت
Follow these steps carefully to install your CREATE WINDCALM Ceiling Fan. For a visual guide, please watch the comprehensive installation video below, followed by detailed step-by-step instructions and images.
Video: Detailed installation steps for the CREATE WINDCALM Ceiling Fan.
الخطوة 1: تركيب القوس
Position the mounting bracket against the ceiling and mark the drilling points. Drill holes according to your ceiling type and secure the bracket firmly. Ensure no wires are pinched.
1.1 Wooden Ceiling Installation
- Mark drilling points.
- Drill pilot holes (approx. Ø6 mm).
- Secure the mounting bracket using wood screws.

Figure 2: Securing the mounting bracket to a wooden ceiling.
1.2 Concrete Ceiling Installation
- Mark drilling points.
- Drill holes (approx. Ø8 mm).
- Insert expansion bolts and secure the mounting bracket.

Figure 3: Securing the mounting bracket to a concrete ceiling.
1.3 False Ceiling Installation
- Mark and drill holes for toggle bolts (not included).
- Insert toggle bolts through the bracket and into the ceiling.
- Tighten toggle bolts to secure the mounting bracket.

Figure 4: Securing the mounting bracket to a false ceiling using toggle bolts.
Step 2: Driver and Electrical Connections
Connect the electrical wires from your home to the fan's driver unit. Ensure all connections are secure and insulated. Connect Live (L), Neutral (N), and Ground (Earth) wires from your home to the corresponding wires of the driver and fan support. Then connect the motor wires to the driver wires according to the color coding.
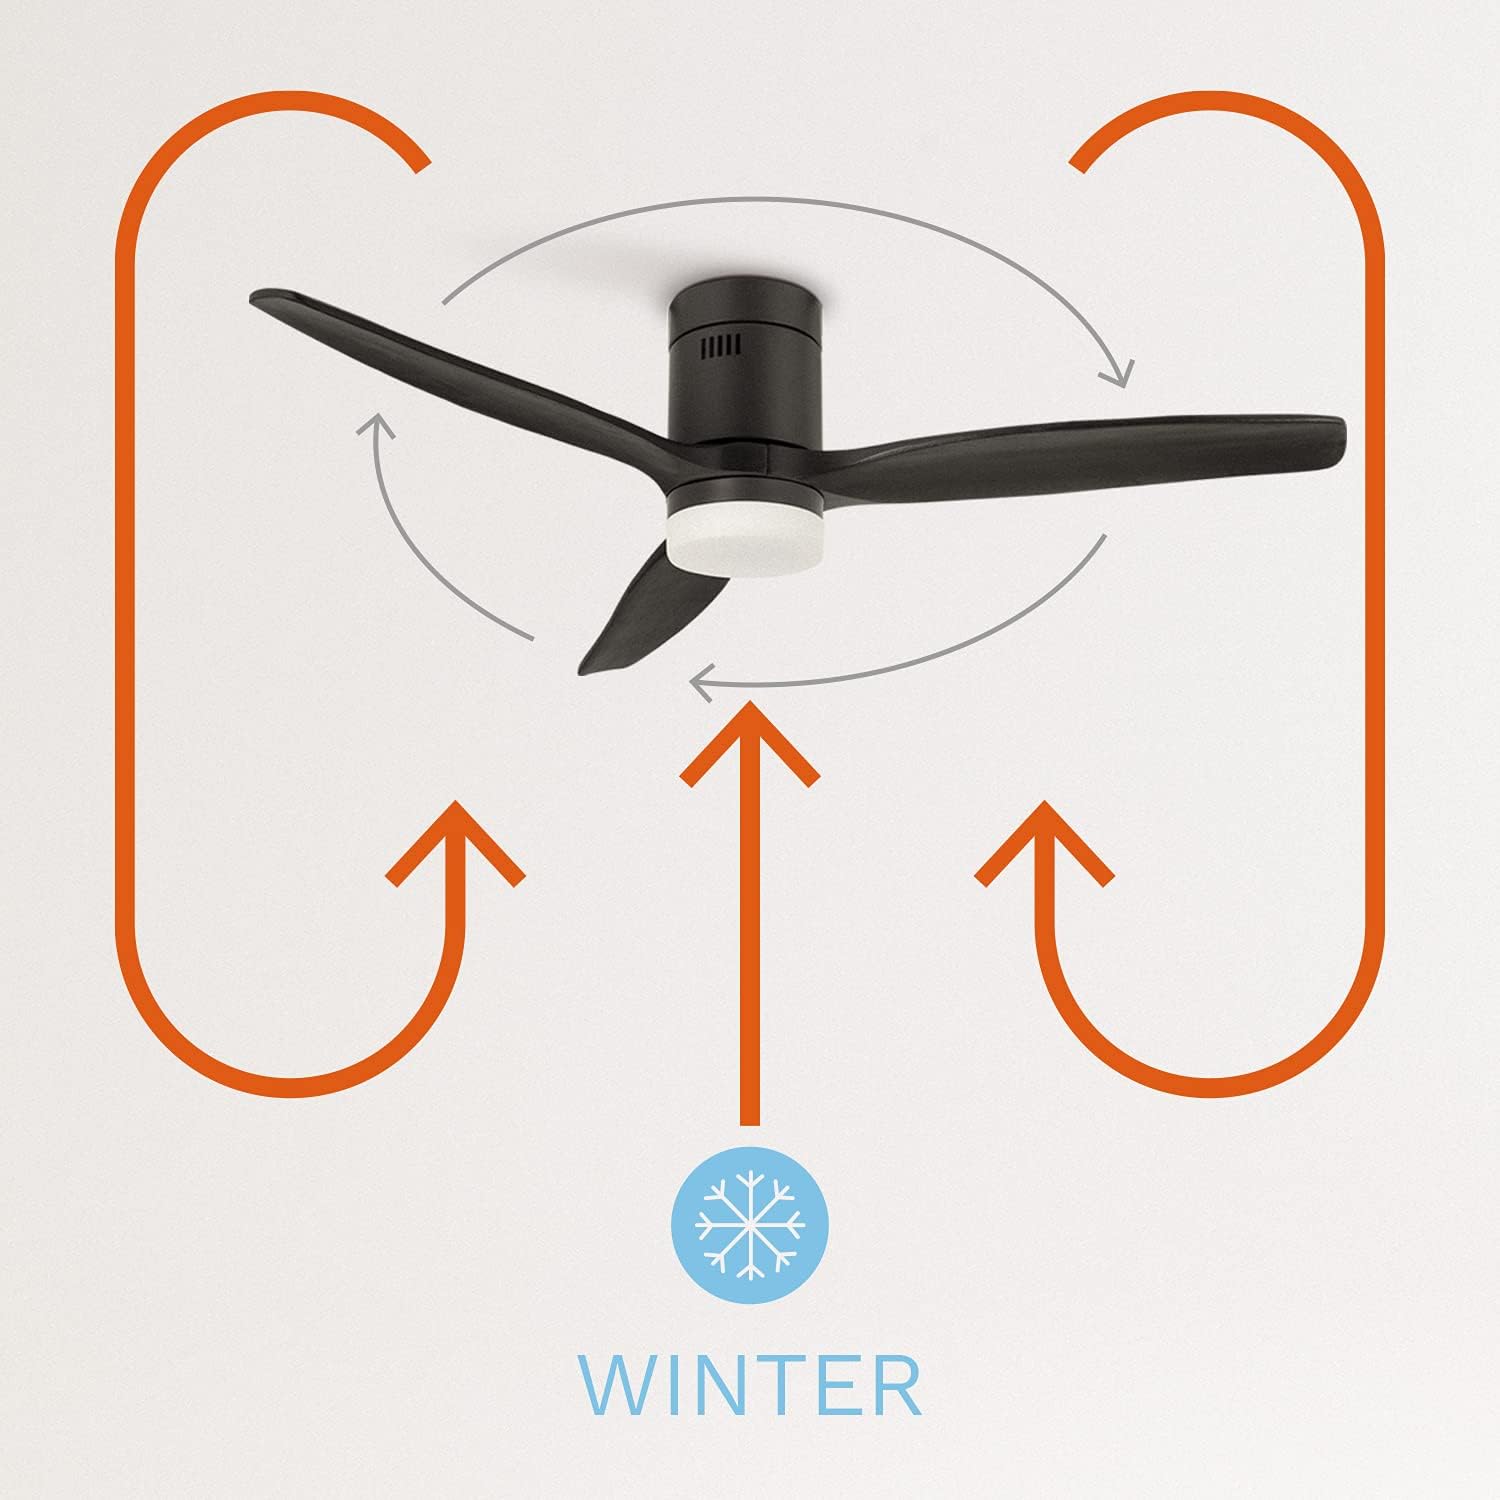
Figure 5: Wiring connections for the fan driver.
Step 3: Anchoring the Motor to the Ceiling
Carefully lift the fan motor assembly and align it with the mounting bracket. Secure the motor to the bracket using the provided screws.

Figure 6: Attaching the fan motor to the ceiling mounting bracket.
Step 4: Assembling the Fan Blades
Attach each fan blade to the motor housing using the provided screws. Do not overtighten the screws to allow for proper blade alignment.

Figure 7: Securing the fan blades to the motor.
Step 5: Placing the Decorative Element
Position the decorative element over the motor and secure it in place. This covers the internal wiring and provides a finished look.

Figure 8: Installing the decorative cover on the fan motor.
Step 6: LED Light Kit Connection (if applicable)
If your fan model includes an LED light kit, connect the LED plate wires to the corresponding wires from the fan motor. Ensure the connections are secure.

Figure 9: Connecting the LED light plate.
الخطوة 7: لampshade Placement (if applicable)
For models with an LED light, carefully attach the lampshade to the fan. Ensure it is securely fastened.

Figure 10: Attaching the lampshade to the fan.
تعليمات التشغيل
Your CREATE WINDCALM Ceiling Fan comes with a remote control and can also be controlled via Wi-Fi (for SMART models).
وظائف التحكم عن بعد
- تشغيل/إيقاف التشغيل: اضغط على زر الطاقة لتشغيل المروحة أو إيقاف تشغيلها.
- التحكم في السرعة: Adjust fan speed through 6 levels using the speed buttons.
- التحكم في الضوء: For models with light, switch between three color temperatures (warm, neutral, cool) using the light button. Note: Light intensity is not adjustable.
- المؤقت: Set the fan to turn off automatically after 1 to 4 hours.
- وضع الصيف/الشتاء:
- وضع الصيف: Changes the blade rotation direction to push cool air downwards, cooling the room.
- وضع الشتاء: Changes the blade rotation direction to distribute warm air accumulated near the ceiling evenly downwards.

Figure 11: Remote control and smartphone app interface for fan operation.

Figure 12: Diagram illustrating the fan's summer mode operation.

Figure 13: Diagram illustrating the fan's winter mode operation.
Wi-Fi / Smart Control (for SMART models)
If you have chosen the Wi-Fi option, you can control and program your fan using the CREATE app on your mobile phone. Refer to the app's instructions for pairing and advanced features.
صيانة
- تنظيف: To clean the fan, wipe it with a soft, damp قطعة قماش. لا تستخدم منظفات كاشطة أو مذيبات. تأكد من جفاف المروحة تمامًا قبل تشغيلها.
- موازنة الشفرة: If the fan wobbles, use the included balancing kit to correct the balance.
- الفحوصات الدورية: قم بفحص جميع البراغي والوصلات بشكل دوري للتأكد من أنها مثبتة بإحكام.
استكشاف الأخطاء وإصلاحها
| مشكلة | السبب المحتمل | حل |
|---|---|---|
| المروحة لا تبدأ | لا يوجد مصدر للطاقة؛ الأسلاك فضفاضة؛ بطارية جهاز التحكم عن بعد منخفضة. | التحقق من قاطع الدائرة؛ التحقق من جميع توصيلات الأسلاك؛ استبدال بطاريات جهاز التحكم عن بعد. |
| تذبذب المروحة | Loose blades; Unbalanced blades; Loose mounting bracket. | Tighten blade screws; Use balancing kit; Secure mounting bracket. |
| الضوء لا يعمل | Loose light kit connection; Faulty LED plate. | Check LED plate wiring; Contact customer support for replacement. |
| جهاز التحكم عن بعد لا يعمل | Battery low/dead; Remote not paired. | استبدل البطاريات؛ راجع تعليمات الاقتران عن بعد في الدليل الكامل. |
تحديد
| ميزة | قيمة |
|---|---|
| ماركة | يخلق |
| رقم الموديل | 82466_181215 |
| لون | أسود |
| أسلوب | مع الضوء |
| مصدر الطاقة | كهرباء سلكية |
| المجلدtage | 240 فولت |
| واتtage | 40 واط |
| سعة تدفق الهواء | 2.1E+2 Cubic Feet Per Minute |
| مستوى الضوضاء | 50 ديسيبل |
| طول الشفرة | 66 سنتيمتر |
| سرعة الدوران | 223 دورة في الدقيقة |
| قطر القطع | 132 سنتيمتر |
| ميزة خاصة | سرعة عالية |
| أبعاد المنتج | 132 عمق × 132 عرض × 31.5 ارتفاع سم |
| وزن العنصر | 7 كيلوغرام |

Figure 14: Energy efficiency label for the fan.

Figure 15: Product data sheet with detailed specifications.
الضمان والدعم
For warranty information, technical support, or any inquiries regarding your CREATE WINDCALM Ceiling Fan, please visit the official CREATE brand store or contact their customer service directly.
Official CREATE Store: Visit CREATE Store on Amazon


