1. المقدمة
The ATS BBPhotoPhone is an amplified speakerphone designed for ease of use, featuring large buttons and photo memory keys. It functions as a standalone telephone or as a dialer for an existing landline. This manual provides instructions for setup, operation, maintenance, and troubleshooting to ensure optimal performance of your device.
2. مواصفات المنتج
- 10 Memory Picture Keys: Allows for one or two-touch dialing using custom photos.
- 2-Way High-Level Speakerphone: Integrated speakerphone for hands-free communication.
- Speakerphone Volume Control: Slide control to adjust speakerphone audio level.
- Normal/One Touch Dialing Mode: Toggle switch to select preferred dialing method.
- Ringer Volume Switch: Adjustable ringer volume (Off, Low, High).
- Bright LED Indicators: Visual alerts for incoming calls (ringer LED) and in-use status.
- Phone Jack Powered: Operates without batteries or an AC adapter.
- نسخة إحتياطية للذاكرة: All programmed memories are retained.
- الوظائف الرئيسية: Includes Memory key, Redial/Pause key, Speakerphone key, and Music on Hold/Mute.
- جدار قابل للنقل: Designed for flexible placement.
- Automatic Hang-Up: Unit automatically disconnects on most lines after the other party hangs up.

الشكل 2.1: الجبهة view of the ATS BBPhotoPhone, showcasing the large, customizable photo memory buttons and main control keys.
3. الإعداد
3.1 توصيل الهاتف
- Locate a standard telephone wall jack in your home or office.
- Connect one end of the provided telephone line cord to the 'LINE' jack on the back of the BBPhotoPhone.
- Connect the other end of the telephone line cord to the wall jack.
- If connecting another phone to the same line, use the 'PHONE' jack on the BBPhotoPhone to connect the additional telephone.
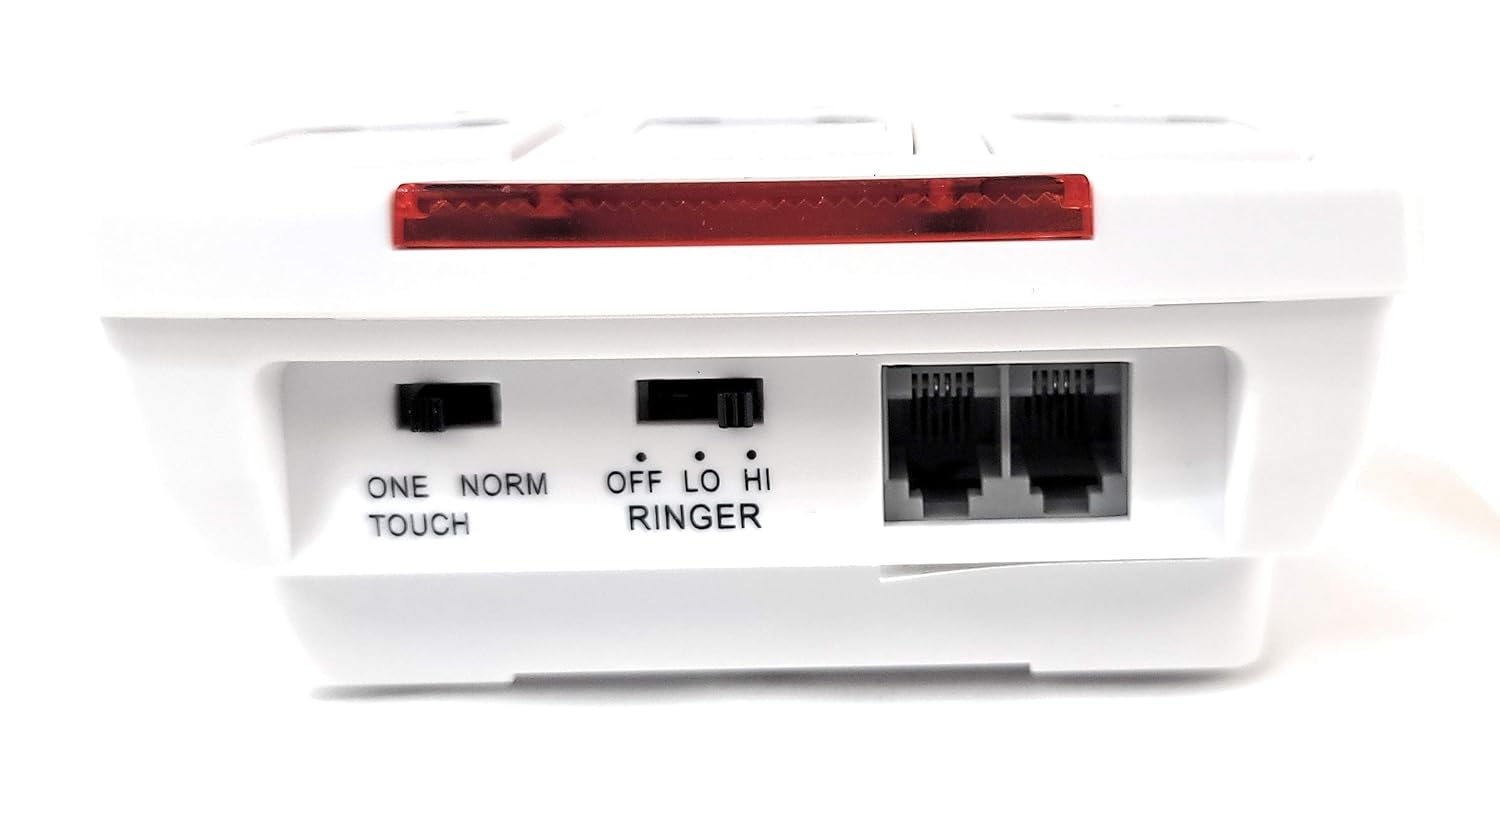
الشكل 3.1: خلفي view of the BBPhotoPhone, illustrating the telephone line input ('LINE'), auxiliary phone output ('PHONE'), and the 'ONE TOUCH/NORM' and 'RINGER' switches.
3.2 Inserting Photos into Memory Keys
The 10 memory keys are designed to hold small photos for easy visual identification of contacts. To insert a photo:
- Gently lift the clear plastic cover on each memory button.
- Insert a trimmed photo of the contact into the designated slot.
- Replace the clear plastic cover securely.
3.3 التركيب على الحائط (اختياري)
The BBPhotoPhone can be wall-mounted for convenience. Use the integrated mounting holes on the back of the unit to secure it to a wall using appropriate screws (not included).

الشكل 3.2: القاع view of the BBPhotoPhone, highlighting the wall mounting slots and speaker grille.
4. تعليمات التشغيل
4.1 Dialing Modes
The BBPhotoPhone offers two dialing modes, selectable via the 'ONE TOUCH/NORM' switch on the back of the unit:
- One Touch Mode: Ideal for users who prefer simplified dialing. Pressing a photo memory key will automatically dial the stored number.
- الوضع العادي: For standard dialing. Pressing a photo memory key will display the number, requiring a subsequent press of the 'SPEAKER' button or lifting a connected handset to dial.
4.2 برمجة مفاتيح الذاكرة
To program a phone number into a photo memory key:
- اضغط على ذاكرة button. The 'IN USE' LED may illuminate.
- اتصل برقم الهاتف الذي ترغب في تخزينه (حتى 16 رقمًا).
- Press the desired photo memory key (0-9) to save the number.
- The number is now stored. Repeat for other memory keys.
4.3 إجراء مكالمة
- Using Photo Memory Keys:
- In One Touch Mode: Simply press the desired photo memory key.
- In Normal Mode: Press the desired photo memory key, then press the المتحدث button or lift the handset of a connected phone.
- الاتصال اليدوي: اضغط على المتحدث button, wait for a dial tone, then dial the number using the numeric keypad.
- معاودة الاتصال: اضغط على إعادة الاتصال/ص زر لإعادة طلب آخر رقم تم الاتصال به.
4.4 استخدام مكبر الصوت
To use the speakerphone function:
- أثناء المكالمة ، اضغط على المتحدث button. The 'IN USE' LED will illuminate.
- Adjust the speaker volume using the slide control on the side of the unit.

الشكل 4.1: الجانب view of the BBPhotoPhone, indicating the location of the speaker volume slide control.
4.5 Mute and Hold Function
اضغط على HOLD/MUTE button during a call to place the call on hold. Music will play for the caller. Press again to resume the conversation.
4.6 Ringer Volume Adjustment
Use the 'RINGER' switch on the back of the unit to select the desired ringer volume: Off, Low, or High.
5. الصيانة
To ensure the longevity and proper functioning of your BBPhotoPhone, follow these simple maintenance guidelines:
- تنظيف: Wipe the unit with a soft, dry cloth. Avoid using liquid cleaners, aerosols, or harsh chemicals, as these can damage the surface or internal components.
- بيئة: قم بتخزين الهاتف في بيئة جافة، بعيدًا عن أشعة الشمس المباشرة، أو الحرارة الزائدة، أو الرطوبة.
- التعامل: تعامل مع الجهاز بحرص. تجنب إسقاطه أو تعريضه لصدمات قوية.
6. استكشاف الأخطاء وإصلاحها
If you encounter issues with your BBPhotoPhone, please refer to the following common problems and solutions:
| مشكلة | السبب المحتمل | حل |
|---|---|---|
| No dial tone or power. | خط الهاتف غير موصول بشكل صحيح. | Ensure the telephone line cord is securely plugged into both the wall jack and the 'LINE' jack on the phone. |
| Cannot hear caller on speakerphone. | Speaker volume is too low or muted. | Adjust the speaker volume slide control to a higher level. Ensure the 'HOLD/MUTE' button is not active. |
| لا يصدر صوت رنين. | Ringer switch is set to 'OFF'. | Set the 'RINGER' switch on the back of the unit to 'LOW' or 'HIGH'. |
| Memory keys are not dialing correctly. | Number not programmed or incorrect dialing mode. | Reprogram the memory key (Section 4.2). Verify the 'ONE TOUCH/NORM' switch is set to the desired mode. |
7. المواصفات
| ميزة | مواصفة |
|---|---|
| ماركة | نظام تتبع المركبات |
| نموذج | BBPhotoPhone |
| الأبعاد (العبوة) | 19.71 × 12.5 × 5.89 سم |
| وزن العنصر | 372 جرام |
| مصدر الطاقة | Phone Jack Powered |
| نوع العرض | قاد |
| Primary Interface | أزرار |
| مادة | أكريلونيتريل بوتادين ستايرين (ABS) |
| نوع التركيب | حامل الحائط |
| لون | أبيض مائل للصفرة |
| نوع الهاتف | حبالي |
8. الضمان والدعم
For warranty information or technical support, please refer to the documentation provided with your purchase or contact Assistive Technology Services directly. Keep your purchase receipt as proof of purchase.


