مقدمة
Welcome to the user manual for your new Astro Men's Digital Watch, model A9916-PPHB. This guide provides comprehensive instructions on how to set up, operate, and maintain your watch to ensure optimal performance and longevity. Please read this manual carefully before using your watch.
المنتج انتهىview ووظائف الأزرار
Your Astro digital watch features a clear display and intuitive button controls for various functions.
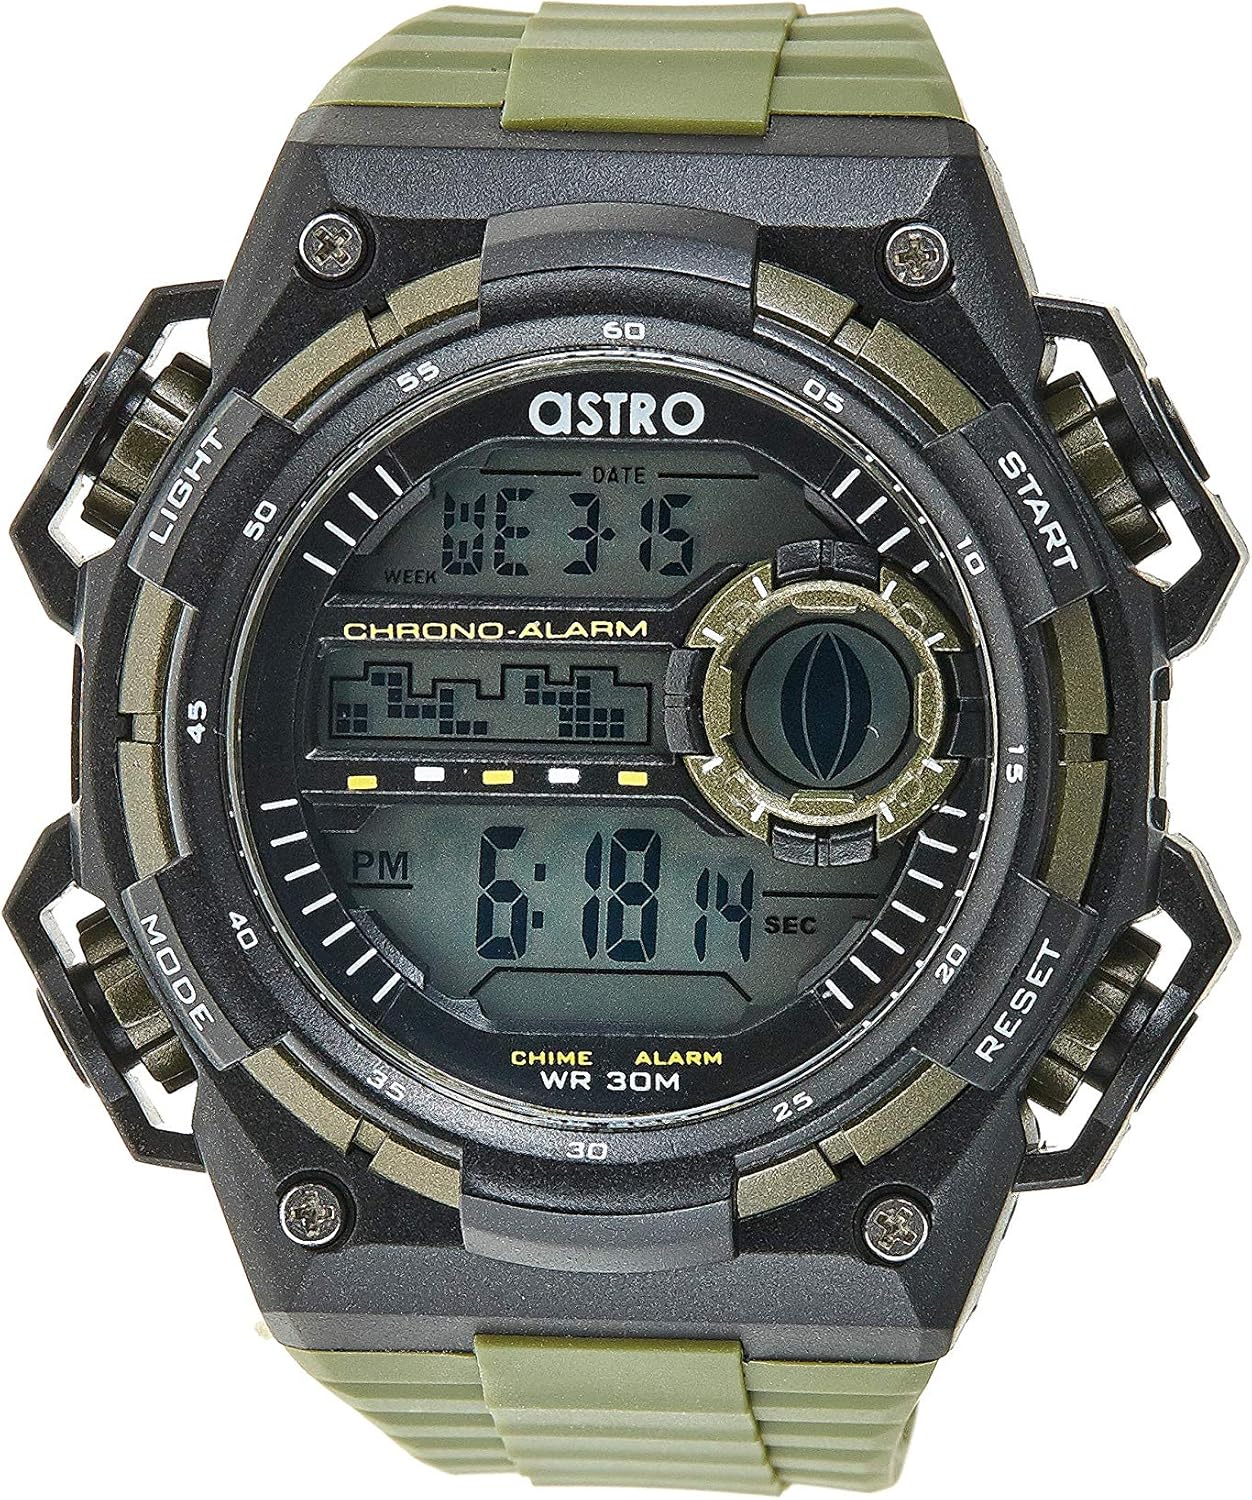
الشكل 1: الجبهة View من الحرس. This image displays the watch face, highlighting the digital display and the four primary control buttons: LIGHT (top left), MODE (bottom left), START (top right), and RESET (bottom right). The display shows the time, day of the week, and date, along with indicators for chronograph and alarm functions.

الشكل 2: الجانب View من الحرس. This image provides a profile view of the watch, clearly showing the placement and design of the "LIGHT" and "MODE" buttons on the left side of the watch case. These buttons are essential for navigating through the watch's functions and activating the backlight.

الشكل 3: العودة View من الحرس. This image shows the reverse side of the watch, featuring the stainless steel case back secured by four screws. The durable olive green plastic strap, with its buckle closure, is also visible, indicating the watch's robust construction.
وظائف الأزرار:
- زر الإضاءة (أعلى اليسار): Activates the backlight for viewing the display in low-light conditions.
- زر الوضع (أسفل اليسار): Cycles through different modes: Time Display, Alarm Setting, Chronograph (Stopwatch), and Date Setting.
- زر البدء (أعلى اليمين): Used to start/stop the chronograph, adjust values during setting, or activate the alarm.
- زر إعادة الضبط (أسفل اليمين): Used to reset the chronograph, confirm settings, or switch between 12/24-hour format.
الإعداد والتكوين الأولي
1. فك الصندوق والفحص
Upon receiving your watch, carefully unbox it and inspect for any visible damage. Ensure all components, including the watch and any accompanying documentation (like the guarantee card), are present.

Figure 4: Watch Packaging and Guarantee Card. This image shows the watch's protective tin packaging and the included guarantee card, which is important for warranty claims.
2. ضبط الوقت والتاريخ
- من وضع عرض الوقت العادي، اضغط على وضع اضغط على الزر ثلاث مرات للدخول إلى وضع ضبط الوقت. ستبدأ أرقام الثواني بالوميض.
- اضغط على إعادة ضبط button to cycle through the settings: Seconds → Hour → Minute → Month → Date → Day of the Week.
- While a digit is flashing, press the يبدأ اضغط على الزر لزيادة القيمة. يبدأ button to rapidly advance the digits.
- بمجرد ضبط جميع الإعدادات، اضغط على وضع اضغط على الزر للخروج من وضع الإعداد والعودة إلى عرض الوقت العادي.
3. اختيار تنسيق 12/24 ساعة
في وضع عرض الوقت العادي، اضغط على إعادة ضبط زر للتبديل بين تنسيق 12 ساعة (مع مؤشر "صباحًا" / "مساءً") وتنسيق 24 ساعة.
تعليمات التشغيل
1. وظيفة التنبيه
- من شاشة عرض الوقت العادية، اضغط على وضع اضغط على الزر مرة واحدة للدخول إلى وضع التنبيه. سيتم عرض وقت التنبيه.
- اضغط على إعادة ضبط button to select the hour or minute to set. The selected digit will flash.
- اضغط على يبدأ زر لضبط الرقم الوامض.
- لتنشيط/إلغاء تنشيط التنبيه، اضغط على يبدأ اضغط على الزر أثناء وضع التنبيه (بدون وميض أي أرقام). سيظهر رمز التنبيه/يختفي على الشاشة.
- اضغط على وضع الزر للعودة إلى عرض الوقت الطبيعي.
2. هوurlذ الرنين
لتنشيط أو إلغاء تنشيط المنزلurly chime (which beeps at the top of every hour):
- في وضع التنبيه، اضغط على إعادة ضبط زر لتبديل الهوurly chime on/off. A chime icon will appear/disappear on the display.
3. ساعة الإيقاف (كرونوغراف)
- من شاشة عرض الوقت العادية، اضغط على وضع اضغط على الزر مرتين للدخول إلى وضع الكرونوغراف. ستظهر على الشاشة عبارة "00:00:00".
- اضغط على يبدأ اضغط على الزر لبدء التوقيت.
- اضغط على يبدأ اضغط على الزر مرة أخرى لإيقاف التوقيت مؤقتًا.
- اضغط على إعادة ضبط button while paused to reset the chronograph to "00:00:00".
- اضغط على وضع الزر للعودة إلى عرض الوقت الطبيعي.
4. وظيفة الإضاءة الخلفية
اضغط على ضوء button (top left) at any time to illuminate the display for a few seconds, making it visible in dark environments.
الصيانة والعناية
1. تنظيف ساعتك
To keep your watch looking its best, wipe it regularly with a soft, dry cloth. For stubborn dirt, a slightly damp يمكن استخدام قطعة قماش، ثم تجفيفها فوراً. تجنب استخدام المواد الكيميائية القاسية أو المواد الكاشطة.
2. Water Resistance (WR 30M)
Your Astro watch is water resistant up to 30 meters (3 ATM). This means it is suitable for daily use and can withstand splashes or brief immersion in water, such as during hand washing or light rain. It is NOT suitable for showering, swimming, diving, or any water sports. Do not operate buttons when the watch is wet.
3. استبدال البطارية
When the display becomes dim or functions become erratic, it may be time to replace the battery. Battery replacement should ideally be performed by a qualified watch technician to ensure proper sealing and water resistance integrity.
استكشاف الأخطاء وإصلاحها
| مشكلة | السبب المحتمل | حل |
|---|---|---|
| العرض فارغ أو خافت. | بطارية منخفضة. | استبدال البطارية. |
| الوقت غير صحيح. | لم يتم ضبط الوقت بشكل صحيح أو تم الضغط على الزر عن طريق الخطأ. | Refer to "Setting the Time and Date" section to reset the time. |
| الأزرار لا تستجيب. | Watch may be in a frozen state or battery is extremely low. | Try pressing all buttons simultaneously for a few seconds to reset. If problem persists, replace battery. |
| لا يصدر صوت الإنذار. | لم يتم تفعيل جهاز الإنذار. | Ensure the alarm icon is displayed on the screen. Refer to "Alarm Function" section. |
تحديد
- رقم الموديل: A9916-PPHB
- نوع العرض: رقمي
- مادة الحزام: بلاستيك
- مادة العلبة: Plastic / Stainless Steel Back
- مقاومة الماء: 30 متراً (3 ضغط جوي)
- الوظائف: Time (12/24-hour), Date, Day, Alarm, Hourly Chime, Chronograph, Backlight
- الشركة المصنعة: استرو
الضمان والدعم
Your Astro A9916-PPHB watch comes with a manufacturer's guarantee. Please refer to the included guarantee card (Figure 4) for specific terms and conditions of your warranty. Keep your purchase receipt and guarantee card in a safe place as proof of purchase.
For technical support, warranty claims, or any inquiries not covered in this manual, please contact your retailer or the official Astro customer service channel as indicated on your guarantee card or product packaging.


