1. المقدمة
This manual provides comprehensive instructions for the operation and maintenance of your Fetcus Universal Remote Control, designed for various Hitachi Air Conditioner models. Please read this manual thoroughly before using the remote control to ensure proper function and longevity.
This remote control is a direct replacement or compatible alternative for original Hitachi air conditioner remote models including RAS-D10EX, RAR-5E1, RAS-10XH1, RAR-5E2, RAR-5E3, RAR-5E4, RAR-5E5, RAR-5E6, and RAS-D14EX2.
2. مواصفات المنتج
- التوافق العالمي: Designed to work with a wide range of Hitachi air conditioner models.
- اتصال الأشعة تحت الحمراء: Utilizes standard infrared signals for reliable communication with your AC unit.
- Dedicated AC Functions: Includes specific buttons for common air conditioner operations such as power, mode selection, temperature adjustment, fan speed, and more.
- تصميم مضغوط: مريح وسهل الاستخدام.
- No App Support: Operates independently without the need for a smartphone application.
- تكرار: Operates at 433 MHz for signal transmission.
3. الإعداد
3.1 تركيب البطارية
The remote control requires appropriate batteries for operation. Follow these steps to install or replace batteries:
- حدد موقع حجرة البطارية في الجزء الخلفي من جهاز التحكم عن بعد.
- قم بتحريك غطاء حجرة البطارية للأسفل أو اضغط على المزلاج لفتحه.
- Insert new batteries, ensuring the positive (+) and negative (-) terminals align correctly with the markings inside the compartment. Typically, two AAA batteries are required, though specific battery type should be confirmed by checking the compartment markings.
- أغلق غطاء حجرة البطارية بشكل آمن حتى يستقر في مكانه.

الشكل 3.1: مؤخرة view of the Fetcus remote control with the battery compartment open, revealing the two battery slots and a label with battery safety warnings. This image illustrates the correct orientation for battery insertion.
مهم: قم بإزالة البطاريات إذا لم يتم استخدام جهاز التحكم عن بعد لفترة طويلة لمنع التسرب والتلف.
4. تعليمات التشغيل
Familiarize yourself with the buttons on your remote control. The remote features a main display and various control buttons for your air conditioner.
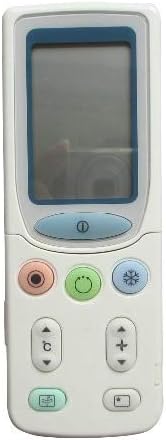
الشكل 4.1: أمام view of the Fetcus remote control, highlighting the LCD screen and the primary control buttons for power, mode, and temperature adjustment.
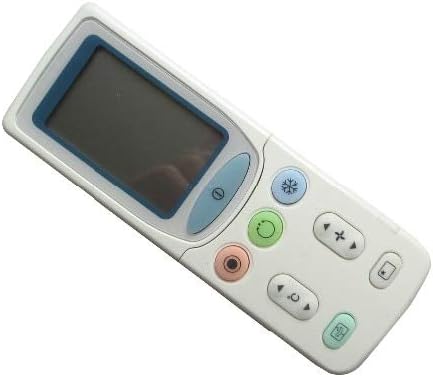
الشكل 4.2: بزاوية view of the Fetcus remote control, showing the main display and primary function buttons including power, mode, and fan speed controls.
4.1 الوظائف الأساسية
- زر الطاقة (①): اضغط لتشغيل مكيف الهواء أو إيقاف تشغيله.
- زر الوضع (↻): Press repeatedly to cycle through operating modes: Auto, Cool, Dry, Fan, Heat (if applicable to your AC unit).
- أزرار ضبط درجة الحرارة (+ / -): اضغط لزيادة أو تقليل درجة الحرارة المطلوبة.
- زر سرعة المروحة (❄): Press to adjust the fan speed (e.g., Auto, Low, Medium, High).
4.2 الوظائف المتقدمة (تحت الغطاء المنزلق)
Some advanced functions are accessible by sliding down the cover on the remote control. This reveals additional buttons for more specific controls.

الشكل 4.3: بزاوية view of the Fetcus remote control with the sliding cover open, exposing additional advanced function buttons beneath the main display.
- Swing/Louver Control: Adjusts the direction of the airflow (vertical or horizontal swing).
- Timer/Sleep Mode: Sets a timer for the AC unit to turn on or off, or activates a sleep-friendly operating mode.
- C/F Switch (درجة مئوية): يبدل عرض درجة الحرارة بين الدرجة المئوية والفهرنهايت.
- زر إعادة الضبط: Used to reset the remote control settings or clear certain functions. Consult your AC unit's manual for specific reset procedures if needed.
- Other Specific Buttons: Depending on your specific Hitachi AC model, other buttons may control functions like Quiet mode, Turbo mode, or Health functions. Refer to your AC unit's original manual for detailed explanations of these specific icons.
5. الصيانة
- تنظيف: امسح جهاز التحكم عن بُعد بقطعة قماش ناعمة وجافة. لا تستخدم منظفات سائلة أو مواد كاشطة، فقد تُتلف سطحه أو مكوناته الداخلية.
- استبدال البطارية: Replace batteries when the remote's range decreases or the display becomes dim. Always replace all batteries at the same time with new ones of the same type.
- تخزين: قم بتخزين جهاز التحكم عن بعد في مكان بارد وجاف بعيدًا عن أشعة الشمس المباشرة ودرجات الحرارة القصوى.
6. استكشاف الأخطاء وإصلاحها
| مشكلة | السبب المحتمل | حل |
|---|---|---|
| جهاز التحكم عن بعد لا يستجيب. | البطاريات الميتة أو المثبتة بشكل غير صحيح. | استبدل البطاريات مع التأكد من القطبية الصحيحة (+/-). |
| نطاق الاتصال عن بعد ضعيف. | بطاريات ضعيفة؛ وجود عائق بين جهاز التحكم عن بعد ووحدة التيار المتردد. | استبدل البطاريات. تأكد من وجود خط رؤية واضح لجهاز استقبال الأشعة تحت الحمراء الخاص بوحدة التكييف. |
| AC unit not responding to specific functions. | Remote not fully compatible with all AC unit features; AC unit does not support the function. | Verify the function exists on your specific AC model. This remote is a universal replacement and may not support all obscure functions of every original remote. |
| العرض باهت أو فارغ. | انخفاض طاقة البطارية. | استبدال البطاريات. |
7. المواصفات
| ميزة | التفاصيل |
|---|---|
| ماركة | البقع الصلعاء |
| رقم الطراز (داخلي) | CLS-D41D8CD98F00B204E9800998ECF8427E |
| الأجهزة المتوافقة | Air Conditioner (Hitachi RAS-D10EX, RAR-5E1, RAS-10XH1, RAR-5E2, RAR-5E3, RAR-5E4, RAR-5E5, RAR-5E6, RAS-D14EX2) |
| تكنولوجيا الاتصال | الأشعة تحت الحمراء |
| تكرار | 433 ميجا هرتز |
| أقصى عدد من الأجهزة المدعومة | 1 |
| مادة | Other (Durable Plastic) |
| وصف البطارية | Lithium (Typically uses AAA batteries, please check compartment) |
| المميزات الخاصة | Universal, Wireless |
| كمية حزمة العنصر | 1 |
| تاريخ أول توفر | 8 مايو 2019 |
8. الضمان والدعم
This Fetcus Remote Control comes with a ضمان لمدة 90 يومًا من تاريخ الشراء. يغطي هذا الضمان عيوب التصنيع ويضمن عمل المنتج كما هو مُصمم له في ظل الاستخدام العادي.
For warranty claims or technical support, please contact your retailer or the manufacturer with your purchase details. Please retain your proof of purchase for warranty validation.


