1. المقدمة والمنتجview
Thank you for choosing the Stayer Professional Telescopic Miter Saw SCR 315 W. This manual provides essential information for the safe and efficient operation, maintenance, and troubleshooting of your new tool. Please read this manual thoroughly before initial use and keep it for future reference.
This powerful 1800W miter saw is designed for precision cutting with a large capacity, capable of cutting materials up to 370 mm in length and 120 mm in height. Its belt-driven transmission significantly reduces noise and improves work quality. The robust yet lightweight aluminum base ensures stability and durability.

الصورة 1.1: انتهىview of the Stayer Professional Telescopic Miter Saw SCR 315 W.
2. تعليمات السلامة
التزم دائمًا بإجراءات السلامة الأساسية للحد من مخاطر الحريق والصدمات الكهربائية والإصابات الشخصية. احتفظ بهذا الدليل في متناول يدك للرجوع إليه بسرعة.
قواعد السلامة العامة:
- ارتدِ دائمًا معدات الحماية الشخصية المناسبة، بما في ذلك نظارات السلامة، وحماية السمع، وقناع الغبار.
- تأكد من أن منطقة العمل نظيفة ومضاءة جيدًا وخالية من العوائق.
- أبعد الأطفال والمارة أثناء تشغيل المنشار.
- لا تقم بتشغيل الأدوات الكهربائية في أجواء قابلة للانفجار، مثل وجود سوائل قابلة للاشتعال أو غازات أو غبار.
- Secure the workpiece firmly before cutting. Never hold small pieces by hand.
- تأكد من أن واقي الشفرة موجود دائمًا في مكانه ويعمل بشكل صحيح.
- Disconnect the saw from the power source before making any adjustments, changing accessories, or performing maintenance.
- Use only sharp, clean blades of the correct size and type for the material being cut.
- Avoid awkward hand positions. Always maintain proper footing and balance.
3. المكونات والميزات الرئيسية
Familiarize yourself with the various parts of your miter saw to ensure safe and effective operation.

Image 3.1: Labeled diagram of the miter saw components.
- مقبض النقل: For safe and easy carrying of the saw.
- Belt Motor: 1800W motor with belt transmission for quiet and efficient operation.
- Telescopic Rail: Allows for extended cutting capacity up to 370mm.
- عمودي Clamp: Secures the workpiece for stable cutting.
- إمالة الرأس: Adjustable from -45° to +45° for bevel cuts in both directions.
- Extendable Support: Provides additional support for longer workpieces.
- Adjustable Rotary Table: Allows for precise miter angle adjustments (0°/22.5°/45°).
- قدم مطاطية: Ensures stability and reduces vibration during operation.
- دليل الليزر: Provides a precise cutting line for improved accuracy.

Image 3.2: Additional features and technical data overview.
4. الإعداد
Although the saw comes largely pre-assembled, some setup is required before first use.
التفريغ والتنسيب:
- قم بإزالة المنشار وجميع الملحقات من العبوة بعناية.
- Inspect the saw for any shipping damage. Do not operate if damaged.
- Place the saw on a stable, level workbench or stand that can support its weight (approx. 19 kg) and the workpiece. Ensure sufficient space around the saw for safe operation and material handling.
- Ensure the rubber feet are securely positioned to prevent movement.
التعديلات الأولية:
- Verify that all locking mechanisms for the miter table, bevel head, and telescopic rail are functioning correctly.
- Check the alignment of the blade with the miter scale and laser guide. Adjust if necessary according to the calibration section (if applicable in a detailed manual).
- Connect the saw to a suitable power outlet (220V AC).

الصورة 4.1: View of the miter table and fence, ready for setup.
5. تعليمات التشغيل
اتبع الخطوات التالية للتشغيل الآمن والفعال لمنشار المتراس الخاص بك.
إجراء القطع الأساسي:
- تحضير قطعة العمل: Mark your desired cut line on the material.
- ضبط الإعدادات: Set the desired miter angle on the rotary table and the bevel angle on the tilting head. Secure all locking levers.
- موضع قطعة العمل: Place the workpiece firmly against the fence and the saw table. Use the vertical clamp to secure it. Ensure the material is fully supported, using the extendable supports if needed.
- محاذاة القطع: Lower the saw head slightly (without starting the motor) to align the blade with your marked cut line. Use the laser guide for precise alignment.
- تشغيل المنشار: Ensure your hands are clear of the blade path. Press the power switch to start the motor. Allow the blade to reach full speed before beginning the cut.
- قم بالقطع: Slowly and steadily lower the saw head through the workpiece. For telescopic cuts, push the saw head forward along the rail as you cut.
- النسخة الكاملة: بمجرد اكتمال القطع، قم بتحرير مفتاح الطاقة واترك الشفرة تتوقف تمامًا قبل رفع رأس المنشار.
- إزالة قطعة العمل: Carefully remove the cut material and any off-cuts.

Image 5.1: The miter saw in action, demonstrating a cut.

الصورة 5.2: عن قرب view of the cutting process, showing the laser guide.
6. الصيانة
تضمن الصيانة الدورية طول عمر منشار القطع المائل وأداءه الأمثل.
تنظيف:
- After each use, disconnect the saw from power and clean off sawdust and debris using a brush or vacuum cleaner.
- Pay special attention to the blade guard, miter scale, and telescopic rails to ensure smooth operation.
- The dust collection system is designed to minimize sawdust, but regular cleaning of the dust bag/port is essential.
Blade Care and Replacement:
- Regularly inspect the saw blade for sharpness, cracks, or missing teeth. A dull blade can cause kickback and poor cut quality.
- When replacing the blade, ensure the saw is unplugged. Follow the instructions in your saw's specific blade replacement guide. Use only blades with a 315mm diameter and appropriate arbor size.
فحص الحزام:
- Periodically inspect the drive belt for wear, cracks, or slippage. A worn belt can affect performance and increase noise.
- Refer to the service manual for instructions on belt replacement if necessary.
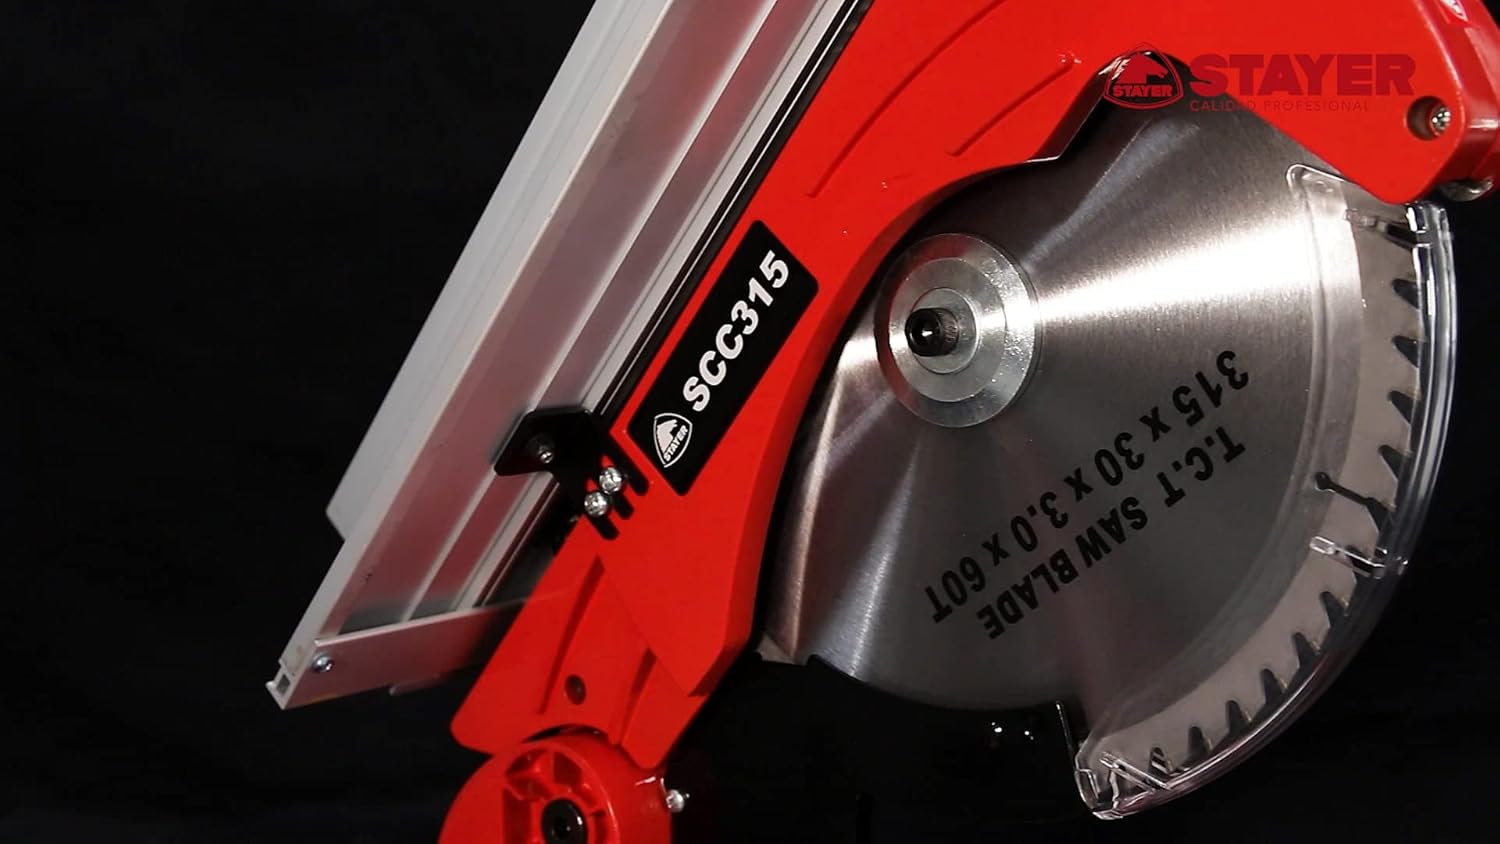
Image 6.1: Close-up of the blade and guard, important for maintenance checks.
7. استكشاف الأخطاء وإصلاحها
يتناول هذا القسم المشكلات الشائعة التي قد تواجهها مع منشار المتراس الخاص بك.
| مشكلة | السبب المحتمل | حل |
|---|---|---|
| المنشار لا يبدأ | انقطاع التيار الكهربائي، عطل في المفتاح، مشكلة في المحرك | Check power connection, circuit breaker. If problem persists, contact service. |
| جودة القطع رديئة (خشنة، متشققة) | Dull blade, incorrect blade for material, improper feed rate, workpiece not secure | Replace or sharpen blade. Use appropriate blade. Adjust feed rate. Secure workpiece firmly. |
| اهتزاز أو ضوضاء مفرطة | Loose blade, worn belt, damaged bearings, unstable setup | Check blade tightness. Inspect belt for wear. Ensure saw is on a stable surface. If severe, seek professional service. |
| Laser guide not accurate | Misalignment, dirty laser lens | Clean laser lens. Refer to specific instructions for laser calibration (if available). |
| جمع الغبار غير فعال | Dust bag full, clogged port, improper connection | Empty dust bag. Clear any clogs in the dust port. Ensure connections are secure. |
| Play/wobble in saw head or table | Loose components, manufacturing defect | Check for any accessible tightening points. If significant play affects accuracy or safety, contact customer support. |
If you encounter problems not listed here or if solutions do not resolve the issue, please contact Stayer customer support.
8. المواصفات الفنية
Detailed specifications for the Stayer Professional Telescopic Miter Saw SCR 315 W.
| مواصفة | قيمة |
|---|---|
| رقم الموديل | 1.1933 |
| الشركة المصنعة | ستاير |
| مصدر الطاقة | كهرباء سلكية |
| المجلدtage | 220 فولت (تيار متردد) |
| قوة | 1800 واط |
| سرعة | 3500 دورة في الدقيقة |
| مادة الشفرة | Aluminum Oxide (typical for general purpose blades) |
| ميزة خاصة | Silent (Belt Drive) |
| وزن العنصر | 19 كيلوغرام |
| أبعاد الحزمة | 95 × 55 × 55 سم |
| Cutting Capacity (Length) | حتى 370 ملم |
| قدرة القطع (الارتفاع) | حتى 120 ملم |
9. الضمان والدعم
For warranty information, please refer to the warranty card or documentation included with your purchase. Warranty terms and conditions may vary by region and retailer.
If you require technical assistance, spare parts, or have questions regarding the operation or maintenance of your Stayer Professional Telescopic Miter Saw, please contact Stayer customer support or your authorized dealer. Have your model number (1.1933) and purchase details ready when contacting support.


