1. المقدمة
This user manual provides comprehensive instructions for the setup, operation, and maintenance of your Reloop RP-1000 MK2 Professional Belt Drive Turntable System. Please read this manual thoroughly before using the product to ensure proper function and to prevent damage.
The Reloop RP-1000 MK2 is designed for both aspiring DJs and HiFi enthusiasts, offering high-quality audio reproduction through its belt-driven mechanism. This design effectively isolates the platter from motor vibrations, ensuring clear, distortion-free sound. The MK2 version features an enhanced top panel construction, improved metallic buttons, and a pre-fitted Ortofon OM Black pick-up system for immediate playback.
2. تعليمات السلامة
To ensure safe operation and prolong the life of your turntable, please observe the following safety guidelines:
- مزود الطاقة: Connect the unit only to an AC outlet with the correct voltage as indicated on the product. Ensure the power cord is not pinched or walked on.
- رُطُوبَة: لا تُعرِّض الجهاز للمطر أو الرطوبة أو الرطوبة الزائدة. لا تضع عليه أي أغراض مملوءة بالسوائل، مثل المزهريات.
- تهوية: تأكد من وجود تهوية كافية حول الوحدة. لا تسد فتحات التهوية.
- مصادر الحرارة: احتفظ بالوحدة بعيدًا عن مصادر الحرارة مثل المشعات أو فتحات التدفئة أو المواقد أو الأجهزة الأخرى (بما في ذلك ampالمُضخِّمات) التي تنتج الحرارة.
- تنظيف: نظف بقطعة قماش جافة فقط. تجنب استخدام المنظفات السائلة أو البخاخات.
- الخدمة: Do not attempt to service the unit yourself. Refer all servicing to qualified service personnel. Servicing is required when the apparatus has been damaged in any way, such as power-supply cord or plug is damaged, liquid has been spilled or objects have fallen into the apparatus, the apparatus has been exposed to rain or moisture, does not operate normally, or has been dropped.
- الموقع: Place the turntable on a stable, level surface to prevent vibrations and ensure proper tracking.
3. محتويات العبوة
يرجى التأكد من تضمين جميع العناصر المدرجة أدناه في الحزمة الخاصة بك:
- طبق القرص الدوار
- OM Black pick-up system (by Ortofon)
- headshell
- سليبمات
- ثقل موازن
- سلك الطاقة
- دليل تعليمات التشغيل (هذه الوثيقة)
في حال وجود أي عناصر مفقودة أو تالفة، يرجى الاتصال ببائع التجزئة أو خدمة دعم عملاء Reloop على الفور.
4. انتهى المنتجview
Familiarize yourself with the main components of your Reloop RP-1000 MK2 turntable.

الشكل 4.1: بزاوية view of the Reloop RP-1000 MK2 turntable, showcasing the platter, tonearm, and control panel.
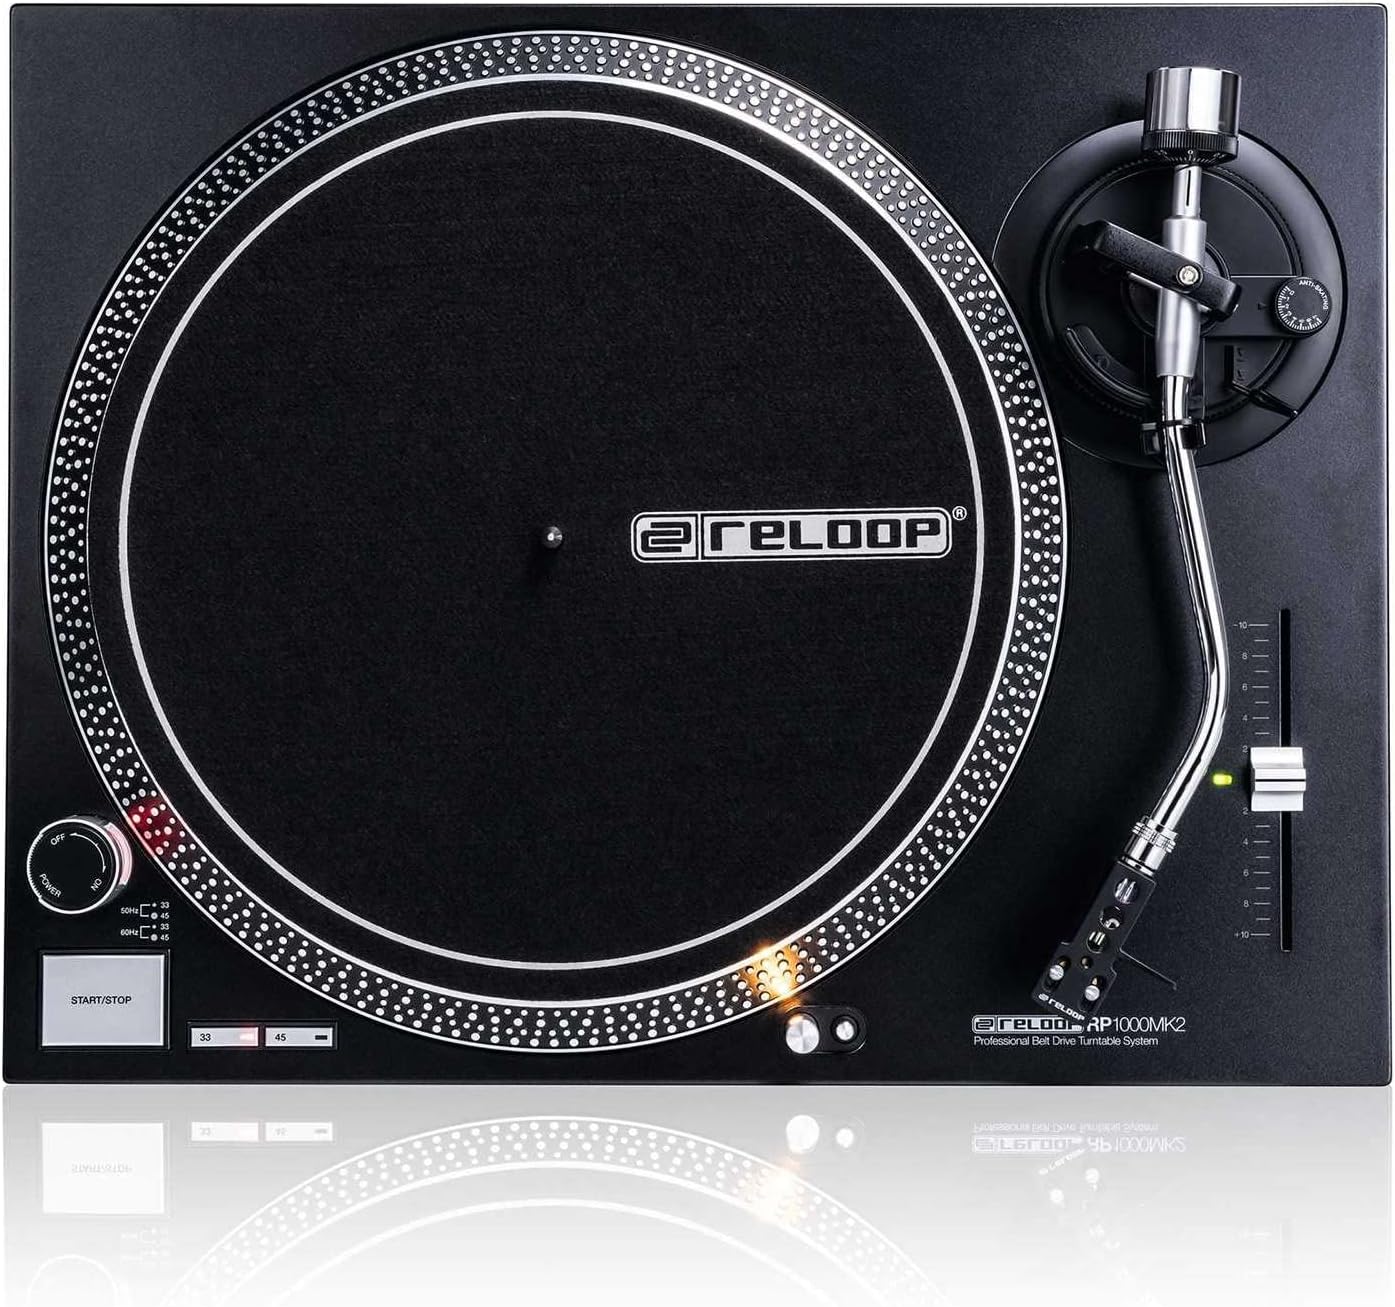
الشكل 4.2: من أعلى إلى أسفل view highlighting the platter, slipmat with Reloop logo, S-shaped tonearm, and pitch control slider.

الشكل 4.3: مفصل view of the S-shaped tonearm, headshell, and the pre-fitted Ortofon OM Black pick-up system.

Figure 4.4: Close-up of the power knob, start/stop button, and speed selection buttons (33/45 RPM).
المكونات الرئيسية:
- طبق: Precision-engineered, die-cast aluminum platter for stable rotation.
- تونيرم: Statically balanced S-shaped tonearm with hydraulic lift and anti-skating mechanism.
- خرطوشة: High-quality OM Black pick-up system by Ortofon, pre-fitted to a headshell.
- السيطرة على ارض الملعب: Adjustable slider with a range of +/-10% for fine speed adjustments.
- Speed Select Buttons: Buttons for selecting 33 1/3 RPM and 45 RPM playback speeds.
- زر البدء / الإيقاف: Controls the rotation of the platter.
- ضوء الهدف: Extendable aluminum target light to illuminate the needle position in dark environments.
- Shock-absorbing Feet: Improve isolation from unwanted vibrations.
5. الإعداد
5.1 التفريغ والتنسيب
- أزل جميع المكونات من العبوة بعناية. احتفظ بالعبوة لنقلها أو تخزينها مستقبلاً.
- Place the turntable on a flat, stable, and level surface, away from direct sunlight, heat sources, and strong magnetic fields.
- Ensure there is sufficient space around the unit for ventilation.
5.2 تركيب القرص والحزام
- Place the platter onto the center spindle. Ensure it sits securely.
- Locate the drive belt. Carefully stretch the belt around the inner rim of the platter and hook it onto the motor pulley, which is visible through one of the platter's openings.
- Place the felt slipmat on top of the platter.
5.3 إعداد ذراع التسجيل
The OM Black pick-up system is pre-fitted to the headshell. Follow these steps to balance the tonearm:
- Attach the headshell with the pre-fitted cartridge to the front end of the tonearm. Secure it by turning the locking ring clockwise.
- Place the counterweight onto the rear of the tonearm and rotate it until it is approximately centered.
- حرر عمود نقل الصوت clamp and lower the tonearm lift.
- Carefully adjust the counterweight by rotating it forwards or backwards until the tonearm is perfectly balanced and floats horizontally.
- Once balanced, hold the counterweight steady and rotate only the numbered ring on the front of the counterweight to '0' (zero).
- Rotate the entire counterweight (including the numbered ring) counter-clockwise to set the recommended tracking force for the Ortofon OM Black cartridge, typically between 1.5 to 2.0 grams. Refer to the cartridge manufacturer's specifications for the precise recommended tracking force.
- Set the anti-skating dial to the same value as your tracking force.
- أعد ذراع التسجيل إلى مكانه وثبته باستخدام المشبكamp.
5.4 وصلات الصوت والطاقة
- Connect the RCA audio cables from the turntable's output to the PHONO input of your amplifier or mixer. Ensure correct left (white) and right (red) channel connections.
- قم بتوصيل سلك التأريض من القرص الدوار إلى طرف التأريض الموجود على جهازك amplifier or mixer to minimize hum.
- Plug the power cord into the turntable's power input and then into a suitable AC power outlet.
6. تعليمات التشغيل
6.1 التشغيل الأساسي
- تشغيل الطاقة: Turn the power knob clockwise to the "ON" position. The platter will not start spinning until the START/STOP button is pressed.
- حدد السرعة: Press the "33" or "45" button to select the desired playback speed according to the record you are playing. The corresponding LED will illuminate.
- مكان السجل: Carefully place a vinyl record onto the platter.
- طبق البداية: Press the START/STOP button. The platter will begin to rotate.
- موضع ذراع التسجيل: حرر عمود نقل الصوت clamp. Use the tonearm lift lever to raise the tonearm. Carefully move the tonearm over the desired track on the record.
- ذراع النغمة السفلي: Gently lower the tonearm lift lever to allow the stylus to descend onto the record groove.
- اللعب: The audio will now play through your connected audio system.
- إيقاف التشغيل: At the end of the record, or when you wish to stop, use the tonearm lift lever to raise the tonearm, return it to its rest, and secure it with the clamp. Press the START/STOP button to stop the platter rotation.
- إيقاف التشغيل: Turn the power knob counter-clockwise to the "OFF" position when not in use.
6.2 Using Pitch Control
The pitch control slider allows you to finely adjust the playback speed by +/-10%. Move the slider up or down to increase or decrease the speed. The center detent indicates 0% pitch adjustment (nominal speed).
6.3 Target Light
Press the aluminum target light button to extend the light, illuminating the needle position. This is particularly useful in low-light environments. Press it again to retract the light.
7. الصيانة
7.1 تنظيف الوحدة
- قم دائمًا بفصل سلك الطاقة قبل التنظيف.
- Use a soft, dry, lint-free cloth to wipe the surface of the turntable.
- للبقع العنيدة، استخدمي قليلاً منamp يمكن استخدام قطعة قماش، ثم استخدام قطعة قماش جافة مباشرة. تجنب استخدام المنظفات الكاشطة أو المذيبات.
7.2 العناية بالقلم
- The stylus (needle) is a delicate component. Handle it with extreme care.
- Clean the stylus regularly using a soft brush designed for stylus cleaning, brushing gently from back to front.
- A worn or dirty stylus can damage your records and degrade sound quality. Replace the stylus when signs of wear are apparent (e.g., distorted sound, skipping).
7.3 استبدال الحزام
The belt is a wear-and-tear part. If you notice inconsistent speed or the platter not spinning, the belt may need replacement. Contact Reloop support or an authorized service center for replacement belts and instructions.
7.4 Dust Cover Care (if applicable)
If your turntable includes a dust cover, clean it with a soft, damp cloth. Avoid using dry cloths as they can scratch the acrylic surface. Do not use harsh chemicals.
8. استكشاف الأخطاء وإصلاحها
قبل الاتصال بالدعم الفني، يرجى الاطلاع على المشكلات الشائعة التالية وحلولها:
| مشكلة | السبب المحتمل | حل |
|---|---|---|
| No power / Platter not spinning | Power cord not connected; Power switch off; Belt not installed or broken. | Ensure power cord is securely plugged in. Turn power switch ON. Check if the drive belt is correctly installed around the platter and motor pulley. Replace belt if broken. |
| لا يوجد صوت أو صوت منخفض جداً | كابلات RCA غير موصلة بشكل صحيح؛ Amplifier/mixer input incorrect; Stylus damaged or dirty; Cartridge not properly seated. | Check RCA connections to amplifier/mixer (PHONO input). Ensure ground wire is connected. Clean stylus. Re-seat cartridge in headshell. |
| Distorted sound / Skipping | Stylus dirty or worn; Tracking force incorrect; Anti-skating incorrect; Turntable not level; Record dirty or damaged. | Clean or replace stylus. Re-adjust tracking force and anti-skating. Ensure turntable is on a level surface. Clean record. |
| سرعة غير متسقة | Worn or stretched belt; Motor issue. | Inspect the drive belt for wear and replace if necessary. If the issue persists, contact service. |
9. المواصفات
| ميزة | وصف |
|---|---|
| اسم الموديل | RP-1000 MK2 Professional Belt Drive Turntable System |
| نوع المحرك | حملة الحزام |
| نظام المحرك | Powerful belt-drive motor system absorbs unwanted vibration and noise |
| طبق كبير | Precision-engineered, die-cast aluminum platter with stable rotation |
| السرعات | 2 selectable speeds (33 1/3 & 45 RPM) |
| السيطرة على ارض الملعب | Adjustable range of +/-10% |
| Tonearm | Statically balanced S-shaped tonearm with hydraulic lift and anti-skate |
| بناء | Redesigned metal top panel, tactile buttons, reinforced housing construction, optimized damping features, shock-absorbing feet |
| الأبعاد (العرض × العمق × الارتفاع) | 17.72 × 13.86 × 5.67 بوصة (حوالي 45 × 35.2 × 14.4 سم) |
| وزن | 16.06 رطل (حوالي 7.3 كجم) |
| الاتصال | Analog RCA output, Ground terminal |
| مصدر الطاقة | Corded Electric, 220 Volts (check local voltagالمتطلبات الإلكترونية) |
10. الضمان والدعم
10.1 معلومات الضمان
Reloop products are manufactured to the highest quality standards. This product comes with a manufacturer's warranty. Please refer to the warranty card included in your package or visit the official Reloop webيرجى زيارة الموقع للاطلاع على شروط وأحكام الضمان التفصيلية المطبقة في منطقتك.
احتفظ بإثبات الشراء (الإيصال أو الفاتورة) لأنه سيكون مطلوبًا لأي مطالبات بالضمان.
10.2 دعم العملاء
Should you encounter any issues not covered in the troubleshooting section, or require further assistance, please contact Reloop customer support or your authorized dealer. Contact information can typically be found on the official Reloop webالموقع أو على عبوة منتجك.
For the latest information, FAQs, and support resources, please visit the official Reloop webموقع: www.reloop.com


