دليل تعليمات حامل الشاشة المزدوجة HUANUO HNCM7
الموديل: HNCM7
العلامة التجارية: هوانو
مقدمة
This manual provides detailed instructions for the assembly, operation, and maintenance of your HUANUO HNCM7 Dual Monitor Mount. Designed for monitors up to 30 inches and weighing up to 22 lbs per arm, this mount offers flexible adjustment and helps optimize your workspace. Please read these instructions carefully before installation and retain for future reference.

الشكل 1: انتهىview of HUANUO HNCM7 Dual Monitor Mount components.
ماذا يوجد في الصندوق
تأكد من وجود جميع المكونات قبل البدء بالتجميع:
- العمود الرئيسي مع القاعدة
- Dual Articulating Arms (2 sections per arm)
- VESA Mounting Plates (2)
- سي- Clamp حَشد
- مكونات التثبيت عبر الحلقات
- Various Screws (M4x12, M4x30, M5x12, M5x30, M6x12, M6x30) and Washers for VESA attachment
- Allen Wrenches (2 sizes)
- مقاطع إدارة الكابلات
- Desk Protection Pad
- دليل التعليمات
تحديد
| ميزة | التفاصيل |
|---|---|
| رقم الموديل | HNCM7 |
| توافق حجم الشاشة | 13" to 30" (per arm) |
| سعة الوزن | يصل وزن كل ذراع إلى 22 رطل (10 كجم). |
| التوافق مع VESA | 75×75 مم، 100×100 مم |
| ضبط الارتفاع | 16.73 بوصة |
| زاوية الميل | ±45 درجة |
| زاوية الدوران | ±90 درجة |
| تناوب | 360 درجة |
| خيارات التركيب | سي- Clamp، جروميت ماونت |
| سي- Clamp سمك سطح المكتب | 0.4" - 3" |
| Grommet Mount Desktop Thickness | 0.4" - 2.2" |
| مادة | سبائك الفولاذ |
| لون | أسود |
تعليمات الإعداد
Follow these steps to correctly assemble and install your HUANUO HNCM7 Dual Monitor Mount.
الخطوة 1: اختر طريقة التركيب الخاصة بك
The mount supports two installation methods: C-Clamp or Grommet Mount. Select the method suitable for your desk.
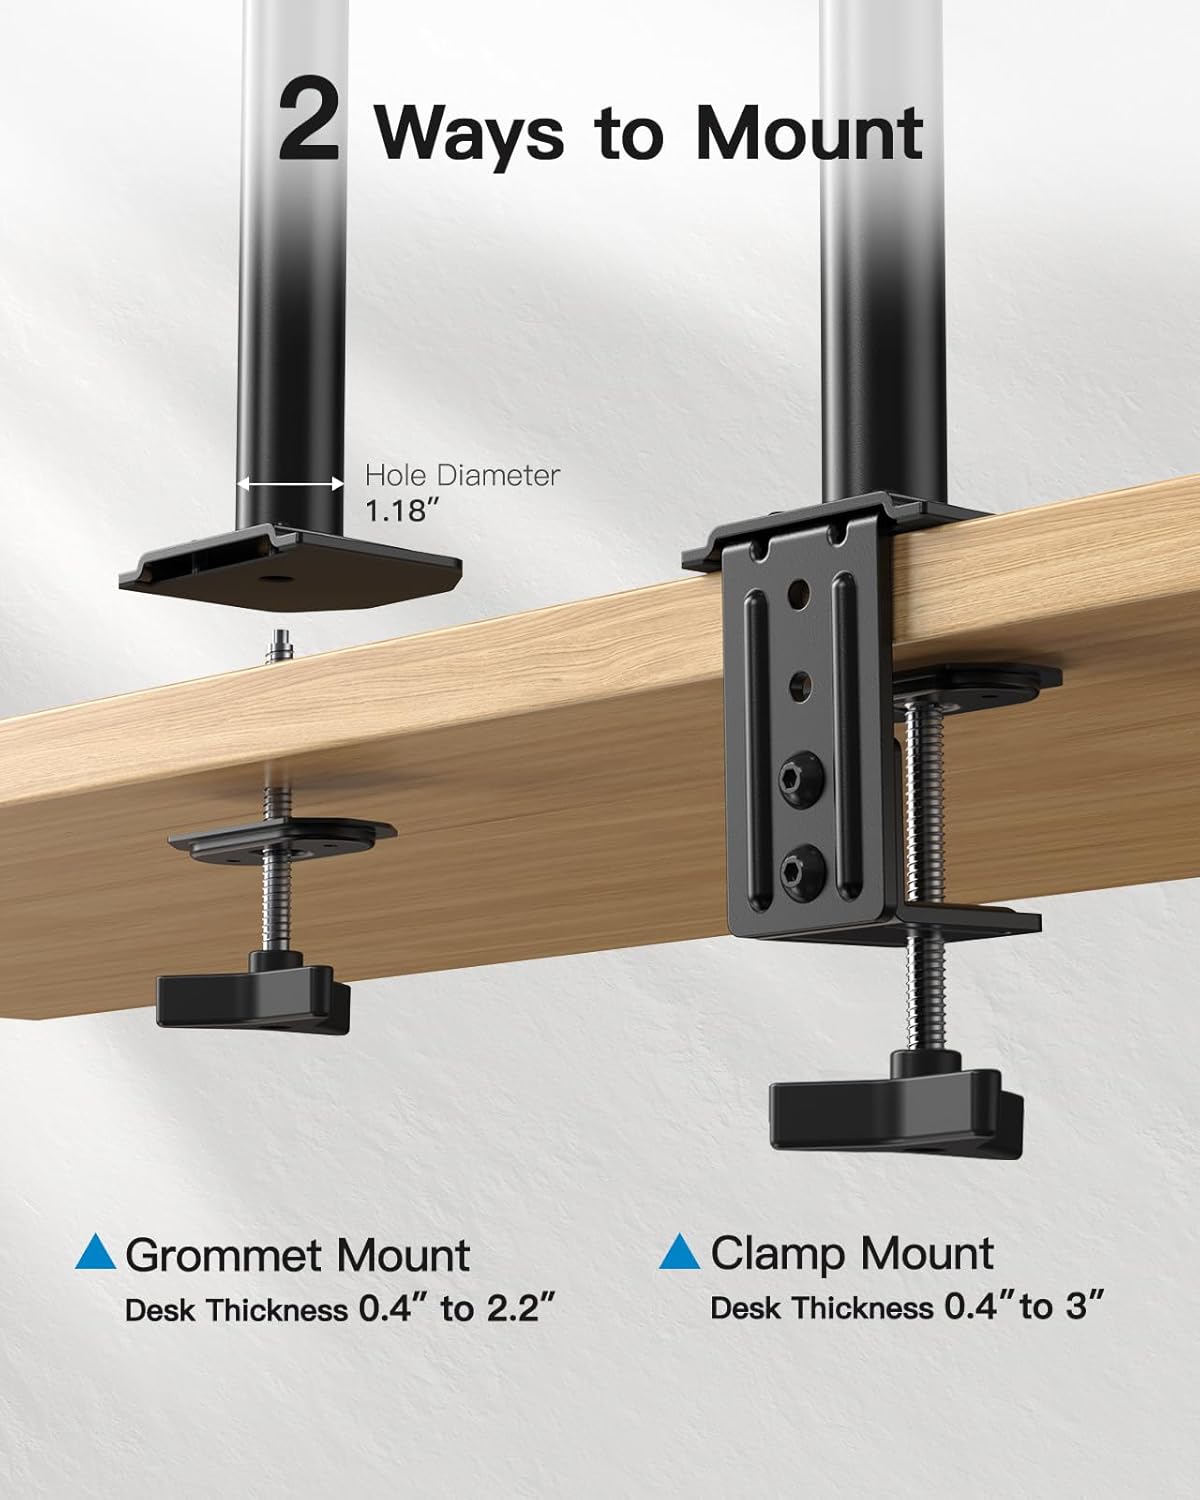
Figure 2: Illustration of C-Clamp وخيارات تركيب الحلقات المعدنية.
سي- Clamp تثبيت:
- إرفاق C-clamp assembly to the bottom of the main pole.
- Place the desk protection pad on the top surface of your desk where the clamp سيتم وضعه.
- Secure the mount to the edge of your desk by tightening the C-clamp screw until it is firm and stable. Ensure your desktop thickness is between 0.4" and 3".
تركيب حلقة التثبيت:
- If your desk has a grommet hole (diameter 1.18" or larger), insert the grommet mount components through the hole.
- Attach the main pole to the grommet mount.
- Secure the mount from underneath the desk by tightening the screw. Ensure your desktop thickness is between 0.4" and 2.2".
Step 2: Assemble the Articulating Arms
- Slide the articulating arm assembly onto the main pole.
- Adjust the height of the arms on the pole to your desired position.
- Tighten the set screw on the arm collar using the provided Allen wrench to secure the arms in place.
الخطوة 3: قم بتوصيل لوحات VESA بالشاشات
- ضع شاشتك بعناية على سطح ناعم ونظيف بحيث يكون وجهها لأسفل.
- قم بمحاذاة لوحة تثبيت VESA مع فتحات التثبيت الموجودة في الجزء الخلفي من شاشتك (75 × 75 مم أو 100 × 100 مم).
- Use the appropriate screws (A-D packets) and washers to secure the VESA plate to the monitor. Do not overtighten.
الخطوة الخامسة: تثبيت الشاشات على الأذرع
- With the VESA plate attached to your monitor, carefully slide the monitor onto the end of the articulating arm.
- Ensure the monitor is securely seated on the arm. Tighten any locking screws on the VESA head to prevent accidental detachment.
Video 1: Detailed unboxing and assembly guide for the HUANUO Dual Monitor Stand (Model HNCM7).
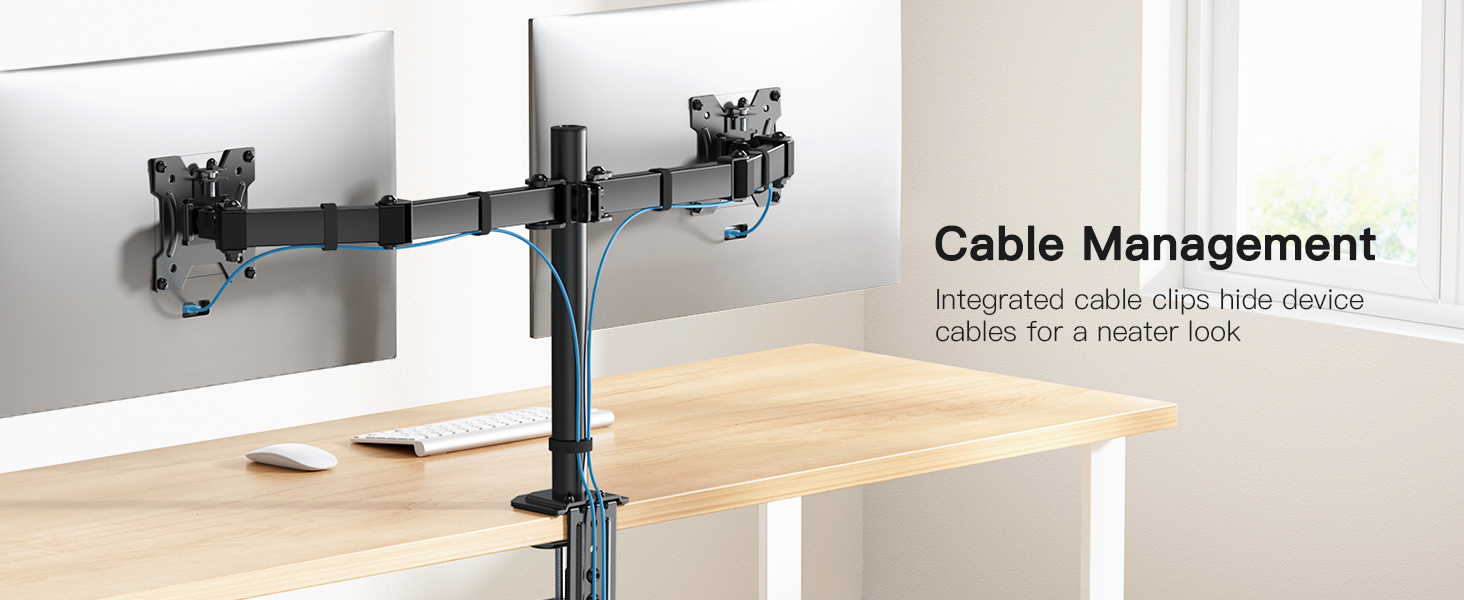
الخطوة 5: إدارة الكابلات
Utilize the integrated cable clips along the articulating arms to route and organize your monitor cables. This helps maintain a tidy workspace and prevents cable clutter.

Figure 3: Integrated cable management system for a neat setup.
تعليمات التشغيل
The HUANUO HNCM7 mount offers extensive adjustability to achieve optimal viewجي الراحة.

Figure 4: Demonstrating the tilt, swivel, and rotation capabilities of the monitor mount.
ضبط الارتفاع:
To adjust the height of the monitors, loosen the set screw on the arm collar on the main pole. Slide the arms up or down to the desired height (up to 16.73 inches), then re-tighten the screw firmly.
الإمالة والدوران والدوران:
- الإمالة: The monitor can be tilted ±45 degrees up or down. Loosen the tilt bolt on the VESA plate, adjust the angle, and then re-tighten.
- قطب: The articulating arms allow for ±90 degrees swivel at various joints, enabling you to position monitors side-to-side or forward/backward.
- تناوب: Each monitor can be rotated 360 degrees, allowing for landscape or portrait orientation.
Adjust the tightness of the joints using the provided Allen wrenches to achieve the desired resistance for movement. This prevents monitors from sagging or moving too freely.
الشكل 5: تحقيق بيئة عمل مريحة viewing comfort with adjustable monitor positioning.
صيانة
تضمن الصيانة الدورية طول عمر حامل الشاشة وأدائه الأمثل.
- تنظيف: امسح الحامل بقطعة قماش ناعمة.amp القماش. تجنب استخدام المنظفات الكاشطة أو المذيبات التي قد تؤدي إلى إتلاف الطبقة النهائية.
- التحقق من ضيق: Periodically check all screws and bolts, especially those securing the mount to the desk and the monitors to the VESA plates. Re-tighten as necessary to maintain stability.
- تشحيم: If any joints become stiff over time, a small amount of silicone-based lubricant can be applied to the moving parts.
استكشاف الأخطاء وإصلاحها
فيما يلي حلول للمشاكل الشائعة التي قد تواجهها:
- Monitors are not stable/sagging: Ensure all bolts and screws, particularly those on the arm joints and VESA plates, are tightened securely. Adjust the tension of the articulating arms if they are too loose.
- صعوبة في ضبط وضع الشاشة: Loosen the relevant bolts or screws at the joints slightly to allow for easier movement. Re-tighten once the desired position is achieved.
- Mount feels wobbly on the desk: تأكد مرة أخرى من أن C-clamp or grommet mount is fully tightened to the desk. Ensure the desk surface is sturdy enough to support the weight of the mount and monitors.
- اجزاء مفقودة: If any parts are missing upon unboxing, contact HUANUO customer support immediately.
الضمان والدعم
For warranty information or technical support, please refer to the contact details provided in the original product packaging or visit the official HUANUO webموقع. احتفظ بإيصال الشراء الخاص بك لمطالبات الضمان.
معلومات الاتصال:
- بريد إلكتروني: support@huanuo.com
- Telephone: 1-800-556-0533 (Mon-Fri 10am - 6pm PST/PDT USA)


