1. المقدمة
This manual provides comprehensive instructions for the installation, operation, and maintenance of your FSP CMT230 ATX Mid Tower PC Gaming Case. Please read this manual carefully before proceeding with installation to ensure proper setup and optimal performance.
The FSP CMT230 is designed to accommodate ATX, Micro-ATX, and Mini-ITX motherboards, offering a versatile platform for building your computer system. It features a sleek design with a mesh front panel and pre-installed blue LED fans for efficient cooling.

الصورة 1.1: الجانب الأمامي view of the FSP CMT230 PC Gaming Case, showcasing the translucent side window and illuminated blue LED fans.
2. محتويات العبوة
تأكد من وجود جميع المكونات في العبوة:
- FSP CMT230 ATX Mid Tower PC Gaming Case
- مجموعة الملحقات (البراغي، الفواصل، روابط الكابلات)
- دليل المستخدم (هذا المستند)
3. الإعداد وتثبيت المكونات
3.1 إعداد القضية
- ضع العلبة على سطح ثابت ومستوٍ.
- قم بإزالة الألواح الجانبية عن طريق فك مسامير الإبهام الموجودة في الجزء الخلفي من العلبة وتحريك الألواح للخلف.

الصورة 3.1: من أعلى إلى أسفل view of the FSP CMT230 case with the translucent side panel removed, revealing the spacious interior for component installation.
3.2 تركيب اللوحة الأم
- قم بتثبيت درع الإدخال/الإخراج في الفتحة الخلفية للعلبة.
- Align the motherboard with the pre-installed standoffs. Ensure the correct standoffs are used for your motherboard form factor (ATX, Micro-ATX, Mini-ITX).
- قم بتأمين اللوحة الأم باستخدام البراغي المتوفرة.
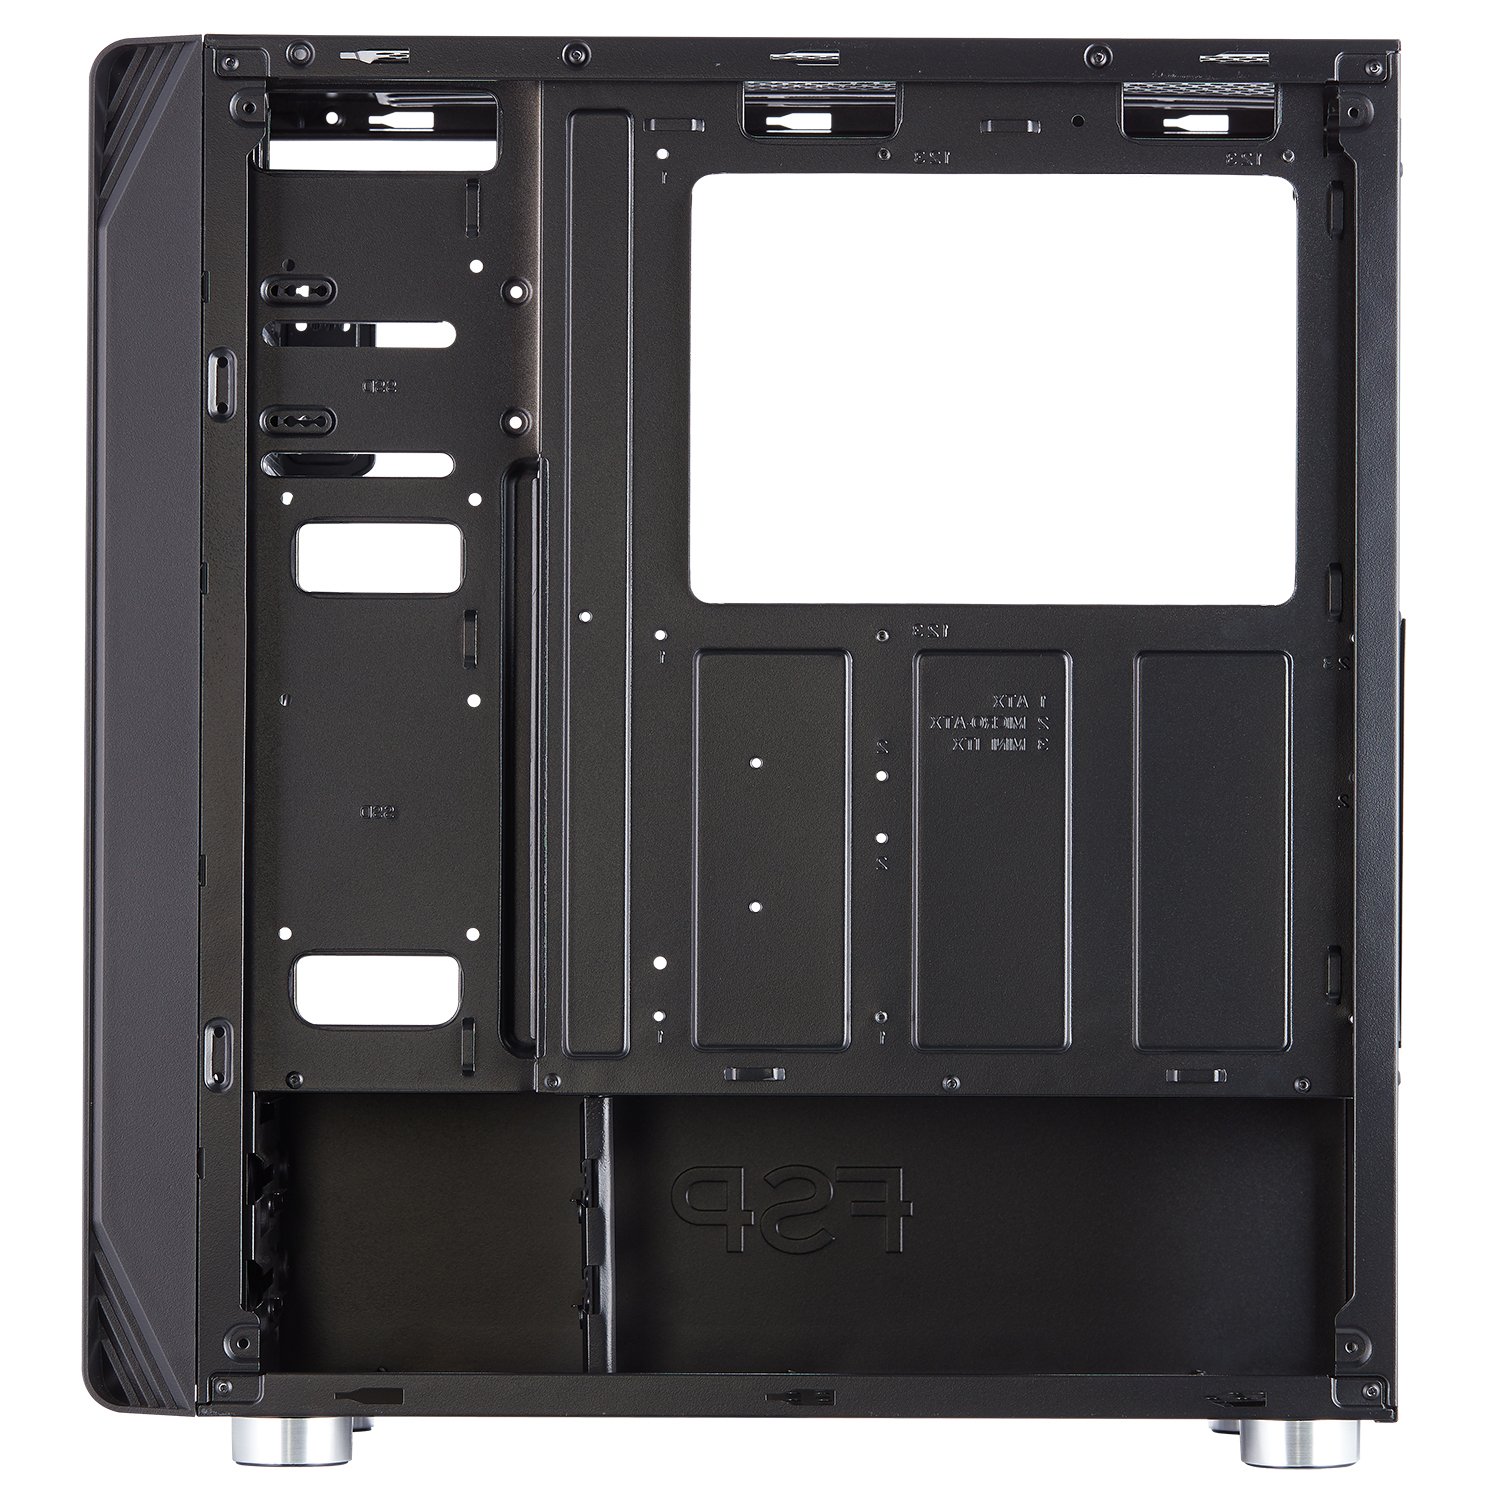
الصورة 3.2: داخلي view of the FSP CMT230, highlighting the motherboard tray with clearly marked mounting points for various motherboard sizes.
3.3 تركيب وحدة إمداد الطاقة (PSU)
- ضع وحدة تزويد الطاقة في الحجرة المخصصة لها في الجزء الخلفي السفلي من الهيكل.
- قم بتأمين وحدة إمداد الطاقة باستخدام البراغي من الجزء الخلفي للعلبة.
3.4 تثبيت محرك الأقراص (HDD/SSD)
- محركات الأقراص الصلبة مقاس 3.5 بوصة: Install into the drive cages located beneath the PSU shroud or in designated bays.
- أقراص SSD مقاس 2.5 بوصة: Mount SSDs to the dedicated SSD trays or mounting points on the motherboard tray or behind it.
3.5 Expansion Card (GPU) Installation
- قم بإزالة أغطية فتحات PCI-E اللازمة من الجزء الخلفي من الهيكل.
- Insert the expansion card (e.g., graphics card) into the appropriate PCI-E slot on the motherboard.
- Secure the card with screws.
3.6 تركيب المروحة والرادياتير
The CMT230 comes with three pre-installed 120mm blue LED fans (two in the front, one in the rear). Additional fan and radiator support is available:
- أمام: Supports up to two 120mm/140mm fans or one 280mm radiator.
- قمة: Supports up to two 120mm/140mm fans or one 280mm radiator.
- مؤخرة: Supports one 120mm fan (one pre-installed).
3.7 إدارة الكابلات
Utilize the cable routing holes and tie-down points behind the motherboard tray to organize cables. This improves airflow and maintains a clean interior aesthetic.

الصورة 3.3: الجزء الداخلي الخلفي view of the FSP CMT230, illustrating the space and routing options for effective cable management behind the motherboard tray.
3.8 منافذ الإدخال/الإخراج الأمامية
Connect the front panel cables (USB 3.0, USB 2.0, Audio, Power, Reset, LED) to the corresponding headers on your motherboard. Refer to your motherboard manual for specific header locations.

الصورة 3.4: الجبهة view of the FSP CMT230, detailing the front panel with USB 3.0, USB 2.0, audio ports, and power/reset buttons.
4. تعليمات التشغيل
4.1 تشغيل/إيقاف التشغيل
Press the power button located on the top front panel of the case to turn your computer system on or off. A short press typically initiates power-on or sleep mode, while a long press (usually 4-5 seconds) forces a shutdown.
4.2 استخدام منافذ اللوحة الأمامية
توفر اللوحة الأمامية وصولاً سهلاً إلى:
- منافذ USB 3.0 (x2): لنقل البيانات بسرعة عالية مع الأجهزة المتوافقة.
- منافذ USB 2.0 (x2): للأجهزة USB القياسية.
- مقابس الصوت: لتوصيل سماعات الرأس والميكروفونات.
4.3 LED Fan Operation
The pre-installed blue LED fans illuminate automatically when the system is powered on. The LED color is fixed to blue and cannot be changed or turned off independently.
5. الصيانة
5.1 التنظيف
- الخارج: امسحي الأسطح الخارجية بقطعة ناعمة ، دamp قماش. تجنب المنظفات الكاشطة.
- فلاتر الغبار: Regularly remove and clean the dust filters (if applicable) to maintain optimal airflow and prevent dust buildup inside the case.
- الداخلية: Use compressed air to remove dust from internal components and fans. Ensure the system is powered off and unplugged before cleaning the interior.
5.2 Airflow Optimization
Ensure that the case has adequate clearance around its intake and exhaust vents to facilitate proper airflow and cooling performance.
6. استكشاف الأخطاء وإصلاحها
If you encounter issues with your FSP CMT230 case, consider the following:
- النظام لا يعمل: Verify all power connections (PSU to motherboard, front panel power switch to motherboard header) are correctly seated.
- المراوح لا تدور: Check fan power connections to the motherboard or PSU. Ensure pre-installed fans are connected via Molex if applicable.
- Front panel USB/Audio not working: Confirm that the front panel headers are correctly connected to the motherboard.
For persistent issues, consult your motherboard manual or contact FSP support.
7. المواصفات
| ميزة | مواصفة |
|---|---|
| ماركة | FSP |
| نموذج | CMT230 |
| نوع الحالة | البرج الاوسط |
| التوافق مع اللوحة الأم | ATX و Micro-ATX و Mini-ITX |
| الأبعاد (الطول × العرض × الارتفاع) | 39 × 21 × 45 سم (تقريبًا) |
| وزن العنصر | 4.54 كجم |
| فتحات التوسعة | 7 فتحات PCI-E |
| حجرات القيادة | 2 x ODD, 2 x HDD, 2 x SSD |
| منافذ الإدخال / الإخراج الأمامية | منفذان USB 3.0، منفذان USB 2.0، مدخل/مخرج صوت |
| مراوح مثبتة مسبقًا | 3 x 120mm Blue LED (2 Front, 1 Rear) |
| أقصى طول GPU | 373 ملم |
| أقصى ارتفاع لمبرد وحدة المعالجة المركزية | 179 ملم |
| دعم المبرد | Up to 2 x 280mm (Front/Top) |
| مادة | معدن |
| المميزات الخاصة | LED Lighting, Unique Airflow Design |
8. الضمان والدعم
FSP products are manufactured to high-quality standards. For warranty information and technical support, please refer to the official FSP website or contact your local FSP distributor. Keep your proof of purchase for warranty claims.


