1. المقدمة
This manual provides comprehensive instructions for the setup, installation, operation, maintenance, and troubleshooting of your Antec VSK2000-U3 Micro-ATX Desktop Case. Please read this manual thoroughly before beginning installation to ensure proper assembly and optimal performance.
Video 1: Computer Case Display. This video provides a visual overview of a computer case, demonstrating its external features and design.
2. الميزات الرئيسية
The Antec VSK2000-U3 Micro-ATX Desktop Case is designed for efficient and compact PC builds. Key features include:
- Motherboard Support: Up to Micro-ATX
- Cooling: 1 x 92 mm temperature-controlled fan included
- Power Supply Unit (PSU) Support: TFX form factor
- Drive Bays: Supports up to 1 x 5.25” ODD, 1 x 3.5" HDD & 1 x 2.5" SSD
- فتحات التوسعة: 4

الشكل 1: الجبهة view of the Antec VSK2000-U3 case, highlighting the front panel I/O and optical drive bay.
3. الإعداد والتثبيت
Follow these steps to install your components into the Antec VSK2000-U3 case. Ensure all power is disconnected before handling internal components.
3.1. إعداد القضية
- إزالة الألواح الجانبية: Carefully remove the side panels of the case to access the interior.
- تثبيت I/O Shield: Install the I/O shield provided with your motherboard into the rear opening of the case.

الشكل 2: الجانب view of the Antec VSK2000-U3 case with the side panel removed, showing the internal layout.
3.2. تركيب اللوحة الأم
- Align Motherboard: Carefully align your Micro-ATX motherboard with the standoffs inside the case.
- لوحة أم آمنة: Use the provided screws to secure the motherboard to the standoffs.
3.3. تركيب التيار الكهربائي
- موقف PSU: Install your TFX form factor power supply into its designated bay.
- مصدر طاقة آمن: Secure the power supply with screws from the rear of the case.
- توصيل كابلات الطاقة: Route and connect the necessary power cables to your motherboard and other components.

الشكل 3: خلفي view of the Antec VSK2000-U3 case, showing the I/O shield area, expansion slots, and PSU mounting.
3.4. Drive Installation (ODD, HDD, SSD)
- Optical Drive (ODD): Install your 5.25" optical drive into the front bay. The case features a tool-less ODD housing system.
- Hard Disk Drive (HDD): Install your 3.5" HDD into the designated bay. The case features a tool-less HDD housing system.
- Solid State Drive (SSD): Install your 2.5" SSD into the designated bay.
- ربط محركات الأقراص: Connect SATA data and power cables to all installed drives.
3.5. تركيب بطاقة التوسعة
- إزالة أغطية الفتحة: قم بإزالة أغطية فتحات التوسعة اللازمة من الجزء الخلفي للعلبة.
- تثبيت البطاقة: Insert your expansion card (e.g., graphics card) into the appropriate PCI-E slot on the motherboard.
- بطاقة آمنة: Secure the expansion card with a screw.
3.6. توصيلات اللوحة الأمامية
Connect the front panel cables (USB 3.0, audio, power switch, reset switch, LED indicators) to the corresponding headers on your motherboard. Refer to your motherboard manual for specific header locations.
3.7. إدارة الكابلات
Route cables neatly to improve airflow and aesthetics. Use cable ties or the case's cable management features to secure cables away from moving parts and airflow paths.
3.8. Video Tutorials for Installation
Video 2: Detailed Installation Tutorial. This video demonstrates the step-by-step process of installing components into a computer case, including the motherboard, power supply, and drives.
Video 3: Micro ATX PC Case Installation. This video illustrates the assembly process for a Micro ATX PC case, covering component placement and cable routing.
4. تعليمات التشغيل
Once all components are securely installed and connected, replace the side panels. Connect your monitor, keyboard, mouse, and other peripherals to the appropriate ports on the rear I/O panel and front panel. Connect the power cable to the power supply and a wall outlet, then press the power button on the front of the case to start your system.
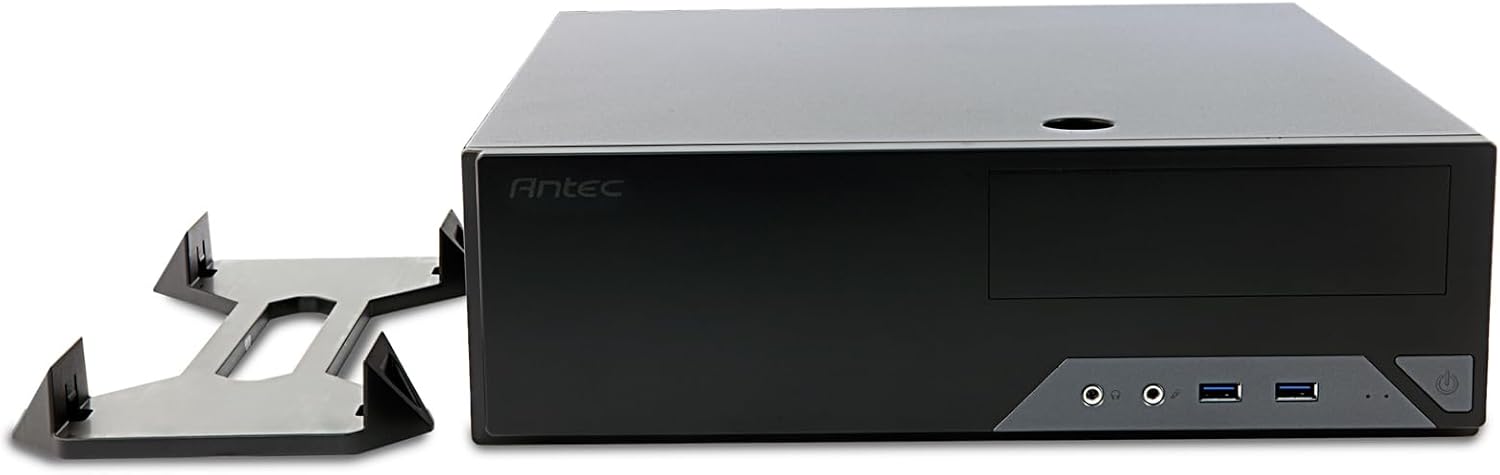
Figure 4: The Antec VSK2000-U3 case shown in a horizontal orientation with its included stand, demonstrating versatile placement options.
5. الصيانة
تساعد الصيانة المنتظمة على ضمان طول عمر جهاز الكمبيوتر الخاص بك وأدائه الأمثل.
- تنظيف الغبار: Periodically clean dust from the case interior, fans, and air vents using compressed air or a soft brush. Ensure the system is powered off and unplugged before cleaning.
- إدارة الكابلات: Check cable routing periodically to ensure no cables are obstructing airflow or fan operation.
- فحص المروحة: Ensure the included 92mm temperature-controlled fan and any other installed fans are operating correctly and free from obstructions.
6. استكشاف الأخطاء وإصلاحها
إذا واجهت مشكلات في بناء جهاز الكمبيوتر الخاص بك، ففكر في خطوات استكشاف الأخطاء وإصلاحها الشائعة التالية:
- لا يوجد طاقة:
- Verify the power cable is securely connected to the PSU and wall outlet.
- تأكد من أن مفتاح PSU في وضع التشغيل.
- Check all internal power connections (24-pin ATX, 8-pin CPU, GPU power, drive power).
- Confirm front panel power switch cable is correctly connected to the motherboard.
- لا يوجد عرض:
- Ensure the monitor is connected to the correct graphics output (dedicated GPU or motherboard integrated graphics).
- أعد تركيب بطاقة الرسومات ووحدات ذاكرة الوصول العشوائي (RAM).
- الضوضاء المفرطة:
- Identify the source of the noise (fan, HDD).
- Clean dust from fans.
- Ensure no cables are touching fan blades.
7. المواصفات
| ميزة | التفاصيل |
|---|---|
| ماركة | أنتيك |
| مسلسل | VSK2000-U3 |
| اسم الموديل | VSK2000-U3 |
| التوافق مع اللوحة الأم | مايكرو ATX |
| نوع الحالة | Mid Tower (Slim Desktop) |
| الأبعاد (الطول × العرض × الارتفاع) | 18.6 × 15.9 × 7 بوصة |
| وزن العنصر | 5.28 رطل |
| لون | أسود |
| مادة | Painted/Coated Metal (Likely Steel Or Aluminum With Plastic Components) |
| نوع تركيب مصدر الطاقة | Rear Mount (TFX form factor) |
| طريقة التبريد | Air (1 x 92 mm temperature-controlled fan included) |
| حجم المروحة | 92 مليمتر |
| حجرات القيادة | 1 x 5.25” ODD, 1 x 3.5" HDD, 1 x 2.5" SSD |
| فتحات التوسعة | 4 |
8. الضمان والدعم
The Antec VSK2000-U3 Micro-ATX Desktop Case comes with a ضمان لمدة سنتين. For technical support, warranty claims, or additional product information, please visit the official Antec webالموقع الإلكتروني أو تواصل مع قسم خدمة العملاء. احتفظ بإيصال الشراء للتحقق من صحة الضمان.
لمزيد من المساعدة، يرجى الرجوع إلى Antec Store.


