1. المقدمة
Thank you for choosing the Meister 600W Belt Sander MBS600-1. This powerful tool is designed for efficient sanding of large flat surfaces made of wood, plastic, and metal. It is ideal for tasks such as removing paint and varnish, deburring plastic, and preparing surfaces for finishing. This manual provides essential information for safe operation, proper setup, maintenance, and troubleshooting to ensure optimal performance and longevity of your belt sander.
2. تعليمات السلامة الهامة
التزم دائمًا باحتياطات السلامة الأساسية عند استخدام الأدوات الكهربائية للحد من خطر الحريق والصدمات الكهربائية والإصابات الشخصية. احتفظ بهذا الدليل للرجوع إليه مستقبلًا.
السلامة العامة لأداة الطاقة
- سلامة منطقة العمل: حافظ على نظافة منطقة عملك وإضاءة جيدة. الأماكن المزدحمة أو المظلمة تُعرّضك للحوادث. لا تشغّل الأدوات الكهربائية في أجواء قابلة للانفجار، مثل وجود سوائل أو غازات أو غبار قابل للاشتعال.
- السلامة الكهربائية: يجب أن تتوافق مقابس الأدوات الكهربائية مع المقبس. لا تُجري أي تعديلات على المقبس بأي شكل من الأشكال. تجنب ملامسة جسمك للأسطح المؤرضة أو الموصولة بها، مثل الأنابيب، والمشعات، والمواقد، والثلاجات.
- السلامة الشخصية: Always wear eye protection. Use dust masks, non-skid safety shoes, hard hats, or hearing protection for appropriate conditions. Dress properly. Do not wear loose clothing or jewelry. Keep hair and clothing away from moving parts.
- استخدام الأداة والعناية: لا تضغط على الأداة الكهربائية. استخدم الأداة الكهربائية المناسبة لتطبيقك. افصل القابس عن مصدر الطاقة قبل إجراء أي تعديلات أو تغيير الملحقات أو تخزين الأدوات الكهربائية.
Belt Sander Specific Safety
- Ensure the sanding belt is correctly installed and tensioned before operation.
- Always use the auxiliary handle for secure guidance and control of the machine.
- Connect the dust extraction system to maintain a clean and safe working environment.
- لا تقم برمل المواد التي تحتوي على الأسبستوس.
- The tool is GS certified, indicating compliance with German safety standards.
3. محتويات العبوة
Carefully unpack your Meister 600W Belt Sander and check that all items are present and undamaged. If any parts are missing or damaged, please contact your retailer.
- 1 x Meister 600W Belt Sander MBS600-1
- 1 x Fabric abrasive belt, grit 80
- 1 x External dust extraction adapter (2 pieces)
- صندوق واحد لجمع الغبار

Figure 1: Meister 600W Belt Sander MBS600-1 with included accessories: sanding belt, dust collection box, and dust extraction adapter.
4. ميزات المنتج ومكوناته
Familiarize yourself with the main components of your belt sander before operation.
- Power Switch with Lock-on Function: للعمل المستمر.
- قرص ضبط السرعة: Allows continuous adjustment of belt speed for material-specific work.
- مقبض مساعد: Provides secure grip and guidance.
- منفذ استخراج الغبار: For connecting the dust collection box or an external vacuum system.
- ذراع التحرير السريع: For fast and tool-free sanding belt changes.
- Soft-Grip Inserts: لضمان سهولة الاستخدام وأمانه.
- LED Operating Indicator: Shows when the tool is powered on.

Figure 2: Power switch with lock-on function and LED indicator.

Figure 3: Speed adjustment dial for continuous speed control.

Figure 4: Dust extraction adapter and dust collection box attachment.
5. الإعداد
ربط حزام الصنفرة
- تأكد من فصل الأداة عن مصدر الطاقة.
- Locate the quick-release lever on the side of the sander.
- Push the quick-release lever to loosen the belt tension.
- Slide the old sanding belt off (if applicable) and slide the new belt onto the rollers, ensuring the arrow on the belt matches the direction of rotation indicated on the tool.
- Release the quick-release lever to tension the belt.
- Manually rotate the belt a few times to ensure it is centered. If not, use the belt tracking adjustment knob (if present) to center it.
توصيل مجموعة الغبار
- For internal dust collection, attach the provided dust collection box to the dust extraction port. Ensure it clicks securely into place.
- For external dust extraction, attach the 2-piece adapter to the dust extraction port, then connect your external vacuum hose to the adapter.
الاستخدام الثابت
The belt sander can be quickly converted for stationary use by clamping it to a workbench. This is useful for tasks like sharpening or sanding smaller workpieces.
- تأكد من فصل الأداة عن الكهرباء.
- Position the sander upside down on a stable workbench.
- Secure the sander using appropriate clamps (not included) through the designated mounting points. Ensure the sander is stable and will not move during operation.
- Always ensure adequate ventilation and clear the area around the sanding belt.

Figure 5: Belt sander set up for stationary use, clampإد إلى طاولة العمل.
6. تعليمات التشغيل
تشغيل/إيقاف التشغيل
- لتشغيل: Press the power switch. The LED operating indicator will light up.
- للتشغيل المستمر: Press the power switch and then press the lock button. The tool will continue to run without holding the switch.
- To Turn Off (from continuous operation): اضغط على مفتاح الطاقة مرة أخرى.
ضبط السرعة
Use the speed adjustment dial to select the appropriate belt speed (170-250 m/min) for your material and application. Lower speeds are generally suitable for fine sanding or heat-sensitive materials, while higher speeds are for coarse material removal.
تقنيات الصنفرة
- استخدام الهاتف المحمول: Hold the sander firmly with both hands using the main handle and auxiliary handle. Place the sander flat on the workpiece and move it evenly across the surface. Apply light, consistent pressure.
- استخدامات القرطاسية: With the sander clamped to a workbench, carefully bring the workpiece to the moving sanding belt. Maintain a firm grip on the workpiece and move it smoothly against the belt.
- ملاءمة المواد: This sander is effective for wood, plastic, and metal. Always test on a scrap piece first to determine the optimal speed and pressure.
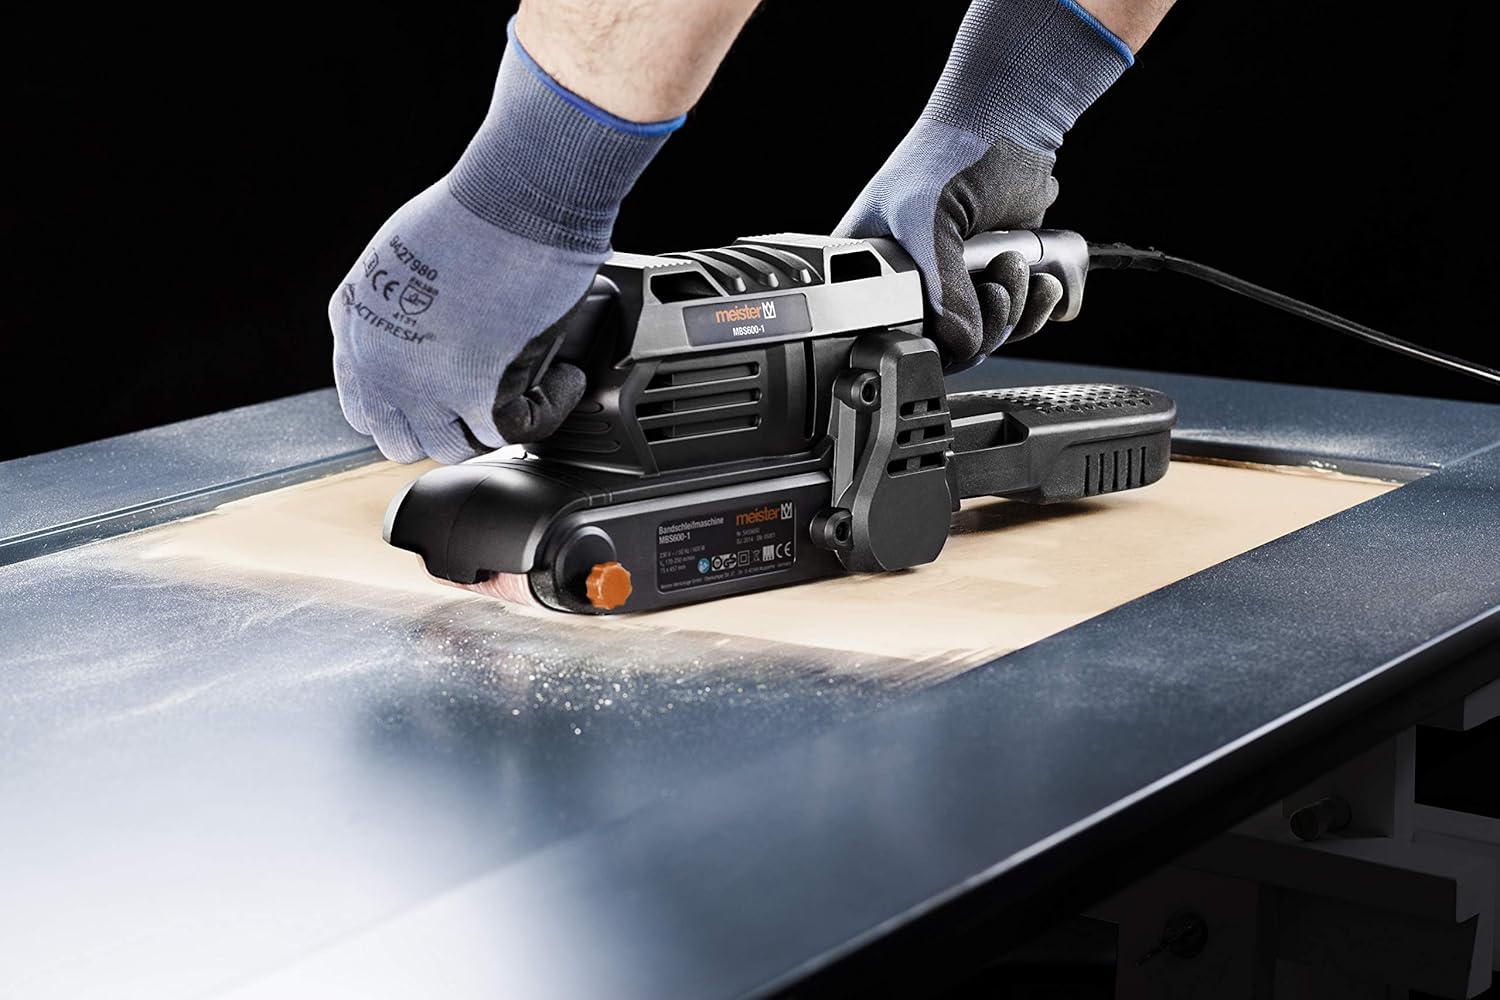
Figure 6: Operating the belt sander on a flat surface.
7. الصيانة
تضمن الصيانة المنتظمة طول عمر أداةك وتشغيلها بشكل آمن.
تنظيف الأداة
- افصل الأداة دائمًا قبل التنظيف.
- استخدم فرشاة ناعمة أو هواء مضغوط لتنظيف الغبار والحطام من فتحات التهوية وحول منطقة حزام الصنفرة.
- امسح السكن بالإعلانamp قماش. لا تستخدم مواد كيميائية قاسية أو منظفات كاشطة.
Changing Sanding Belts
Refer to the 'Attaching the Sanding Belt' section under Setup for detailed instructions on changing the abrasive belt.
تفريغ صندوق الغبار
Regularly empty the dust collection box to maintain effective dust extraction and prevent clogging. Detach the box, empty its contents, and reattach it securely.
8. استكشاف الأخطاء وإصلاحها
فيما يلي بعض المشكلات الشائعة وحلولها المحتملة:
| مشكلة | السبب المحتمل | حل |
|---|---|---|
| ساندر لا يبدأ | لا يوجد مصدر للطاقة؛ مفتاح معيب | Check power connection and outlet; Contact service if switch is faulty. |
| Sanding belt slips or runs off | Belt not tensioned correctly; Belt tracking misaligned | Re-tension belt with quick-release lever; Adjust belt tracking knob. |
| Poor sanding results | Worn sanding belt; Incorrect grit; Too much pressure | Replace sanding belt; Use appropriate grit for the task; Apply lighter, even pressure. |
| غبار زائد | Dust box full or not attached correctly; Dust extraction port blocked | Empty and reattach dust box; Clear any blockages in the dust port or adapter. |
9. المواصفات الفنية
| مواصفة | قيمة |
|---|---|
| رقم الموديل | MBS600-1 (Reference: 5455650) |
| القدرة المقدرة | 600 واط |
| مزود الطاقة | 230 V / 50 هرتز |
| سرعة الحزام | 170 - 250 m/min (continuously adjustable) |
| سطح الصنفرة | 150 × 75 ملم |
| حجم الحزام الكاشط | 457 × 75 ملم |
| وزن | 2.5 kg (product) / 3.14 kg (package) |
| طول الكابل | 300 سم (3 متر) |
| المكونات المضمنة | 1 x Belt Sander, 1 x K80 Abrasive Belt, 1 x 2-piece External Dust Adapter, 1 x Dust Box |
| الشركة المصنعة | Conmetall Meister GmbH - Tools - FR |
10. الضمان والدعم
The Meister 600W Belt Sander MBS600-1 is manufactured to high-quality standards and is GS certified for your safety. For warranty claims or technical support, please refer to the warranty card included with your product or contact your retailer. Keep your proof of purchase for any warranty-related inquiries.
Information regarding spare parts availability is not provided in the product details. For any specific spare part inquiries, please contact the manufacturer or your point of purchase.


