1. المقدمة
This manual provides detailed instructions for the installation, operation, maintenance, and troubleshooting of the HP Compaq 513426-001 Motherboard. This motherboard, also known as the Pegatron M2N68-LA Narra5-GL6 Rev:5.0, is designed for use in HP Pavilion P6000 series desktop computers. Please read this manual thoroughly before proceeding with any installation or configuration to ensure proper functionality and system stability.
2. انتهى المنتجview
The HP Compaq 513426-001 Motherboard is a core component for your desktop system, supporting AMD processors with AM2+ and AM2 sockets. It features multiple expansion slots, memory slots, and connectivity options to build or upgrade a personal computer.

الشكل 2.1: بزاوية view of the HP Compaq 513426-001 Motherboard, showing various components including the CPU socket, RAM slots, and I/O ports.
تتضمن الميزات الرئيسية ما يلي:
- CPU Socket: AM2+/AM2 for compatible AMD processors.
- Memory Slots: 5 slots supporting up to 32 GB of RAM.
- Storage Connectivity: 6 SATA ports for hard drives and solid-state drives.
- Integrated Graphics: Onboard video output ports.
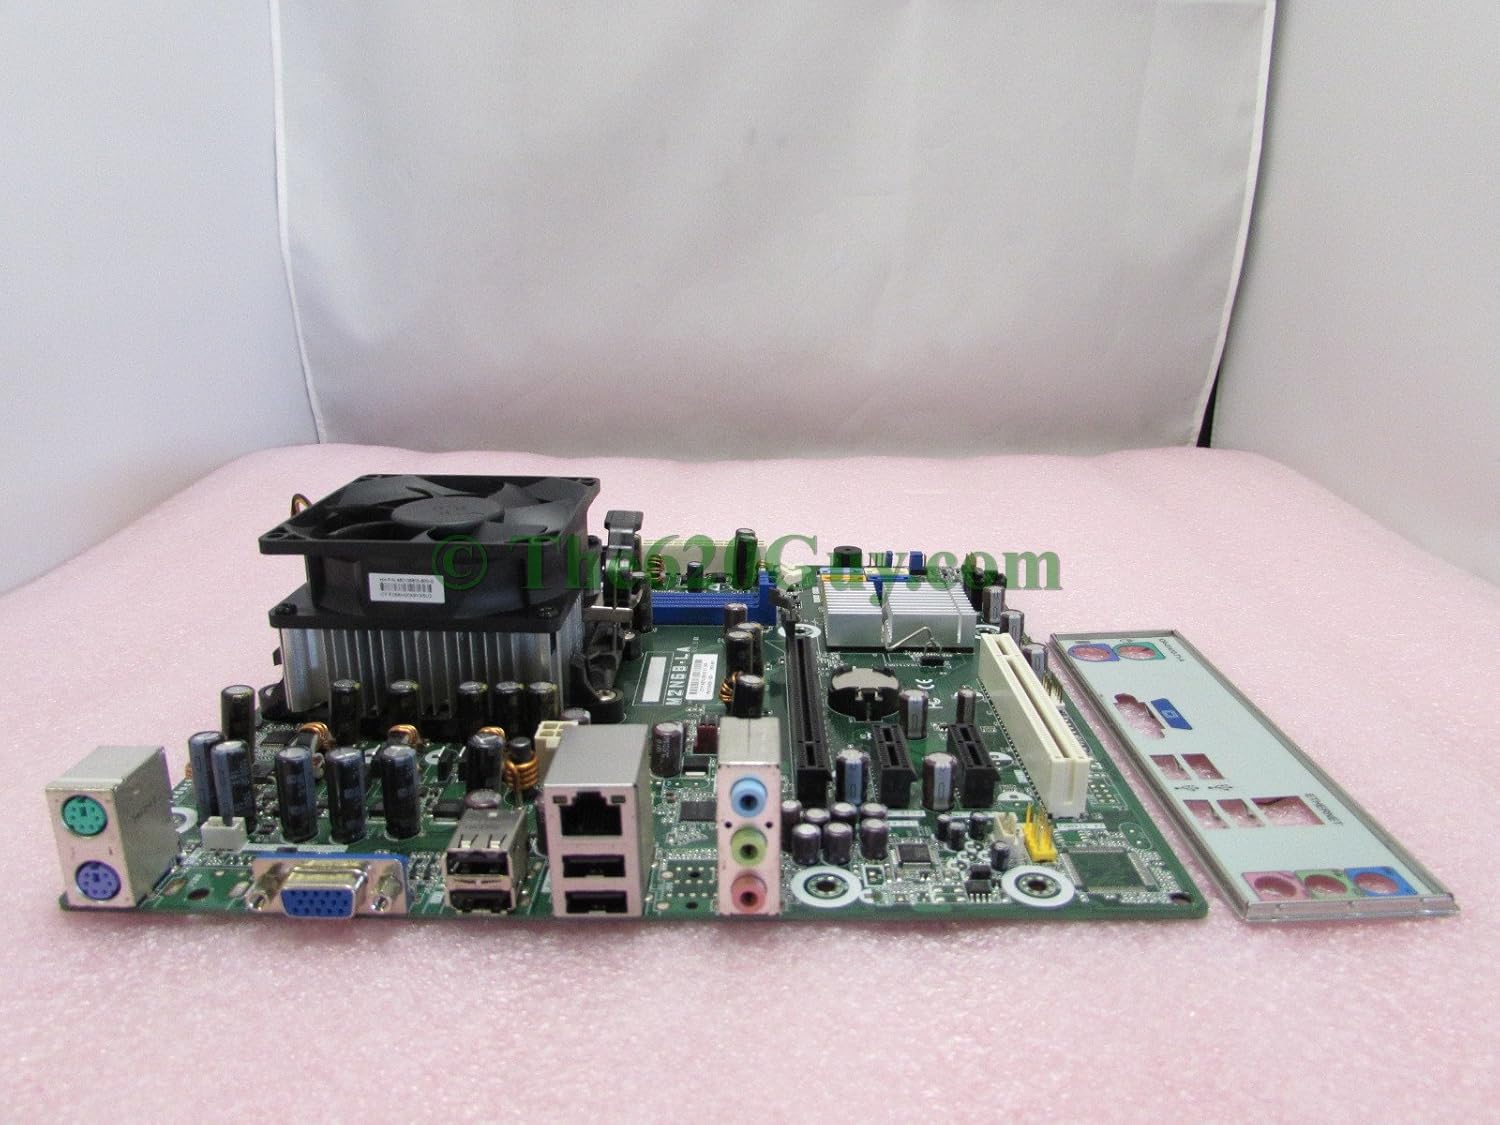
الشكل 2.2: الجانب view of the motherboard, illustrating the CPU heatsink and fan assembly, along with the rear I/O panel.

الشكل 2.3: النفقات العامة view of the motherboard, clearly showing the layout of components, expansion slots, and the included I/O shield.

Figure 2.4: Another angled perspective of the motherboard, highlighting the CPU cooler installation area and the various ports on the I/O panel.
3. الإعداد والتثبيت
Before beginning installation, ensure your computer is powered off and unplugged from the wall outlet. Wear an anti-static wrist strap to prevent electrostatic discharge (ESD) damage to components.
3.1. تثبيت وحدة المعالجة المركزية
- Locate the AM2+/AM2 CPU socket on the motherboard.
- Gently lift the retention lever on the side of the CPU socket.
- Align the CPU with the socket, ensuring the gold triangle on the CPU matches the triangle on the socket. Do not force the CPU into place.
- Once seated, lower the retention lever to secure the CPU.
- ضع طبقة رقيقة ومتساوية من المعجون الحراري على الجزء العلوي من وحدة المعالجة المركزية (إذا لم يتم وضعه مسبقًا على المبرد).
- قم بتركيب مبرد وحدة المعالجة المركزية وفقًا لتعليمات الشركة المصنعة، مع التأكد من أنه يتصل بإحكام بوحدة المعالجة المركزية.
3.2. تثبيت الذاكرة (RAM)
- Locate the 5 memory slots on the motherboard.
- افتح المشابك الموجودة في كلا طرفي فتحة الذاكرة.
- قم بمحاذاة وحدة الذاكرة مع الفتحة، مع التأكد من أن الشق الموجود على الوحدة يتطابق مع المفتاح الموجود في الفتحة.
- اضغط بقوة على كلا طرفي وحدة الذاكرة حتى تستقر المشابك في مكانها.
3.3. اتصال جهاز التخزين
- Connect SATA data cables from your hard drives or SSDs to the 6 SATA ports on the motherboard.
- Ensure power cables from the power supply are connected to your storage devices.
3.4. تركيب بطاقة التوسعة
- Identify the appropriate PCI Express (PCIe) or PCI slot for your expansion card (e.g., graphics card, network card).
- Remove the corresponding metal bracket from your computer case.
- قم بمحاذاة البطاقة مع الفتحة واضغط لأسفل بقوة حتى تستقر تمامًا.
- Secure the card with a screw or retention clip from your computer case.
3.5. Power Supply and Front Panel Connections
- Connect the main 24-pin ATX power connector from your power supply to the motherboard.
- Connect the 4-pin or 8-pin CPU power connector to the motherboard.
- Connect the front panel headers (power button, reset button, HDD LED, power LED, front USB, front audio) to their respective pins on the motherboard. Refer to your computer case manual for specific pin assignments.
3.6. تركيب اللوحة الأم
- Install standoffs in your computer case that align with the screw holes on the motherboard.
- Carefully place the motherboard onto the standoffs, ensuring the rear I/O ports align with the I/O shield in the case.
- ثبّت اللوحة الأم بالبراغي. لا تُشدّها أكثر من اللازم.
4. Operating System and BIOS Configuration
4.1. بدء التشغيل الأولي
After all components are installed and connected, plug in your computer and power it on. The system should perform a Power-On Self-Test (POST). If successful, you will see a display on your monitor.
4.2. BIOS/UEFI Access and Configuration
To access the BIOS (Basic Input/Output System) setup utility, press the designated key (commonly ديل, F2, ف10، أو ف12) repeatedly during the initial boot sequence. Within the BIOS, you can configure settings such as:
- Boot order (to install an operating system from a USB drive or DVD).
- تاريخ النظام ووقته.
- CPU and memory settings.
- Integrated peripheral settings.
4.3. تثبيت نظام التشغيل
Once the BIOS is configured, you can proceed with installing your preferred operating system. The motherboard is compatible with various operating systems, including Linux, as indicated in its specifications. Follow the installation instructions provided with your operating system.
5. الصيانة
تساعد الصيانة الدورية على ضمان طول عمر اللوحة الأم والنظام وتشغيلهما بشكل مستقر.
5.1. إزالة الغبار
Dust accumulation can lead to overheating and component failure. Periodically (e.g., every 6-12 months), open your computer case and use compressed air to gently remove dust from the motherboard, CPU cooler, and other components. Ensure the system is powered off and unplugged before cleaning.
5.2. إدارة الكابلات
Ensure internal cables are neatly routed and do not obstruct airflow. Proper cable management improves cooling efficiency and makes future maintenance easier.
5.3. تحديثات BIOS
Occasionally, the manufacturer may release BIOS updates to improve compatibility, stability, or add new features. Check the official HP support website for your specific system model (HP Pavilion P6000 series) for available BIOS updates and follow their instructions carefully. Incorrect BIOS updates can render your motherboard inoperable.
6. استكشاف الأخطاء وإصلاحها
إذا واجهت مشكلات، راجع خطوات استكشاف الأخطاء وإصلاحها الشائعة التالية:
6.1. لا يوجد طاقة / النظام لا يعمل
- Verify that the power supply is connected to the wall outlet and switched on.
- تحقق من جميع توصيلات الطاقة إلى اللوحة الأم (طاقة ATX وCPU ذات 24 سنًا).
- تأكد من توصيل كابل زر الطاقة في اللوحة الأمامية بشكل صحيح بموصل اللوحة الأم.
- اختبر مصدر الطاقة باستخدام نظام آخر أو جهاز اختبار مصدر الطاقة إن وجد.
6.2. No Display / Blank Screen
- Ensure the monitor is powered on and connected to the correct video output port on the motherboard or graphics card.
- أعد تركيب بطاقة الرسومات (إن وجدت) ووحدات الذاكرة.
- Try booting with only one memory module installed.
- If using a dedicated graphics card, try connecting the monitor to the integrated graphics port (if available) to rule out the card as the issue.
6.3. عدم استقرار النظام/الأعطال
- Check CPU and system temperatures using monitoring software. Overheating can cause instability.
- قم بتشغيل أدوات تشخيص الذاكرة للتحقق من وجود وحدات ذاكرة الوصول العشوائي (RAM) معيبة.
- Ensure all drivers for your operating system are up to date.
- Check for loose connections for power or data cables.
6.4. Beep Codes
If your system emits a series of beeps during startup, these are diagnostic codes indicating a specific hardware issue. Refer to the HP or Pegatron documentation for a list of beep codes specific to the Narra5-GL6 motherboard to diagnose the problem.
7. المواصفات
| ميزة | مواصفة |
|---|---|
| ماركة | كومباك |
| رقم الموديل | 513426-001 |
| مقبس وحدة المعالجة المركزية | AM2+/AM2 |
| الأجهزة المتوافقة | كمبيوتر شخصي |
| فتحات الذاكرة المتاحة | 5 |
| سعة تخزين الذاكرة (الحد الأقصى) | 32 جيجا بايت |
| Total SATA Ports | 6 |
| منصة | Linux (Compatible) |
| الشركة المصنعة | كومباك |
| رمز المنتج الموحد | 787322305937 |
| أبعاد الطرد | 25.4 × 25.4 × 2.54 سم |
| وزن | 1.36 كجم |
8. الضمان والدعم
For warranty information and technical support, please refer to the documentation provided with your original HP Pavilion P6000 series desktop computer or contact HP customer support directly. Keep your proof of purchase for warranty claims. Specific warranty terms may vary by region and purchase date.


