1. المقدمة
شكرا لك على الشراءasing the Fonestar AS-170RU Hi-Fi Amplifier. This device is designed to provide high-fidelity stereo audio amplification, featuring a built-in USB/MP3 player, AM/FM digital tuner, and multiple audio inputs. This manual provides detailed instructions for safe installation, operation, and maintenance of your ampمكبر الصوت. يرجى قراءة هذا الدليل جيداً قبل الاستخدام والاحتفاظ به للرجوع إليه مستقبلاً.
2. تعليمات السلامة
- مزود الطاقة: تأكد من amplifier is connected to a power supply matching the voltage specified on the unit. Disconnect the power cord from the outlet if the unit will not be used for an extended period.
- تهوية: لا تسد فتحات التهوية. تأكد من وجود مساحة كافية حول الوحدة لضمان تدفق الهواء بشكل صحيح ومنع ارتفاع درجة الحرارة.
- الماء والرطوبة: لا تعرض الجهاز للمطر أو الرطوبة أو السوائل المتساقطة أو المتناثرة. لا تضع أشياء مملوءة بالسوائل، مثل المزهريات، على الجهاز.
- مصادر الحرارة: احتفظ بالوحدة بعيدًا عن مصادر الحرارة مثل المشعات أو فتحات التدفئة أو المواقد أو الأجهزة الأخرى (بما في ذلك ampالمُضخِّمات) التي تنتج الحرارة.
- تنظيف: تنظيف فقط بقطعة قماش جافة. لا تستخدم المنظفات أو منظفات يتم رشها السائل.
- الخدمة: لا تحاول خدمة هذا المنتج بنفسك. قم بإحالة جميع أعمال الصيانة إلى أفراد الخدمة المؤهلين.
- الموقع: ضع الجهاز على سطح مستوٍ وثابت. تجنب وضعه تحت أشعة الشمس المباشرة أو بالقرب من مجالات مغناطيسية قوية.
3. محتويات العبوة
يرجى التأكد من تضمين العناصر التالية في الحزمة الخاصة بك:
- Fonestar AS-170RU Hi-Fi Ampالقمامة
- جهاز التحكم عن بعد
- هوائي AM
- هوائي FM
- دليل المستخدم (هذا المستند)
4. انتهى المنتجview
4.1 اللوحة الأمامية
The front panel provides access to essential controls and the display.
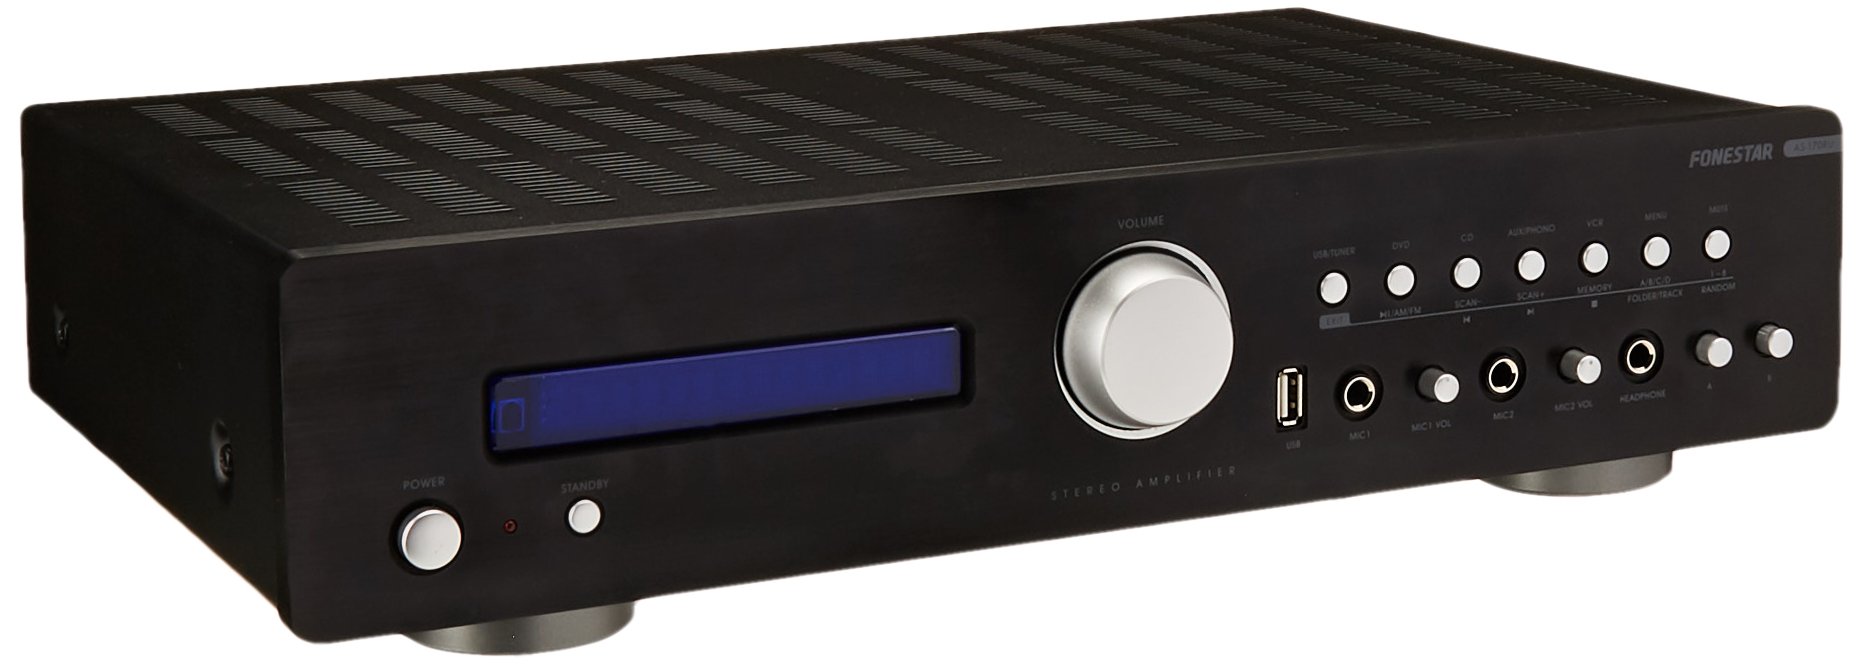
Image: Fonestar AS-170RU Front Panel. تعرض هذه الصورة الواجهة الأمامية view التابع amplifier, showing the VFD display, USB port, headphone output, input selectors, volume knob, and other control buttons.
- زر الطاقة: يتحول amplifier أو إيقاف تشغيله.
- VFD Display: Shows current input, volume level, tuner information (frequency, RDS), and USB/MP3 track details (ID3 tag).
- منفذ USB: For connecting USB storage devices to play MP3 files.
- مخرج سماعة الرأس: مقبس مقاس 6.3 ملم لتوصيل سماعات الرأس.
- محددات الإدخال: Buttons for choosing audio sources (CD, DVD, VCR, AUX/Phono, USB/Tuner).
- التحكم في مستوى الصوت: Rotary knob to adjust the master volume level.
- مدخلات الميكروفون: Two 6.3mm microphone jacks with independent volume control.
- عناصر التحكم في النغمة: Buttons or menu options for adjusting Bass, Treble, and Balance.
4.2 اللوحة الخلفية
The rear panel contains all the necessary connections for your audio sources, speakers, and antennas.

Image: Fonestar AS-170RU Rear Panel. This image illustrates the rear connections of the amplifier, including speaker terminals (A/B), various RCA input jacks (CD, DVD, VCR, AUX/Phono), REC OUT, PRE OUT, AMP IN, and antenna connections (FM COAX, AM LOOP ANT).
- Speaker Outputs (A/B): Terminals for connecting two pairs of speakers. Supports 4-16 ohms for A or B, or 8-16 ohms for A+B.
- Audio Inputs (RCA):
- إدخال القرص المضغوط: لتوصيل مشغل الأقراص المدمجة.
- مدخل DVD: For connecting a DVD player or other audio source.
- VCR Input: For connecting a VCR or other audio source.
- AUX/PHONO Input: For connecting auxiliary devices or a turntable (Phono input may require a pre-amplifier if your turntable does not have one built-in).
- تسجيل الخروج: RCA output for connecting to a recording device.
- ما قبل الخروج: RCA output for connecting to an external power ampمكبر.
- AMP في: RCA input for connecting an external pre-ampمكبر.
- اتصالات الهوائي:
- FM COAX 75Ω: For connecting an FM antenna.
- AM LOOP ANT: For connecting the supplied AM loop antenna.
4.3 التحكم عن بعد
The included remote control allows convenient operation of the ampليفر من بعيد .

Image: Fonestar AS-170RU Remote Control. This image shows the remote control unit with various buttons for power, input selection, volume, mute, tuner functions, USB playback controls, and tone adjustments.
- تعليق: السلطة / قبالة.
- محددات الإدخال: Buttons for CD, DVD, VCR, AUX/PHONO, USB/TUNER.
- رفع / خفض الصوت (VOL +/-): يضبط مستوى الصوت الرئيسي.
- كتم الصوت: يكتم صوت الإخراج.
- AM / FM: Switches between AM and FM tuner modes.
- مسح: Scans for radio stations.
- ذاكرة: Stores radio station presets.
- عناصر التحكم في تشغيل USB: Play/Pause, Stop, Skip Track, Folder/Track navigation.
- EQ OFF / BASS / TREBLE: Access tone controls.
- RDS / ID3: Displays RDS information for radio or ID3 tag لملفات MP3 files.
5. الإعداد
5.1 توصيل مكبرات الصوت
- تأكد من ampتم إيقاف تشغيل مكبر الصوت وفصله عن مأخذ الطاقة.
- Connect your speakers to the "SPEAKERS OUTPUT" terminals on the rear panel.
- Match the positive (+) terminal of the amplifier (red) to the positive (+) terminal of your speaker, and the negative (-) terminal (black) to the negative (-) terminal.
- The AS-170RU supports two groups of speakers (A and B). You can connect one pair to "SPEAKERS A" and another to "SPEAKERS B".
- Ensure your speakers' impedance matches the amplifier's specifications: 4-16 ohms for A or B, or 8-16 ohms for A+B.
5.2 توصيل مصادر الصوت
Use RCA cables to connect your audio components to the corresponding input jacks on the rear panel.
- مشغل أقراص ليزرية: قم بالتوصيل بمدخل "CD".
- مشغل اسطوانات: Connect to the "DVD" input.
- جهاز فيديو: Connect to the "VCR" input.
- Auxiliary Device (e.g., smartphone, tablet): Connect to the "AUX/PHONO" input.
- القرص الدوار: Connect to the "AUX/PHONO" input. If your turntable does not have a built-in pre-amplifier, you may need an external phono pre-ampمكبر.
5.3 توصيل الهوائيات
- هوائي FM: Connect the supplied FM wire antenna to the "FM COAX 75Ω" terminal. Extend the wire for optimal reception.
- هوائي AM: Connect the supplied AM loop antenna to the "AM LOOP ANT" terminals. Position the loop for best reception.
5.4 توصيل الطاقة
بعد إتمام جميع توصيلات الصوت ومكبرات الصوت، قم بتوصيل amplifier's power cord into a suitable AC power outlet.
6. تعليمات التشغيل
6.1 التشغيل الأساسي
- تشغيل/إيقاف التشغيل: Press the Power button on the front panel or the STANDBY button on the remote control to turn the amplifier أو إيقاف تشغيله.
- حدد مصدر الإدخال: Press the desired input selector button on the front panel (CD, DVD, VCR, AUX/PHONO) or the remote control (CD, DVD, VCR, AUX/PHONO, USB/TUNER).
- ضبط مستوى الصوت: Rotate the Volume knob on the front panel or use the VOL +/- buttons on the remote control to adjust the sound level.
- صامت: Press the MUTE button on the remote control to temporarily silence the audio. Press it again to restore sound.
6.2 USB/MP3 Playback
- Insert a USB storage device (flash drive) into the USB port on the front panel.
- Select "USB/TUNER" as the input source. The amplifier will automatically detect and begin playing MP3 files.
- Use the playback controls on the remote control (Play/Pause, Stop, Skip Track, Folder/Track) to navigate and control your music.
- The VFD display will show track information, including ID3 tags إذا كانت متاحة.
- ال amplifier supports up to 65,000 indexable folders and files, with a maximum of 8 folder levels.
6.3 تشغيل موالف AM/FM
- Select "USB/TUNER" as the input source, then press the AM/FM button on the remote control to switch between AM and FM bands.
- المسح التلقائي: Press the SCAN button on the remote control to automatically search for and store available radio stations.
- ضبط يدوي: Use the tuning buttons (usually arrow keys) on the remote control to manually adjust the frequency.
- المحطات مسبقة الضبط: ال amplifier supports 64 presets. Use the MEMORY button to store and recall your favorite stations.
- وظيفة RDS: If available, press the RDS button on the remote control to display Radio Data System information (e.g., station name, program type).
6.4 مدخلات الميكروفون
- Connect microphones to the 6.3mm MIC 1 and MIC 2 jacks on the front panel.
- Adjust the independent volume controls for each microphone to achieve the desired level.
6.5 Tone and Balance Control
ال amplifier allows adjustment of bass, treble, and balance through its menu system or dedicated buttons on the remote control. Refer to the remote control section for specific buttons like EQ OFF, BASS, TREBLE.
7. الصيانة
- تنظيف: Disconnect the power before cleaning. Use a soft, dry cloth to wipe the exterior surfaces. Do not use abrasive cleaners, waxes, or solvents.
- تهوية: تحقق دورياً من خلو فتحات التهوية من الغبار والحطام.
- تخزين: في حالة تخزين الوحدة لفترة طويلة، افصلها عن مأخذ الطاقة وخزنها في مكان بارد وجاف، بعيدًا عن أشعة الشمس المباشرة ودرجات الحرارة القصوى.
8. استكشاف الأخطاء وإصلاحها
If you encounter problems with your ampيرجى الرجوع إلى الجدول التالي للاطلاع على الحلول الممكنة.
| مشكلة | السبب المحتمل | حل |
|---|---|---|
| لا يوجد طاقة | سلك الطاقة غير موصول؛ مأخذ الطاقة معطل؛ Ampالمجفف في وضع الاستعداد. | Ensure power cord is securely plugged in. Test the outlet with another device. Press the Power/STANDBY button. |
| لا يوجد صوت | تم اختيار إدخال غير صحيح؛ مستوى الصوت منخفض جدًا؛ السماعات غير متصلة بشكل صحيح؛ وظيفة كتم الصوت نشطة. | Select the correct input source. Increase volume. Check speaker connections. Deactivate MUTE. |
| استقبال الراديو ضعيف | Antenna not connected or poorly positioned; Interference. | Connect and adjust the position of the AM/FM antennas. Move the ampيُبعد مكبر الصوت عن الأجهزة الإلكترونية الأخرى. |
| تشغيل USB لا يعمل | USB device not inserted correctly; Incompatible file format; USB device faulty. | تأكد من إدخال جهاز USB بالكامل. تحقق مما إذا كان fileملفات الصوت بصيغة MP3. جرب جهاز USB آخر. |
| Amplifier turns off unexpectedly or cycles power | Overheating; Short circuit in speaker wiring; Internal fault. | Ensure adequate ventilation. Check speaker wires for frayed strands causing short circuits. If the problem persists, disconnect power and contact qualified service personnel. |
9. المواصفات
- نموذج: AS-170RU
- انتاج الطاقة: 80 + 80 W RMS at 4 Ω
- معاوقة مكبر الصوت: 4-16 Ω (A or B), 8-16 Ω (A+B)
- حماية: 3 circuits (short circuits, overload, overvoltage)
- مشغل يو اس بي: إم بي 3 file playback, ID3 tag support. Max 65,000 indexable folders/files, max 8 folder levels.
- الموالف: Digital AM/FM, 64 presets, RDS.
- المدخلات: 2 x Microphone (6.3mm), 4 x RCA (CD, DVD, VCR, AUX/Phono), 1 x RCA (AMP في).
- المخرجات: 1 x RCA (REC OUT), 1 x RCA (PRE OUT), Headphone (6.3mm).
- عرض: Blue VFD.
- التحكم في النغمة: Bass, Treble, Balance (via menu/remote).
- أبعاد: 40 × 40 × 60 سم (تقريبًا 15.7 × 15.7 × 23.6 بوصة)
- وزن: 7.2 كجم (حوالي 15.87 رطلاً)
10. الضمان والدعم
For warranty information and technical support, please refer to the warranty card included with your product or contact your authorized Fonestar dealer. Do not attempt to repair the unit yourself, as this may void your warranty.


