1. المقدمة
This manual provides detailed instructions for the installation, configuration, and maintenance of your ASRock G41C-VS motherboard. Please read this manual thoroughly before installing the motherboard to ensure proper setup and operation. This motherboard supports Intel Core 2 Extreme, Core 2 Quad, Core 2 Duo, Pentium Dual Core, and Celeron processors with an LGA 775 socket, and features both DDR2 and DDR3 memory support.
2. الإعداد والتثبيت
2.1 تخطيط اللوحة الأم
Familiarize yourself with the components and connectors on the motherboard before proceeding with installation.
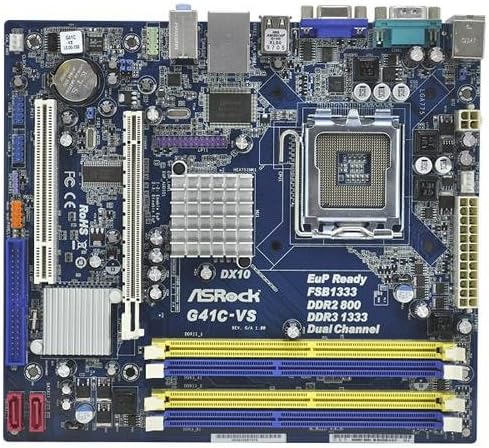
الصورة 1: زيادةview of the ASRock G41C-VS motherboard, showing the CPU socket, memory slots, expansion slots, and various connectors.
2.2 تركيب المعالج (CPU)
The ASRock G41C-VS motherboard uses an LGA 775 socket. Follow these steps to install your compatible Intel processor:
- حدد مكان مقبس وحدة المعالجة المركزية LGA 775 على اللوحة الأم.
- ادفع ذراع التحميل للأسفل برفق واسحبه إلى الجانب لفتح إطار تثبيت المقبس.
- Carefully align the CPU with the socket, ensuring the golden triangle on the CPU matches the triangle on the socket. Do not force the CPU into the socket.
- قم بإنزال وحدة المعالجة المركزية في المقبس.
- Close the retention frame and secure it by pushing the load lever back into its locked position.
- Apply a thin layer of thermal paste to the CPU surface, then install the CPU cooler according to its manufacturer's instructions.
2.3 تثبيت الذاكرة (RAM)
This motherboard supports both DDR2 and DDR3 memory modules. It features two DDR2 DIMM slots and two DDR3 DIMM slots, supporting dual channel memory architecture.
- افتح المشابك الموجودة في كلا طرفي فتحة DIMM.
- قم بمحاذاة وحدة الذاكرة مع الفتحة، مع التأكد من أن الشق الموجود على الوحدة يتطابق مع المفتاح الموجود في الفتحة.
- اضغط بقوة على كلا طرفي وحدة الذاكرة حتى تستقر المشابك في مكانها.
- Ensure both clips are fully closed and the module is securely seated.
2.4 تركيب بطاقة التوسعة
The motherboard includes one PCI-Express x16 slot for graphics cards and one PCI slot for other expansion cards.
- Locate the desired expansion slot.
- Remove the corresponding metal bracket from your PC case.
- Align the expansion card with the slot and press down firmly until it is fully seated.
- قم بتثبيت البطاقة في علبة الكمبيوتر باستخدام برغي.
2.5 توصيل الأجهزة الطرفية والطاقة
Connect all necessary cables to the motherboard:
- موصلات الطاقة: Connect the 24-pin ATX power connector and the 4-pin ATX 12V power connector from your power supply unit (PSU) to the motherboard.
- أجهزة SATA: Connect your SATA hard drives or SSDs to the SATA ports on the motherboard using the provided SATA data cables.
- موصلات اللوحة الأمامية: Connect the power switch, reset switch, power LED, and HDD LED cables from your PC case to the front panel header on the motherboard. Refer to the motherboard diagram for correct pin assignments.
- منافذ USB: Connect internal USB headers for front panel USB ports. Connect external USB devices to the rear USB 2.0 ports.
- صوتي: Connect front panel audio cables to the appropriate header. Connect speakers or headphones to the rear audio jacks.
- فيديو: Connect your monitor to the VGA port on the rear I/O panel if using integrated graphics.
- شبكة: Connect an Ethernet cable to the RJ45 LAN port for network access.
3. تعليمات التشغيل
3.1 Initial Boot and BIOS Setup
After completing hardware installation, power on your system. During the initial boot sequence, you can access the BIOS (Basic Input/Output System) setup utility by pressing the ديل key (or as indicated on screen).
- إعدادات BIOS: Configure boot order, date and time, and other system parameters as needed. Save changes before exiting the BIOS.
- تركيب نظام التشغيل: Install your preferred operating system from a bootable USB drive or optical disc.
3.2 تثبيت برنامج التشغيل
For optimal performance and stability, install the necessary drivers for your motherboard components. These drivers can be found on the included support CD or downloaded from the official ASRock webموقع.
- Install chipset drivers.
- Install integrated graphics drivers (Intel GMA X4500).
- Install audio drivers.
- Install LAN drivers.
4. الصيانة
4.1 التنظيف
نظّف الجزء الداخلي لجهاز الكمبيوتر بانتظام لمنع تراكم الغبار، الذي قد يؤدي إلى ارتفاع درجة الحرارة وتلف المكونات. استخدم الهواء المضغوط لإزالة الغبار من المراوح والمشتتات الحرارية والمكونات الأخرى. تأكد من إيقاف تشغيل الجهاز وفصله عن مصدر الطاقة قبل التنظيف.
4.2 استبدال بطارية CMOS
The motherboard uses a CR2032 lithium coin cell battery to power the CMOS (Complementary Metal-Oxide-Semiconductor) memory, which stores BIOS settings and the system clock. If your system consistently loses time or BIOS settings, the battery may need replacement. Locate the battery holder on the motherboard, gently remove the old battery, and insert a new CR2032 battery with the positive (+) side facing up.
5. استكشاف الأخطاء وإصلاحها
يوفر هذا القسم حلولاً للمشكلات الشائعة التي قد تواجهها.
- لا يوجد طاقة: Ensure all power cables (24-pin ATX, 4-pin ATX 12V) are securely connected to the motherboard and PSU. Verify the PSU is switched on and connected to a working power outlet.
- لا يوجد عرض: Check that the monitor is properly connected to the VGA port. If using a discrete graphics card, ensure it is correctly seated in the PCI-Express x16 slot and connected to power (if required). Try reseating RAM modules.
- عدم استقرار النظام/الأعطال: This can be caused by improperly seated RAM, overheating, or outdated drivers. Ensure RAM is correctly installed, CPU cooler is functioning, and all drivers are up-to-date.
- CMOS Reset: If you encounter issues after changing BIOS settings, you can reset the CMOS to default settings. This is typically done by briefly shorting a specific jumper on the motherboard (refer to the motherboard diagram for the CLRCMOS1 jumper) or by removing the CMOS battery for a few minutes.
6. المواصفات
Below are the technical specifications for the ASRock G41C-VS motherboard:
| عنصر | مواصفة |
|---|---|
| دعم المعالج | LGA 775 for Intel Core 2 Extreme, Core 2 Quad, Core 2 Duo, Pentium Dual Core, Celeron Processors |
| مجموعة الشرائح | Intel G41 + ICH7 |
| ذاكرة | 2 x DDR2 DIMM slots (DDR2 800/667 non-ECC, un-buffered, max 8GB) 2 x DDR3 DIMM slots (DDR3 1333(OC)/1066/800 non-ECC, un-buffered, max 8GB) Supports Dual Channel Memory Technology |
| فتحات التوسعة | 1 × فتحة PCI Express x16 1 × فتحة PCI |
| الرسومات | Integrated Intel GMA X4500 Graphics Max. shared memory 1759MB Supports DirectX 10, Pixel Shader 4.0 |
| تخزين | 4 x SATA2 3.0 Gb/s connectors |
| صوتي | 5.1 CH HD Audio (VIA VT1705 Audio Codec) |
| شبكة محلية | PCIE x1 Gigabit LAN 10/100/1000 Mb/s (Realtek RTL8111DL) |
| اللوحة الخلفية I / O | 1 × منفذ ماوس PS/2 1 × منفذ لوحة مفاتيح PS/2 1 × المنفذ التسلسلي: COM1 منفذ VGA واحد 4 منفذ USB 2.0 1 × منفذ RJ-45 LAN مزود بمصباح LED مقابس صوت عالية الدقة: خط داخلي / مكبر صوت أمامي / ميكروفون |
| الموصلات الداخلية | 2 x USB 2.0 Headers (support 4 USB 2.0 ports) 1 × موصل مروحة وحدة المعالجة المركزية 1 x Chassis Fan Connector 1 × 24 دبوس موصل الطاقة ATX 1 × 4 دبوس موصل طاقة 12 فولت 1 × موصل صوت اللوحة الأمامية 1 x SPDIF Out Header 1 × وصلة CMOS واضحة |
| عامل الشكل | Micro ATX Form Factor (8.9-in x 7.5-in, 22.6 cm x 19.1 cm) |
| أبعاد المنتج | 8.8 × 7.8 × 1.9 بوصة |
| وزن العنصر | 1.81 رطل |
7. محتويات العبوة
The ASRock G41C-VS motherboard package typically includes the following items:
- ASRock G41C-VS Motherboard
- دليل التثبيت السريع
- Support CD (for drivers and utilities)
- I / O Shield
- 2 × كابلات بيانات ساتا
8. الدعم والضمان
For technical support, driver updates, and further information, please visit the official ASRock website. Warranty terms and conditions are subject to regional policies and can be found on the ASRock support page or by contacting your local retailer.
For additional assistance, you may refer to the ASRock support resources available online.


