1. انتهى المنتجview
The Tamiya Nakajima Ki-84 IA Type 4 Hayate Model Kit (Model TM61013) is a highly detailed 1/48 scale replica of the Japanese Army's Type 4 Fighter "Hayate". This model kit allows enthusiasts to recreate the iconic aircraft with precision and historical accuracy.
المميزات الرئيسية:
- Kit Length: 8.1 بوصة (20.67 سم)
- Detail Level: Detailed cockpit & engine components.
- حجم: 1/48 Scale Aircraft.
وصف المنتج:
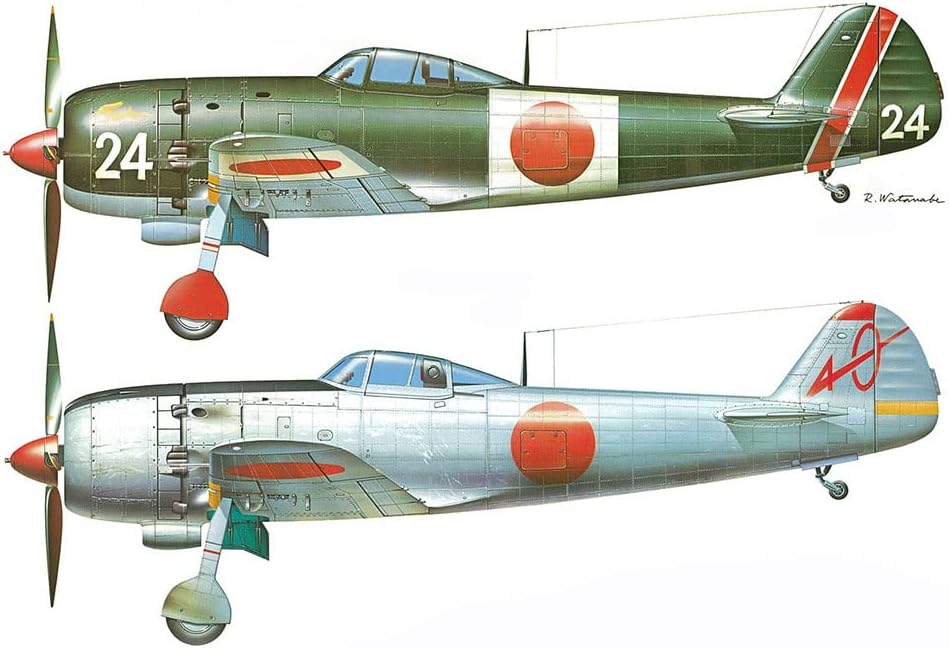
The Nakajima Ki-84, officially adopted in April 1944 as the Army's Type 4 Fighter "Hayate," was a significant aircraft in Japanese aviation history. With approximately 3,500 units produced by the end of World War II, it was the most numerous Japanese aircraft produced in about a year. The Hayate was recognized for its excellent speed, climbing ability, firepower, and maneuverability, matching or exceeding Allied fighters of its era. This model kit captures the essence of this "Decisive fighter to turn the fate of the Greater East Asia," which saw its first campaign over Central China as part of the 22nd Air Flotilla.
2. صور المنتج


3. مقاطع فيديو رسمية للمنتج
4. الإعداد والتجميع
Careful assembly is crucial for achieving the best results with your Tamiya model kit. Follow these general steps, referring to the detailed instructions provided in your kit for specific part numbers and assembly sequences.
4.1. التحضير
- فك مكونات الحزمة: Carefully remove all sprues, decals, and instruction sheets from the box.
- Review تعليمات: Read the entire instruction manual thoroughly before beginning assembly. Familiarize yourself with the steps, part identification, and painting guide.
- جمع الأدوات: Essential tools include a hobby knife, plastic cement, tweezers, sanding sticks/files, and side cutters. Additional tools for painting and detailing may be required.
- مساحة العمل: Ensure a clean, well-lit, and ventilated workspace.
4.2. خطوات التجميع
- إزالة الأجزاء: Carefully cut parts from the sprues using side cutters. Avoid pulling or twisting, which can damage parts.
- تنظيف الأجزاء: Use a hobby knife or sanding stick to remove any excess plastic (flash) or mold lines from the parts.
- اختبار الملاءمة: Before applying cement, test fit parts together to ensure a proper fit. Adjust as necessary.
- Apply Cement: Apply a small amount of plastic cement to the mating surfaces. Hold parts firmly together until the cement sets.
- الجمعيات الفرعية: Assemble smaller sections (e.g., cockpit, engine, landing gear) first, as indicated in the instructions.
- التجميع الرئيسي: Join the sub-assemblies to form the main structure of the aircraft (fuselage, wings).
- الرسم (اختياري): Many modelers prefer to paint certain components before final assembly. Refer to the painting guide for color schemes.
- تطبيق مائي: Once painting is complete and dry, apply decals according to the placement guide. Use decal setting solutions for better adhesion and a painted-on look.
- التفاصيل النهائية: Attach delicate parts such as antennas, pitot tubes, and clear canopy pieces.
Note: The kit includes detailed cockpit and engine components. Take extra care during their assembly to highlight these features.
5. Operating & Display
Once assembled, your Tamiya model kit is ready for display. While not a functional aircraft, proper handling and display methods will preserve its appearance.
5.1. Handling Your Model
- لمسة رقيقة: Always handle the model with care, grasping it by sturdy sections like the main fuselage or wings. Avoid touching delicate parts such as antennas, landing gear, or propellers.
- أيدي نظيفة: Ensure your hands are clean and free of oils or dirt before handling to prevent smudges or damage to the paint and decals.
5.2. Displaying Your Model
- سطح مستقر: Place the model on a flat, stable surface to prevent accidental falls.
- تجنب أشعة الشمس المباشرة: Prolonged exposure to direct sunlight can cause paint to fade and plastic to warp or become brittle.
- حماية الغبار: Consider displaying your model in a dust-proof display case to keep it clean and protected.
- درجة الحرارة والرطوبة: Store the model in an environment with stable temperature and humidity to prevent material degradation.
6. الصيانة
Regular, gentle maintenance will help preserve the appearance and integrity of your Tamiya model kit for years to come.
6.1. التنظيف
- إزالة الغبار: Use a soft, dry brush (such as a makeup brush or a dedicated model brush) to gently remove dust from the model's surfaces. For stubborn dust, a can of compressed air can be used from a safe distance.
- تجنب السوائل: Do not use water, cleaning solutions, or chemical solvents, as these can damage paint, decals, or the plastic itself.
6.2. التخزين
- التخزين الوقائي: If storing the model for an extended period, place it in a sturdy box with soft padding to prevent damage.
- الرقابة البيئية: Store in a cool, dry place away from direct sunlight and extreme temperature fluctuations.
7. استكشاف المشكلات الشائعة وإصلاحها
Encountering issues during model assembly is common. Here are solutions to some frequent problems:
| مشكلة | حل |
|---|---|
| الأجزاء لا تتناسب مع بعضها البعض بشكل صحيح. | Ensure all flash and mold lines are removed. Test fit parts before cementing. If necessary, gently sand mating surfaces for a better fit. |
| Decals do not adhere or wrinkle. | Ensure the surface is clean and glossy. Use decal setting solutions to help decals conform to irregular surfaces and improve adhesion. Apply a clear coat after decals are dry. |
| Excess glue visible after assembly. | Use plastic cement sparingly. If using liquid cement, apply with a fine brush. For dried excess, carefully scrape with a hobby knife or sand with very fine grit sandpaper, then repaint if needed. |
| Small parts break during removal from sprue. | Always use sharp side cutters and cut away from the part. For very delicate parts, use a hobby knife to carefully slice them off. |
8. المواصفات
| يصف | التفاصيل |
|---|---|
| ماركة | تمية |
| رقم الموديل | تي ام 61013 |
| أبعاد المنتج | 8.13 × 9.21 × 2.77 بوصة |
| وزن العنصر | 7.4 أونصات |
| حجم | 1/48 |
| العمر الموصى به | 19 سنوات وما فوق |
| أول تاريخ متاح | 9 مايو 2008 |
9. الضمان والدعم
Specific warranty information for Tamiya model kits is typically provided within the product packaging or on the manufacturer's official website. Please refer to these sources for the most accurate and up-to-date warranty details.
For technical support, missing parts, or general inquiries regarding your Tamiya model kit, please contact Tamiya customer service directly. Their contact information can usually be found on the product box or their official webموقع.
Note: As this is a model kit requiring assembly, warranty coverage typically applies to manufacturing defects in the parts themselves, not issues arising from assembly errors or improper handling.


