1. المقدمة
This manual provides essential instructions for the safe and effective use of your Sealey VS803 Heavy Duty Door Hinge Pin Tool Set. Please read this manual thoroughly before operation and retain it for future reference.
The Sealey VS803 is designed for the removal of door hinge pins, particularly those found in hollow-type hinges. Its robust construction and cranked anvil design facilitate improved access and leverage for efficient pin extraction.
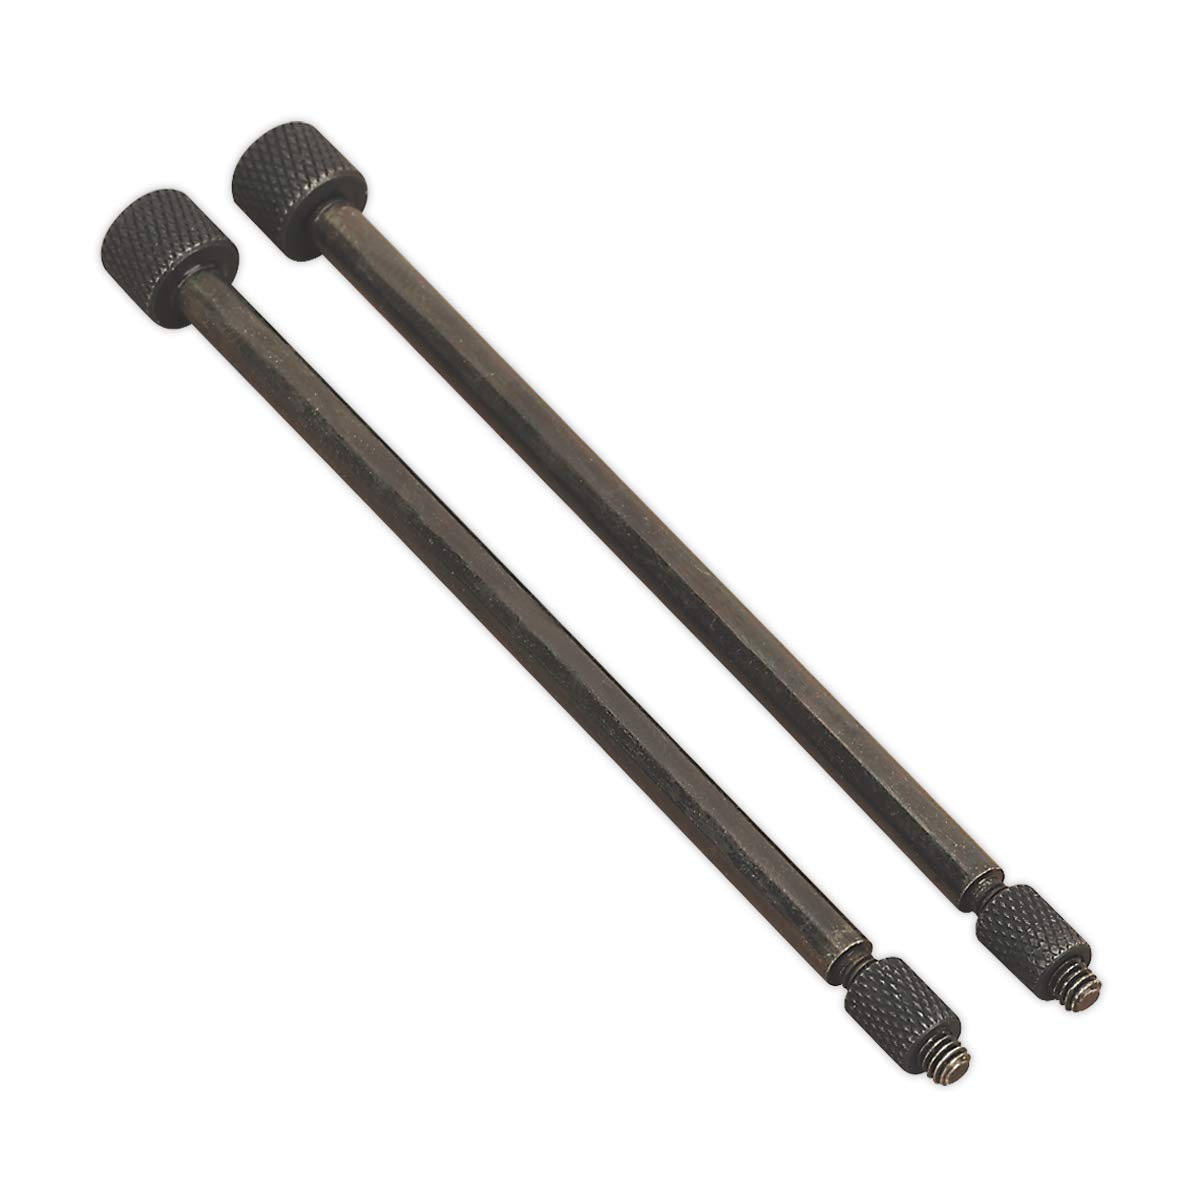
Figure 1: Sealey VS803 Heavy Duty Door Hinge Pin Tool Set. This image displays the two components of the Sealey VS803 Heavy Duty Door Hinge Pin Tool Set. Each pin is made of dark-colored steel, featuring a cylindrical body with a hexagonal cross-section for grip, and knurled, threaded ends designed for engaging and removing hinge pins. The overall length of each pin is approximately 125 mm (4.92 inches), with a diameter of 5 mm (0.2 inches).
2. معلومات السلامة
- Always wear appropriate personal protective equipment, including safety glasses, when using hand tools.
- Ensure the workpiece is stable and secure before attempting to remove hinge pins.
- Do not use excessive force. If a pin is stuck, investigate the cause rather than forcing the tool.
- Keep hands and fingers clear of the working area to prevent injury.
- خزّن الأداة في مكان جاف وآمن، بعيداً عن متناول الأطفال.
- Inspect the tool for any damage before each use. Do not use a damaged tool.
3. الإعداد
The Sealey VS803 Hinge Pin Tool Set requires minimal setup. Upon unpacking, inspect both pins for any signs of shipping damage or manufacturing defects. Ensure the knurled ends are intact and free from burrs.
No assembly is required for this tool set. It is ready for immediate use after inspection.
4. تعليمات التشغيل
- Identify Hinge Type: Confirm the door is fitted with hollow-type hinge pins suitable for this tool.
- وضع الأداة: Place the cranked anvil end of the tool against the hinge, aligning it with the base of the hinge pin. The cranked design allows for better access in confined spaces.
- تطبيق القوة: Using a hammer or mallet, gently tap the top of the tool. The steel pin will exert force on the hinge pin, driving it out from the hinge.
- Gradual Removal: Continue tapping the tool, ensuring the hinge pin is moving smoothly. If resistance is met, stop and re-evaluate the alignment or check for obstructions.
- Complete Removal: Once the hinge pin is sufficiently dislodged, it can typically be pulled out by hand or with pliers.
ملحوظة: Always ensure stable footing and a clear work area. Avoid striking the tool with excessive force, which could damage the tool or the hinge.
5. الصيانة
- تنظيف: After each use, wipe the tool clean with a dry cloth to remove any dirt, grease, or debris.
- تشحيم: Periodically apply a light coat of rust-preventative oil to the steel pins, especially if storing in a humid environment.
- تخزين: Store the tool set in its original packaging or a suitable tool box in a dry, cool place to prevent corrosion and damage.
- تقتيش: Regularly inspect the pins for signs of wear, bending, or damage. Replace the tool if it shows significant wear or damage that could affect its performance or safety.
6. استكشاف الأخطاء وإصلاحها
| مشكلة | السبب المحتمل | حل |
|---|---|---|
| Hinge pin not moving | Pin is seized, rusted, or obstructed. Incorrect tool alignment. | Apply penetrating oil to the hinge pin. Re-align the tool. Do not force. Consider professional assistance for severely seized pins. |
| Tool appears damaged after use | Excessive force applied. Incorrect usage. | Ensure proper technique is used. Do not use a damaged tool; replace it. |
7. المواصفات
| ميزة | التفاصيل |
|---|---|
| رقم الموديل | في اس 803 |
| ماركة | سيلي |
| مادة | فُولاَذ |
| Pin Dimensions (Diameter x Length) | Ø5 x 125 mm (approximately 0.2" x 4.92") |
| وزن العنصر | Approximately 1.58 ounces (total for set) |
| مناسب لـ | Removing doors fitted with hollow type hinge pins |
8. الضمان والدعم
For warranty information, please refer to the terms and conditions provided by your retailer or the official Sealey webالموقع. احتفظ بإثبات الشراء الخاص بك لاستخدامه في أي مطالبات بالضمان.
For technical support or further assistance, please contact your authorized Sealey dealer or visit the Sealey official webموقع للحصول على تفاصيل الاتصال.


