مقدمة
This manual provides detailed instructions for the setup, operation, maintenance, and troubleshooting of your Pisichen 24-inch Touchscreen Monitor with Built-in Webcam (Model 238TS-CMR). This monitor features a 2K QHD (2560x1440) resolution display with a 100Hz refresh rate, 10-point multi-touch functionality, and an integrated pop-up webcam, designed to enhance your productivity and interactive experience.
معلومات السلامة
- Always place the monitor on a stable, flat surface to prevent accidental falls.
- لا تعرض الشاشة للمطر أو الرطوبة أو درجات الحرارة القصوى.
- تجنب سد فتحات التهوية لمنع ارتفاع درجة الحرارة.
- استخدم فقط محول الطاقة المرفق مع الشاشة.
- Disconnect the power cable from the outlet before cleaning or if the monitor will be unused for an extended period.
- لا تحاول تفكيك الشاشة أو إصلاحها بنفسك. قم بإحالة جميع أعمال الصيانة إلى فنيين مؤهلين.
محتويات الحزمة
يرجى التأكد من وجود جميع العناصر في الحزمة الخاصة بك:
- Pisichen 24-inch Touchscreen Monitor (Model 238TS-CMR)
- حامل شاشة (قاعدة وذراع)
- محول الطاقة والكابل
- كابل HDMI
- كابل USB-C إلى USB-C
- USB-A to USB-B Cable (for touch functionality with non-USB-C devices)
- دليل المستخدم (هذا المستند)
يثبت
1. التجمع الوقوف
- قم بإزالة الشاشة بعناية من عبوتها وضعها ووجهها لأسفل على سطح ناعم ونظيف لمنع الخدوش.
- Attach the stand arm to the back of the monitor using the provided screws.
- Connect the stand base to the stand arm and secure it with the designated screw.
- Once assembled, carefully lift the monitor and place it upright on your desk.

Figure 1: Monitor stand assembly and adjustment capabilities.
2. الاتصال بجهازك
The monitor supports multiple connection types. Choose the appropriate cable for your device.
- توصيل الطاقة: Connect the power adapter to the monitor's DC power port and then plug it into a power outlet.
- USB-C Connection (Recommended for full functionality): If your device has a USB-C port that supports DisplayPort Alternate Mode, connect the monitor using the provided USB-C to USB-C cable. This single cable can transmit video, audio, and touch signals, and may also provide power delivery to your laptop.
- HDMI or DisplayPort Connection: Connect an HDMI or DisplayPort cable from your device to the corresponding port on the monitor for video and audio. For touch functionality, you must also connect the USB-A to USB-B cable from your device's USB port to the monitor's USB-B upstream port.
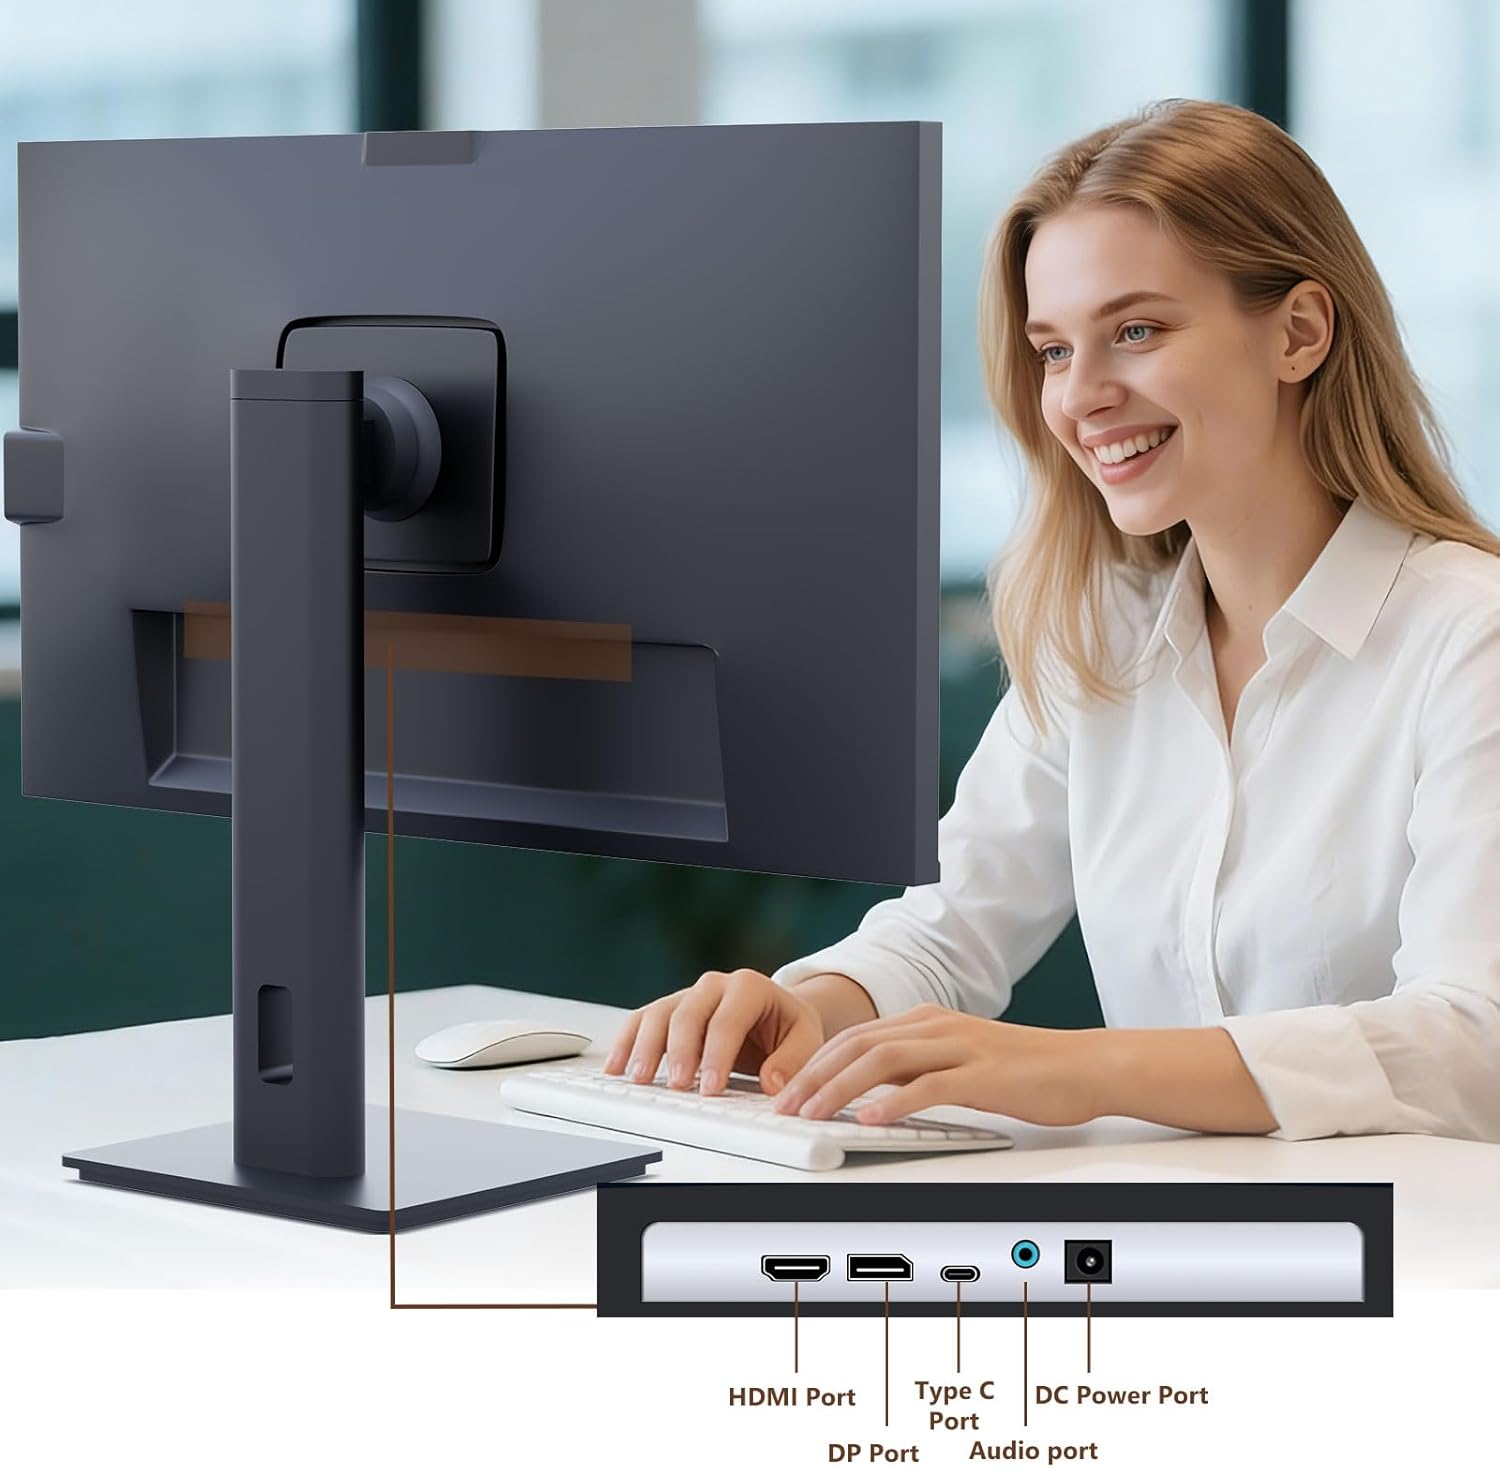
Figure 2: Available ports on the Pisichen monitor.

Figure 3: USB-C one-cable connection for simplified setup.

Figure 4: Connection options for desktop and laptop devices.
3. التشغيل الأولي
Press the power button located on the monitor to turn it on. The monitor will automatically detect the active input source. If multiple sources are connected, you may need to select the correct input via the On-Screen Display (OSD) menu.
تعليمات التشغيل
1. وظيفة شاشة اللمس
The monitor supports 10-point multi-touch. Ensure the USB-C cable is connected (for full functionality) or the USB-A to USB-B cable is connected in addition to your video cable for touch input to work. Touch gestures are similar to those used on tablets or smartphones.
- مقبض: Single touch for selection or activation.
- سحب: Touch and hold, then move your finger to move items.
- قرصة / انتشار: استخدم إصبعين للتكبير أو التصغير.
- انتقاد: Move your finger across the screen to scroll or navigate.

Figure 5: Demonstrating intuitive touch interaction.

Figure 6: Collaborative use of the multi-touch display.
2. Built-in Webاستخدام الكاميرا
The monitor features a pop-up webcam for privacy and convenience. To use the webcam, gently press the top center of the monitor frame where the webcam is located. It will pop up. To retract it, gently press it down until it clicks into place.
Ensure your operating system and video conferencing software recognize the webالكاميرا. لا تتطلب الوظائف الأساسية عادةً برامج تشغيل إضافية.

Figure 7: The monitor with its built-in pop-up webcam in use during a video conference.

Figure 8: High-definition video calls using the integrated webكام.
3. قائمة العرض على الشاشة (OSD)
The OSD menu allows you to adjust various monitor settings. Use the buttons on the back or bottom of the monitor to navigate and select options.
- السطوع / التباين: ضبط مستويات سطوع الشاشة والتباين.
- إعدادات الألوان: تعديل درجة حرارة اللون، والجاما، والمعلمات الأخرى المتعلقة بالألوان.
- مصدر الإدخال: Manually select between HDMI, DisplayPort, or USB-C inputs.
- صوتي: اضبط مستوى الصوت لمكبرات الصوت المدمجة أو سماعات الرأس المتصلة.
- وضع الصورة: حدد أوضاع العرض المسبقة (مثل: قياسي، لعبة، فيلم).
- النطاق الديناميكي العالي: Enable or disable High Dynamic Range settings for improved dark detail optimization.

Figure 9: HDR feature for enhanced visual detail.
4. التعديلات المريحة
يتيح حامل الشاشة إجراء تعديلات متنوعة لتحسين تجربتك viewالراحة:
- ضبط الارتفاع: Gently push or pull the monitor up or down.
- الإمالة: Tilt the screen forward or backward to find the ideal angle.
- قطب: قم بتدوير الشاشة إلى اليسار أو اليمين على قاعدتها.
- المحور: قم بتدوير الشاشة 90 درجة لوضع الصورة viewعمل.
Figure 10: Ergonomic adjustments for optimal viewعمل.
صيانة
- تنظيف الشاشة: امسح الشاشة برفق بقطعة قماش ناعمة وخالية من الوبر. لإزالة البقع الصعبة، استخدمampبلّل قطعة القماش قليلاً بالماء أو بمنظف شاشات غير كاشط. لا ترش السائل مباشرة على الشاشة.
- تنظيف الجسم: استخدم قطعة قماش ناعمة وجافة لمسح سطح الشاشة.asinز. تجنب استخدام المنظفات القوية أو المنظفات الكاشطة.
- تخزين: إذا كنت ترغب في تخزين الشاشة لفترة طويلة، فافصل جميع الكابلات وقم بتخزينها في مكان بارد وجاف، ويفضل أن يكون في عبوتها الأصلية.
استكشاف الأخطاء وإصلاحها
لا يوجد طاقة
- تأكد من توصيل كابل الطاقة بشكل آمن بالشاشة ومأخذ الطاقة.
- تأكد من أن منفذ الطاقة يعمل عن طريق توصيل جهاز آخر.
- Check if the power adapter is correctly connected to the monitor.
لا توجد إشارة / شاشة فارغة
- Confirm the video cable (HDMI, DP, or USB-C) is securely connected to both the monitor and your device.
- تأكد من تحديد مصدر الإدخال الصحيح في قائمة العرض على الشاشة.
- Check your computer's display settings to ensure the monitor is detected and enabled.
- جرب كابل فيديو أو منفذًا مختلفًا إن أمكن.
Touch Functionality Not Working
- If using HDMI or DisplayPort, ensure the USB-A to USB-B cable is connected from your device to the monitor.
- If using USB-C, ensure your device's USB-C port supports DisplayPort Alternate Mode and touch data transmission.
- Check your operating system's touch settings.
- Note that some devices, such as game consoles (PS3/4/5, Xbox, Steam Deck, Fire TV Cube) and certain Apple products (iPhone, iPad, Switch), do not support touch functionality with this monitor.

Figure 11: Touch compatibility chart for various devices.
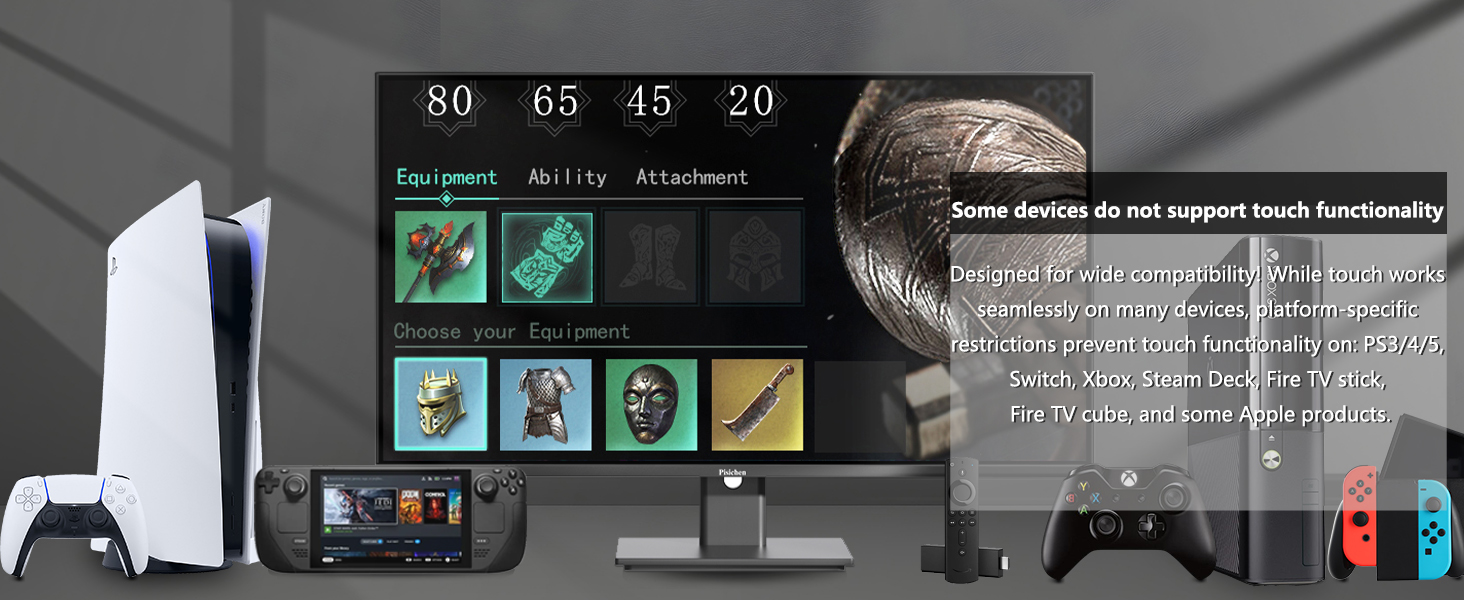
Figure 12: Devices that do not support touch functionality.
Webcam Not Detected
- تأكد من webcam is fully popped up.
- Verify that the USB connection (either USB-C or USB-A to USB-B) is properly established.
- تحقق من إعدادات الخصوصية في نظام التشغيل الخاص بك للتأكد من منح التطبيقات إمكانية الوصول إلى الكاميرا.
- أعد تشغيل الكمبيوتر الخاص بك.
تحديد
| ميزة | وصف |
|---|---|
| رقم الموديل | 238TS-CMR |
| حجم الشاشة | 23.8 بوصة |
| دقة | 2560 × 1440 (QHD Wide 1440p) |
| معدل التحديث | 100 هرتز |
| سطوع | 400 شمعة (نيت) |
| نسبة التباين | 3000:1 |
| اتصال تقنية | 10 نقاط اللمس المتعدد |
| Webكاميرا | Built-in Pop-up Camera |
| الاتصال | HDMI, DisplayPort (DP), USB Type-C, USB-B (upstream), Audio Out, DC Power |
| نسبة العرض إلى الارتفاع | 16:9 |
| سطح الشاشة | لامع |
| أبعاد المنتج | 1.97 × 21.26 × 12.6 بوصة |
| وزن العنصر | 11.53 رطل |
| الشركة المصنعة | شركة شنتشن كونوا للإلكترونيات المحدودة |
الضمان والدعم
Your Pisichen monitor is covered by a limited warranty. Please refer to the warranty card included in your package for specific terms and conditions, including the warranty period and coverage details.
For technical support, troubleshooting assistance, or warranty claims, please contact Pisichen customer service. Contact information can typically be found on the manufacturer's webالموقع أو على بطاقة الضمان.
When contacting support, please have your monitor's model number (238TS-CMR) and purchase information readily available.