1. المقدمة
This manual provides detailed instructions for the installation, operation, and maintenance of your darkFlash DS900 Air ATX Mid-Tower PC Gaming Case. Please read this manual thoroughly before beginning assembly to ensure proper setup and safe usage. The DS900 Air is designed to offer a clear view of your components with its 270° full-view tempered glass and provides excellent cooling capabilities for high-performance systems.

Figure 1.1: darkFlash DS900 Air ATX Mid-Tower PC Gaming Case with internal components and RGB lighting.
2. معلومات السلامة
يجب دائمًا مراعاة احتياطات السلامة التالية أثناء التثبيت والتشغيل:
- افصل مصدر الطاقة عن مأخذ الحائط قبل تثبيت أو إزالة أي مكونات.
- ارتدِ سوار معصم مضادًا للكهرباء الساكنة لمنع الضرر الناتج عن التفريغ الكهروستاتيكي (ESD) للمكونات الحساسة.
- Handle tempered glass panels with care. Avoid impacts or dropping them, as they can shatter.
- احتفظ بالأجزاء الصغيرة والبراغي بعيدًا عن متناول الأطفال.
- تأكد من وجود تهوية مناسبة حول الجهاز لمنع ارتفاع درجة الحرارة.
- Do not attempt to modify the case structure, as this may void the warranty and pose safety risks.
3. المواصفات
| ميزة | مواصفة |
|---|---|
| اسم الموديل | DS900 Air |
| نوع الحالة | برج ATX متوسط |
| دعم اللوحة الأم | ATX و Micro-ATX و Mini-ITX |
| خلوص طول وحدة معالجة الرسومات | حتى 425 ملم |
| ارتفاع مبرد وحدة المعالجة المركزية | حتى 170 ملم |
| نوع PSU | ATX (Bottom-mounted) |
| حجرات القيادة | 2x 3.5" HDD or 2x 2.5" SSD, 2x 2.5" SSD |
| فتحات التوسعة | 7 فتحات PCIe |
| منافذ الإدخال والإخراج | 1x USB-C, 1x USB 3.0, Audio (HD Audio) |
| دعم المشجعين | Bottom: 3x 120mm; Top: 3x 120mm or 2x 140mm; Rear: 1x 120mm; Right Side: 2x 120mm |
| دعم المبرد | Top: Up to 360mm; Side: Up to 240mm |
| مواد | فولاذ، زجاج مقسّى |
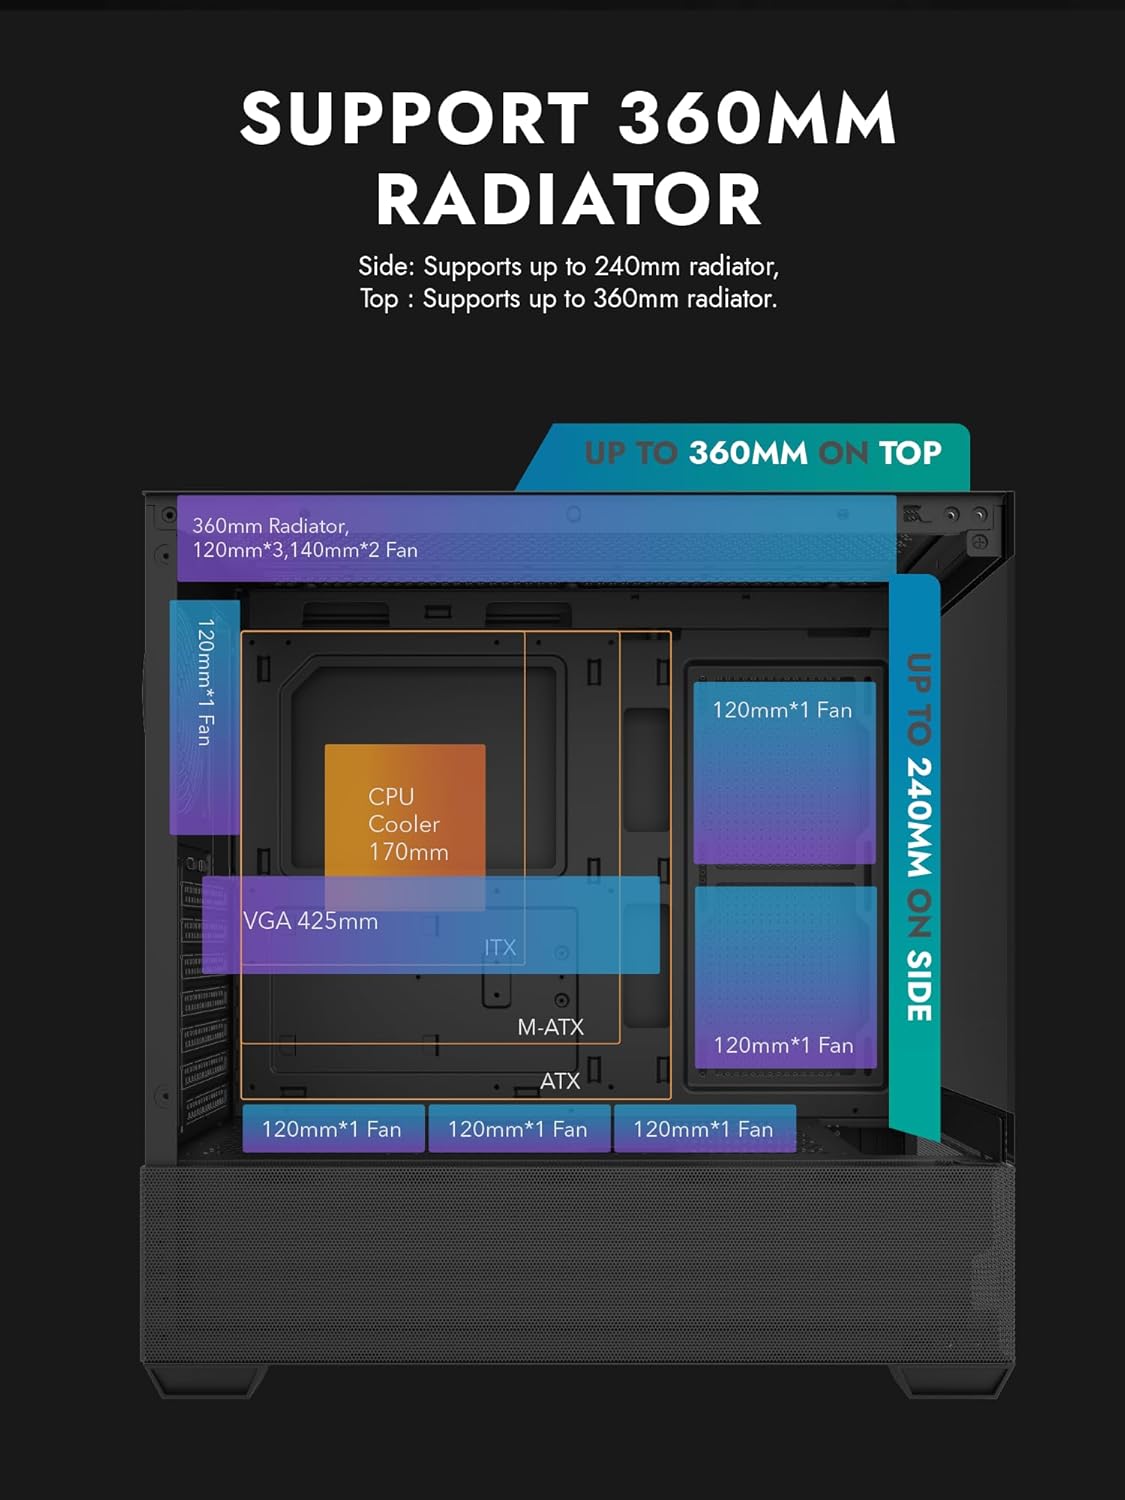
Figure 3.1: Radiator and fan support diagram for the DS900 Air case, illustrating maximum component dimensions.
4. الإعداد والتثبيت
Follow these steps to assemble your PC components within the darkFlash DS900 Air case.
4.1. إعداد القضية
- إزالة الألواح الجانبية: The DS900 Air features a tool-free clamshell side panel. Gently pull the top edge of the tempered glass side panel to unlatch it, then lift it off. Repeat for the other side panel if necessary.
- صندوق الملحقات: حدد موقع صندوق الملحقات داخل العلبة، والذي يحتوي على البراغي وربطات الكابلات وغيرها من أدوات التثبيت.
4.2. تركيب اللوحة الأم
- قم بتثبيت درع الإدخال/الإخراج في الفتحة الخلفية للعلبة.
- Align your ATX, Micro-ATX, or Mini-ITX motherboard with the standoffs inside the case. Ensure the I/O ports align with the I/O shield.
- قم بتأمين اللوحة الأم باستخدام البراغي المتوفرة.
4.3. تركيب وحدة إمداد الطاقة (PSU)
- The DS900 Air has a dedicated bottom PSU chamber. Slide your ATX power supply into the chamber from the rear of the case.
- قم بتأمين وحدة إمداد الطاقة باستخدام البراغي من الجزء الخلفي للعلبة.
- Route necessary power cables through the cutouts into the main compartment.
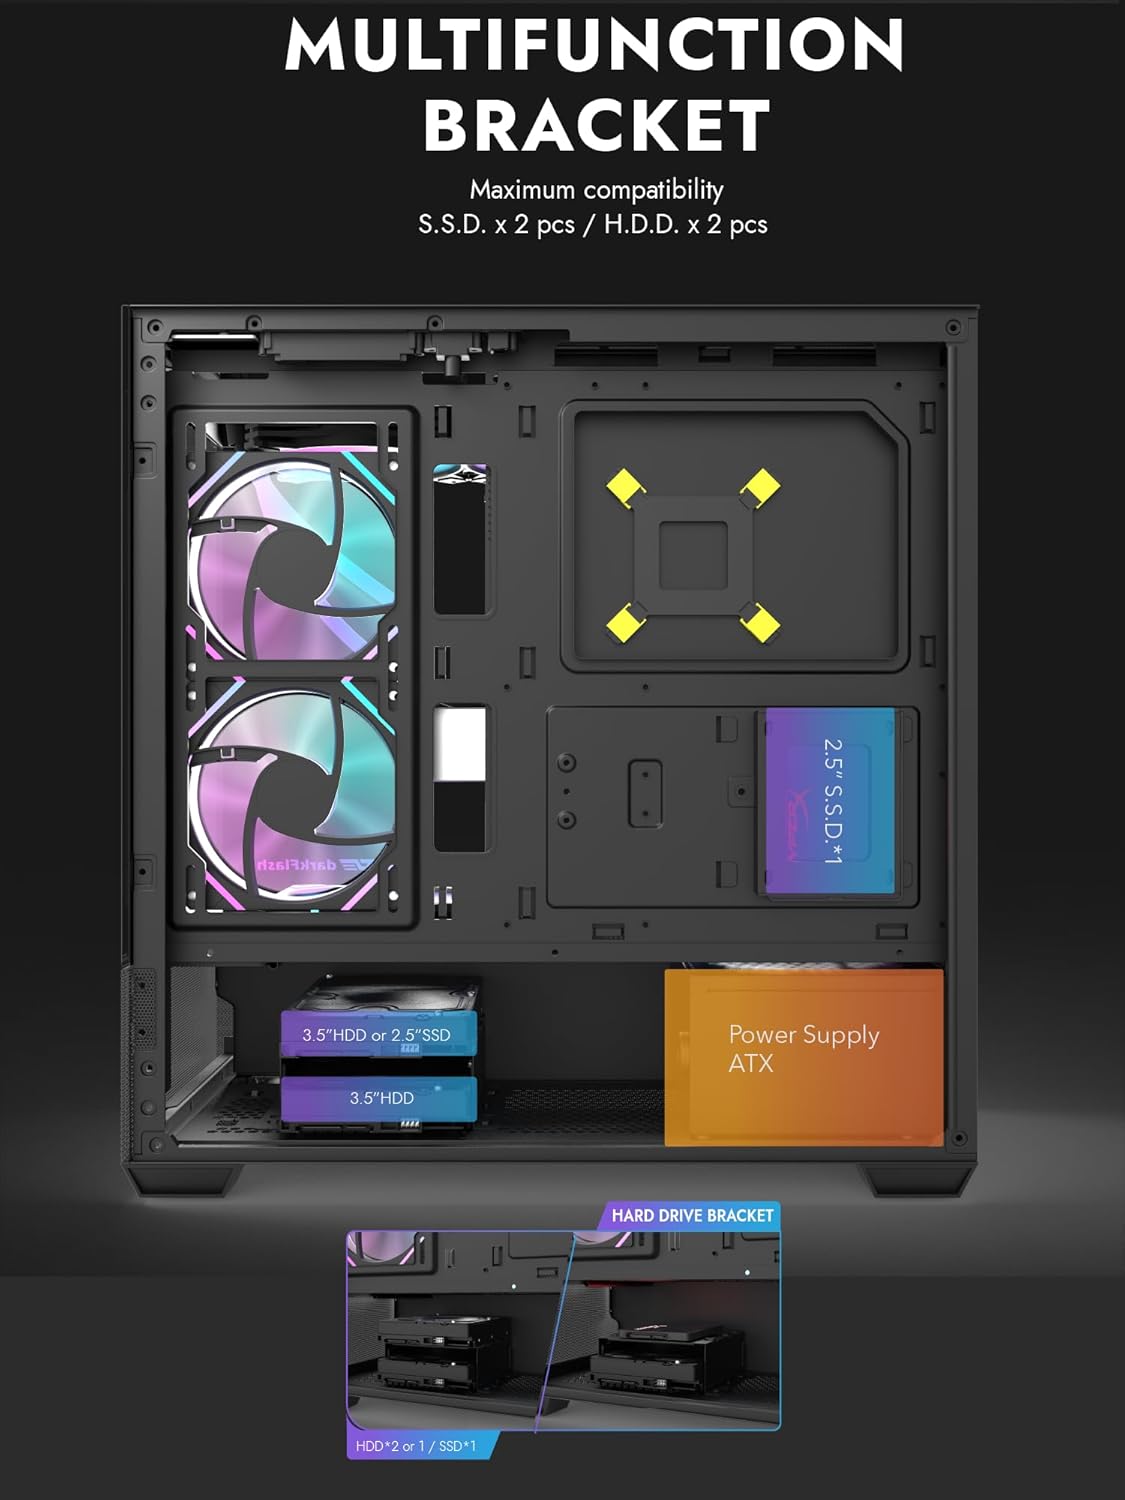
Figure 4.1: Internal layout showing the multifunction drive bracket and the bottom-mounted PSU chamber.
4.4. تركيب جهاز التخزين
The case supports up to two 3.5" HDDs or 2.5" SSDs in the hard drive bracket, and two additional 2.5" SSDs on the multifunction bracket.
- 3.5" HDD / 2.5" SSD: Install drives into the removable hard drive bracket located in the PSU chamber. Secure with screws.
- قرص SSD مقاس 2.5 بوصة: Mount 2.5" SSDs onto the multifunction bracket located on the motherboard tray. Secure with screws.
4.5. تثبيت بطاقة الرسومات (GPU)
- قم بإزالة أغطية فتحة PCIe الضرورية من الجزء الخلفي للعلبة.
- قم بإدخال بطاقة الرسوميات في فتحة PCIe المناسبة على اللوحة الأم.
- ثبّت بطاقة الرسومات بالبراغي. يدعم الهيكل وحدات معالجة رسومات يصل طولها إلى 425 مم.
4.6. Cooling System Installation (Fans/Radiators)
The DS900 Air offers extensive cooling options:
- قمة: Supports up to 3x 120mm fans or 2x 140mm fans, or a 360mm radiator.
- قاع: Supports up to 3x 120mm fans.
- مؤخرة: يدعم مروحة واحدة مقاس 120 مم.
- الجانب الأيمن: Supports 2x 120mm fans or a 240mm radiator.
Install fans and radiators using the appropriate screws and mounting points. Ensure correct airflow direction for optimal cooling.

Figure 4.2: Fan support locations and quantities within the DS900 Air chassis.

Figure 4.3: Airflow diagram demonstrating optimal cooling paths through the case.
4.7. توصيل كابلات الإدخال/الإخراج الأمامية
Connect the front panel cables (USB-C, USB 3.0, HD Audio, Power, Reset, LED) to their corresponding headers on your motherboard. Refer to your motherboard manual for exact header locations.

Figure 4.4: Top-right I/O panel featuring USB-C and USB 3.0 ports.
4.8. إدارة الكابلات
استخدم فتحات توجيه الكابلات ونقاط التثبيت خلف لوحة الأم لتنظيم الكابلات. هذا يحسن تدفق الهواء والمظهر العام.
5. تشغيل جهاز الكمبيوتر الخاص بك
Once all components are installed and cables are connected, replace the side panels. Connect your monitor, keyboard, mouse, and power cable. Press the power button on the case to start your system. Ensure all fans are spinning and components are receiving power.
6. الصيانة
تساعد الصيانة الدورية على ضمان الأداء الأمثل وطول عمر مكونات جهاز الكمبيوتر الخاص بك.
- تنظيف الغبار: Periodically clean dust filters and internal components using compressed air. The DS900 Air features mesh panels that help filter dust.
- تدفق الهواء: Ensure no obstructions block the intake or exhaust vents of the case.
- إدارة الكابلات: Re-evaluate cable routing periodically to ensure no cables are interfering with fan blades or airflow.
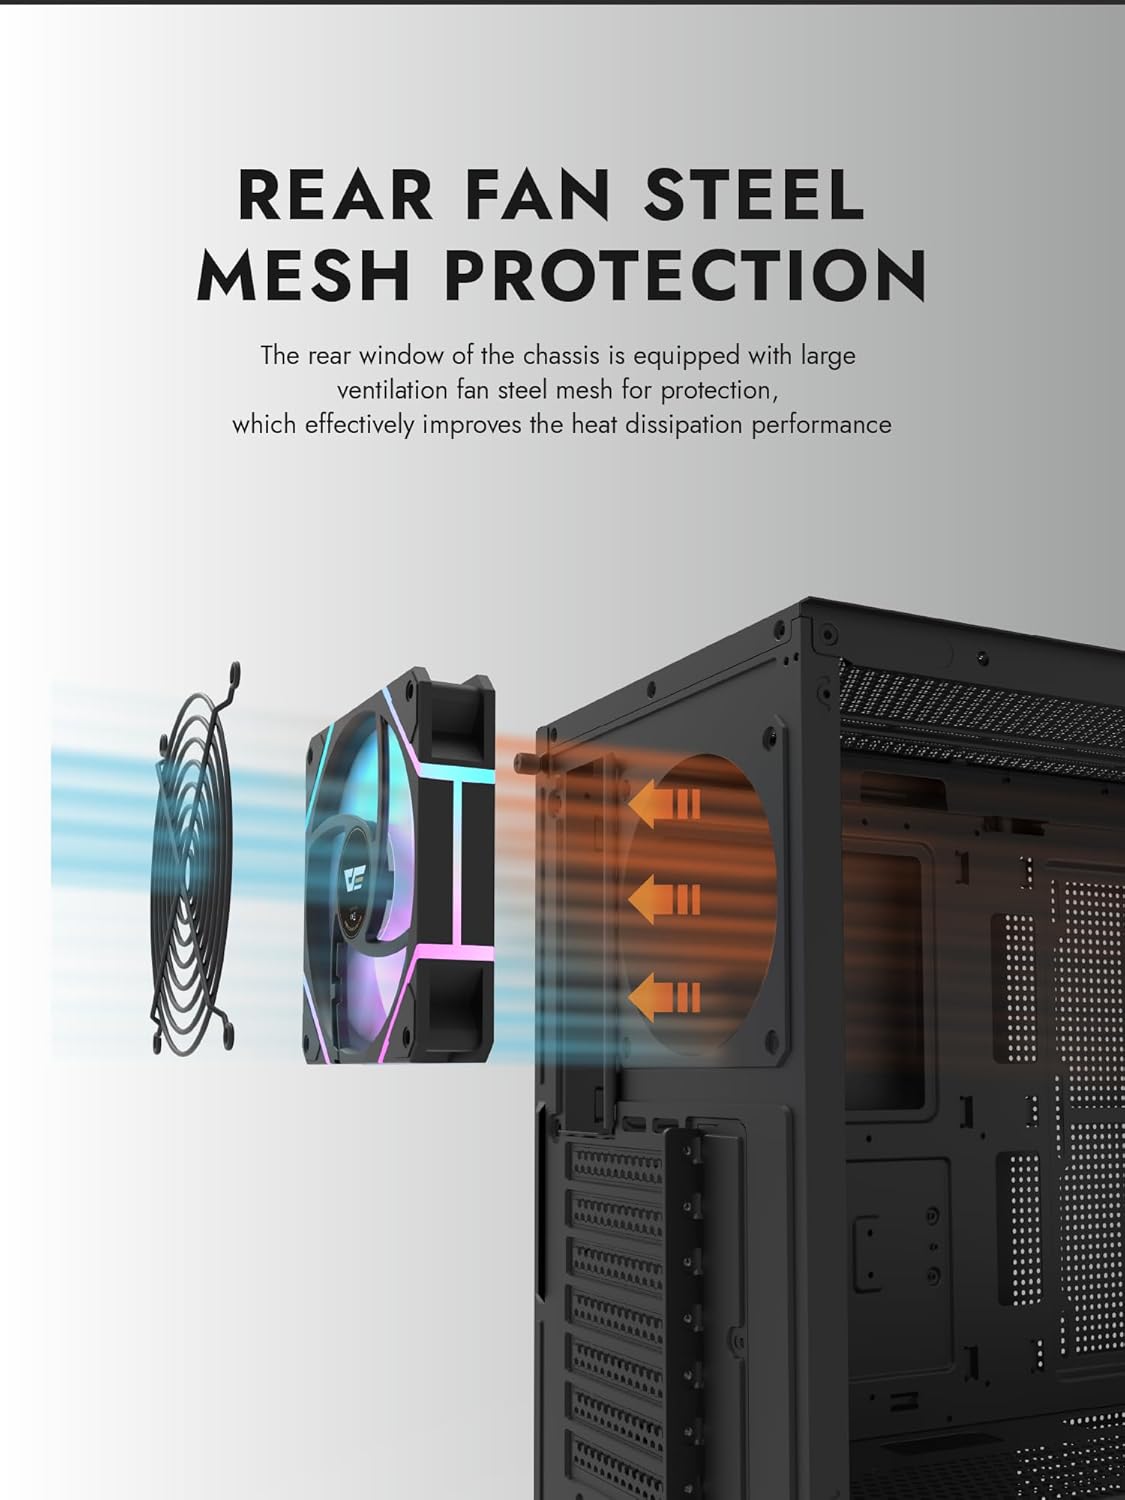
Figure 6.1: Rear fan steel mesh protection, designed to improve heat dissipation.
7. استكشاف الأخطاء وإصلاحها
إذا واجهت مشكلات في بناء جهاز الكمبيوتر الخاص بك، ففكر في خطوات استكشاف الأخطاء وإصلاحها الشائعة التالية:
- لا يوجد طاقة: Check all power connections, including the PSU to the wall, PSU to motherboard, and front panel power switch cable to the motherboard.
- لا يوجد عرض: Ensure your monitor is connected to the graphics card (not the motherboard I/O unless using integrated graphics). Reseat the graphics card and RAM.
- ارتفاع درجة الحرارة: Verify all fans are spinning correctly and are oriented for proper airflow. Check CPU cooler installation.
- لم يتم اكتشاف المكون: Reseat the component (e.g., RAM, GPU, storage drive) and check its power and data connections.
8. الضمان والدعم
darkFlash products are manufactured to high-quality standards. For warranty information or technical support, please refer to the official darkFlash webالموقع أو تواصل مع بائع التجزئة. احتفظ بإثبات الشراء لطلبات الضمان.