
Prexiso 5-in-1 Stud Finder
PREXISO 5-in-1 Stud Finder with Laser Level & Ultrasound Distance Measure User Manual
Model: 5-in-1 Stud Finder
مقدمة
The PREXISO 5-in-1 Multi-Purpose Detector is a versatile tool designed to assist with various home improvement and construction tasks. It combines the functions of a stud finder, metal detector, AC wire detector, laser level, and ultrasonic distance measurer. This manual provides detailed instructions for safe and effective use of the device.
معلومات السلامة
- سلامة الليزر: This product is a Class II laser with an output power less than 1mW. Avoid direct eye exposure to the laser beam.
- Sharp Needles: The auxiliary laser marking stud button features sharp needles. Exercise caution when pressing this button to prevent injury. These needles are intended for use on wallpaper and wooden surfaces only. Do not use on stone, metal walls, or low-density plasterboard.
- AC Wire Detection: Always be aware of the potential presence of live AC wires behind walls. The device will provide an audible and visual warning when AC wires are detected. Take appropriate precautions to avoid electrical hazards.
- العوامل البيئية: Increased moisture on wall surfaces can affect the device's conductivity and may lead to inaccurate readings. Ensure surfaces are dry for optimal performance.
- Ultrasonic Measurement Accuracy: The ultrasonic distance measure function is intended for rough reference only and may not be as accurate as a laser distance measure.
المنتج انتهىview
Familiarize yourself with the components of your PREXISO 5-in-1 Multi-Purpose Detector:
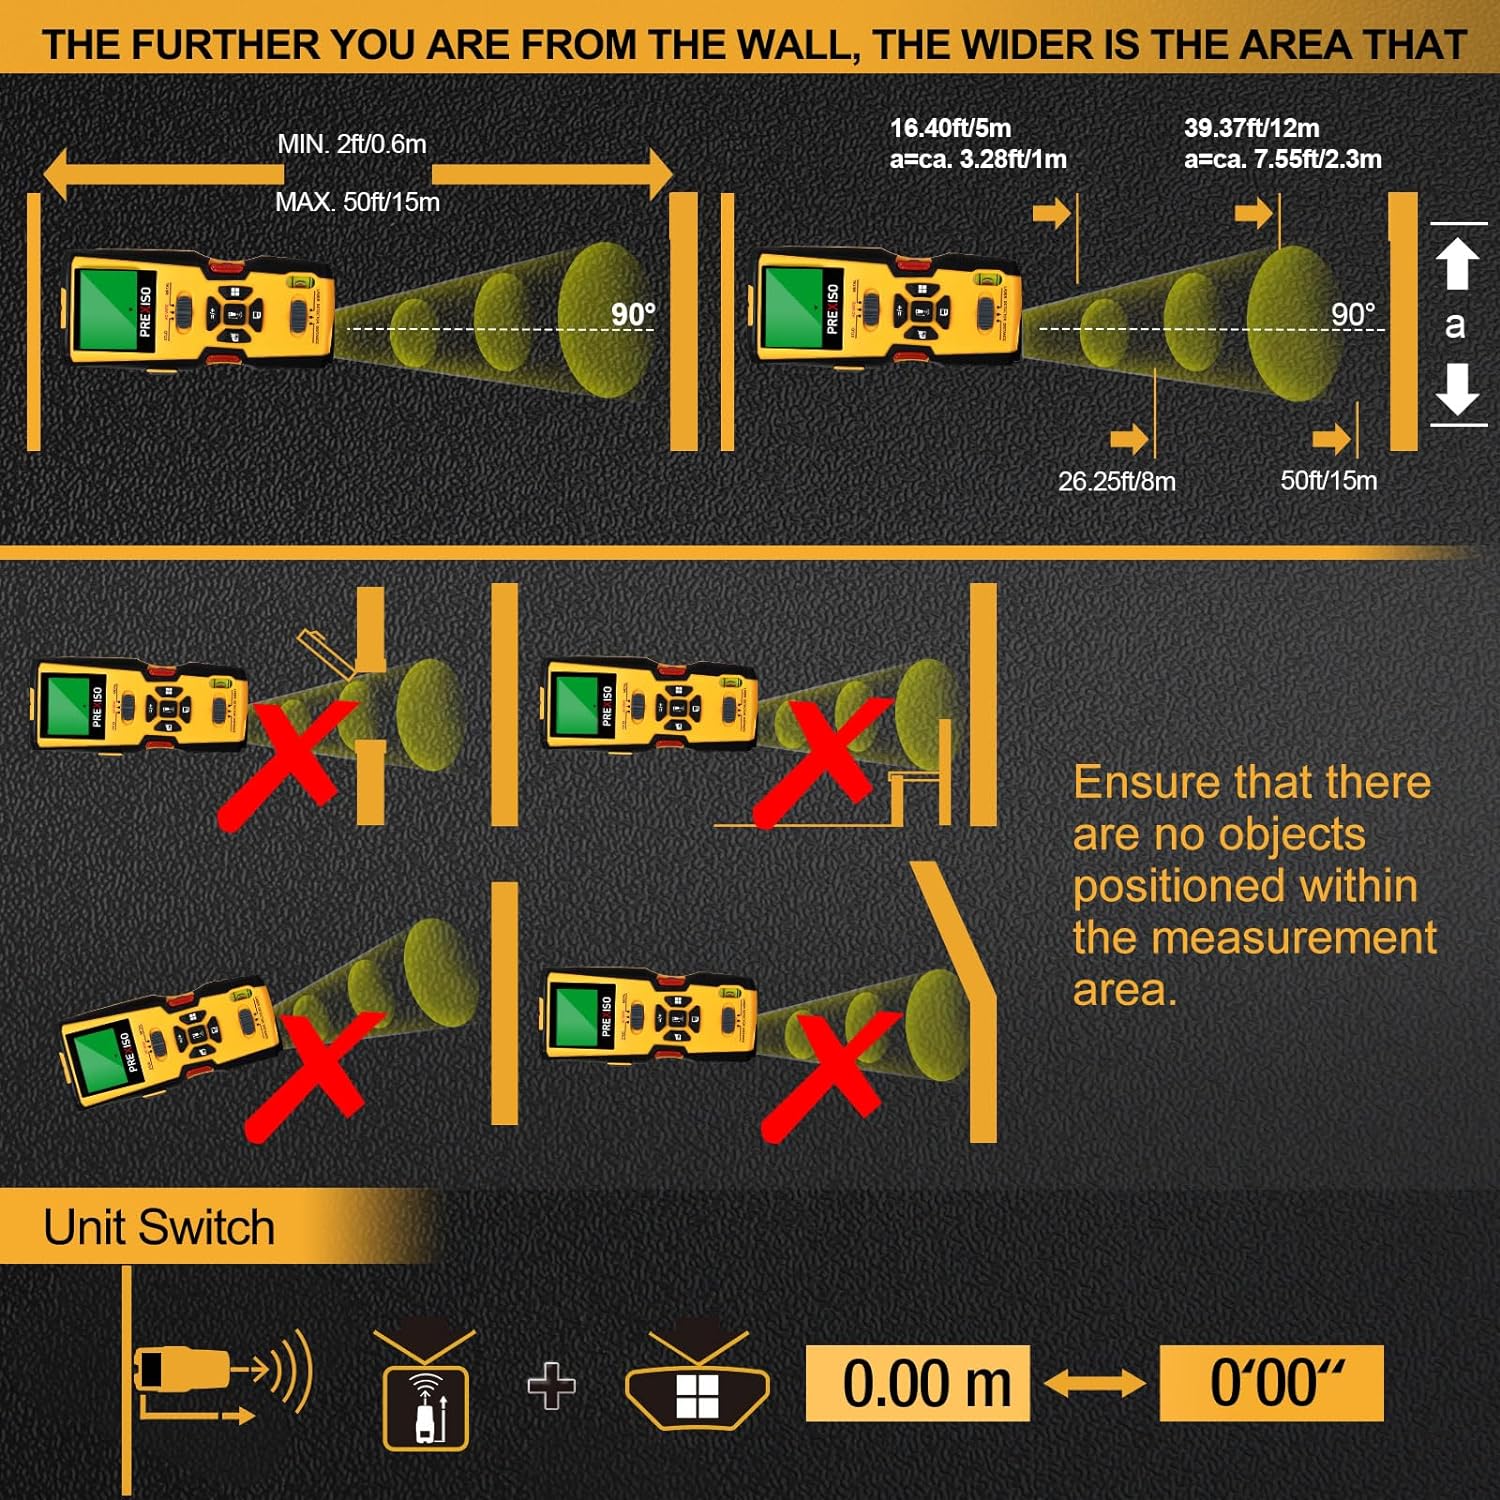
Figure 1: PREXISO 5-in-1 Stud Finder Component Diagram
- شاشة LCD: Shows detection results, measurements, and mode indicators.
- Material Switch (STUD/AC WIRE/METAL): يحدد وضع الكشف.
- Function Switch (LASER/DETECTOR/DISTANCE): Selects the primary function.
- Stud Button: Activates the stud marking needles (use with caution).
- Ultrasound Measure Buttons: For distance, area, volume, memory, and addition calculations.
- Spirit Level Bubble Vial: For horizontal leveling.
- Laser Beam Exit: Emits the laser line for marking.
- Ultrasound Sender/Receiver: For ultrasonic distance measurements.
- Contact Pads: Located on the back for detection.
- حجرة البطارية: Holds the 9V battery.
يثبت
تركيب البطارية
- حدد مكان حجرة البطارية في الجزء الخلفي من الجهاز.
- افتح غطاء البطارية.
- أدخل بطارية واحدة 9 فولت، مع التأكد من صحة القطبية (+/-).
- أغلق غطاء البطارية بشكل محكم.
Video: PREXISO 5-in-1 Stud Finder with Laser Level Distance Measure - This video provides a visual overview of the product's features and basic operation, including battery installation and mode selection.
تعليمات التشغيل
1. المعايرة
Before each use, especially for stud and metal detection, the device requires automatic calibration for maximum reliability and accuracy.
- Turn on the stud finder.
- Place the device flat against the wall surface where you intend to scan.
- Press and hold the scan button (usually on the side) until calibration is complete. The display will indicate when it's ready.
- Keep the button pressed down during the entire scanning operation.
2. Stud, Metal, and AC Wire Detection
This device offers three scanning modes to locate concealed objects:

Figure 2: Locating Concealed Objects
- حدد الوضع: Use the Material Switch to select between STUD, AC WIRE, or METAL mode.
- معايرة: Perform calibration as described above.
- مسح: While holding the scan button, slowly slide the device horizontally across the wall surface.
- كشف: When an object is detected, the LCD screen will display arrows indicating its location, and an audible beep will sound. The center of the object is indicated by a solid dot on the screen.
- العلامة: Use a pencil to mark the detected location.
أعماق الكشف:
- Wood Studs: Up to 1 inch (24mm) deep in drywall.
- Metal Objects: Up to 1-1/2 inches (38mm) deep.
- Live AC Wires: Up to 1-3/8 inches (35mm) deep.

Figure 3: 5-in-1 Multi-Purpose Detector Features
3. Laser Marking
The device can project a horizontal laser line for accurate leveling, useful for hanging pictures or shelves.
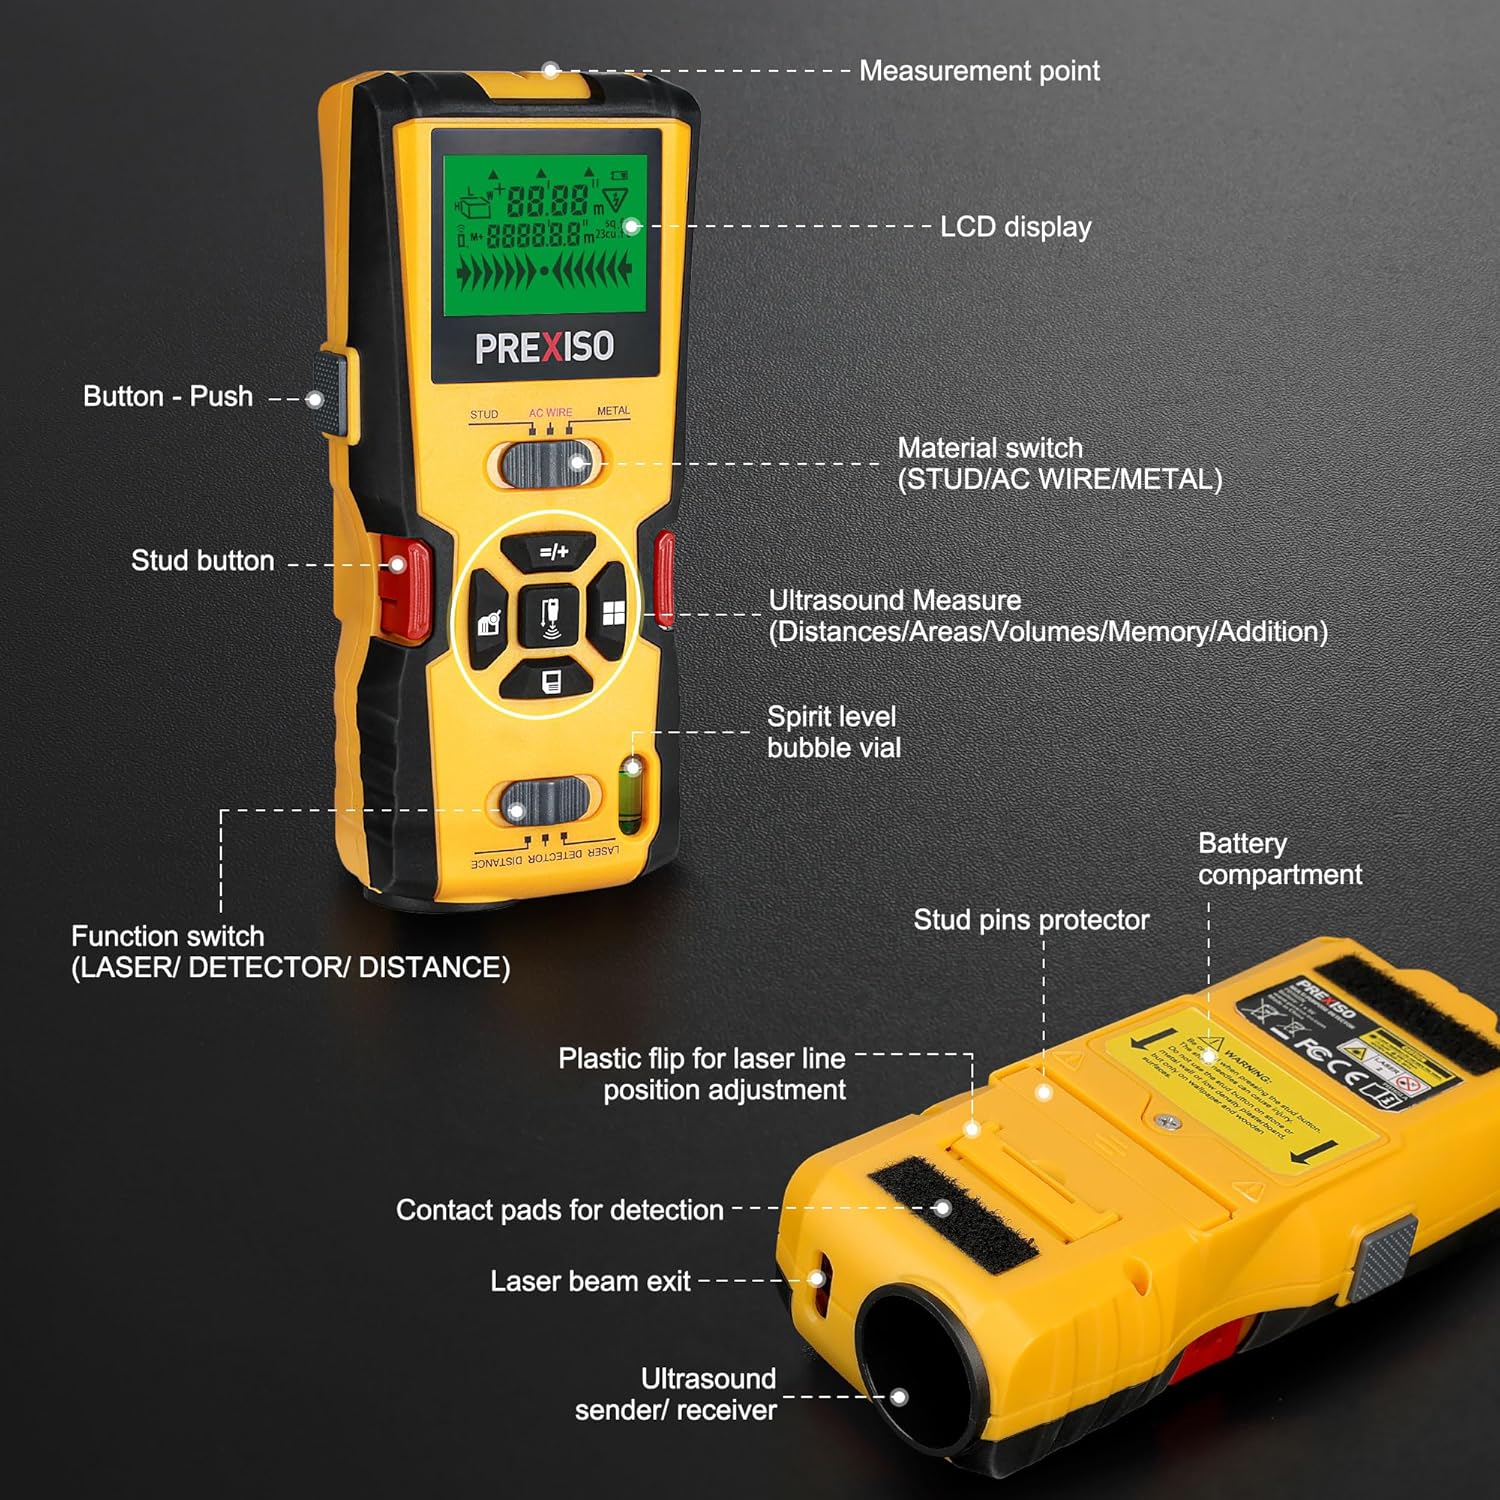
Figure 4: Laser Marking in Use
- حدد الوضع: Slide the Function Switch to the LASER position.
- جهاز الموضع: Place the device against the wall at the desired height. Use the built-in bubble vial to ensure the device is perfectly horizontal.
- Adjust Laser: If needed, use the plastic flip on the back to adjust the laser line position for uneven walls.
- علامة: The laser line will project across the wall, providing a guide for marking.
Caution: The stud button with needles is for auxiliary laser marking on wallpaper and wooden surfaces only. Do not use on stone or metal walls, or low-density plasterboard. Ensure the stud pins protector is engaged when not using the needles.
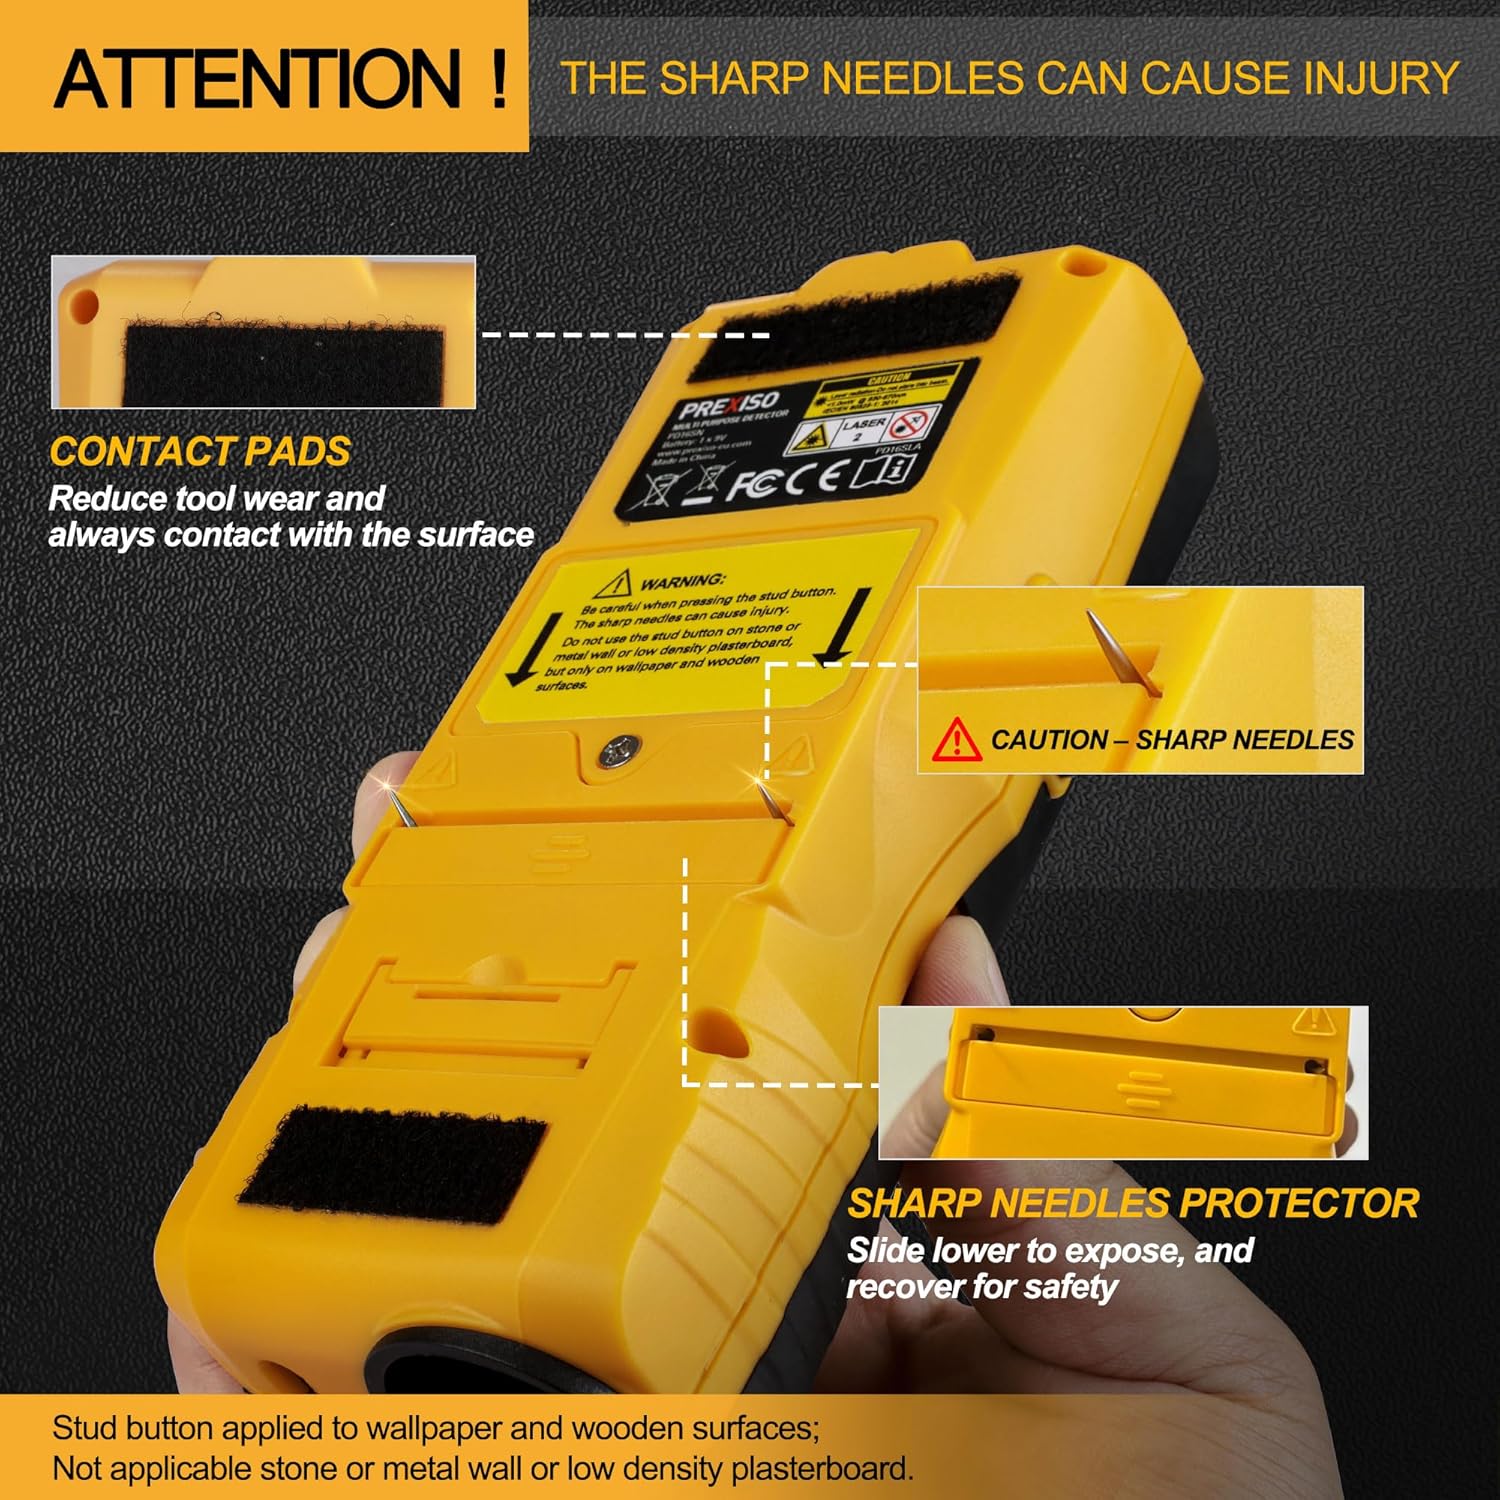
Figure 5: Sharp Needles Warning and Protector
4. Ultrasonic Distance Measurement
This function allows for measuring distances, areas, and volumes using ultrasound.

Figure 6: Ultrasonic Distance Measure Functions
- حدد الوضع: Slide the Function Switch to the DISTANCE position.
- قياس المسافة: Point the ultrasound sender/receiver towards the target surface. Press the measurement button. The distance will be displayed on the LCD.
- Area/Volume Measurement: Follow the on-screen prompts to take multiple distance measurements to calculate area or volume.
- Addition Measurement: The device supports adding multiple measurements.
- تبديل الوحدة: Use the appropriate button to switch between metric (m) and imperial (ft/in) units.
Note: Ensure there are no objects positioned within the measurement area that could obstruct the ultrasonic waves. This function is for rough measurements and may not be as precise as laser distance measurement.
صيانة
- حافظ على نظافة الجهاز وجفافه. امسحه بقطعة قماش ناعمة.amp القماش. لا تستخدم المنظفات أو المذيبات الكاشطة.
- قم بإزالة البطارية إذا لم يتم استخدام الجهاز لفترة طويلة لمنع التسرب.
- Store the device in its protective carrying case in a cool, dry place.
- Regularly check the contact pads for wear and ensure they are clean for accurate detection.
استكشاف الأخطاء وإصلاحها
- قراءات غير دقيقة: Ensure the wall surface is dry. High moisture levels can interfere with electromagnetic fields and cause false readings. Re-calibrate the device on a clear section of the wall.
- لم يتم الكشف عن أي شيء: Verify that the correct mode (STUD, AC WIRE, or METAL) is selected. Ensure the scan button is continuously pressed during scanning.
- Ultrasonic Measurement Errors: Confirm there are no obstructions between the device and the target surface. The ultrasonic function works best on reflective surfaces.
- Laser Not Visible/Level: Check the battery level. Ensure the device is placed on a stable, level surface or adjusted using the plastic flip for leveling.
تحديد
| ميزة | مواصفة |
|---|---|
| ماركة | بريكسيسو |
| رقم الموديل | 5-in-1 Stud Finder |
| لون | أصفر |
| مصدر الطاقة | Battery Powered (1x 9V battery required) |
| مادة | بلاستيك |
| وزن العنصر | 13.6 أونصات |
| أبعاد الحزمة | 9.18 × 4.09 × 2.24 بوصة |
| Stud Scan Depth | يصل إلى بوصة واحدة |
| عمق المسح المعدني | حتى 1-1/2 بوصة |
| AC Wire Scan Depth | حتى 1-3/8 بوصة |
| Ultrasonic Distance Measure Range | ما يصل إلى 50 قدمًا / 15 أمتار |
| دورة الليزر | Class II, < 1mW |
الضمان والدعم
For warranty information and customer support, please refer to the product packaging or contact PREXISO customer service directly. Keep your purchase receipt as proof of purchase.
Ask a question about this manual
Ask about setup, troubleshooting, compatibility, parts, safety, or missing instructions. Manuals+ will review the question and use this page’s manual context to help answer it.