
1. المقدمة
Thank you for choosing the KEENSTAR 20Bar Espresso Machine. This manual provides essential information for the safe operation, maintenance, and troubleshooting of your new espresso machine. Please read it thoroughly before first use and keep it for future reference.
2. تعليمات السلامة الهامة
- اقرأ كافة التعليمات قبل استخدام الجهاز.
- لا تلمس الأسطح الساخنة. استخدم المقابض أو الأزرار.
- للحماية من الحريق والصدمات الكهربائية وإصابة الأشخاص، لا تغمر السلك أو المقابس أو الجهاز في الماء أو أي سائل آخر.
- من الضروري المراقبة الدقيقة عند استخدام أي جهاز بواسطة الأطفال أو بالقرب منه.
- افصل الجهاز عن المقبس عند عدم استخدامه وقبل التنظيف. اتركه ليبرد قبل تركيب أو خلع الأجزاء وقبل تنظيف الجهاز.
- لا تقم بتشغيل أي جهاز بسلك أو قابس تالف أو بعد حدوث عطل في الجهاز، أو تعرضه للتلف بأي شكل من الأشكال.
- قد يؤدي استخدام ملحقات غير موصى بها من قبل الشركة المصنعة للجهاز إلى نشوب حريق أو حدوث صدمة كهربائية أو إصابة الأشخاص.
- لا تستخدمه في الهواء الطلق.
- لا تترك السلك يتدلى على حافة الطاولة أو المنضدة، أو يلامس الأسطح الساخنة.
- لا تضعه على أو بالقرب من موقد غاز أو كهرباء ساخن، أو في فرن ساخن.
- احرص دائمًا على توصيل القابس بالجهاز أولًا، ثم وصل السلك بمقبس الحائط. لفصله، أدر أي جهاز تحكم إلى وضع "إيقاف التشغيل"، ثم افصل القابس من مقبس الحائط.
- لا تستخدم الجهاز لغير الغرض المخصص له.
- توخى الحذر الشديد عند التخلص من البخار الساخن.
- هذا الجهاز مخصص للاستخدام المنزلي فقط.
3. محتويات العبوة
Please check the package contents upon unboxing to ensure all items are present and undamaged.
صورة: All components included in the KEENSTAR 20Bar Espresso Machine package. This includes the main unit, portafilter with handle, single and double shot filters, coffee spoon with tamper, and a removable drip tray. The water tank and steam nozzle are also visible.
- KEENSTAR 20Bar Espresso Machine Main Unit
- مقبض فلتر القهوة
- 1-Shot Filter Basket
- 2-Shot Filter Basket
- ملعقة قهوة بحرف Tamper
- صينية التنقيط القابلة للإزالة
- دليل المستخدم
4. انتهى المنتجview
Familiarize yourself with the various parts of your espresso machine.

صورة: أمام view of the KEENSTAR 20Bar Espresso Machine, showcasing its sleek stainless steel design and key operational areas.
- خزان المياه: Detachable, 1.1 Liter capacity. Located at the back of the machine.
- لوحة التحكم: Intuitive touch screen for selecting brew options (Espresso, Americano, Espresso Cool, Steam, ON/OFF, 2X Espresso).
- حامل المرشح: يحتفظ بالقهوة المطحونة للتخمير.
- عصا البخار: For frothing milk for lattes and cappuccinos. Features a 360-degree rotation.
- صينية التنقيط: قابل للإزالة لسهولة التنظيف.
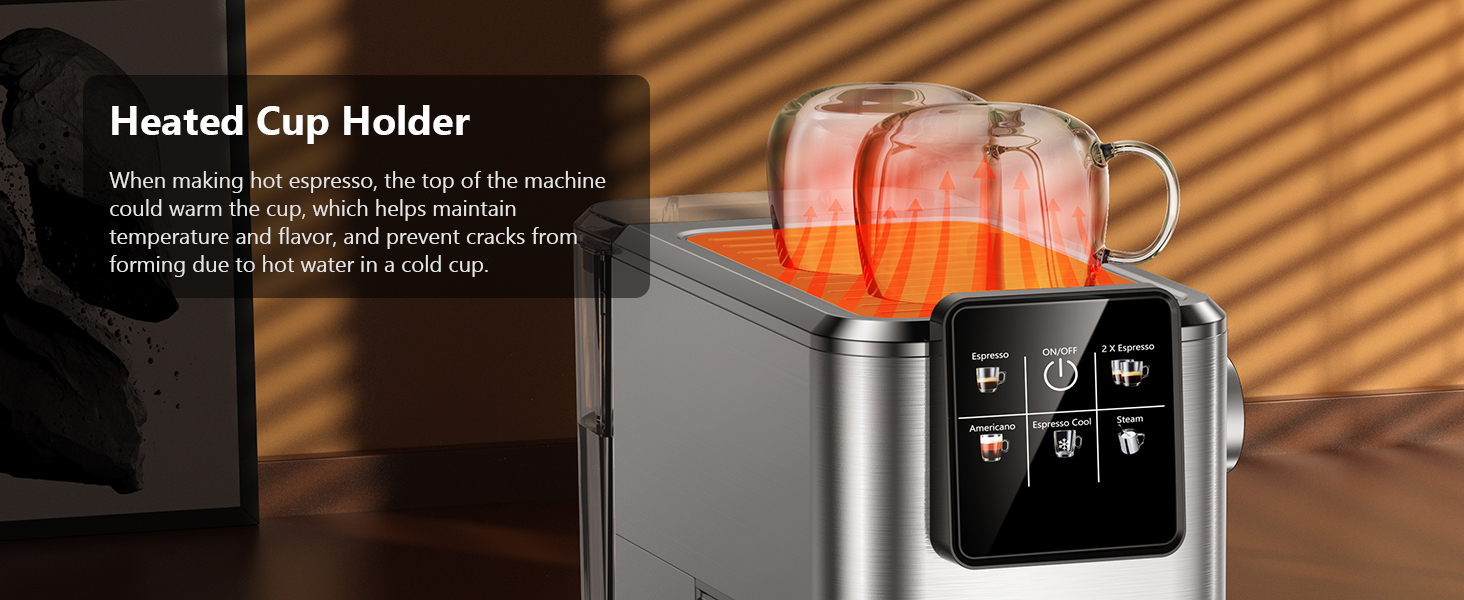
- Heated Cup Holder: Located on top of the machine to warm cups, maintaining coffee temperature.
5. الإعداد
5.1 Initial Use and Priming
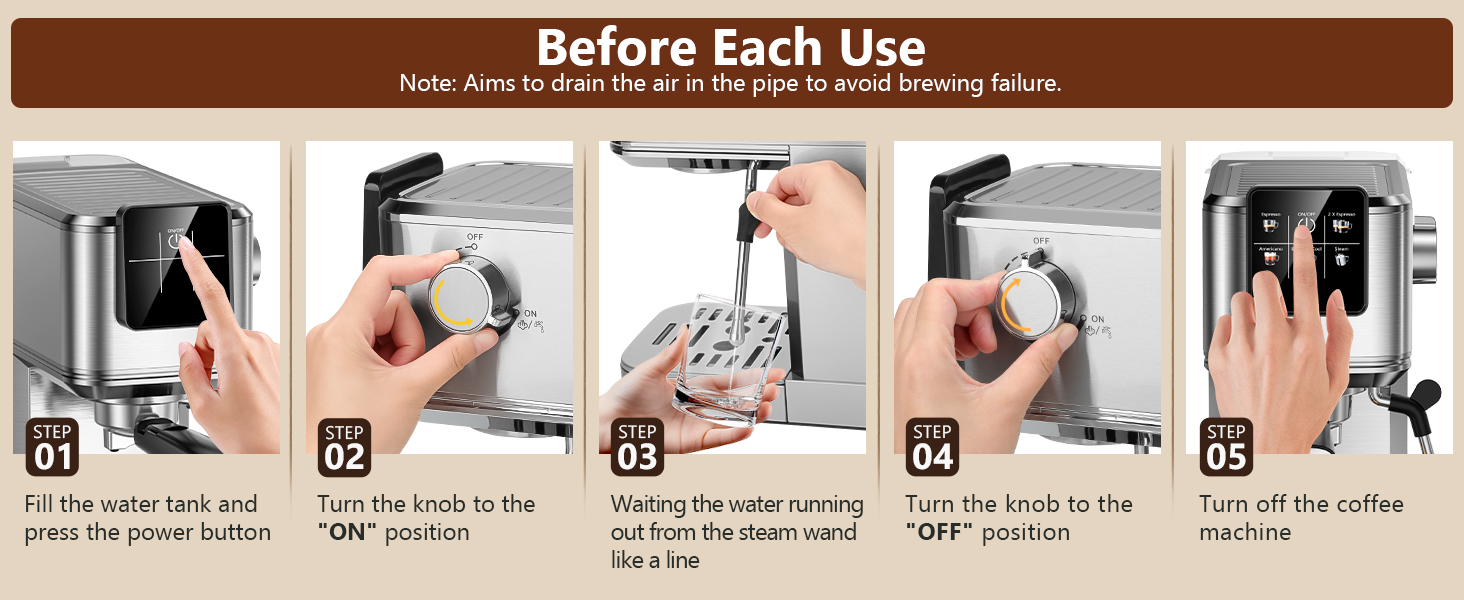
Before first use, or if the machine has not been used for a long time, it is essential to prime the system to ensure proper operation and remove any air from the pipes.
- Fill the water tank with fresh water and place it back into the machine. Ensure the tank cover is properly closed.
- Plug the machine into a power outlet. The ON/OFF button on the touch screen will illuminate.
- Press the ON/OFF button to turn on the machine. The indicator lights will blink as the machine preheats.
- Once the indicator lights are steady, the machine is ready.
- ضع كوبًا فارغًا تحت عصا البخار.
- Turn the steam knob to the "ON" position. Water will run out from the steam wand like a line. Let it run for about 10-15 seconds to purge air.
- Turn the steam knob to the "OFF" position.
- Press the ON/OFF button to turn off the machine. The machine is now primed and ready for use.

صورة: Visual steps for priming the espresso machine before its first use or after a period of inactivity. This process drains air from the internal pipes.
5.2 تعبئة خزان المياه
The water tank has a maximum capacity of 1200ml. Do not exceed the maximum fill line to prevent overflow.
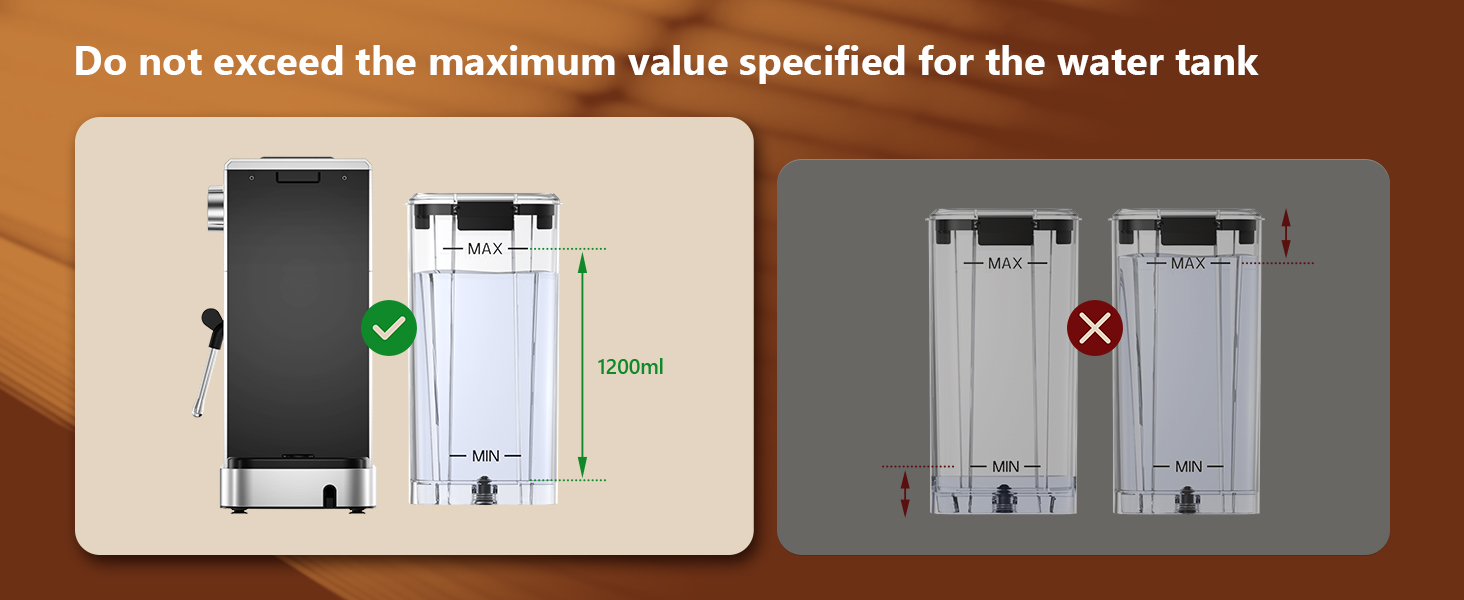
صورة: Guidance on filling the water tank, indicating the 1200ml maximum fill level to avoid overfilling.
6. تعليمات التشغيل
6.1 تحضير قهوة الإسبريسو
The machine features a 20-bar pressure system and pre-soak technology for rich espresso extraction.
- Ensure the steam knob is set to the "OFF" position before brewing coffee.
- Fill the water tank with fresh water and press the ON/OFF button to power on. Wait for the indicator to become steady, signifying preheating is complete.
- Select the appropriate filter basket (1-shot or 2-shot) and place it into the portafilter.
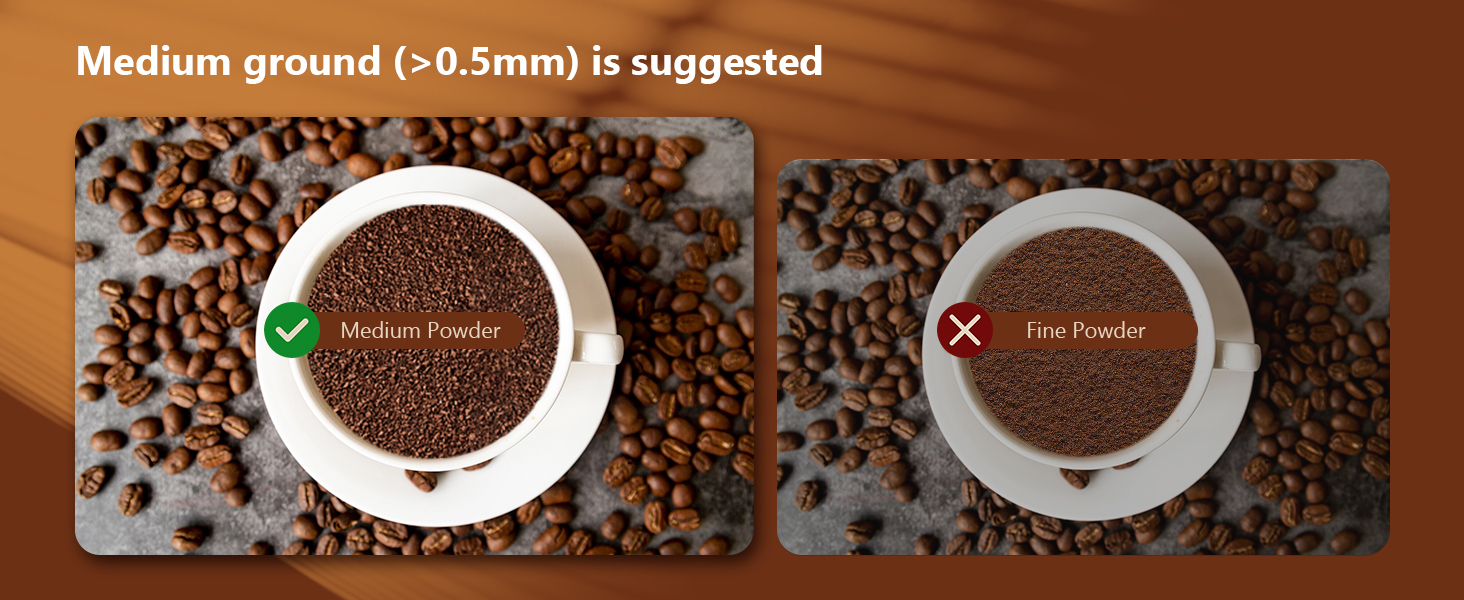
- Add ground coffee to the filter basket. Use medium ground coffee (greater than 0.5mm) for optimal results.
- Tamp the ground coffee firmly and evenly using the coffee tampاه.
- Attach the portafilter to the machine, ensuring it is fully locked into place.
- ضع كوبك (أكوابك) على صينية التنقيط أسفل حامل الفلتر.
- Select "Espresso" for a single shot or "2 X Espresso" for a double shot on the touch screen. The machine will begin brewing.
- بمجرد اكتمال التخمير، سوف تتوقف الماكينة تلقائيًا.

صورة: Step-by-step visual instructions for brewing espresso, from preparing the machine to the final extraction.
صورة: Illustration demonstrating the correct way to lock the portafilter before brewing to prevent leaks and ensure proper extraction.

صورة: Recommended coffee grind size (medium, >0.5mm) for optimal espresso extraction, contrasting it with fine ground coffee.
6.2 Making Cold Brew Espresso
This machine offers a rapid cold brew function, producing smooth cold brew in as little as 10 minutes.
- Ensure the water tank is filled with iced water for the cold brew function.
- Prepare the portafilter with ground coffee as described in Section 6.1.
- Attach the portafilter to the machine and place a cup underneath.
- Select "Espresso Cool" on the touch screen. The machine will begin the cold brew process.
- Enjoy your rapid cold brew espresso.

صورة: The espresso machine preparing cold brew, emphasizing the requirement for iced water in the tank.
6.3 رغوة الحليب
The powerful steam wand allows you to create creamy microfoam for lattes and cappuccinos.
- Fill the water tank with fresh water and press the ON/OFF button to power on.
- Press the "Steam" button on the touch screen to preheat the steam function. The indicator will blink during preheating and become steady when ready.
- After preheating, turn the steam knob to the "ON" position to release any remaining water in the pipe before frothing.
- Insert the steam nozzle approximately 1 inch into the surface of your milk.
- Gradually turn the steam knob to increase steam until the desired foam consistency is achieved.
- Once finished, turn the steam knob to the "OFF" position and clean the steam wand immediately.
صورة: Visual instructions for frothing milk, detailing the steps from preheating to creating microfoam.
7. الصيانة والتنظيف
يضمن التنظيف المنتظم طول عمر ماكينة الإسبريسو وأدائها الأمثل.
- النظافة العامة: امسح الجزء الخارجي من الماكينة بالإعلانamp قماش. لا تستخدم المنظفات الكاشطة أو الإسفنج.
- صينية التنقيط: يجب تفريغ صينية التنقيط القابلة للإزالة وتنظيفها بانتظام.
- حامل الفلتر وسلال الفلتر: After each use, remove the portafilter and discard used coffee grounds. Rinse the portafilter and filter basket under running water.
- عصا البخار: بعد رغوة الحليب مباشرة، امسحي عصا البخار بالصابون.amp cloth to prevent milk residue from drying. Purge steam briefly to clear any internal blockages.
- خزان المياه: نظف خزان المياه بشكل دوري باستخدام منظف معتدل واشطفه جيداً.
- إزالة الترسبات: Depending on water hardness, descale the machine every 2-3 months. Follow the instructions provided with a suitable descaling solution.

صورة: Important cleaning instruction: All accessories must be washed by hand and are not dishwasher safe.
8. استكشاف الأخطاء وإصلاحها
راجع هذا القسم للتعرف على المشكلات الشائعة وحلولها.
| مشكلة | السبب المحتمل | حل |
|---|---|---|
| لا يوجد توزيع للقهوة / تدفق بطيء |
|
|
| Water leaks from portafilter edge |
|
|
| عصا البخار لا تنتج البخار |
|
|
| القهوة ليست ساخنة بما فيه الكفاية |
|
|
9. المواصفات
- ماركة: كينستار
- اسم الموديل: JH-C5210
- نظام الضغط: 20 بار
- قوة: 1350 واط
- سعة خزان المياه: 1.1 لتر (37 أونصة)
- أبعاد المنتج: 11.8 بوصة عمق × 12.6 بوصة عرض × 5.5 بوصة ارتفاع
- وزن السلعة: 4.6 رطل
- مادة: الفولاذ المقاوم للصدأ
- ميزة خاصة: Programmable, Touch Screen, Milk Frother, Hot & Rapid Cold Brew
- نوع إدخال القهوة: القهوة المطحونة
- نوع الفلتر: قابلة لإعادة الاستخدام
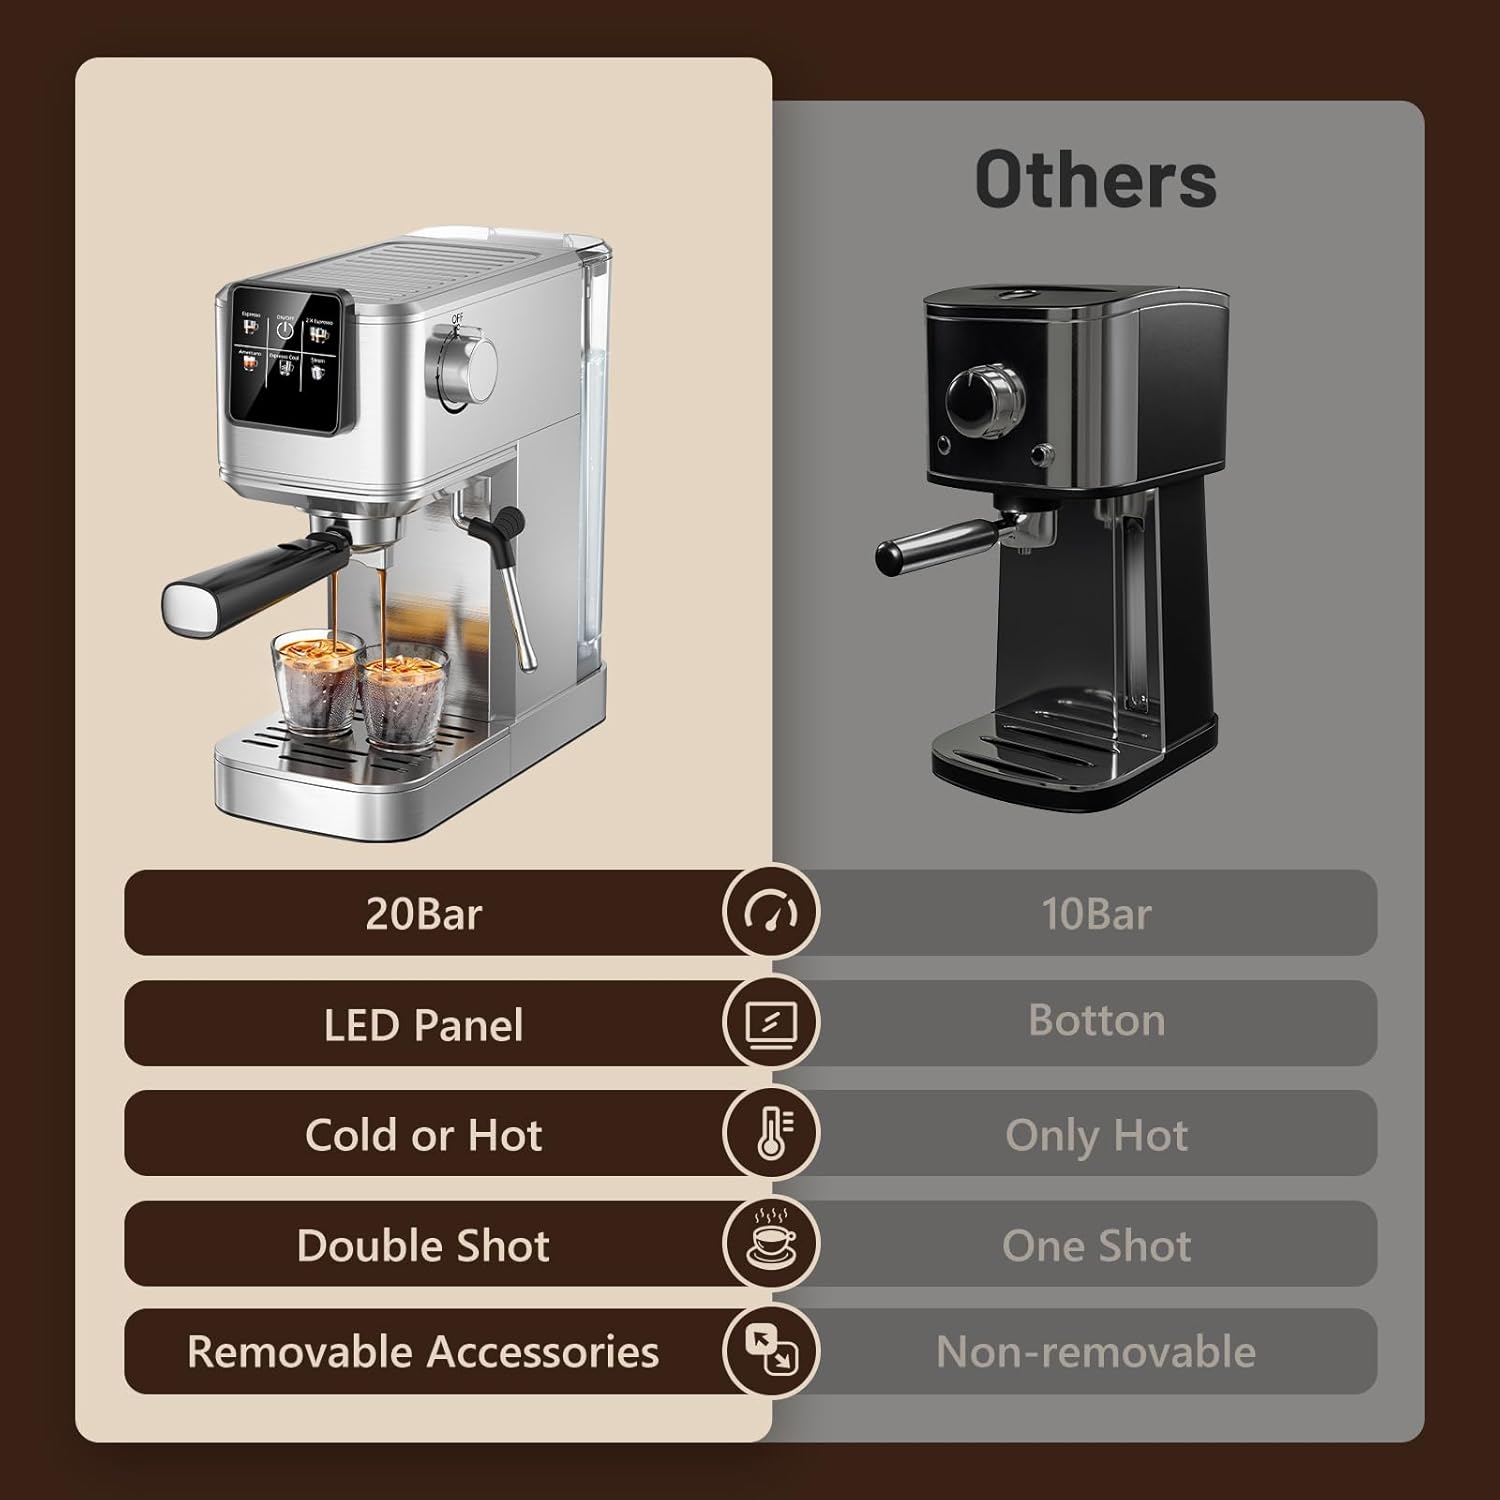
صورة: Feature comparison of the KEENSTAR machine, emphasizing its 20Bar pressure, LED panel, and versatility for hot and cold beverages.

صورة: Dimensions of the KEENSTAR espresso machine, indicating its compact size.
10. الضمان والدعم
For warranty information or technical support, please refer to the contact details provided on the product packaging or visit the official KEENSTAR webالموقع. احتفظ بإثبات الشراء الخاص بك لاستخدامه في أي مطالبات بالضمان.