فيترو M06
دليل تعليمات استخدام علبة الكمبيوتر المخصصة للألعاب Vetroo M06 Micro-ATX/Mini-ITX
الموديل: M06
مقدمة
This manual provides detailed instructions for the installation, operation, and maintenance of your Vetroo M06 Micro-ATX/Mini-ITX Gaming PC Case. Please read this manual thoroughly before beginning assembly to ensure proper setup and optimal performance.

Image: The Vetroo M06 Micro-ATX/Mini-ITX Gaming PC Case in black, showcasing its mesh front panel and side window, viewتم التقاطها من زاوية.
الميزات الرئيسية
- تصميم مضغوط: Micro-ATX / Mini-ITX form factor with a high-airflow mesh front panel, designed for space-efficient builds.
- تبريد مُحسَّن: Supports up to five 120mm fans and a 240mm top-mounted liquid radiator for efficient thermal management.
- توافق وحدة معالجة الرسومات: يستوعب بطاقات الرسومات التي يصل طولها إلى 355 مم.
- Flexible PSU Mounting: Features an adjustable power supply installation area with a maximum length of 160mm.
- الاتصال الحديث: Front panel includes USB Type-C and USB 3.0 ports for convenient peripheral access.
محتويات الحزمة
يرجى التأكد من وجود جميع المكونات قبل المتابعة في عملية التثبيت:
- Vetroo M06 PC Case
- صندوق الملحقات (البراغي، الفواصل، روابط الكابلات)
- SFX PSU Bracket (1x)
- دليل المستخدم (هذا المستند)
تحديد
| ميزة | التفاصيل |
|---|---|
| اسم الموديل | م06 |
| نوع الحالة | برج صغير |
| التوافق مع اللوحة الأم | مايكرو ايه تي اكس ، ميني اي تي اكس |
| أبعاد المنتج (الطول × العرض × الارتفاع) | 15.55 بوصة × 7.87 بوصة × 13.07 بوصة (395 مم × 200 مم × 332 مم) |
| وزن العنصر | 13.37 رطل (6.06 كجم) |
| مادة | Acrylonitrile Butadiene Styrene (ABS), SPCC (0.8mm metal plate) |
| أقصى طول GPU | 355 ملم |
| أقصى ارتفاع لمبرد وحدة المعالجة المركزية | 165 ملم |
| أقصى طول PSU | 160mm (Adjustable mounting) |
| دعم المشجعين | ما يصل إلى 5 مراوح مقاس 120 مم |
| دعم المبرد | 1 x 240mm (Top) |
| منافذ الإدخال / الإخراج الأمامية | 1 x USB Type-C, 1 x USB 3.0, HD Audio, Power Button, Reset Button |

Image: Diagram illustrating the compact dimensions of the Vetroo M06 PC case, measuring 15.5 inches in depth, 7.8 inches in width, and 13.0 inches in height.

Image: A detailed diagram outlining the compatibility specifications for the Vetroo M06 PC case, including maximum CPU cooler height (165mm), GPU length (355mm), PSU length (160mm), and supported motherboard form factors (M-ATX/ITX).
الإعداد والتثبيت
Before starting, ensure you have a clean, static-free workspace. Refer to your component manuals for specific installation details.
1. تركيب اللوحة الأم
- Remove the side panel(s) of the case.
- Install the necessary motherboard standoffs into the case tray according to your motherboard's form factor (Micro-ATX or Mini-ITX).
- قم بوضع اللوحة الأم بعناية على الحوامل، مع محاذاة فتحات البراغي.
- قم بتأمين اللوحة الأم بالمسامير.
2. تثبيت وحدة معالجة الرسومات (GPU)
- Remove the appropriate PCIe slot covers from the rear of the case.
- Insert your graphics card into the primary PCIe slot on your motherboard.
- قم بتأمين بطاقة الرسوميات بالعلبة باستخدام البراغي.
- Connect any required PCIe power cables from your power supply to the GPU.
3. تركيب PSU
- Determine the desired mounting position for your power supply. The Vetroo M06 supports adjustable PSU mounting.
- If using an SFX power supply, attach the included SFX bracket to the PSU.
- Slide the power supply into its designated bay and secure it with screws from the rear of the case.
- Route the necessary power cables to your components.

الصورة: داخلية view of the Vetroo M06 PC case highlighting the three adjustable mounting positions for ATX/SFX power supplies, along with an illustration of the included SFX bracket.
4. Storage Installation (HDD/SSD)
- Locate the designated mounting points for 3.5" HDDs and 2.5" SSDs.
- Secure your storage drives using the provided screws.
- Connect SATA data and power cables to each drive.
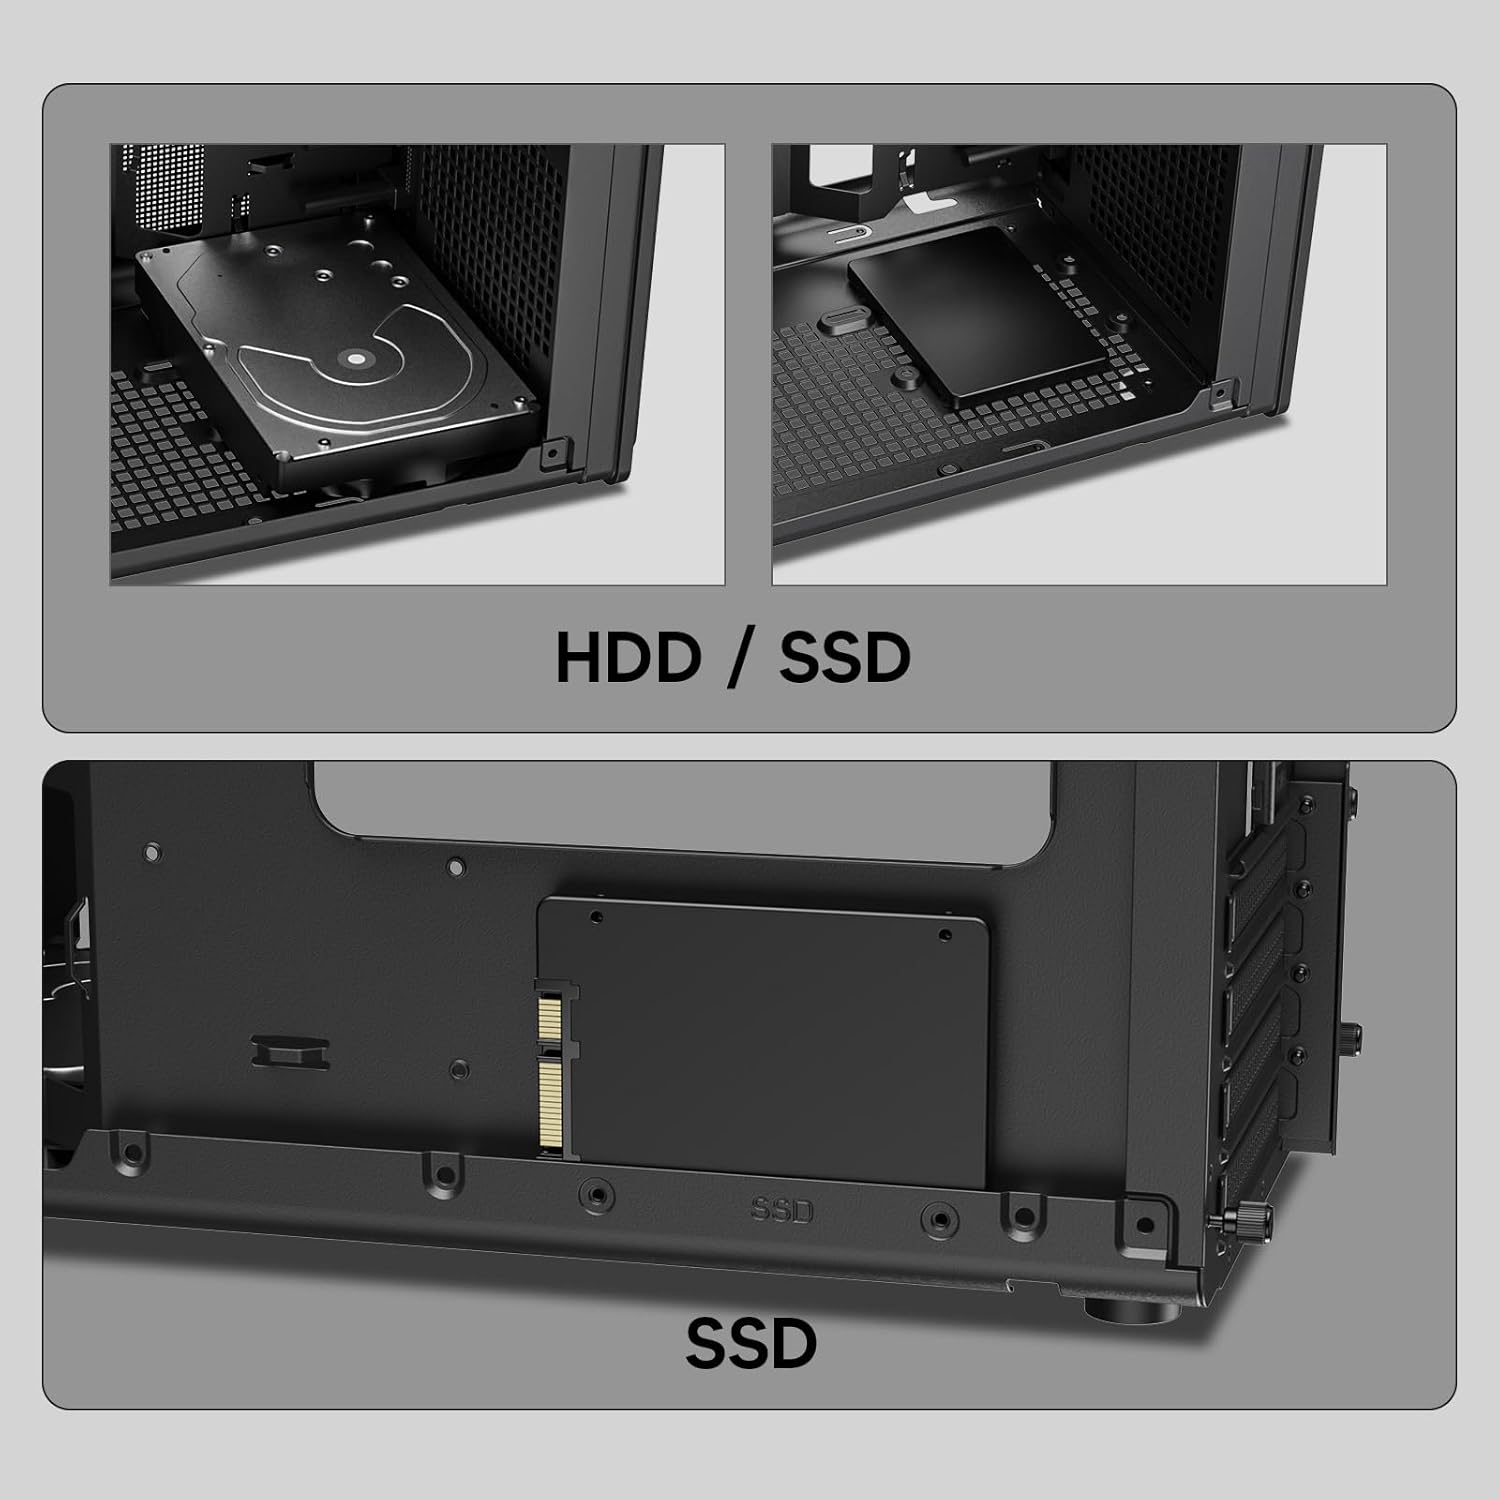
الصورة: عن قرب views of the Vetroo M06 PC case interior, demonstrating the mounting options for both 3.5-inch Hard Disk Drives (HDDs) and 2.5-inch Solid State Drives (SSDs).
5. Cooling System Installation (Fans/Radiator)
- Identify the fan mounting locations (up to five 120mm fans).
- Mount fans using appropriate screws, ensuring correct airflow direction.
- For liquid cooling, install a 240mm radiator at the top mounting position, securing it with screws.
- Connect fan and pump cables to your motherboard or fan controller.
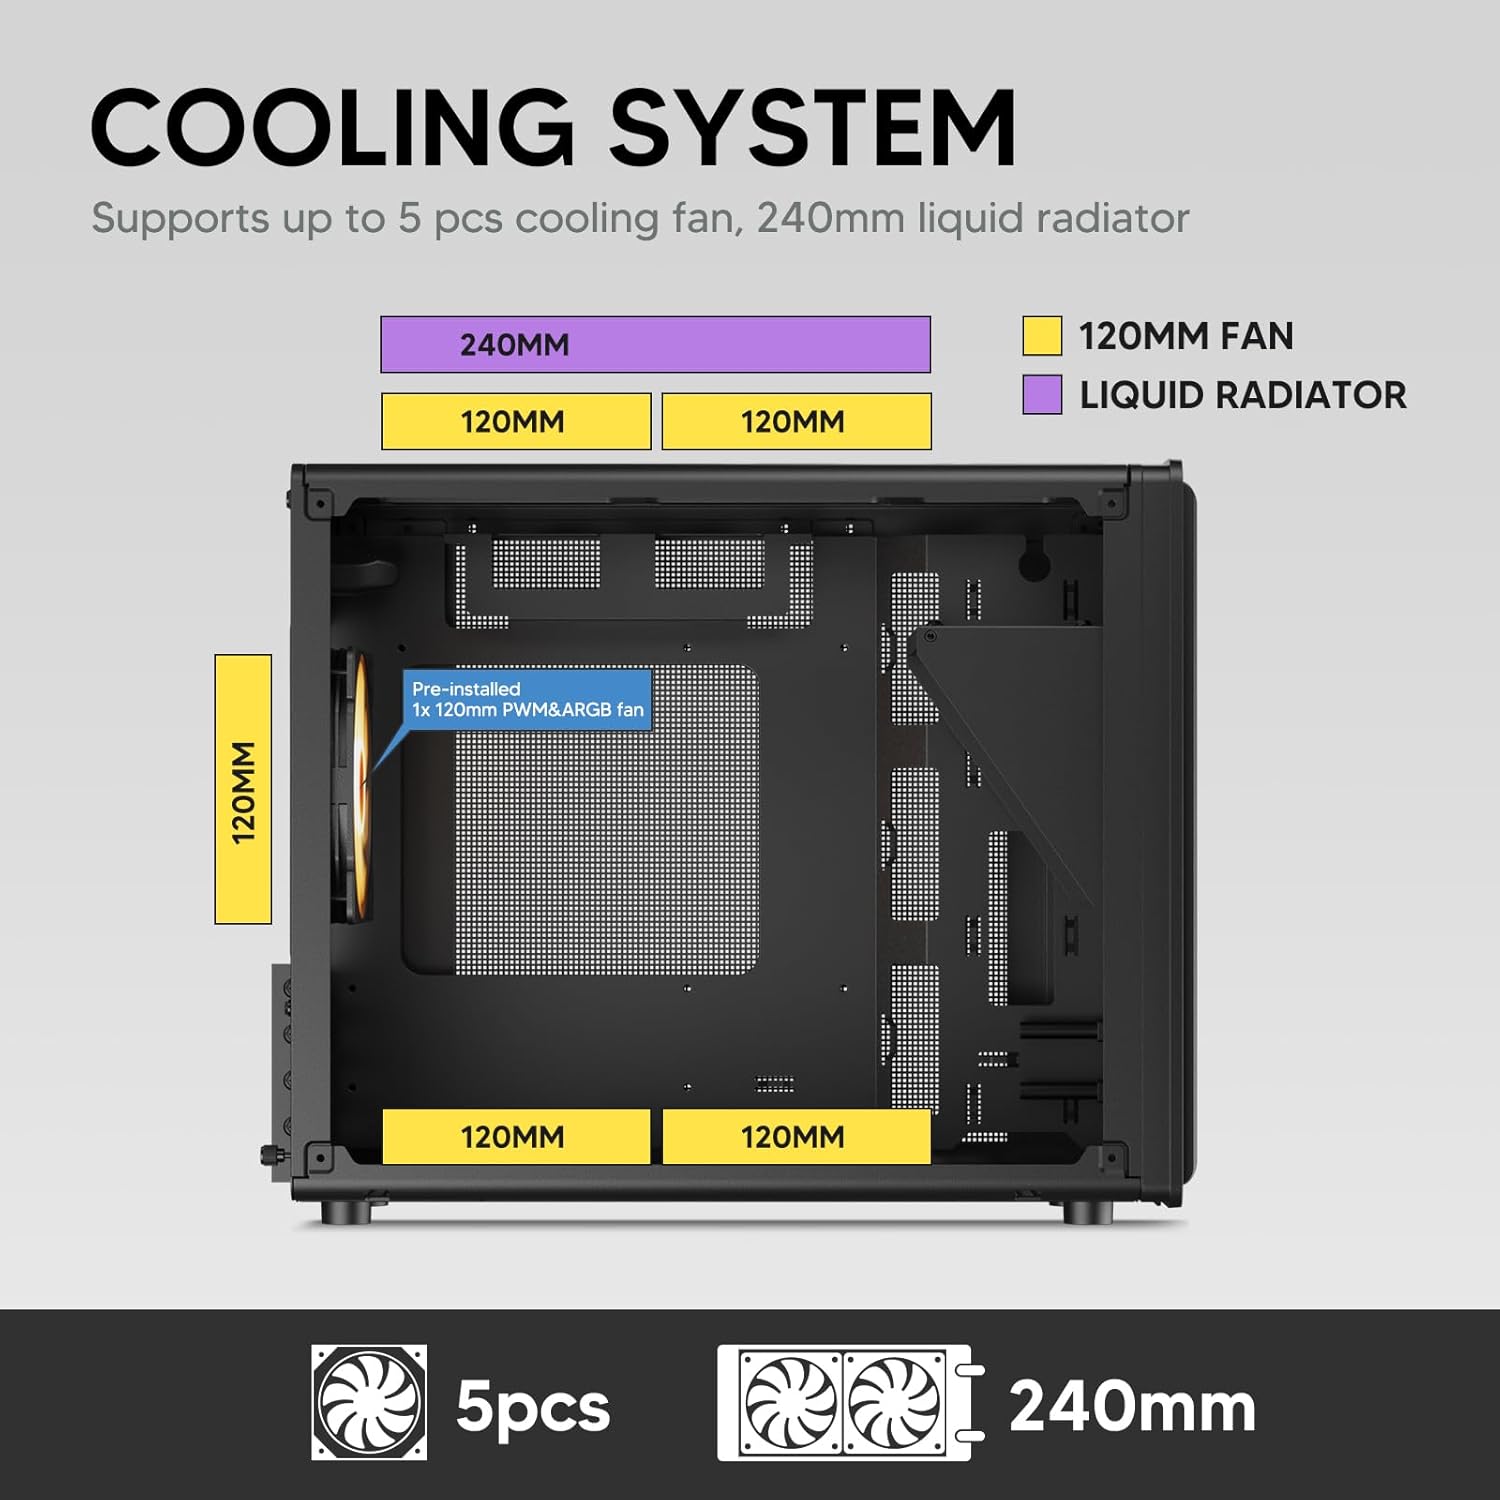
Image: A diagram illustrating the cooling system layout within the Vetroo M06 PC case, detailing the positions for up to five 120mm fans and a 240mm liquid radiator at the top.
6. توصيلات لوحة الإدخال/الإخراج
- Connect the front panel cables (Power, Reset, USB 3.0, USB Type-C, HD Audio) to the corresponding headers on your motherboard. Refer to your motherboard manual for header locations.

Image: A close-up of the Vetroo M06 PC case's front I/O panel, clearly labeling the Power button, Reset button, USB 3.0 port, HD Audio jack, and USB Type-C port.
تعليمات التشغيل
Once all components are installed and cables are connected, replace the side panels. Connect your peripherals (monitor, keyboard, mouse) and power cable to the PSU. Press the power button on the front panel to start your system.
إدارة تدفق الهواء
The Vetroo M06 case features an excellent airflow design with mesh panels to facilitate optimal cooling. Ensure fans are installed to create a balanced airflow, typically with intake fans at the front/bottom and exhaust fans at the rear/top.

Image: An exploded diagram of the Vetroo M06 PC case, illustrating the intended airflow patterns with blue arrows indicating cool air intake and red arrows showing warm air exhaust through its mesh panels.
صيانة
تساعد الصيانة الدورية على إطالة عمر مكونات جهاز الكمبيوتر الخاص بك وتضمن الأداء الأمثل.
- تنظيف الغبار: نظّف فلاتر الغبار والمكونات الداخلية دوريًا باستخدام الهواء المضغوط. تأكد من إيقاف تشغيل النظام وفصله عن الكهرباء قبل التنظيف.
- إدارة الكابلات: Verify that internal cables are neatly routed and do not obstruct airflow.
- فحص المكونات: Ensure all screws are tight and components are securely seated.

Image: A close-up shot of the Vetroo M06 PC case, featuring a digital caliper measuring the thickness of the metal plate, which is specified as 0.8mm, highlighting the case's robust construction.
استكشاف الأخطاء وإصلاحها
إذا واجهت مشكلات، راجع خطوات استكشاف الأخطاء وإصلاحها الشائعة التالية:
- النظام لا يعمل:
- Check all power connections, including the PSU to wall outlet, PSU to motherboard (24-pin and CPU 8-pin), and front panel power switch cable to motherboard.
- تأكد من أن مفتاح PSU في وضع التشغيل.
- لا يوجد إخراج للعرض:
- Verify that your monitor is connected to the graphics card (not the motherboard's integrated graphics ports, unless you are using integrated graphics).
- أعد تركيب بطاقة الرسومات ووحدات ذاكرة الوصول العشوائي (RAM).
- مشاكل ارتفاع درجة الحرارة:
- Ensure all case fans are spinning and oriented correctly for optimal airflow.
- Check CPU cooler installation and thermal paste application.
- Clean any dust buildup from fans and filters.
- منافذ USB لا تعمل:
- Verify that the front panel USB 3.0 and USB Type-C cables are correctly connected to the motherboard headers.
الضمان والدعم
Vetroo products are designed for quality and reliability. For warranty information and technical support, please visit the official Vetroo webالموقع أو تواصل مع خدمة العملاء. احتفظ بإثبات الشراء لطلبات الضمان.
فيترو الرسمي Webموقع: متجر فيترو على أمازون
For further assistance, please refer to the contact information provided with your product packaging or on the official Vetroo support channels.
Ask a question about this manual
Ask about setup, troubleshooting, compatibility, parts, safety, or missing instructions. Manuals+ will review the question and use this page’s manual context to help answer it.