1. المقدمة
شكرا لك على الشراءasing the Elett Handy Polisher with Extension Handle. This versatile cleaning tool is designed to simplify your cleaning tasks with its interchangeable brush heads and convenient extension handle. Please read this manual thoroughly before first use to ensure proper operation, maintenance, and safety.
2. معلومات السلامة
اتبع دائمًا احتياطات السلامة الأساسية عند استخدام الأجهزة الكهربائية لتقليل خطر الحريق والصدمة الكهربائية والإصابة الشخصية.
- احتفظ بالجهاز بعيدًا عن متناول الأطفال والحيوانات الأليفة.
- Do not immerse the main unit in water or other liquids. The device is not waterproof.
- تأكد من إدخال البطاريات بالقطبية الصحيحة. أزل البطاريات إذا لم يتم استخدام الجهاز لفترة طويلة.
- لا تخلط بين البطاريات القديمة والجديدة أو أنواع مختلفة من البطاريات.
- Use only the specified type and number of batteries (4 x AA dry cell batteries, sold separately).
- Do not use the polisher on delicate surfaces that may be scratched or damaged by abrasive cleaning. Test on an inconspicuous area first.
- Turn off the device before changing brush heads or performing any maintenance.
- لا تحاول إصلاح الجهاز أو تعديله بنفسك. تواصل مع خدمة دعم العملاء للحصول على المساعدة.
3. محتويات العبوة
تأكد من تضمين جميع العناصر المدرجة أدناه في الحزمة الخاصة بك:
- Elett Handy Polisher Main Unit
- مقبض التمديد
- Brush Head (Standard)
- Sponge Brush Head
- غطاء الفرشاة
- دليل المستخدم (هذا المستند)
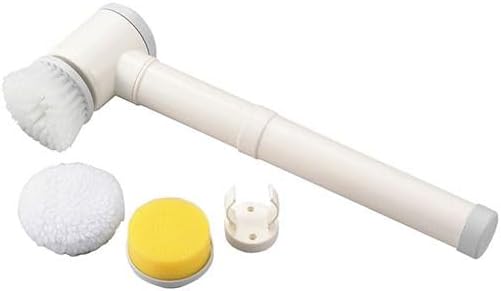
Image 1: Elett Handy Polisher and its included accessories. The main unit is white with grey accents, featuring a handle and a rotating head. Below it are a white fluffy brush, a yellow sponge brush, and a white plastic brush cover.
4. الإعداد
4.1 تركيب البطارية
- حدد مكان حجرة البطارية في الوحدة الرئيسية.
- افتح غطاء حجرة البطارية.
- Insert 4 AA dry cell batteries (sold separately) according to the polarity indicators (+/-) inside the compartment.
- أغلق غطاء حجرة البطارية جيدًا.
4.2 تركيب رؤوس الفرشاة
- Select the desired brush head (standard brush or sponge brush) for your cleaning task.
- Align the brush head with the rotating spindle on the main unit.
- ادفع رأس الفرشاة برفق وقم بلفه حتى يستقر في مكانه بإحكام.
- لإزالته، قم بلف رأس الفرشاة عكس اتجاه عقارب الساعة واسحبه للخارج.
4.3 Attaching the Extension Handle
For extended reach, attach the extension handle:
- Align the end of the main unit with the opening of the extension handle.
- Push the main unit firmly into the extension handle until it locks into place.
- To detach, press the release button (if present) or twist and pull the main unit from the extension handle.
5. تعليمات التشغيل
5.1 تشغيل/إيقاف التشغيل
Press the power button located on the handle of the main unit to turn the polisher ON. Press it again to turn the polisher OFF.
5.2 إجراءات التنظيف
- Ensure the correct brush head is securely attached for the surface you intend to clean.
- Apply a small amount of appropriate cleaning solution directly to the surface or to the brush head.
- Turn on the Elett Handy Polisher.
- Gently place the rotating brush head onto the surface to be cleaned. Apply light pressure and move the polisher slowly over the area.
- For stubborn stains, allow the brush to work for a few seconds before moving on.
- After cleaning, turn off the polisher and wipe the cleaned surface with a clean cloth if necessary.

Image 2: The Elett Handy Polisher in operation, demonstrating its use on a textured surface. The brush head is actively rotating, creating foam as it cleans.
5.3 Brush Head Selection Guide
| نوع الفرشاة | الاستخدام الموصى به |
|---|---|
| Standard Brush | General cleaning of hard surfaces like tiles, grout, sinks, and bathtubs. Effective for scrubbing away dirt and grime. |
| فرشاة الاسفنج | Gentle cleaning and polishing of delicate surfaces, or for applying cleaning solutions evenly. Suitable for glass, mirrors, and polished surfaces. |
6. الصيانة والعناية
6.1 تنظيف الوحدة
- After each use, turn off the polisher and remove the brush head.
- امسح الوحدة الرئيسية بالإعلانamp لا تشطف الوحدة الرئيسية تحت الماء.
- تأكد من جفاف الوحدة تمامًا قبل تخزينها.
6.2 Cleaning Brush Heads
- Rinse the brush heads under running water to remove any cleaning solution or debris.
- For thorough cleaning, use mild soap and water.
- Allow brush heads to air dry completely before reattaching or storing.
6.3 التخزين
Store the Elett Handy Polisher and its accessories in a cool, dry place, away from direct sunlight and moisture. If storing for an extended period, remove the batteries from the main unit.
7. استكشاف الأخطاء وإصلاحها
| مشكلة | السبب المحتمل | حل |
|---|---|---|
| الجهاز لا يعمل. | البطاريات فارغة أو تم إدخالها بشكل غير صحيح. | استبدل البطاريات بأخرى جديدة، مع التأكد من القطبية الصحيحة. |
| Brush head does not rotate or rotates slowly. | Low battery power; brush head not properly attached; excessive pressure applied. | Replace batteries; reattach brush head securely; reduce pressure during use. |
| أداء التنظيف ضعيف. | Incorrect brush head for the task; insufficient cleaning solution; brush head is worn. | Select appropriate brush head; apply more cleaning solution; replace worn brush heads. |
8. المواصفات
| ميزة | التفاصيل |
|---|---|
| رقم الموديل | ET-07H, C6132515 |
| الأبعاد (تقريبًا) | 6.5 × 12 × 41 سم (2.56 × 4.72 × 16.14 بوصة) |
| مادة | راتينج ABS |
| مصدر الطاقة | 4 x AA Dry Cell Batteries (غير متضمن) |
| بلد المنشأ | الصين |
9. الضمان والدعم
This product is designed for durability and performance. For any questions regarding product operation, maintenance, or troubleshooting not covered in this manual, please contact your retailer or the point of purchase for support. Please retain your proof of purchase for warranty claims, if applicable.
لمزيد من المساعدة ، يرجى زيارة موقعنا website or contact our customer service department. Contact details may be found on the product packaging or the retailer's webموقع.