
1. انتهى المنتجview
The Kaleinavi 4-Channel 433MHz Wireless Remote Control Switch System provides a reliable solution for controlling various electrical devices wirelessly. This system includes a receiver board and a remote control transmitter, designed for applications such as industrial automation, home automation, and gate control.

Image 1.1: The Kaleinavi 4-Channel Wireless Remote Control Switch System, showing the receiver board and the four-button remote control transmitter.
2. المواصفات
- العمل المجلدtage: DC12V (DC24V version available upon request)
- حاضِر: Standby less than 10mA, Working less than 128mA
- درجة حرارة العمل: من -10 درجة مئوية إلى +60 درجة مئوية
- تردد المتلقي: 433.92 ميجا هرتز
- حساسية الاستقبال: -105 ديسيبل
- حالة الإخراج: Switching Value (Relay Output)
- أقصى حمل: 10A Relay (Resistive load less than 8A, Inductive load less than 3A)
- المسافة البعيدة: Up to 200 meters (500 meters mentioned in product description, actual range may vary based on environment)
- Receiver Board Size: 70 مم × 50 مم × 18 مم
- حجم العلبة: 75 مم × 55 مم × 30 مم
- نوع الترميز: كود التعلم
- رقم موديل المنتج: Kaleinavi25004150001-01
- وزن السلعة: حوالي 3.53 أونصة

الصورة 2.1: تفصيلية view of the receiver board, indicating dimensions (75mm width, 57.8mm height) and the location of the DIP switch and antenna.
3. الإعداد والأسلاك
3.1 توصيل الطاقة
Input DC12V power to the receiver board. Ensure correct polarity: connect the positive (+) wire to the positive terminal and the negative (-) wire to the negative terminal. The receiver is designed for DC12V operation, but a DC24V version is available if required.

Image 3.1: Wiring diagram illustrating the DC12V input connection and typical output connections for controlling devices like gate openers (OPEN, STOP, CLOSE).
3.2 Output State Configuration (Jumper Settings)
The output state of the receiver can be configured using jumpers on the receiver board. This determines how the relay responds to remote control commands.
- الوضع اللحظي: The relay is ON only while the transmitter button is pressed. Release the button, and the relay turns OFF. To set this mode, place the jumper on 1 Pin or remove the jumper entirely.
- وضع التبديل: Press the transmitter button once to turn the relay ON. Press the same button again to turn the relay OFF. To set this mode, place the jumper on pins "3&4".
- وضع مغلق: Pressing a transmitter button turns its corresponding relay ON and simultaneously turns OFF all other relays. Only one relay can be ON at a time. For example, pressing button A turns relay A ON and relays B, C, D OFF. Pressing button D turns relay D ON and relays A, B, C OFF. To set this mode, place the jumper on pins "1&2".
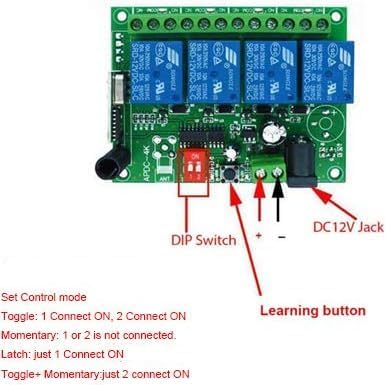
Image 3.2: The receiver board highlighting the DIP switch (red component) for setting control modes and the learning button.
3.3 مثالample Wiring for 1V-220V Control
The relay output allows control of both DC and AC equipment. The terminals are Normally Open (NO) and Normally Closed (NC), functioning as a switch. A separate power supply is required for the controlled equipment.

Image 3.3: Wiring diagram demonstrating how to connect the DC12V receiver to control 1V-220V lights. Note the separate power source for the lights.

الصورة 3.4: سابقample setup showing LED strips connected to the receiver board, demonstrating the control of external devices.
4. تعليمات التشغيل
4.1 Learning Method (Pairing Transmitter)
To pair a remote control transmitter with the receiver:
- Ensure DC12V power is supplied to the receiver.
- Press the learning button on the receiver board. The green LED indicator will turn OFF.
- While the LED is OFF, press any button on the remote control transmitter.
- The LED indicator on the receiver will flash rapidly, indicating successful learning.
4.2 Clearing Code (Unpairing Transmitter)
To clear all paired transmitters from the receiver:
- Press and hold the learning button on the receiver board for approximately 8 seconds.
- Continue holding until the LED indicator turns ON. This signifies that all stored codes have been successfully cleared.
4.3 تشغيل جهاز التحكم عن بعد
Once paired, the remote control buttons (A, B, C, D) will operate the corresponding relays based on the configured output state (Momentary, Toggle, or Latched).
- الوضع اللحظي: Press and hold button A to activate relay A. Release button A to deactivate relay A. This applies to buttons B, C, and D as well.
- وضع التبديل: Press button A once to activate relay A. Press button A again to deactivate relay A. This applies to buttons B, C, and D as well.
- وضع مغلق: Press button A to activate relay A and deactivate all other relays (B, C, D). Press button B to activate relay B and deactivate all other relays (A, C, D). This ensures only one relay is active at any given time.
5. الصيانة
The Kaleinavi Wireless Remote Control Switch System is designed for low maintenance. To ensure optimal performance:
- Keep the receiver board and remote control clean and free from dust and moisture.
- تجنب تعريض الأجهزة لدرجات حرارة قصوى أو لأشعة الشمس المباشرة لفترات طويلة.
- Periodically check wiring connections for security and integrity.
- Replace the remote control battery when its range decreases or it becomes unresponsive.
6. استكشاف الأخطاء وإصلاحها
- Device not responding to remote:
- Check if the receiver is powered correctly (DC12V).
- تأكد من عدم استنزاف بطارية جهاز التحكم عن بعد.
- Verify that the remote control is properly paired with the receiver using the learning method.
- Check for obstructions or excessive distance between the remote and receiver.
- لا يعمل المرحل:
- Confirm the output state (Momentary, Toggle, Latched) is correctly set via the jumpers.
- Check the wiring to the controlled device for proper connection.
- Ensure the load connected does not exceed the maximum specified (10A relay, 8A resistive, 3A inductive).
- مشاكل التداخل:
- If experiencing erratic behavior, try relocating the receiver or remote to minimize interference from other RF devices.
7. معلومات الضمان
This Kaleinavi product comes with a 1-year limited warranty from the date of purchase. This warranty covers defects in materials and workmanship under normal use. It does not cover damage caused by misuse, accident, unauthorized modification, or improper installation. Please retain your proof of purchase for warranty claims.
8. الدعم
For technical assistance, troubleshooting beyond this manual, or warranty inquiries, please contact your retailer or visit the official Kaleinavi brand store online. Please have your product model number (Kaleinavi25004150001-01) and proof of purchase ready when seeking support.
Kaleinavi Brand Store: Visit the Kaleinavi Store on Amazon