1. المقدمة
This manual provides essential instructions for the installation, operation, and maintenance of your Renogy Rover 20A MPPT Charge Controller. Please read this manual thoroughly before installation and use to ensure optimal performance and safety. Keep this manual for future reference.

Figure 1.1: Renogy Rover 20A MPPT Charge Controller
The Renogy Rover 20A MPPT Charge Controller is designed to optimize the charging process from your solar panels to your battery bank. It features Maximum Power Point Tracking (MPPT) technology, ensuring high efficiency even under varying light conditions. This controller is compatible with 12V and 24V battery systems and supports various battery types, including Gel, Sealed, Flooded, and Lithium.
2. معلومات السلامة
يرجى مراعاة احتياطات السلامة التالية أثناء التركيب والتشغيل:
- قم دائمًا بتوصيل البطارية بوحدة التحكم بالشحن أولاً، ثم باللوحة الشمسية، وأخيرًا بالحمل. افصلها بالترتيب العكسي.
- Ensure all wiring is correctly sized and connections are secure to prevent loose connections that can cause excessive heating.
- Install the charge controller in a well-ventilated area, away from flammable materials and direct sunlight.
- Do not disassemble or attempt to repair the charge controller. Contact Renogy support for assistance.
- ارتدِ معدات الحماية الشخصية المناسبة، بما في ذلك حماية العين، عند العمل مع البطاريات والأنظمة الكهربائية.
- تأكد من مستوى صوت النظامtagلا يتجاوز الحد الأقصى لحجم الإدخالtage of the controller (100V).
3. محتويات العبوة
تأكد من تضمين جميع العناصر في الحزمة الخاصة بك:
- Renogy Rover 20A MPPT Solar Charge Controller
- كابل مستشعر درجة الحرارة
- دليل المستخدم (هذا المستند)
4. مواصفات المنتج
The Renogy Rover 20A MPPT Charge Controller offers advanced features for efficient solar power management:
- Dual-Peak MPPT Technology: Achieves up to 99.9% tracking efficiency and 98% conversion efficiency, optimizing solar harvest even in partial shading or cloudy conditions.
- توافق واسع للبطارية: Supports Gel, Sealed, Flooded, and Lithium battery types.
- تعويض درجة الحرارة: Operates effectively across a wide temperature range (-40°F to 149°F) with automatic charging adjustments to protect batteries.
- الحماية الشاملة: Includes TVS surge protection against lightning strikes, reverse polarity, overcharging, over-discharging, overload, and short-circuit protection.
- 4-سtagالشحن الإلكتروني: Provides precise Bulk, Absorption, Float, and Equalization charging for lead-acid batteries, extending their lifespan.
- Lithium Battery Reactivation: Safely revives deeply discharged lithium batteries.
- LCD Display & Data Logging: Backlit LCD displays real-time voltage, current, and error information. Stores up to one year of performance data.
- Modbus Support: Integrates Modbus protocol for smart home solar kits and remote monitoring.
- Direct DC Load Output: Can directly power DC appliances and handle capacitive load surges. Features load scheduling via timer.
- App Monitoring (Optional): Compatible with the BT-2 module (sold separately) for monitoring via the Renogy DC Home App.
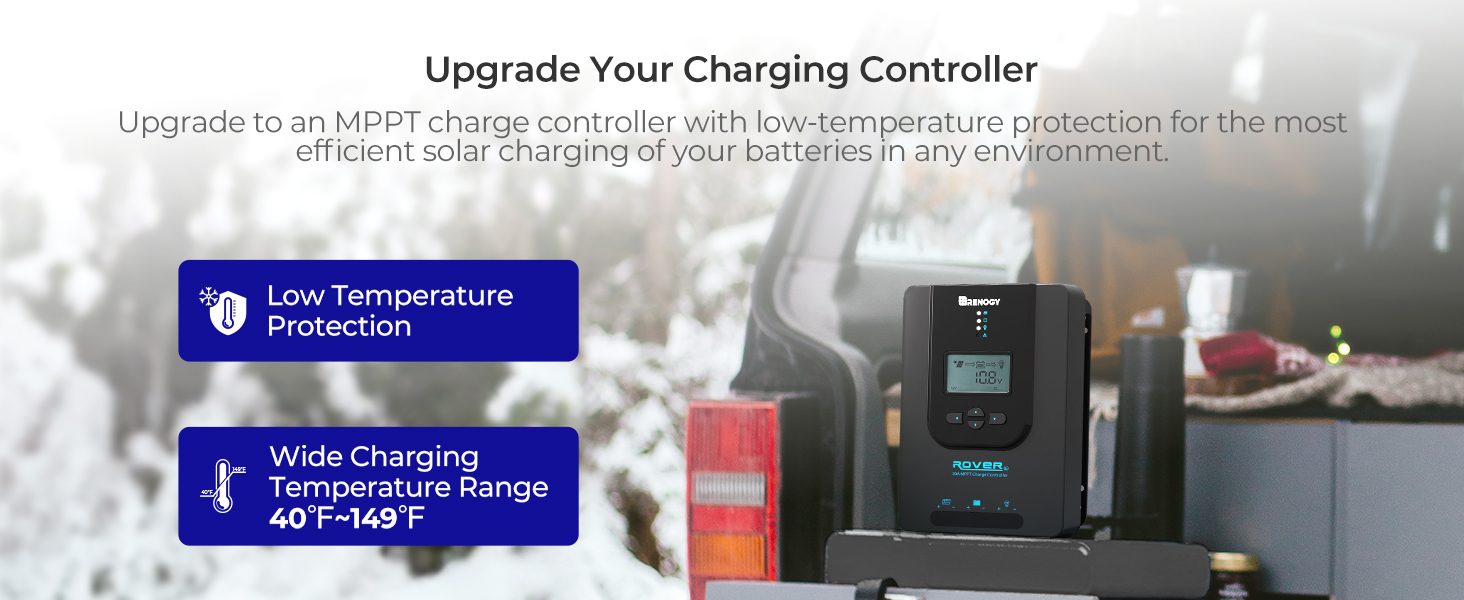
Figure 4.1: Maximizing Solar Harvest with 99% Tracking Efficiency

Figure 4.2: Charge Controller with Wide Temperature Adaptability (-40°F to 149°F)
5. الإعداد والتثبيت
Follow these steps for proper installation of your charge controller:
- التركيب: Choose a dry, well-ventilated location for mounting the controller. Ensure there is sufficient clearance around the unit for heat dissipation. Mount vertically on a non-flammable surface.
- تسلسل الأسلاك:
- Connect the battery cables to the battery terminals on the charge controller. Ensure correct polarity (+ to + and - to -).
- Connect the solar panel cables to the PV terminals on the charge controller. Ensure correct polarity.
- Connect the load cables to the load terminals on the charge controller (optional). Ensure correct polarity.
- مستشعر درجة الحرارة: Connect the included temperature sensor cable to the designated port on the controller. Place the sensor near the battery to enable accurate temperature compensation for charging.
- الطاقة الأولية: Once all connections are secure, the controller will power on and display system information on the LCD.
Important: Always connect the battery first and disconnect the battery last to prevent damage to the controller.
6. تعليمات التشغيل
The LCD display and buttons allow you to monitor and configure the charge controller.
6.1. نظام الملاحة عبر شاشة LCD
Use the buttons on the front panel to navigate through the display screens and adjust settings. Refer to the on-screen prompts for specific actions like 'Select' or 'Enter'.
6.2. اختيار نوع البطارية
يكتشف جهاز التحكم تلقائيًا جهد النظام 12 فولت/24 فولتtages for non-lithium batteries. For lithium batteries, you must manually adjust the battery voltage setting through the controller's menu to ensure proper charging parameters.
6.3. Lithium Battery Activation
The controller includes a lithium battery activation function. This feature allows charging of deeply discharged lithium batteries that might otherwise be unresponsive.

Figure 6.1: Lithium Activation ON
To prevent over-activation and unnecessary activation, you can turn OFF the lithium activation function. This helps avoid potential damage to the battery if it is not intended for activation.

Figure 6.2: Lithium Activation OFF
6.4. Monitoring and Load Control
The LCD provides real-time data on solar input, battery status, and load output. You can also configure load settings, including timers for scheduled operation of connected DC appliances.
7. الصيانة
تضمن الصيانة الدورية طول عمر جهاز التحكم بالشحن وأداءه الأمثل:
- فحص الاتصالات: Periodically check all wiring connections for tightness and corrosion. Ensure no wires are frayed or damaged.
- تنظيف وحدة التحكم: Keep the controller clean and free from dust and debris. Use a dry cloth to wipe the surface. Do not use liquids or solvents.
- تهوية: تأكد من أن منطقة التركيب جيدة التهوية لمنع ارتفاع درجة الحرارة.
- فحص البطارية: Regularly inspect your batteries for any signs of damage, swelling, or leaks.
8. استكشاف الأخطاء وإصلاحها
If you encounter issues with your charge controller, refer to the following common problems and solutions:
| مشكلة | السبب المحتمل | حل |
|---|---|---|
| وحدة التحكم لا تعمل | Loose battery connection, battery voltagمنخفض جدا | Check battery wiring and voltage. Ensure battery is connected first. |
| لا يوجد شحن بالطاقة الشمسية | Solar panel not connected, insufficient sunlight, incorrect polarity | Verify solar panel connections and polarity. Check for shading. |
| التحميل لا يعمل | Load disconnected, overload, load timer active | Check load connections. Reduce load. Adjust load timer settings. |
| حجم غير صحيحtagقراءات البريد | Loose connections, faulty sensor | Check all wiring. Ensure temperature sensor is properly connected. |
For persistent issues or error codes not listed, please contact Renogy customer support.
9. المواصفات
| مواصفة | قيمة |
|---|---|
| ماركة | رينوجي |
| نموذج | Rover 20A MPPT |
| الحد الأقصى لتيار الشحن | 20 أمبير |
| حجم النظامtage | 12V/24V Auto-Detect (DC) |
| الحد الأقصى لحجم إدخال PVtage | 100 فولت |
| كفاءة التتبع | 99.9% |
| كفاءة التحويل | 98% |
| نوع العرض | شاشة الكريستال السائل |
| نطاق درجة حرارة التشغيل | -40 درجة فهرنهايت إلى 149 درجة فهرنهايت (-40 درجة مئوية إلى 65 درجة مئوية) |
| مادة | أكريلونتريل بوتادين ستايرين (ABS)، بلاستيك |
| وزن العنصر | 1.59 كيلوغرام |
| رمز المنتج العالمي / رقم GTIN | 840315237445 |
10. الضمان والدعم
The Renogy Rover 20A MPPT Charge Controller comes with a ضمان المواد والصنعة لمدة 3 سنوات. This warranty covers defects in materials and manufacturing under normal use.

Figure 10.1: 3-Year Material and Workmanship Warranty
For warranty claims, technical assistance, or any questions regarding your product, please contact Renogy customer support. Keep your purchase receipt as proof of purchase for warranty services.
You can find more information and contact details on the official Renogy webموقع: www.renogy.com