
1. المقدمة
This manual provides detailed instructions for the safe installation, operation, and maintenance of your Carro 36-inch Low Profile Ceiling Fan. Please read this manual thoroughly before installation and use, and retain it for future reference. This ceiling fan is designed for indoor living spaces, offering efficient air circulation and integrated lighting.

الصورة 1.1: انتهىview of the Carro 36-inch Low Profile Ceiling Fan. This image displays the fan's compact design, white finish, and integrated light fixture.
2. معلومات السلامة
To reduce the risk of electric shock, fire, or injury to persons, read and follow all instructions carefully. Ensure the power is turned off at the circuit breaker before installation or servicing. All wiring must be in accordance with national and local electrical codes. Installation should be performed by a qualified electrician if you are unsure.
- Do not install the fan if the mounting location cannot support the fan's weight.
- Ensure the fan blades are at least 7 feet (2.1 meters) from the floor.
- لا تقم بتشغيل المروحة إذا كانت الأسلاك أو المكونات تالفة.
- تجنب وضع الأشياء في مسار شفرات المروحة.
- هذه المروحة مصممة للاستخدام الداخلي فقط.
3. محتويات العبوة
تأكد من وجود كافة المكونات قبل البدء في التثبيت:
- Ceiling Fan Unit (including motor, blades, and integrated light) x1
- جهاز التحكم عن بعد X1
- Mounting Hardware Kit x1
- دليل المستخدم x1
4. الإعداد والتثبيت
The Carro 36-inch Low Profile Ceiling Fan features an intuitive flush-mount design, making it suitable for rooms with lower ceilings. Detailed instructions are provided in the separate installation guide included with your product. Ensure all electrical connections are secure and properly insulated.

الصورة 4.1: عن قرب view of the fan's three white plastic blades. These blades are designed for efficient air movement and durability.
خطوات التثبيت الرئيسية:
- انقطاع التيار الكهربائي: قم بإيقاف تشغيل الطاقة عند قاطع الدائرة الرئيسي.
- شريحة متزايدة: قم بتثبيت دعامة التثبيت بإحكام على صندوق التوصيل الموجود في السقف.
- التوصيلات الكهربائية: Connect the fan's electrical wires to the household wiring according to the color-coded instructions.
- المروحة: قم بتوصيل مجموعة محرك المروحة بحامل التثبيت.
- مرفق شفرة: قم بتثبيت شفرات المروحة على غلاف المحرك.
- تركيب مجموعة الإضاءة: Connect and secure the integrated LED light kit.
- التحقق النهائي: Ensure all connections are tight and the fan is securely mounted before restoring power.
5. تعليمات التشغيل
Your Carro ceiling fan is operated using the included remote control. Ensure the remote has fresh batteries installed.
5.1 التحكم في المروحة
- تشغيل/إيقاف التشغيل: اضغط على زر الطاقة لتشغيل المروحة أو إيقاف تشغيلها.
- تعديل السرعة: Use the speed control buttons to select from 10 adjustable fan speeds.
- Airflow Direction (Summer/Winter Mode): اضغط على زر الرجوع لتغيير اتجاه شفرات المروحة.

Image 5.1: Illustration of fan airflow in Summer Mode (downward airflow for cooling) and Winter Mode (upward airflow for recirculating warm air).
- وضع الصيف: تدور الشفرات عكس اتجاه عقارب الساعة، دافعة الهواء إلى الأسفل لخلق نسيم بارد.
- وضع الشتاء: Blades rotate clockwise, drawing air up towards the ceiling to recirculate warm air.
5.2 التحكم في الضوء
- تشغيل / إيقاف الضوء: اضغط على زر الإضاءة لتشغيل أو إيقاف تشغيل ضوء LED المدمج.
- ضبط درجة حرارة اللون: Cycle through warm (2700K), natural (3500K), and cool (4000K) light options.
- يعتم: Use the dimming buttons to adjust the light brightness from 1% to 100%.
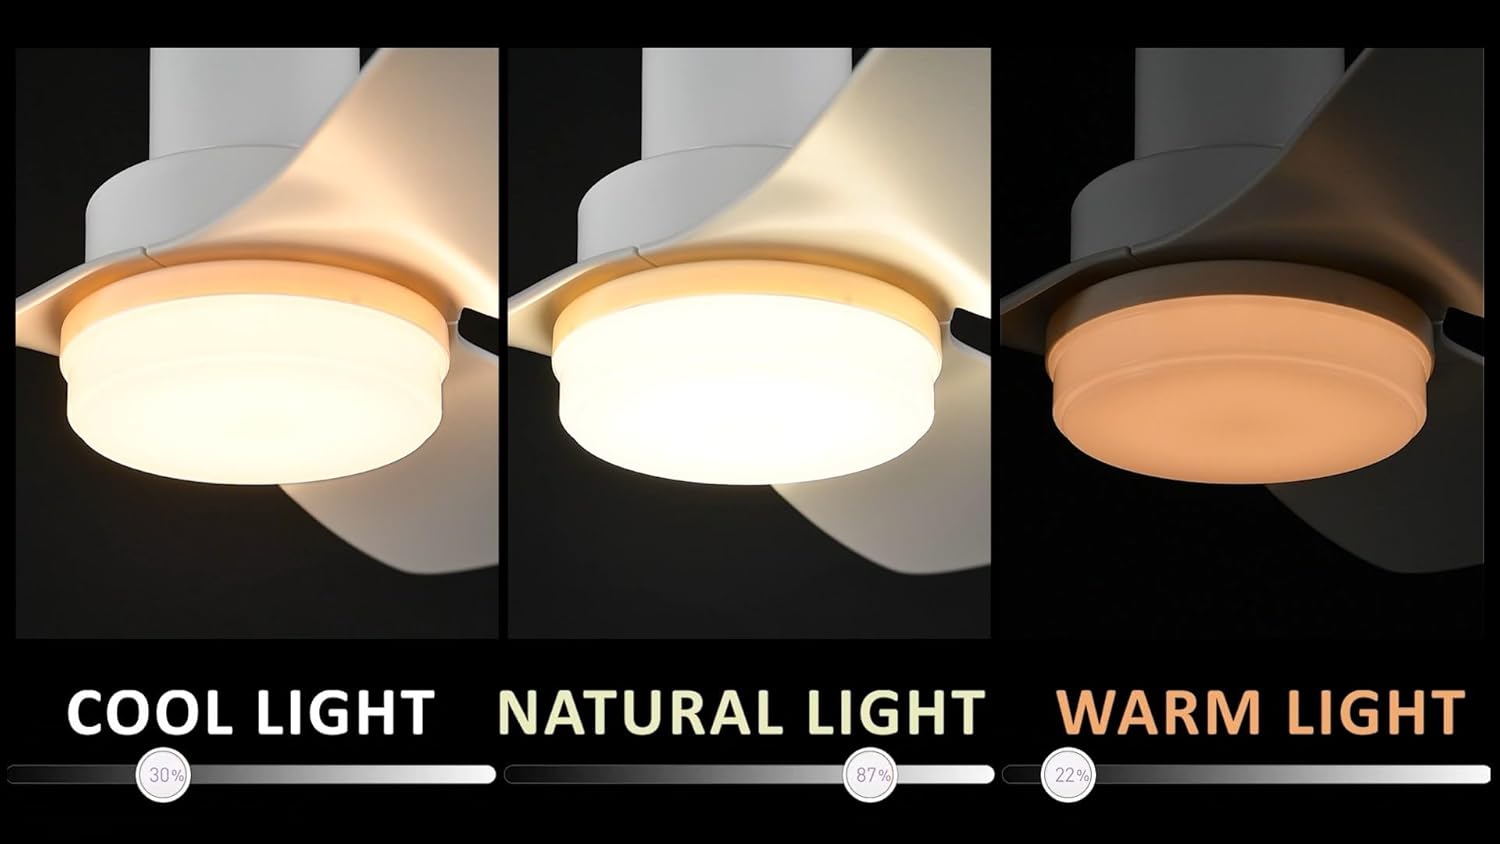
Image 5.2: Visual representation of the three adjustable light color temperatures: Cool Light (4000K), Natural Light (3500K), and Warm Light (2700K).
6. الصيانة
تضمن الصيانة المنتظمة الأداء الأمثل وطول العمر لمروحة السقف الخاصة بك.
- تنظيف: Periodically clean the fan housing and blades with a soft, damp القماش. لا تستخدم المنظفات أو المذيبات الكاشطة.
- فحص الشفرة: افحص شفرات المروحة بحثًا عن أي تشققات أو تلف. استبدل الشفرات التالفة فورًا.
- فحص الضيق: Ensure all screws and fasteners are tight, especially those securing the blades and mounting bracket.
- لا يتطلب التشحيم: يتم تشحيم محرك التيار المستمر بشكل دائم ولا يتطلب زيتًا إضافيًا.
7. استكشاف الأخطاء وإصلاحها
إذا واجهت مشاكل مع مروحة السقف، فراجع المشاكل والحلول الشائعة التالية:
| مشكلة | السبب المحتمل | حل |
|---|---|---|
| المروحة لا تبدأ | لا يوجد طاقة للمروحة؛ توصيلات الأسلاك غير محكمة؛ بطارية جهاز التحكم عن بعد منخفضة أو غير مقترنة. | افحص قاطع الدائرة الكهربائية؛ تحقق من جميع توصيلات الأسلاك؛ استبدل بطارية جهاز التحكم عن بعد أو أعد إصلاح جهاز التحكم عن بعد. |
| الضوء لا يعمل | وصلة سلكية مفكوكة بمجموعة الإضاءة؛ مشكلة في مشغل مصابيح LED. | تحقق من أسلاك مجموعة الإضاءة؛ اتصل بدعم العملاء إذا كنت تشك في وجود مشكلة في مشغل LED. |
| تذبذب المروحة | براغي الشفرة فضفاضة؛ الشفرات غير متوازنة؛ دعامة التثبيت فضفاضة. | Tighten all blade screws; Use a balancing kit (not included) if necessary; Ensure mounting bracket is secure. |
| جهاز التحكم عن بعد لا يستجيب | بطاريات منخفضة أو فارغة؛ جهاز التحكم عن بعد غير مقترن بالمروحة. | Replace batteries; Refer to the remote control pairing instructions in the installation guide. |
If you are unable to resolve the issue after following these steps, please contact Carro customer support.
8. المواصفات
| ميزة | مواصفة |
|---|---|
| ماركة | كارو |
| رقم الموديل | 89cd23b0-5492-4454-a1b6-bc9a842cba24 |
| مقاس | 36 بوصة |
| أبعاد المنتج (العمق × العرض × الارتفاع) | 36 بوصة عمق × 36 بوصة عرض × 10.9 بوصة ارتفاع |
| نوع التركيب | تدفق جبل |
| نوع المحرك | محرك التيار المستمر |
| عدد السرعات | 10 |
| عدد الشفرات | 3 |
| مادة الشفرة | بلاستيك |
| سعة تدفق الهواء | 2650 قدم مكعب في الدقيقة |
| المجلدtage | 120 فولت |
| طريقة التحكم | Remote Control (Voice Control listed as a feature, but remote is primary) |
| درجة حرارة لون الضوء | 2700 كلفن (دافئ)، 3500 كلفن (طبيعي)، 4000 كلفن (بارد) |
| يعتم المدى | 1% إلى 100% |
| الاستخدام الداخلي والخارجي | داخلي |
| شهادة | استخراج وتحويل وتحميل |
9. الضمان والدعم
Carro is committed to product quality and customer satisfaction. If you have any questions, concerns, or require assistance with your ceiling fan, please contact our professional after-sales support team. Refer to your purchase documentation or the Carro webالموقع للحصول على تفاصيل الضمان المحددة ومعلومات الاتصال.