1. المقدمة
This manual provides essential information for the safe assembly, operation, maintenance, and troubleshooting of your Lyromix 15FT Outdoor Trampoline. Please read all instructions carefully before use to ensure safety and prolong the life of your product.
The Lyromix 15FT Outdoor Trampoline is designed for recreational use by children and adults. It features a curved pole design for enhanced stability and safety, an ASTM-certified construction, and includes a basketball hoop and safety enclosure net.
شهادة السلامة: هذا الترampoline is ASTM-certified, ensuring it meets recognized safety and quality standards for recreational trampأولين.
2. انتهى المنتجview
الميزات الرئيسية
- Curved Pole Design: Enhances stability and minimizes contact with enclosure poles during use.
- High-Performance Jump Mat: Durable and designed for consistent bounce.
- شبكة الحماية: High-density PE material provides 360-degree protection.
- طوق كرة السلة: Integrated for added recreational activity.
- البناء المقاوم للطقس: UV and water-resistant materials for outdoor durability.
- إطار قوي: Alloy steel frame with 6 W-shaped legs for stability, featuring hot-dip galvanizing technology for corrosion resistance.
عناصر
ال trampoline includes the following main components:
- Frame (Alloy Steel, galvanized)
- W-shaped Legs
- Jump Mat (PP material)
- Safety Enclosure Net (High-density PE)
- Curved Enclosure Poles (with foam padding)
- Springs (96 chromium-plated springs)
- وسادة غطاء زنبركي
- Basketball Hoop Assembly
- سُلُّم
- أدوات التجميع (المسامير، الغسالات، الصواميل)
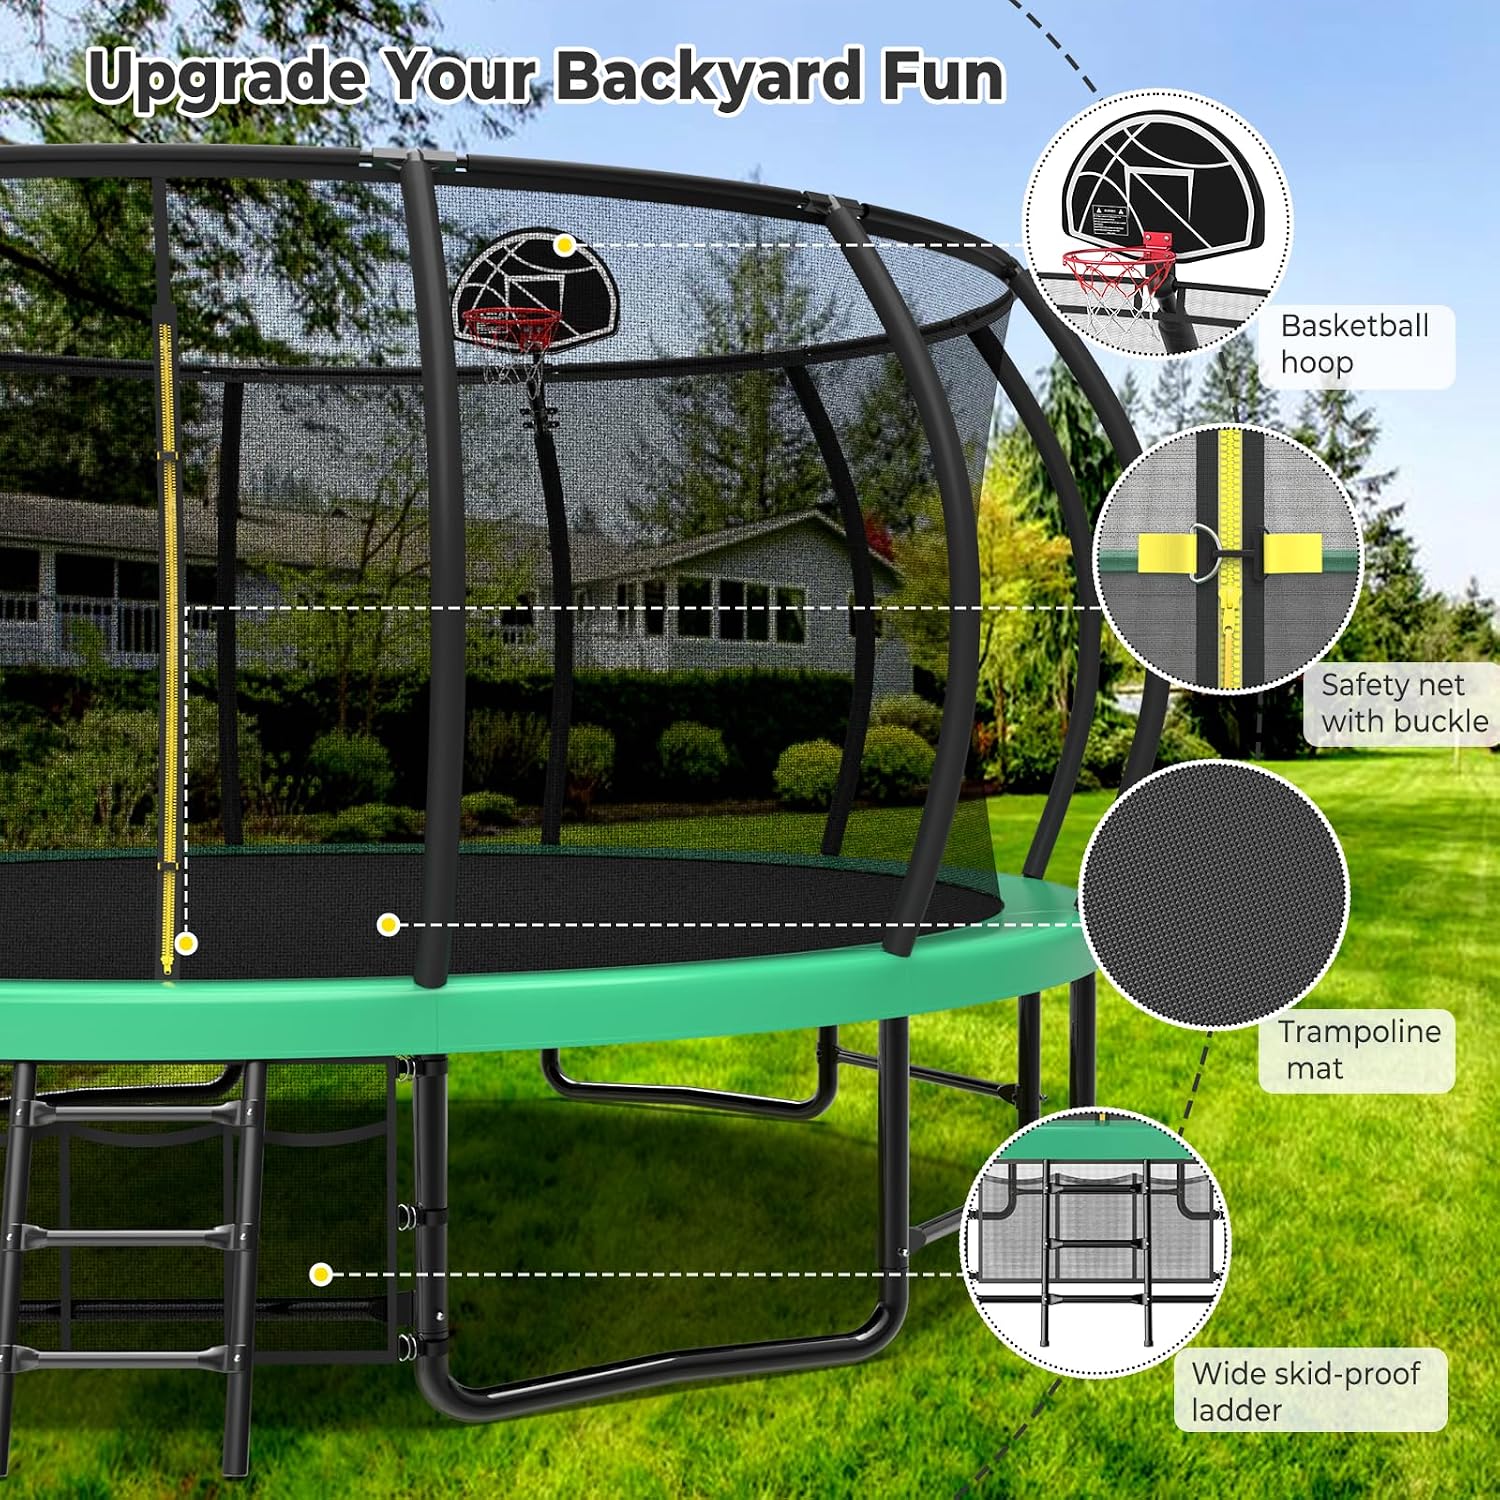
Figure 2.1: Main components of the Lyromix Trampأولين.
3. المواصفات
| يصف | التفاصيل |
|---|---|
| ماركة | ليروميكس |
| اسم الموديل | Trampolines for Adults |
| حجم الإطار | 15 أقدام |
| شكل | دائري |
| أبعاد المنتج (الطول × العرض × الارتفاع) | 180 بوصة طول × 180 بوصة عرض × 108 بوصة ارتفاع |
| مادة الإطار | سبائك الفولاذ |
| Jump Mat Material | البولي بروبلين (PP) |
| مادة شبكة الأمان | High-density Polyethylene (PE) |
| وزن العنصر | 65 رطل |
| عدد الينابيع | 96 |
| لون | أخضر |

الشكل 3.1: Trampأبعاد الإنترنتview.
4. تعليمات الإعداد
Careful assembly is crucial for the safety and stability of your trampoline. It is recommended that two adults perform the assembly. Ensure all parts are present and undamaged before beginning.
انتهت خطوات التجميعview:
- فك الأجزاء وتحديدها: Lay out all components on a clean, flat surface. Refer to the parts list in your packaging to ensure everything is accounted for.
- قم بتجميع الإطار: Connect the curved frame sections to form the main circular frame. Secure these connections using the provided hardware.
- نعلق الساقين: Connect the W-shaped legs to the main frame. Ensure all connections are tight and secure.
- Install the Jump Mat: Carefully spread the jump mat over the assembled frame.
- قم بتركيب الينابيع: Using the provided spring tool, attach the springs from the jump mat to the frame. Install springs diagonally first to distribute tension evenly, then fill in the remaining springs.
- Place the Spring Cover Pad: Cover the springs and frame with the protective padding.
- Assemble and Install Enclosure Poles: Insert the foam-padded upper poles into the lower pole sections. Attach these to the trampإطار أولين.
- Install the Safety Net: Secure the safety enclosure net to the top of the enclosure poles and the bottom of the trampإطار أولين.
- Assemble and Attach Basketball Hoop: Follow the specific instructions for assembling the basketball hoop and securely attaching it to an enclosure pole.
- تثبيت السلم: Attach the ladder to the side of the trampoline frame for safe entry and exit.
Visual Guide: Trampالجمعية oline
Video 4.1: Detailed guide on how to install the Lyromix trampoline, covering frame assembly, spring attachment, and safety net installation.
Detailed Assembly Steps with Images:
Below are visual aids for key assembly stagالعربية:
تجميع الاطار

Figure 4.2: Connecting frame sections. Ensure the spring holes align correctly.

Figure 4.3: Attaching the W-shaped legs to the main frame using bolts and nuts.

Figure 4.4: Completed trampoline frame assembly.
تركيب الربيع

Figure 4.5: Spring installation method for even tension.

Figure 4.6: Attaching springs to the jump mat and frame.
Safety Enclosure and Basketball Hoop

Figure 4.7: Installing foam padding onto enclosure poles and sliding them into the net sleeves.

Figure 4.8: Assembling the basketball hoop components.

Figure 4.9: Final assembled trampأولين.
5. تعليمات التشغيل
إرشادات الاستخدام الآمن:
- الإشراف: قم دائمًا بالإشراف على الأطفال عند استخدامهم للـ trampأولين.
- قافز واحد في كل مرة: To prevent collisions and injuries, allow only one person to jump on the trampأولين في وقت واحد.
- لا تقلبات أو تقلبات: Avoid performing somersaults or flips, as these can lead to serious head and neck injuries.
- مسح المنطقة: تأكد من المنطقة المحيطة بالقطارampoline is clear of obstacles and other individuals.
- Proper Entry and Exit: Use the provided ladder for safe entry and exit. Do not jump on or off the trampأولين.
- الوزن المحدد: Adhere to the maximum weight limit specified in the product documentation to prevent damage and ensure safety.
- حالة الطقس: لا تستخدم trampفي حالة الرياح القوية أو الأمطار أو غيرها من الظروف الجوية السيئة.
- الأحذية: Jump barefoot or in appropriate athletic shoes. Avoid shoes with hard soles that could damage the mat.

Figure 5.1: Children enjoying the trampأولاين بأمان.
6. الصيانة
Regular maintenance helps ensure the longevity and safety of your trampأولين.
- التفتيش الدوري: Periodically check all nuts, bolts, and connections for tightness. Ensure the frame is stable and free from rust or damage.
- فحص الربيع: Inspect all springs for damage, stretching, or detachment. Replace any compromised springs immediately.
- Mat and Net Inspection: Check the jump mat and safety net for tears, holes, or excessive wear. Repair or replace damaged components to maintain safety.
- حالة الحشو: Ensure the spring cover pad is securely in place and free from damage to protect users from springs and the frame.
- تنظيف: Clean the jump mat and net with mild soap and water. Avoid harsh chemicals that could degrade materials.
- التخزين الشتوي: In areas with harsh winters, consider disassembling and storing the trampيتم وضعها داخل المنزل لحمايتها من الظروف الجوية القاسية.

Figure 6.1: Importance of inspecting frame components for damage.
7. استكشاف الأخطاء وإصلاحها
يتناول هذا القسم المشكلات الشائعة التي قد تواجهها مع tr الخاص بكampأولين.
- انخفاض الارتداد: Check if all springs are properly attached and undamaged. Ensure the jump mat is taut.
- أصوات صرير: Inspect frame connections for looseness. Tighten any loose bolts. Applying a silicone-based lubricant to joints may help.
- Net Sagging or Damage: Verify that the safety net is correctly attached to all poles and the frame. Inspect for tears and repair or replace the net if significantly damaged.
- عدم استقرار الهيكل: Ensure all W-shaped legs are firmly on the ground and all frame connections are tightened. Check for any bent or damaged frame parts.
- Basketball Hoop Issues: Check all mounting hardware for tightness. Ensure the backboard and rim are securely fastened.
If you encounter issues not covered here or require further assistance, please contact Lyromix customer support.
8. الضمان والدعم
معلومات الضمان:
Your Lyromix Trampيأتي oline مع ضمان لمدة 12 شهرًا from the date of purchase. This warranty covers manufacturing defects in materials and workmanship under normal use and service. It does not cover damage resulting from misuse, accidents, unauthorized modifications, or normal wear and tear.
يرجى الاحتفاظ بإثبات الشراء الخاص بك لمطالبات الضمان.
دعم العملاء:
For any questions, concerns, or assistance with your Lyromix Trampoline, please contact our dedicated customer support team. Our team is ready to assist with any issues, ensuring you have a smooth and enjoyable experience.
You can visit the official Lyromix store for more information and support resources: Lyromix Store