1. المقدمة
This manual provides detailed instructions for the assembly, installation, operation, and maintenance of your TOOQ DB1202TN-B Dual Monitor Desk Mount with Laptop Tray. Please read this manual thoroughly before installation and use to ensure proper setup and safe operation. Keep this manual for future reference.

Figure 1: TOOQ DB1202TN-B Dual Monitor Desk Mount with Laptop Tray in use.
2. معلومات السلامة
- اقرأ جميع التعليمات: Ensure you understand all instructions and warnings before installation and use.
- قدرة الوزن: Do not exceed the maximum weight capacity of 9 kg (19.8 lbs) per monitor arm and 9 kg (19.8 lbs) for the laptop tray. Exceeding this limit may result in serious injury or property damage.
- حجم الشاشة: تم تصميم هذا الحامل للشاشات التي يتراوح حجمها بين 17 و 32 بوصة.
- حجم الكمبيوتر المحمول: The tray is suitable for laptops between 12 and 17 inches.
- التوافق مع VESA: Ensure your monitors are VESA compatible (75x75mm or 100x100mm).
- سمك المكتب: Verify your desk thickness is within the specified range for clamp أو تركيب جروميت.
- حَشد: Assemble the product according to the instructions. Incorrect assembly can lead to product failure or injury.
- أطفال: احتفظ بالأجزاء الصغيرة بعيدًا عن متناول الأطفال.
- صيانة: Regularly check that the mount is secure and all fasteners are tight.
3. محتويات العبوة
Please verify that all components are present and undamaged before proceeding with installation. If any parts are missing or damaged, contact customer support.
- 1x Main Pole
- 2x Monitor Arms
- 1x Laptop Tray
- 1x Desk Clamp حَشد
- 1x Grommet Mount Assembly
- 1x Hardware Kit (screws, washers, Allen keys)
- 1 × دليل التعليمات

Figure 2: Included mounting hardware (M-A: M4x12, M-B: M5x12, M-C: D5 washers).
4. المواصفات
| ميزة | التفاصيل |
|---|---|
| نموذج | DB1202TN- ب |
| توافق حجم الشاشة | 17" - 32" |
| Monitor Weight Capacity | 9 kg (19.8 lbs) per arm |
| Laptop Size Compatibility | 12" - 17" |
| Laptop Tray Weight Capacity | 9 كجم (19.8 رطل) |
| التوافق مع VESA | 75×75 مم، 100×100 مم |
| زاوية الميل | +45° / -45° |
| زاوية الدوران | +90° / -90° |
| زاوية الدوران | +180° / -180° |
| مادة | سبائك الفولاذ |
| لون | أسود |
| أبعاد المنتج | 43.5 × 29.5 × 13.5 سم (تقريبًا، كما هو معبأ) |
| وزن المنتج | 5.4 كجم |

Figure 3: Detailed technical drawing with dimensions.
5. الإعداد والتثبيت
The TOOQ DB1202TN-B offers two installation options: desk clamp or grommet mount. Choose the method best suited for your desk.
5.1 مكتب Clamp تثبيت
- إرفاق مكتب clamp base to the main pole using the provided screws.
- وضع الكلamp on the edge of your desk. Ensure the desk thickness is compatible with the clamp's range.
- شد القفلamp screw until the mount is securely fastened to the desk. Do not overtighten.

الشكل 4: مكتب clamp تثبيت.
5.2 تركيب التثبيت عبر فتحة التثبيت
- If your desk has a grommet hole, remove the existing grommet cover.
- Assemble the grommet base components as per the diagram in the manual (not provided here, but implied).
- Insert the main pole through the grommet hole.
- Secure the grommet base from underneath the desk using the provided plate and nut. Tighten firmly.

Figure 5: Grommet mount installation.
5.3 Attaching Monitor Arms and Laptop Tray
- Slide the monitor arms onto the main pole at your desired height. Secure them with the locking collars.
- Slide the laptop tray arm onto the main pole and secure it.
- Attach the VESA plates to the back of your monitors using the appropriate M4x12 or M5x12 screws and D5 washers from the hardware kit. Ensure the screws are not overtightened and do not damage the monitor.
- Carefully slide the monitors (with VESA plates attached) onto the monitor arms. Ensure they click into place securely.
- Place your laptop onto the laptop tray. Adjust the width-adjustable claws to securely hold your laptop.

Figure 6: Attaching monitor arms and adjusting height.

Figure 7: Laptop holder with adjustable width claws (276-472mm).
6. تعليمات التشغيل والتعديلات
This monitor mount offers various adjustment options to achieve an ergonomic setup.
- ضبط الارتفاع: Loosen the locking collar on the main pole to slide the monitor arms and laptop tray up or down. Retighten the collar once the desired height is reached.
- تعديل الميل: The monitor and laptop tray can be tilted +45° to -45°. Use the provided Allen key to adjust the tension if the screen does not hold its position.
- تعديل الدوران: Swivel your monitors up to 90° horizontally or vertically.
- تعديل الدوران: Rotate your monitors +180° to -180° for portrait or landscape orientation.
- Laptop Tray Tilt: The laptop tray also offers tilt adjustment for comfortable typing and viewزوايا متعددة.
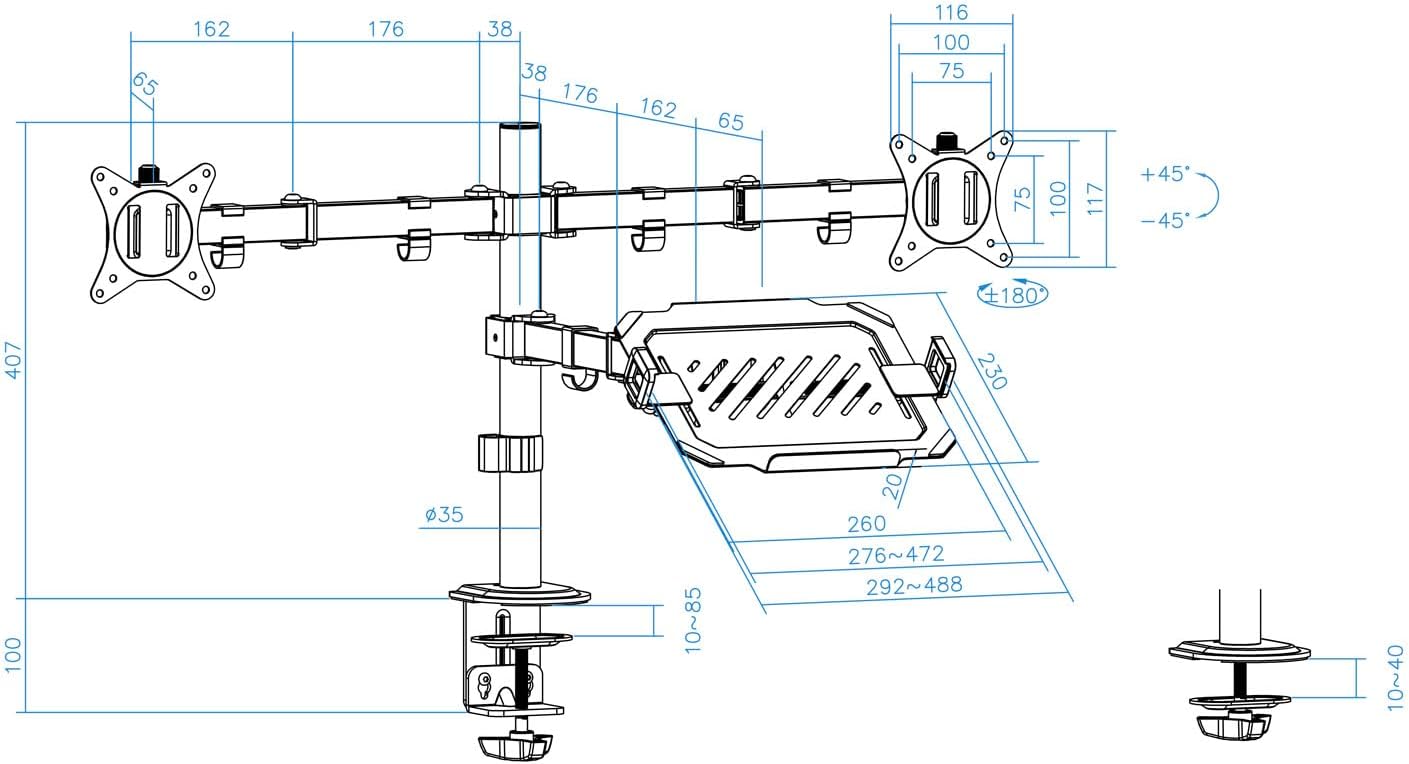
Figure 8: Laptop tray tilt adjustment.

Figure 9: Monitor swivel and rotation capabilities.
6.1 إدارة الكابلات
Utilize the integrated cable clips along the arms and main pole to route and organize your monitor and laptop cables. This helps maintain a clean and tidy workspace.

Figure 10: Cable management clips.
7. الصيانة
- تنظيف: امسح الحامل بقطعة قماش ناعمة.amp القماش. تجنب استخدام المنظفات أو المذيبات الكاشطة.
- فحص الضيق: Periodically check all screws and fasteners to ensure they remain tight and secure. Retighten as necessary.
- تشحيم: No lubrication is required for normal operation.
8. استكشاف الأخطاء وإصلاحها
- Monitor sags or does not hold position:
- Ensure the monitor weight does not exceed the maximum capacity (9 kg per arm).
- Tighten the tilt adjustment screw on the VESA plate using the provided Allen key.
- الحامل غير مستقر:
- Verify the desk clamp أو يتم تثبيت حامل الحلقة بإحكام على المكتب.
- Ensure the main pole and arm collars are tightened.
- Laptop tray sags:
- Ensure the laptop weight does not exceed the maximum capacity (9 kg).
- Tighten the tilt adjustment screw for the laptop tray.
- اجزاء مفقودة:
- Refer to the "Package Contents" section. If parts are missing, contact customer support.
9. الضمان والدعم
For warranty information or technical support, please refer to the documentation included with your purchase or visit the official TOOQ webالموقع. احتفظ بإيصال الشراء كإثبات للشراء.