1. معلومات هامة حول السلامة
Please read and understand all instructions before installing or operating this fixture. Failure to follow these instructions may result in electric shock, fire, or other hazards that could cause personal injury or property damage.
- تحذير: خطر التعرض لصدمة كهربائية. افصل التيار الكهربائي من المصهر أو قاطع الدائرة قبل التركيب أو الصيانة.
- تحذير: Risk of fire. Keep combustible materials away from the lamp.
- This fixture is intended for indoor use only. Do not use in wet locations or where directly exposed to water.
- ضمان حجم العرضtage is compatible with the fixture's requirements (120V-277V).
- All wiring connections must be made in accordance with local and national electrical codes. If you are unsure about wiring, consult a qualified electrician.
- لا تحاول تعديل أو تفكيك الجهاز. لا توجد أجزاء قابلة للصيانة من قبل المستخدم في الداخل.
2. ماذا يوجد في الصندوق
تأكد من وجود كافة المكونات قبل البدء في التثبيت:
- LED Shop Light Fixture(s)
- أدوات التثبيت (البراغي والمثبتات)
- Linking Cables (1.5" and 8" for daisy-chaining)
- صواميل الأسلاك
3. المواصفات
| ميزة | مواصفة |
|---|---|
| ماركة | إضاءة صنكو |
| اسم الموديل | LED Shop Light, 4ft Wraparound, Prismatic Lens, 8.5 Inch |
| الأبعاد (الطول × العرض × الارتفاع) | 48 بوصة طول × 8.58 بوصة عرض × 2.56 بوصة ارتفاع |
| واتtage | 60 واط |
| سطوع | 7200 لومن |
| كفاءة | 120 LM / W |
| درجة حرارة اللون (CCT) | قابلة للتحديد: 4000 كلفن ، 5000 كلفن ، 6000 كلفن |
| المجلدtage | 120 فولت-277 فولت |
| قابلة للتعتيم | لا (غير قابلة للتعتيم) |
| مادة | فولاذ سبيكي، بولي كربونات |
| نوع التركيب | تركيب السقف (تركيب سطحي) |
| المميزات الخاصة | Linkable, Wide Beam Angle (110°) |
| الشهادات | ETL، FCC، RoHS |
| متوسط الحياة | 50,000 ساعة |
The fixture features a durable build with an impact-resistant prismatic lens for wide and consistent light dispersion.

This image illustrates key features including impact resistance, the prismatic lens design, non-dimmable functionality, and the wide voltage compatibility of 120-277V.
4. الإعداد والتثبيت
Follow these steps for proper installation. Ensure power is disconnected before starting.
4.1. التحضير للتثبيت
- قم بإيقاف تشغيل الطاقة: Locate the circuit breaker controlling the installation area and turn off the power.
- Remove Diffuser: Gently remove the prismatic diffuser from the lamp base to access the internal components.
- اختر درجة حرارة اللون (CCT): Before mounting, locate the CCT switch inside the fixture. Select your desired color temperature (4000K, 5000K, or 6000K). This setting cannot be changed easily after installation.

This image shows the internal CCT switch, allowing selection between 4000K, 5000K, and 6000K before installation.
4.2. تركيب التركيبات
The fixture is designed for flush mounting to a ceiling or surface. It includes keyhole slots for easy installation.
- نقاط تثبيت العلامة: Hold the fixture in the desired mounting location and mark the positions for the mounting screws. Ensure these align with a junction box or suitable support structure.
- تثبيت أجهزة التثبيت: Drill pilot holes if necessary and install the provided mounting screws, leaving a small gap for the fixture to slide onto.
- تحضير الأسلاك: If connecting to a junction box, knock out the appropriate punch hole on the fixture's housing.

This diagram illustrates the three main steps for installation: securing the housing, connecting electrical wires, and attaching the light fixture.
4.3 الربط الكهربائي
- توصيل الأسلاك: Using the provided wire nuts, connect the fixture's wires to the supply wires: Live (black) to Live, Neutral (white) to Neutral, and Ground (yellow/green) to Ground. Ensure all connections are secure.
- أسلاك الطي: Carefully tuck all wires and wire nuts into the junction box or fixture housing.
4.4. Linking Multiple Fixtures (Daisy Chain)
This fixture supports daisy-chaining to extend lighting coverage. Use the provided linking cables.
- Connect Linking Cable: Insert one end of a linking cable into the designated port on the first fixture and the other end into the port on the next fixture.
- اتصالات آمنة: Ensure linking cables are securely connected and properly routed.
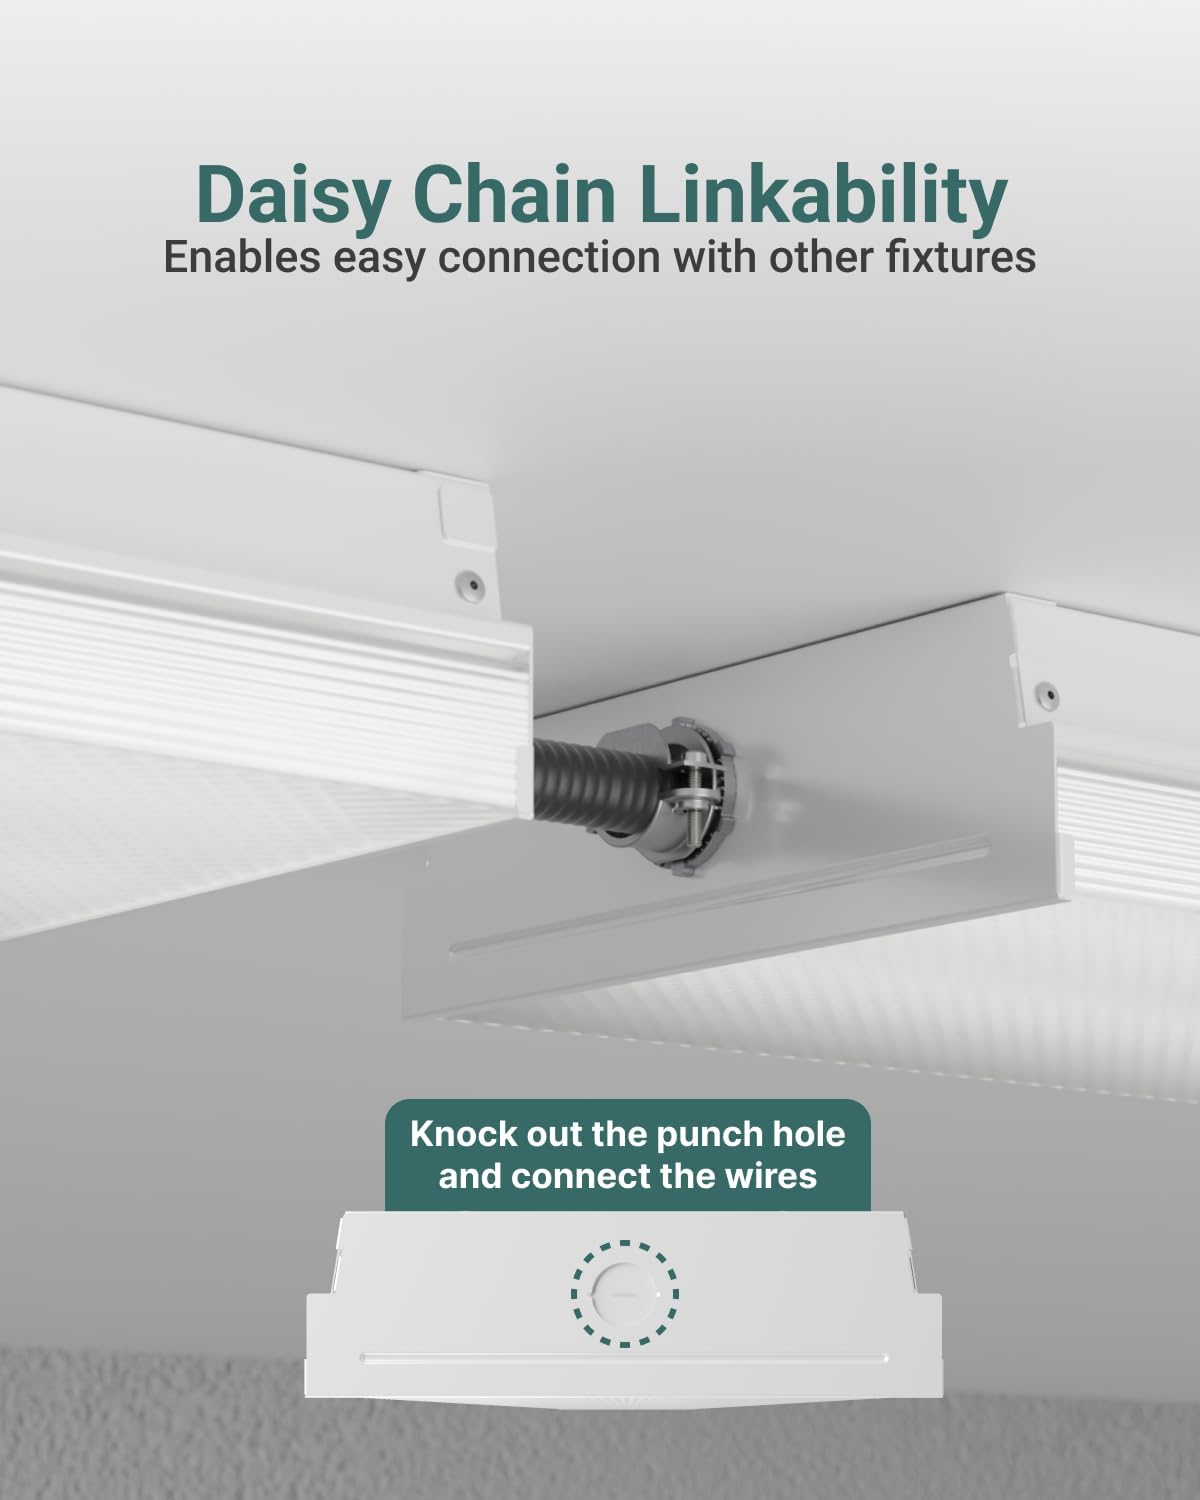
This image demonstrates how to daisy-chain multiple fixtures using the linking cables and highlights the knockout punch hole for electrical connections.
4.5. الخطوات النهائية
- Reattach Diffuser: Align one end of the diffuser with the aluminum base and push it into place until it snaps securely.
- اعادة الطاقة: Turn the circuit breaker back on to restore power to the fixture.
5. تعليمات التشغيل
The Sunco Lighting LED Shop Light is designed for straightforward operation once installed.
5.1. اختيار درجة حرارة اللون (CCT)
This fixture features a selectable color temperature (CCT) switch, allowing you to choose between 4000K (Cool White), 5000K (Daylight), and 6000K (Bright White) to suit your preference or application. The CCT switch is located inside the fixture and must be set during installation before the diffuser is reattached.
- 4000 ك: Provides a neutral white light, suitable for offices or general workspaces.
- 5000 ك: Offers a bright, crisp daylight-like illumination, ideal for tasks requiring high visibility.
- 6000 ك: Delivers a very bright, cool white light, often preferred for industrial settings or areas needing maximum brightness.

This image displays the internal components and wiring, emphasizing the high efficiency of the LED fixture operating within a 120-277V range.
5.2. تشغيل/إيقاف التشغيل
The fixture is non-dimmable and operates via a standard wall switch connected to its power supply. Simply toggle the wall switch to turn the light on or off.
6. الصيانة
The Sunco Lighting LED Shop Light requires minimal maintenance. Always ensure power is disconnected before performing any maintenance.
- تنظيف: امسح الجزء الخارجي من التركيب بقطعة قماش ناعمة وجافة أو مبللة قليلاًamp cloth. Do not use harsh chemicals or abrasive cleaners, as these can damage the finish or lens.
- تقتيش: افحص الجهاز دوريًا بحثًا عن أي علامات تلف أو أسلاك مفكوكة أو تآكل. في حال وجود أي مشكلة، افصل التيار الكهربائي واستشر فني كهرباء مؤهل.
- لا حاجة لاستبدال المصباح: This fixture uses integrated LEDs, meaning there are no bulbs to replace. The LEDs are designed for a long lifespan of 50,000 hours.
7. استكشاف الأخطاء وإصلاحها
If you experience issues with your LED Shop Light, refer to the following common troubleshooting steps:
- الضوء لا يعمل:
- تحقق من قاطع الدائرة للتأكد من تشغيل الطاقة.
- Verify all wire connections are secure and correct.
- Ensure the wall switch is in the ON position.
- ومضات الضوء:
- Confirm the fixture is not connected to a dimmer switch, as it is non-dimmable.
- التحقق من توصيلات الأسلاك الفضفاضة.
- ضمان حجم العرضtage مستقر وضمن النطاق المحدد.
- Incorrect color temperature:
- The CCT switch must be set before installation. If the diffuser is already installed, carefully remove it to access and adjust the switch.
If these steps do not resolve the issue, contact Sunco Lighting customer support for assistance.
8. الضمان والدعم
Sunco Lighting stands behind the quality of its products.
- ضمان: This product is backed by a 3-Year Warranty. Please refer to the official Sunco Lighting webللاطلاع على تفاصيل وشروط الضمان الكاملة، يرجى زيارة الموقع الإلكتروني أو الاطلاع على وثائق الشراء الخاصة بك.
- دعم العملاء: For technical assistance, troubleshooting, or warranty claims, please contact Sunco Lighting customer support.