Acekool CF9
Acekool Portable Air Conditioner User Manual
نموذج: سي اف 9 |العلامة التجارية: اسيكول
1. المقدمة
Thank you for choosing the Acekool Portable Air Conditioner. This 3-in-1 unit provides powerful cooling, efficient dehumidification, and effective air circulation through its fan mode. Designed for convenience and portability, it is ideal for cooling rooms up to 35 square meters. Please read this manual thoroughly before operation to ensure proper use, maintenance, and safety.
2. معلومات السلامة
لتقليل مخاطر نشوب حريق أو صدمة كهربائية أو إصابة عند استخدام مكيف الهواء ، اتبع هذه الاحتياطات الأساسية:
- Always plug the unit into a grounded 220V AC outlet. Do not use extension cords or adapter plugs.
- لا تقم بتشغيل الوحدة بسلك أو قابس تالف.
- لا تسد فتحات دخول أو خروج الهواء. تأكد من وجود مساحة كافية حول الوحدة لضمان تدفق الهواء بشكل صحيح.
- أبقِ الوحدة بعيداً عن مصادر الحرارة وأشعة الشمس المباشرة والمواد القابلة للاشتعال.
- لا تقم بإدخال أصابعك أو أجسام غريبة في مداخل أو منافذ الهواء.
- افصل الوحدة عن التيار الكهربائي قبل التنظيف أو إجراء أي صيانة.
- لا يُقصد استخدام هذا الجهاز من قبل الأشخاص (بما في ذلك الأطفال) ذوي القدرات البدنية أو الحسية أو العقلية المحدودة، أو الذين يفتقرون إلى الخبرة والمعرفة، ما لم يتم الإشراف عليهم أو إعطائهم تعليمات فيما يتعلق باستخدام الجهاز من قبل شخص مسؤول عن سلامتهم.
- تأكد من وضع الوحدة على سطح مستوٍ ومستقر لمنع الانقلاب.
3. مواصفات المنتج
- قوي وفعال: Delivers strong cooling power to quickly and effectively cool your room. Enjoy personal comfort at the touch of a button.
- Flexible and Mobile: Equipped with wheels for easy movement between rooms. Provides a pleasant climate in bedrooms, living rooms, or offices. Adjustable settings allow customization of cooling needs.
- Easy to Use and Control: Features an intuitive control panel and remote control for setting temperature, timer, and fan speed. The convenient timer function allows pre-programming for energy saving.
- Energy-efficient and Environmentally Friendly: Designed for low power consumption, helping to reduce energy costs. Uses R290 refrigerant, contributing to environmental protection.
- أنيقة ومدمجة: Boasts a sleek and modern design that blends seamlessly into any room, making it an attractive addition to your home or office.

Image: The unit's compact size delivers high cooling performance, suitable for rooms up to 300 sq. ft. with 9000 BTU cooling capacity and 350m³/h airflow.

Image: The unit uses environmentally friendly R290 refrigerant, promoting energy efficiency and cost savings.

Image: The 3-in-1 operation system includes cooling (down to 16°C), dehumidifying (up to 42L/day), and fan (2 speeds) functions.
4. مواصفات المنتج
| مواصفة | قيمة |
|---|---|
| ماركة | اسيكول |
| رقم الموديل | سي اف 9 |
| أبعاد المنتج (الطول × العرض × الارتفاع) | 45 × 89 × 44 سم |
| وزن | 26 كيلوغرام |
| تقييم كفاءة الطاقة | A |
| سعة التبريد | 9000 وحدة حرارية بريطانية |
| قدرة إزالة الرطوبة | 42 لترات/يوم |
| الاستهلاك السنوي للطاقة | 1000 واط |
| مستوى الضوضاء | 55 ديسيبل |
| نوع التثبيت | نافذة |
| ميزة خاصة | مزيل الرطوبة |
| لون | أسود |
| المجلدtage | 220 فولت |
| قوة | 1000 واط |
| نسبة كفاءة الطاقة الموسمية (SEER) | 2.6 |
5. محتويات العبوة
يرجى التأكد من وجود جميع المكونات وأنها في حالة جيدة:
- Acekool Portable Air Conditioner Unit
- خرطوم العادم
- Window Seal Kit (includes window slider kit and adapter)
- جهاز التحكم عن بعد
- خرطوم الصرف (للتصريف المستمر في وضع مزيل الرطوبة)
- دليل المستخدم (هذا المستند)
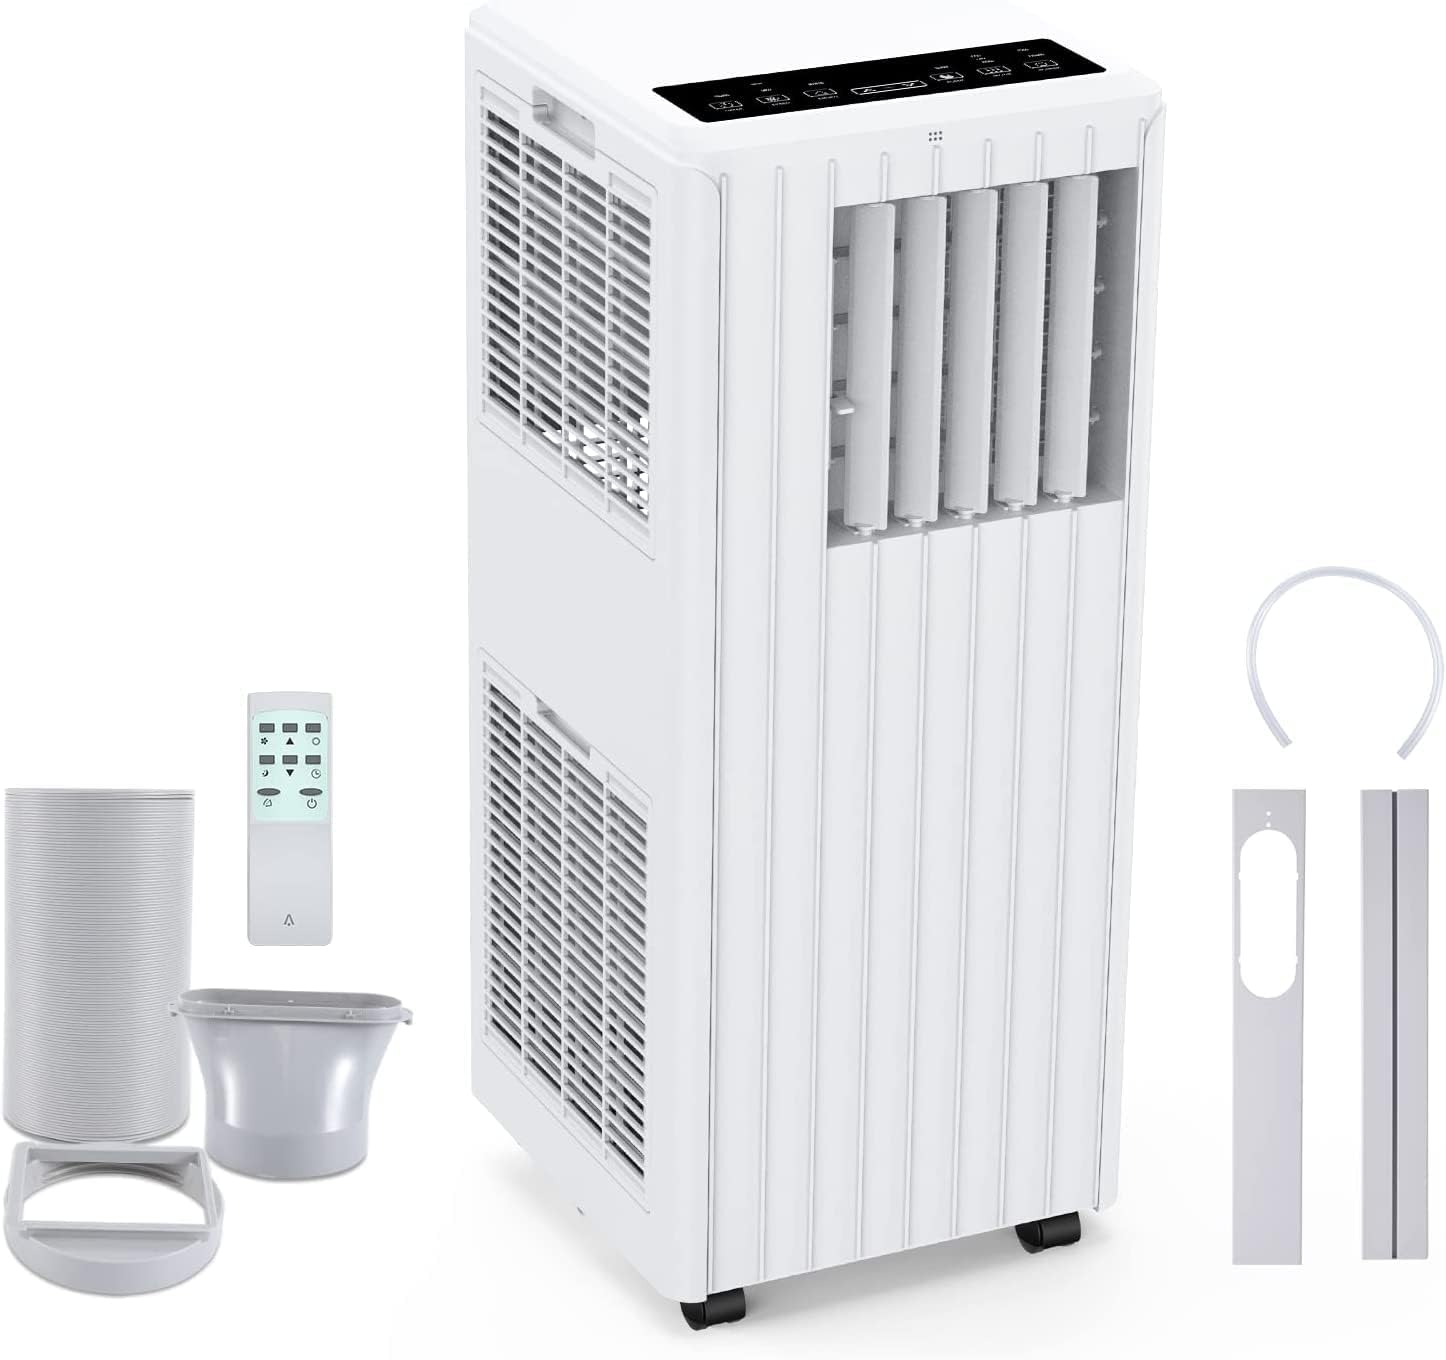
Image: All components included in the package: the main unit, exhaust hose, window sealing plate, remote control, and drain bucket.
6. الإعداد والتثبيت
اتبع هذه الخطوات لإعداد مكيف الهواء المحمول الخاص بك:
- التمركز: Place the air conditioner on a flat, stable surface near a window and a grounded electrical outlet. Ensure there is at least 20 cm (8 inches) of space around the unit for proper airflow.
- قم بتوصيل خرطوم العادم: Screw one end of the exhaust hose into the air outlet on the back of the unit.
- Install Window Seal Kit: اضبط مجموعة انزلاق النافذة لتناسب فتحة نافذتك. ثم ثبّتها في مكانها.
- Connect Exhaust Hose to Window Kit: Attach the other end of the exhaust hose to the adapter on the window slider kit, ensuring a tight seal to prevent hot air from re-entering the room.
- توصيل الطاقة: قم بتوصيل سلك الطاقة بمأخذ تيار متردد مؤرض بقوة 220 فولت.

Image: Visual guide for easy installation, showing how to connect the exhaust hose to the unit and the window sealing plate.
7. تعليمات التشغيل
Your Acekool Portable Air Conditioner can be operated using the control panel on the unit or the included remote control.
لوحة التحكم وجهاز التحكم عن بعد
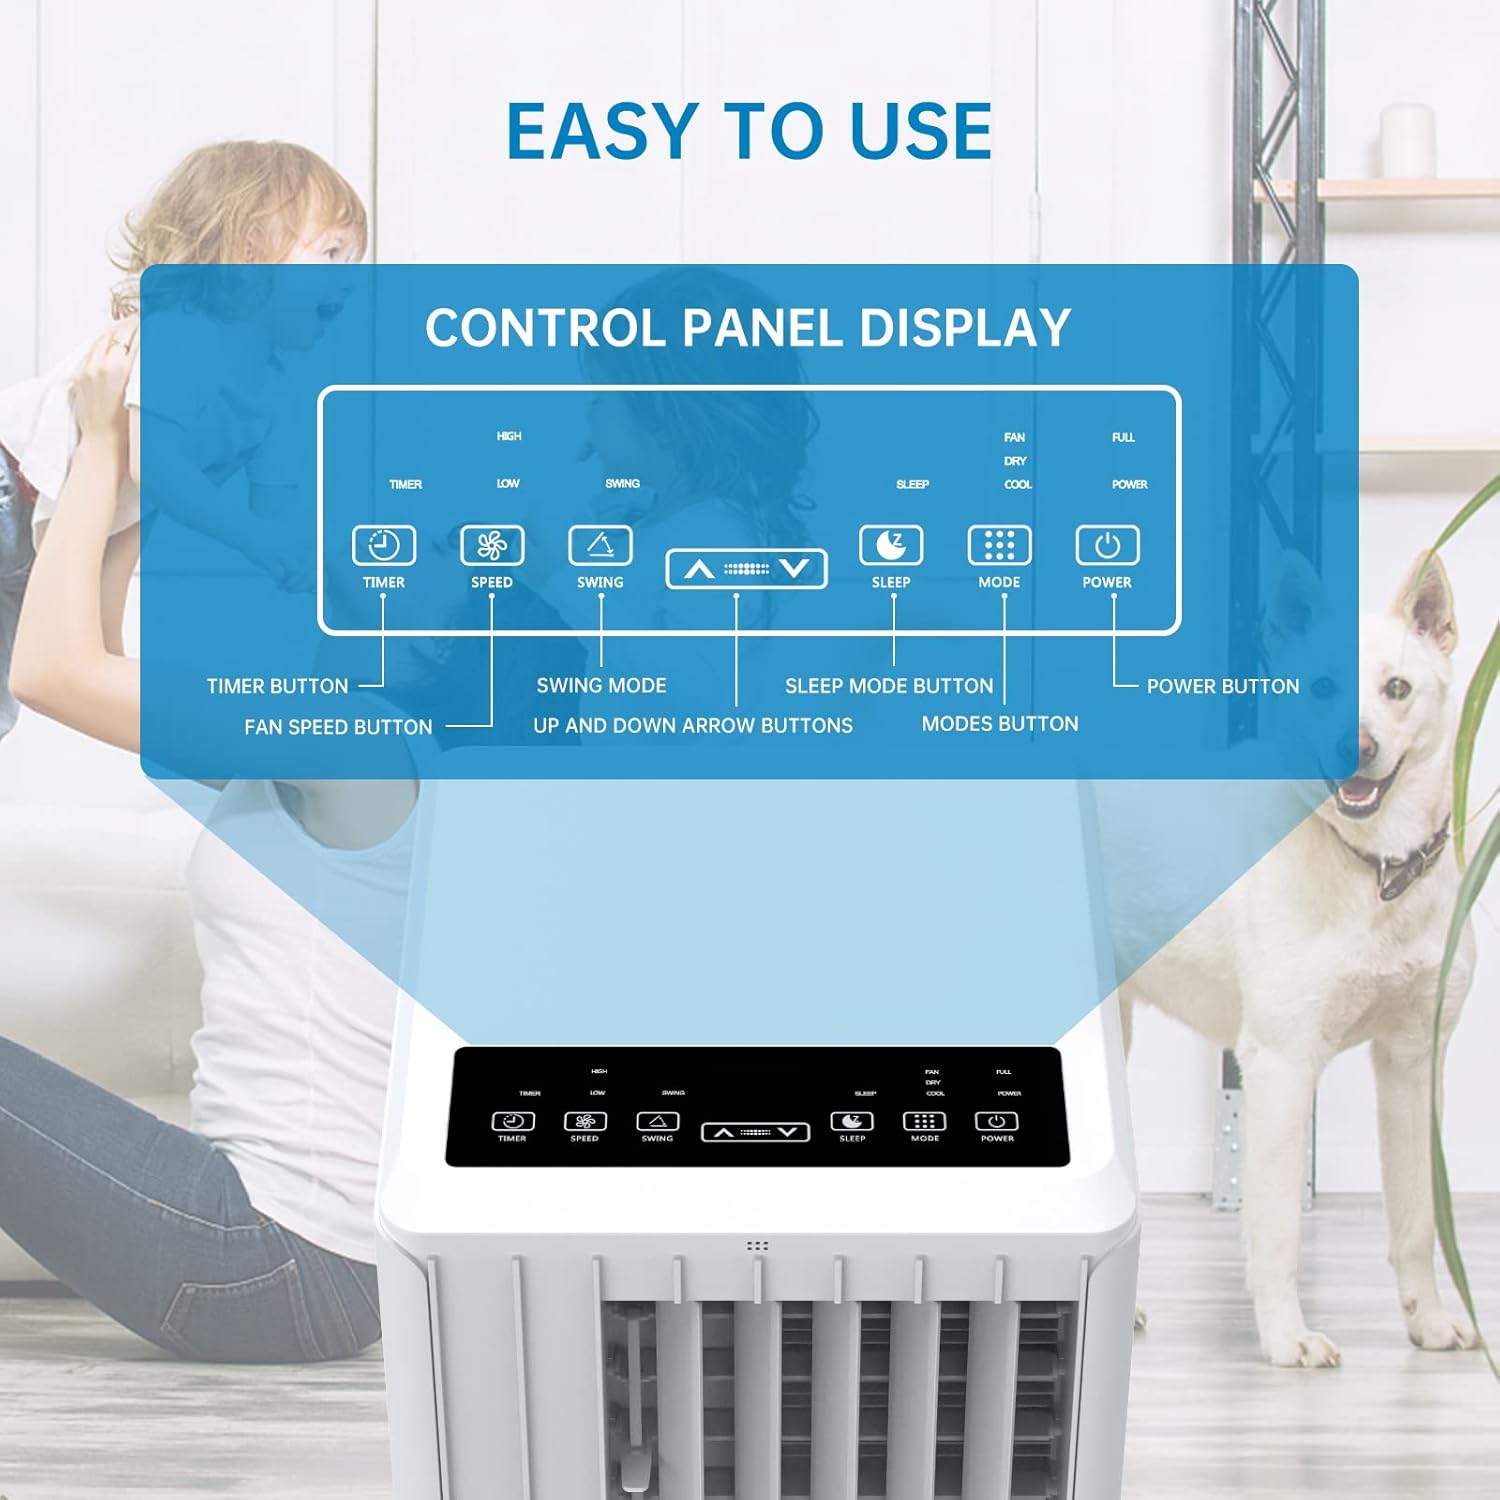
الصورة: مفصلة view of the control panel display, indicating buttons for Timer, Speed, Swing, Sleep, Mode, and Power.

Image: The unit can be conveniently controlled via the remote control, and features a swing mode for wider air distribution.
أوضاع التشغيل

الصورة: أكثر منview of the main operating modes: Cool, Fan, Dry (Dehumidifying), and Sleep, along with smart timer functionality.
- وضع بارد: Press the "Mode" button until the snowflake icon appears. Use the Up/Down arrows to set your desired temperature (16°C - 30°C). The unit will cool the room to the set temperature.
- وضع المروحة: Press the "Mode" button until the fan icon appears. In this mode, the unit circulates air without cooling. Use the "Speed" button to adjust fan speed (Low/High).
- Dehumidify Mode (Dry): Press the "Mode" button until the water drop icon appears. The unit will remove excess moisture from the air. In this mode, the fan speed cannot be adjusted. Ensure the continuous drainage hose is connected for prolonged use.
- وضع السكون: Press the "Sleep" button. In this mode, the unit operates quietly and gradually increases the temperature by 1°C after the first hour and another 1°C after the second hour, maintaining this temperature for 6 hours before returning to normal operation. This mode is ideal for nighttime use.

Image: The sleep mode offers automatic shut-off, quiet operation (55dB), and a 24-hour smart timer for comfortable nighttime use.
وظائف إضافية
- وظيفة المؤقت: Press the "Timer" button to set the desired operating time (1-24 hours) for automatic turn on/off.
- سرعة المروحة: In Cool or Fan mode, press the "Speed" button to cycle through Low and High fan speeds.
- وظيفة التأرجح: Press the "Swing" button to activate or deactivate the automatic vertical oscillation of the air louvers, distributing air more evenly.
8. الصيانة
تضمن الصيانة الدورية الأداء الأمثل وتطيل عمر مكيف الهواء. افصل الجهاز عن الكهرباء قبل التنظيف.
تنظيف فلتر الهواء
ينبغي تنظيف فلتر الهواء كل أسبوعين أو أكثر حسب الاستخدام وجودة الهواء.
- قم بإزالة فلتر الهواء من الجزء الخلفي للوحدة.
- اغسل الفلتر بالماء الدافئ والصابون، ثم اشطفه جيدًا.
- اترك الفلتر ليجف تمامًا في الهواء قبل إعادة إدخاله داخل الوحدة.
تصريف المياه
The unit has an internal water tank that collects condensed water. When the tank is full, the unit will stop operating and display a "FULL" indicator. You will need to drain the water manually.
- Place a shallow pan or bucket under the drain port at the bottom rear of the unit.
- قم بإزالة سدادة التصريف للسماح بتدفق الماء للخارج.
- بمجرد تصريف المياه، قم بتركيب سدادة التصريف بشكل آمن.
For continuous dehumidification, attach the provided drain hose to the continuous drain port.
تنظيف الجزء الخارجي للوحدة
امسح الجزء الخارجي من الوحدة بقطعة قماش ناعمة دamp قماش. لا تستخدم مواد كيميائية قاسية أو منظفات كاشطة.
تخزين
في حالة تخزين الوحدة لفترة طويلة:
- قم بتفريغ جميع المياه من الوحدة.
- تنظيف فلتر الهواء.
- قم بتخزين الجهاز في مكان جاف وبارد، بعيدًا عن أشعة الشمس المباشرة.
9. استكشاف الأخطاء وإصلاحها
قبل الاتصال بدعم العملاء، يرجى الرجوع إلى دليل استكشاف الأخطاء وإصلاحها التالي للاطلاع على المشكلات الشائعة:
| مشكلة | السبب المحتمل | حل |
|---|---|---|
| الوحدة لا تعمل | No power supply; Power cord unplugged; Circuit breaker tripped; Water tank full. | Check power outlet; Plug in power cord securely; Reset circuit breaker; Drain water tank. |
| Unit is not cooling effectively | Air filter dirty; Exhaust hose not properly installed/sealed; Room too large; Doors/windows open; Air inlet/outlet blocked. | Clean air filter; Ensure exhaust hose is properly installed and sealed; Close doors/windows; Clear obstructions from air inlets/outlets. |
| الوحدة صاخبة | الوحدة ليست على سطح مستوٍ؛ فلتر الهواء متسخ؛ المكونات الداخلية تهتز. | Place unit on a flat, stable surface; Clean air filter; If noise persists, contact customer support. |
| تسربات المياه من الوحدة | Drain plug loose; Continuous drain hose not properly connected or blocked. | Ensure drain plug is secure; Check continuous drain hose for proper connection and clear any blockages. |
| جهاز التحكم عن بعد لا يعمل | البطاريات فارغة أو تم إدخالها بشكل غير صحيح؛ وجود عائق بين جهاز التحكم عن بعد والوحدة. | Replace batteries; Ensure line of sight between remote and unit. |
10. الضمان والدعم
For warranty information and customer support, please refer to the warranty card included with your product or visit the official Acekool website. Do not attempt to repair the unit yourself, as this may void the warranty and pose safety risks. For any issues not covered in this manual, please contact Acekool customer service.
Ask a question about this manual
Ask about setup, troubleshooting, compatibility, parts, safety, or missing instructions. Manuals+ will review the question and use this page’s manual context to help answer it.