
Della 048-OPAC-6H
Della 10000 BTU Portable Air Conditioner User Manual
Model: 048-OPAC-6H | Brand: Della
1. معلومات هامة حول السلامة
Please read this manual carefully before operating your portable air conditioner. Keep this manual for future reference. Always follow basic safety precautions to reduce the risk of fire, electric shock, or injury.
- تأكد من وضع الوحدة على سطح مستوٍ ومستقر لمنع الانقلاب.
- لا تقم بتشغيل الوحدة بسلك أو قابس تالف.
- لا تدخل أصابعك أو أي أجسام في مدخل أو مخرج الهواء.
- أبقِ الجهاز بعيداً عن المواد القابلة للاشتعال واللهب المكشوف.
- افصل الوحدة دائمًا قبل التنظيف أو إجراء أي صيانة.
- لا يُقصد استخدام هذا الجهاز من قبل الأشخاص (بما في ذلك الأطفال) ذوي القدرات البدنية أو الحسية أو العقلية المحدودة، أو الذين يفتقرون إلى الخبرة والمعرفة، ما لم يتم الإشراف عليهم أو إعطائهم تعليمات فيما يتعلق باستخدام الجهاز من قبل شخص مسؤول عن سلامتهم.
2. انتهى المنتجview
The Della 10000 BTU Portable Air Conditioner is a versatile unit designed to provide cooling, heating, dehumidification, and fan functions for spaces up to 450 sq. ft. It features smart WiFi connectivity for convenient control via a mobile app, a remote control, and an intuitive soft-touch control panel.

Image: Della Portable Air Conditioner unit, remote control, and smartphone displaying the control app.
Key components include the main unit with integrated handle, exhaust hose, window installation kit, and remote control.

Image: Diagram showing the dimensions of the portable air conditioner: 12.2 inches (width) x 12.2 inches (depth) x 27.6 inches (height).
3. الإعداد
3.1 فك التعبئة
Carefully remove the unit and all accessories from the packaging. Retain the original packaging for future storage or transport. Allow the unit to stand upright for at least 24 hours before initial use to allow the refrigerant to settle.
3.2 التنسيب
Place the air conditioner on a firm, level surface in a location that allows for proper air circulation. Ensure there is at least 20 inches (50 cm) of space from walls or other objects to allow for adequate airflow around the unit.
3.3 تركيب مجموعة النوافذ
The included window kit is designed for easy installation in both horizontal and vertical sliding windows. No drilling is required.

Image: Diagrams illustrating the installation of the window kit in both horizontal and vertical sliding windows, showing compatibility with window openings from 25.5 to 64.1 inches.
- Assemble the window slider kit by sliding the adjustable panels together to fit your window opening. The kit is compatible with window sizes from 25.5 to 64.1 inches.
- Secure the panels with the provided screws.
- Open the window and place the assembled window kit into the window frame. Extend the panels to fit snugly and close the window against the kit to secure it.
- Ensure the window kit is sealed properly to prevent air leakage. Use foam seals if necessary.
3.4 وصلة خرطوم العادم
- Attach the exhaust hose connector to one end of the exhaust hose.
- قم بتوصيل محول مجموعة النافذة بالطرف الآخر من خرطوم العادم.
- Insert the exhaust hose connector into the exhaust outlet on the back of the air conditioner unit.
- Insert the window kit adapter into the opening on the window slider kit.
- تأكد من إحكام جميع التوصيلات لمنع دخول الهواء الساخن إلى الغرفة مرة أخرى.
3.5 توصيل الطاقة
Plug the power cord into a grounded 115V/60Hz electrical outlet. Do not use extension cords or power strips.
4. تعليمات التشغيل
4.1 لوحة التحكم
The unit features an intuitive soft-touch control panel on the top of the unit.
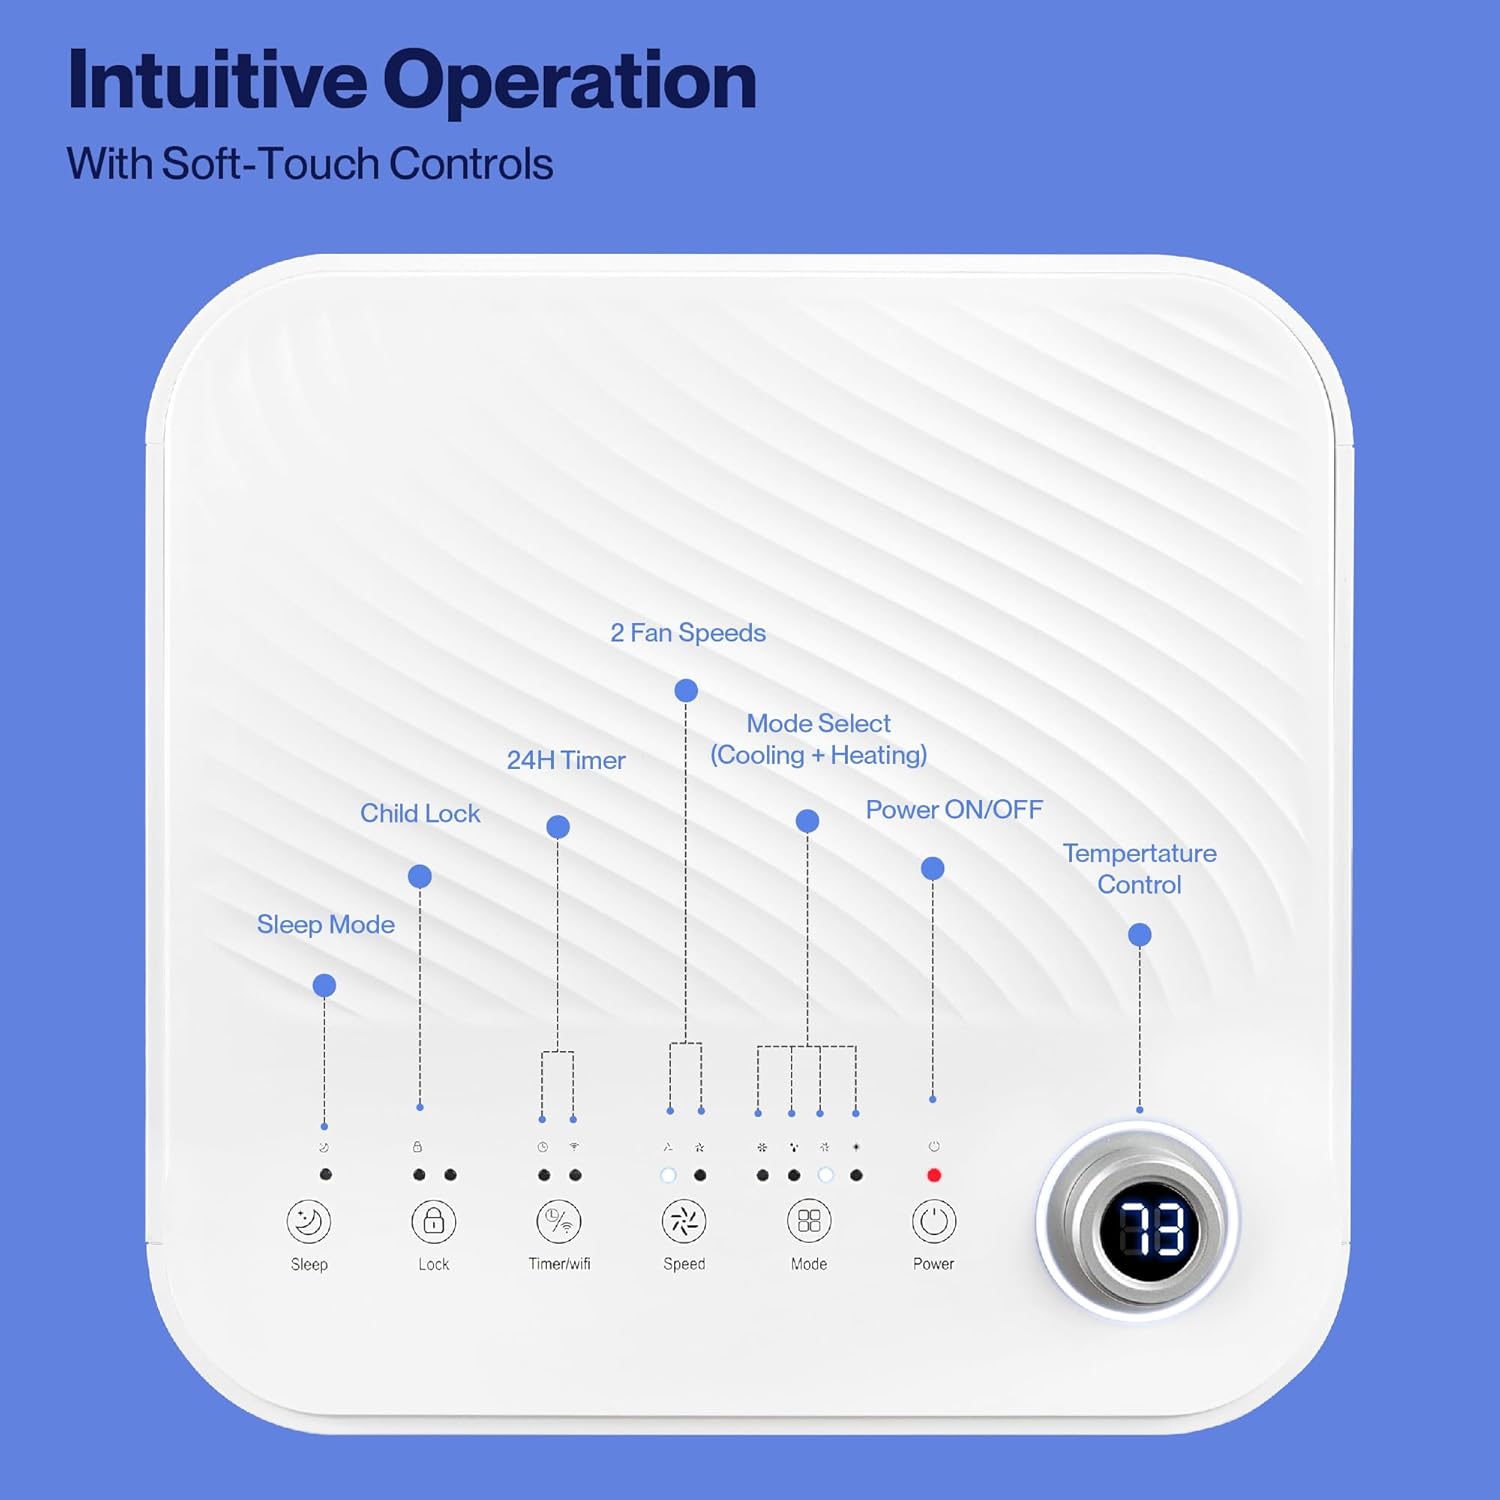
Image: Detailed diagram of the control panel with labels for each button: Sleep, Child Lock, Timer/WiFi, Fan Speed, Mode Select (Cooling + Heating), Power ON/OFF, and Temperature Control with digital display.
- تشغيل/إيقاف الطاقة: اضغط لتشغيل الوحدة أو إيقاف تشغيلها.
- وضع اختيار: Cycle through Cooling, Heating, Dehumidification, Ventilation (Fan), and Sleep modes.
- التحكم في درجة الحرارة: استخدم الأسهم لأعلى/لأسفل لضبط درجة الحرارة المطلوبة.
- سرعة المروحة: Select between 2 fan speeds (Low, High).
- المؤقت: اضبط مؤقتًا لمدة 24 ساعة للتشغيل/الإيقاف التلقائي.
- قفل الطفل: يقوم بتفعيل أو تعطيل وظيفة قفل الأطفال.
- وضع السكون: يقوم بتفعيل وضع السكون لتشغيل أكثر هدوءًا وضبط درجة الحرارة تدريجيًا.
4.2 التحكم عن بعد
The unit comes with a remote control for convenient operation from a distance. All functions available on the control panel can be accessed via the remote.
4.3 WiFi/Smart App Control
Control your Della Portable Air Conditioner from anywhere using the free DELLA+ app on your smartphone. The unit is compatible with Google Assistant and Amazon Alexa for voice control.

Image: A person relaxing on a couch, using a smartphone to control the air conditioner, with text indicating compatibility with Google Assistant and Amazon Alexa.
- Download the DELLA+ app from your smartphone's app store.
- اتبع التعليمات الموجودة داخل التطبيق لتوصيل مكيف الهواء بشبكة WiFi المنزلية لديك.
- Once connected, you can control modes, temperature, fan speed, and set schedules remotely.
The app also supports Smart Geo Location, allowing the unit to automatically turn on or off based on your proximity to home.

Image: A smartphone screen showing a map with a car icon and a notification indicating the AC unit automatically turned on due to Smart Geo Location.
5. الصيانة
Regular maintenance ensures optimal performance and extends the lifespan of your unit. Always unplug the unit before cleaning.
5.1 تنظيف مرشح الهواء
ينبغي تنظيف فلتر الهواء كل أسبوعين أو أكثر حسب الاستخدام وجودة الهواء.
- حدد موقع لوحة فلتر الهواء (عادة ما تكون في الجزء الخلفي أو الجانبي من الوحدة).
- إزالة الفلتر.
- اغسل الفلتر بالماء الدافئ والصابون. اشطفه جيدًا واتركه يجف تمامًا في الهواء قبل إعادة تركيبه.
5.2 تصريف المياه
The unit has a self-evaporating system, but in high humidity conditions, water may accumulate. The "Water-full indicator" will illuminate when the water tank needs draining.
- Place a shallow pan or tray under the drain port (located at the bottom rear of the unit).
- قم بإزالة سدادة التصريف.
- Allow all accumulated water to drain out.
- قم باستبدال سدادة التصريف بشكل آمن.
5.3 التخزين
في حالة تخزين الوحدة لفترة طويلة:
- قم بتصفية كل المياه المتراكمة.
- تنظيف فلتر الهواء.
- Run the unit in fan-only mode for a few hours to dry the interior.
- افصل سلك الطاقة وقم بلفه بشكل أنيق.
- قم بتخزين الوحدة في مكان بارد وجاف، ويفضل أن يكون ذلك في عبوتها الأصلية.
6. استكشاف الأخطاء وإصلاحها
راجع هذا القسم للتعرف على المشكلات الشائعة وحلولها.
| مشكلة | السبب المحتمل | حل |
|---|---|---|
| الوحدة لا تعمل | No power; Power cord unplugged; Circuit breaker tripped; Water tank full | Check power outlet; Plug in power cord; Reset circuit breaker; Drain water tank |
| الوحدة لا تبرد بشكل فعال | Air filter dirty; Exhaust hose not properly installed; Room too large; Doors/windows open; Temperature setting too high | Clean air filter; Ensure exhaust hose is sealed; Close doors/windows; Lower temperature setting |
| الوحدة صاخبة | Unit not on level surface; Air filter dirty; Obstruction in fan | Place unit on level surface; Clean air filter; Check for obstructions |
| تسرب المياه | Drain plug loose or missing; Unit tilted | قم بتأمين سدادة التصريف؛ وتأكد من أن الوحدة مستوية. |
| مشاكل في اتصال الواي فاي | Incorrect WiFi password; Unit too far from router; Router issues | Verify password; Move unit closer to router; Restart router |
إذا استمرت المشكلة بعد تجربة هذه الحلول، فيرجى الاتصال بدعم العملاء.
7. المواصفات
| ميزة | مواصفة |
|---|---|
| رقم الموديل | 048-أوباك -6 ح |
| سعة التبريد | 10000 وحدة حرارية بريطانية |
| منطقة التغطية | تصل إلى 450 قدم مربع قدم. |
| الوظائف | Cooling, Heating, Dehumidifier, Fan, Sleep Mode |
| المجلدtage | 115 فولت |
| مستوى الضوضاء | 54 ديسيبل |
| مادة التبريد | ر 410 أمبير |
| الأبعاد (الطول × العرض × الارتفاع) | 12.2 × 12.2 × 27.6 بوصة |
| مادة | بلاستيك ايه بي اس |
| المميزات الخاصة | Portable, Dehumidifier, WiFi Enabled, Remote Control, Built-in Handle, 24-hour timer, Child Lock |
8. الضمان ودعم العملاء
For warranty information or technical assistance, please refer to the warranty card included with your product or visit the official Della website. You may also contact Della customer support directly for further assistance with troubleshooting or parts replacement.
Ask a question about this manual
Ask about setup, troubleshooting, compatibility, parts, safety, or missing instructions. Manuals+ will review the question and use this page’s manual context to help answer it.