
1. المقدمة
Thank you for choosing the Xigmatek Lux M Micro-ATX Mini Tower PC Case. This manual provides detailed instructions for the installation, operation, and maintenance of your new PC chassis. Please read this manual carefully before beginning the assembly process to ensure proper installation and to maximize the performance and longevity of your system.
The Lux M case is designed to offer a robust and aesthetically pleasing housing for your computer components, featuring a tempered glass side panel, a metallic front panel with a unique cut-out pattern, and pre-installed fixed RGB fans for optimal cooling and visual appeal. It supports Micro-ATX and Mini-ITX motherboards and is compatible with various cooling solutions, including water cooling.
2. معلومات السلامة
يرجى مراعاة احتياطات السلامة التالية أثناء التركيب والتشغيل:
- افصل دائمًا مصدر الطاقة من مقبس الحائط قبل تركيب أو إزالة أي مكونات لمنع حدوث صدمة كهربائية.
- Handle all components with care. Avoid touching circuit boards directly; hold them by their edges.
- Wear an anti-static wrist strap when handling sensitive electronic components to prevent electrostatic discharge (ESD) damage.
- Keep the case and components away from liquids, excessive heat, and direct sunlight.
- تأكد من وجود تهوية مناسبة حول علبة الكمبيوتر لمنع ارتفاع درجة الحرارة.
- احفظ الأجزاء الصغيرة والبراغي بعيداً عن متناول الأطفال.
3. محتويات العبوة
Verify that all items are present in your package. If any items are missing or damaged, please contact your retailer.
- Xigmatek Lux M Micro-ATX Mini Tower PC Case
- صندوق الملحقات (يحتوي على براغي، وفواصل، وربطات كابلات، وما إلى ذلك)
- دليل المستخدم (هذا المستند)
4. انتهى المنتجview
Familiarize yourself with the various parts of your Xigmatek Lux M PC case.
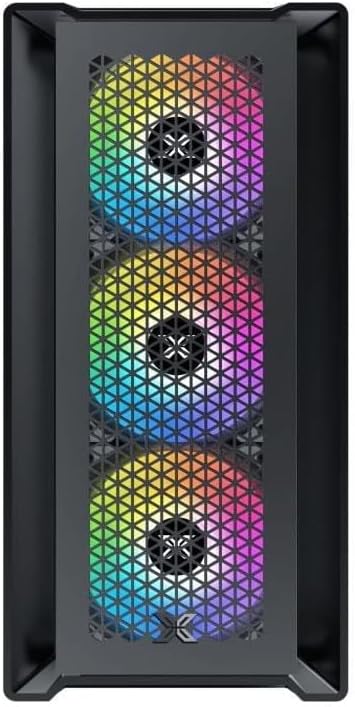
الشكل 4.1: الجبهة View. This image displays the front of the Xigmatek Lux M case, highlighting the metallic mesh panel with a triangular design and the three pre-installed 120mm fixed RGB fans.

Figure 4.2: Angled Top-Front View. This perspective shows the tempered glass side panel, offering a clear view of the interior, and the top panel with its I/O ports (USB, audio) and power button.
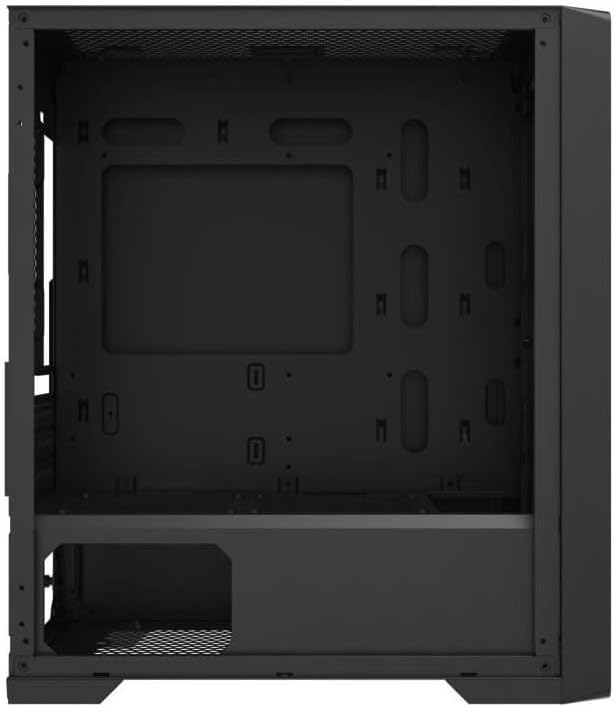
الشكل 4.3: التصميم الداخلي. The internal structure of the case, featuring the motherboard mounting tray, cutouts for cable management, and the power supply shroud at the bottom.
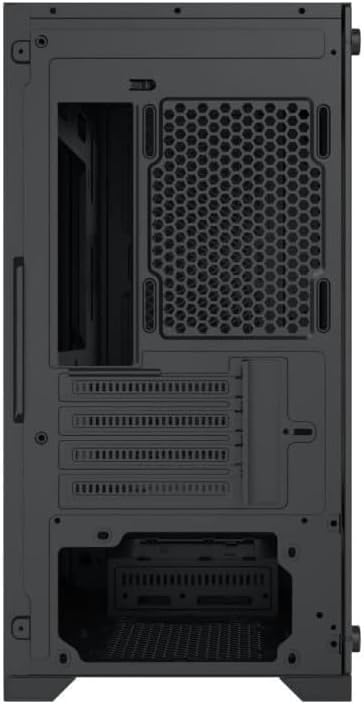
الشكل 4.4: خلفي View. This image illustrates the rear of the case, including the expansion slots for graphics cards and other add-in cards, the rear fan mounting area, and the power supply mounting bracket.
5. الإعداد والتثبيت
Follow these steps to install your computer components into the Xigmatek Lux M case.
5.1. إعداد القضية
- ضع العلبة على سطح مستوٍ وثابت.
- Remove the tempered glass side panel by unscrewing the thumb screws and carefully lifting it off. Set it aside on a soft, non-abrasive surface.
- Remove the opposite steel side panel by unscrewing the thumb screws and sliding it backward.
5.2. تركيب اللوحة الأم
The Lux M supports Micro-ATX and Mini-ITX motherboards.
- قم بتركيب غطاء منافذ الإدخال/الإخراج (إذا لم يكن مثبتًا مسبقًا على اللوحة الأم) في الفتحة الخلفية للهيكل.
- Align the motherboard with the pre-installed standoffs. Ensure all screw holes on the motherboard match the standoffs.
- ثبّت اللوحة الأم باستخدام براغي اللوحة الأم المرفقة. لا تفرط في إحكام ربطها.
5.3. تركيب وحدة إمداد الطاقة (PSU)
The PSU mounts at the rear bottom of the case.
- Slide the PSU into its designated compartment from the rear of the case.
- Align the PSU's screw holes with the holes on the case's rear panel.
- قم بتأمين وحدة إمداد الطاقة باستخدام البراغي المرفقة.
5.4. Storage Drive Installation (2.5"/3.5" Drives)
The case supports 2x 2.5"/3.5" storage drives.
- Locate the drive cage beneath the PSU shroud or dedicated 2.5" mounting points behind the motherboard tray.
- For 3.5" HDDs, slide the drive into a drive tray (if applicable) and secure it with screws.
- For 2.5" SSDs, secure them directly to the mounting points using the provided screws.
5.5. تركيب بطاقة الرسومات (VGA) وبطاقة التوسعة
تدعم العلبة بطاقات الرسوميات التي يصل طولها إلى 320 ملم.
- قم بإزالة أغطية فتحات التوسعة اللازمة من الجزء الخلفي للعلبة.
- أدخل بطاقة الرسومات أو بطاقة التوسعة الأخرى في فتحة PCIe المناسبة على اللوحة الأم.
- Secure the card to the case using the expansion slot screws.
5.6. تركيب نظام التبريد (اختياري)
The Lux M comes with 4x 120mm X24F fixed RGB fans. It supports additional cooling options.
- مبرد وحدة المعالجة المركزية: Max height of 160mm. Install your CPU cooler according to its manufacturer's instructions.
- دعم المبرد: The case supports radiators of 360mm, 240mm, or 120mm. Refer to your radiator's manual for installation. Common mounting locations include the front and top panels.
5.7. إدارة الكابلات
استخدم فتحات توجيه الكابلات ونقاط التثبيت خلف لوحة الأم لتنظيم الكابلات. هذا يحسن تدفق الهواء والمظهر العام.
5.8. التجميع النهائي
- Once all components are installed and cables are managed, reattach the steel side panel and secure it with thumb screws.
- Carefully reattach the tempered glass side panel and secure it with thumb screws.
6. تعليمات التشغيل
After completing the installation, connect your peripherals (monitor, keyboard, mouse) and power cable to the PC. Press the power button located on the top panel of the case to start your system.
The pre-installed X24F RGB fans feature fixed RGB lighting, which will illuminate automatically upon system power-on. No additional software or controller is required for their basic operation.
Ensure that the case's ventilation is not obstructed to maintain optimal airflow and cooling performance.
7. الصيانة
تساعد الصيانة المنتظمة على ضمان طول عمر وأداء مكونات جهاز الكمبيوتر الخاص بك على النحو الأمثل.
- تنظيف الغبار: نظّف فلاتر الغبار (إن وجدت) والجزء الداخلي من الجهاز بشكل دوري باستخدام الهواء المضغوط أو فرشاة ناعمة. تراكم الغبار قد يعيق تدفق الهواء ويؤدي إلى ارتفاع درجة الحرارة.
- التنظيف الخارجي: امسحي الأسطح الخارجية بقطعة ناعمة ، دamp cloth. Avoid harsh chemicals that may damage the finish or tempered glass.
- الزجاج المقسّى: Clean the tempered glass panel with a glass cleaner and a microfiber cloth to avoid scratches and streaks.
8. استكشاف الأخطاء وإصلاحها
إذا واجهت مشكلات أثناء التثبيت أو بعده، ففكر في خطوات استكشاف الأخطاء وإصلاحها الشائعة التالية:
- لا يوجد طاقة:
- تأكد من توصيل كابل الطاقة بشكل آمن بكل من وحدة تزويد الطاقة ومأخذ الحائط.
- Check that the PSU switch is in the 'ON' position.
- تأكد من أن كابل مفتاح الطاقة في اللوحة الأمامية متصل بشكل صحيح بموصل اللوحة الأمامية للوحة الأم.
- Fans Not Spinning / RGB Not Lighting:
- Ensure all fan power cables are securely connected to the motherboard or a fan controller.
- For RGB, confirm that any necessary RGB headers are connected to the motherboard (though the included fans are fixed RGB and should light up with power).
- لا يوجد إخراج للعرض:
- Verify that your monitor cable is connected to the graphics card (if installed) and not the motherboard's integrated graphics port.
- أعد تركيب بطاقة الرسومات في فتحة PCIe الخاصة بها.
- ارتفاع درجة الحرارة:
- Ensure all case fans are spinning and oriented correctly for optimal airflow (intake/exhaust).
- قم بتنظيف أي مرشحات للغبار والمكونات الداخلية.
- تأكد من أن مبرد وحدة المعالجة المركزية مثبت بشكل صحيح ويتصل جيداً بوحدة المعالجة المركزية.
For more complex issues, consult your component manuals or seek assistance from Xigmatek support or a qualified technician.
9. المواصفات
| ميزة | مواصفة |
|---|---|
| ماركة | زيغماتيك |
| اسم الموديل | Lux M |
| رقم الموديل | EN48540 |
| نوع الحالة | برج صغير |
| التوافق مع اللوحة الأم | Micro-ATX ، Mini-ITX |
| مادة | Tempered Glass (side panel), Metal (front panel) |
| لون | أسود |
| مراوح مثبتة مسبقًا | 4 x 120mm X24F Fixed RGB Fans |
| دعم المبرد | 360 ملم، 240 ملم، 120 ملم |
| أقصى ارتفاع لمبرد وحدة المعالجة المركزية | 160 ملم |
| الحد الأقصى لطول VGA | 320 ملم |
| أقصى طول PSU | 165 ملم |
| حجرات التخزين | 2x 2.5"/3.5" |
| المميزات الخاصة | RGB Lighting, Triangular Mesh Front Design |
10. الضمان والدعم
Xigmatek products are manufactured to the highest quality standards. For warranty information and technical support, please refer to the warranty card included with your product or visit the official Xigmatek webيرجى الاحتفاظ بإثبات الشراء الخاص بك للمطالبة بالضمان.
For further assistance, you may contact Xigmatek customer support through their official channels.