
1. المقدمة
The Dongar Dashcam Power Adapter provides a clean, plug-and-play power solution for your dashcam or other USB-powered devices by utilizing the existing wiring in your vehicle's rearview mirror. This adapter eliminates the need for messy cables running from the cigarette lighter or fuse box, offering a factory-installed appearance.

Image: The Dongar Dashcam Power Adapter (10-pin Type H) unit.
2. ماذا يوجد في الصندوق
Your Dongar Dashcam Power Adapter kit includes the following components:
- One (1) Dongar Dash Cam Power Adapter with built-in USB module and 10-pin Type H harness.
- One (1) short USB-C cable for powering modern dash cams.
- Pry tool for installation.

Image: The Dongar Dashcam Power Adapter, 10-pin Type H harness, and included USB-C cable.
3. توافق السيارة
This adapter is designed for select Hyundai and Kia models. It requires an auto-dimming or powered rearview mirror (e.g., mirrors with garage buttons). The adapter is غير متوافق with Hyundai Ioniq 5, EV6, or vehicles equipped with digital mirrors.
To confirm compatibility, please refer to the detailed compatibility charts below. If your vehicle is not listed, you can compare your mirror's wiring connector to the product photos to ensure the pin layout matches the adapter.
3.1. Hyundai Compatibility Chart

Image: Hyundai 10-pin Type H Compatibility Chart (Part 1 of 2), listing models, trims, and years.
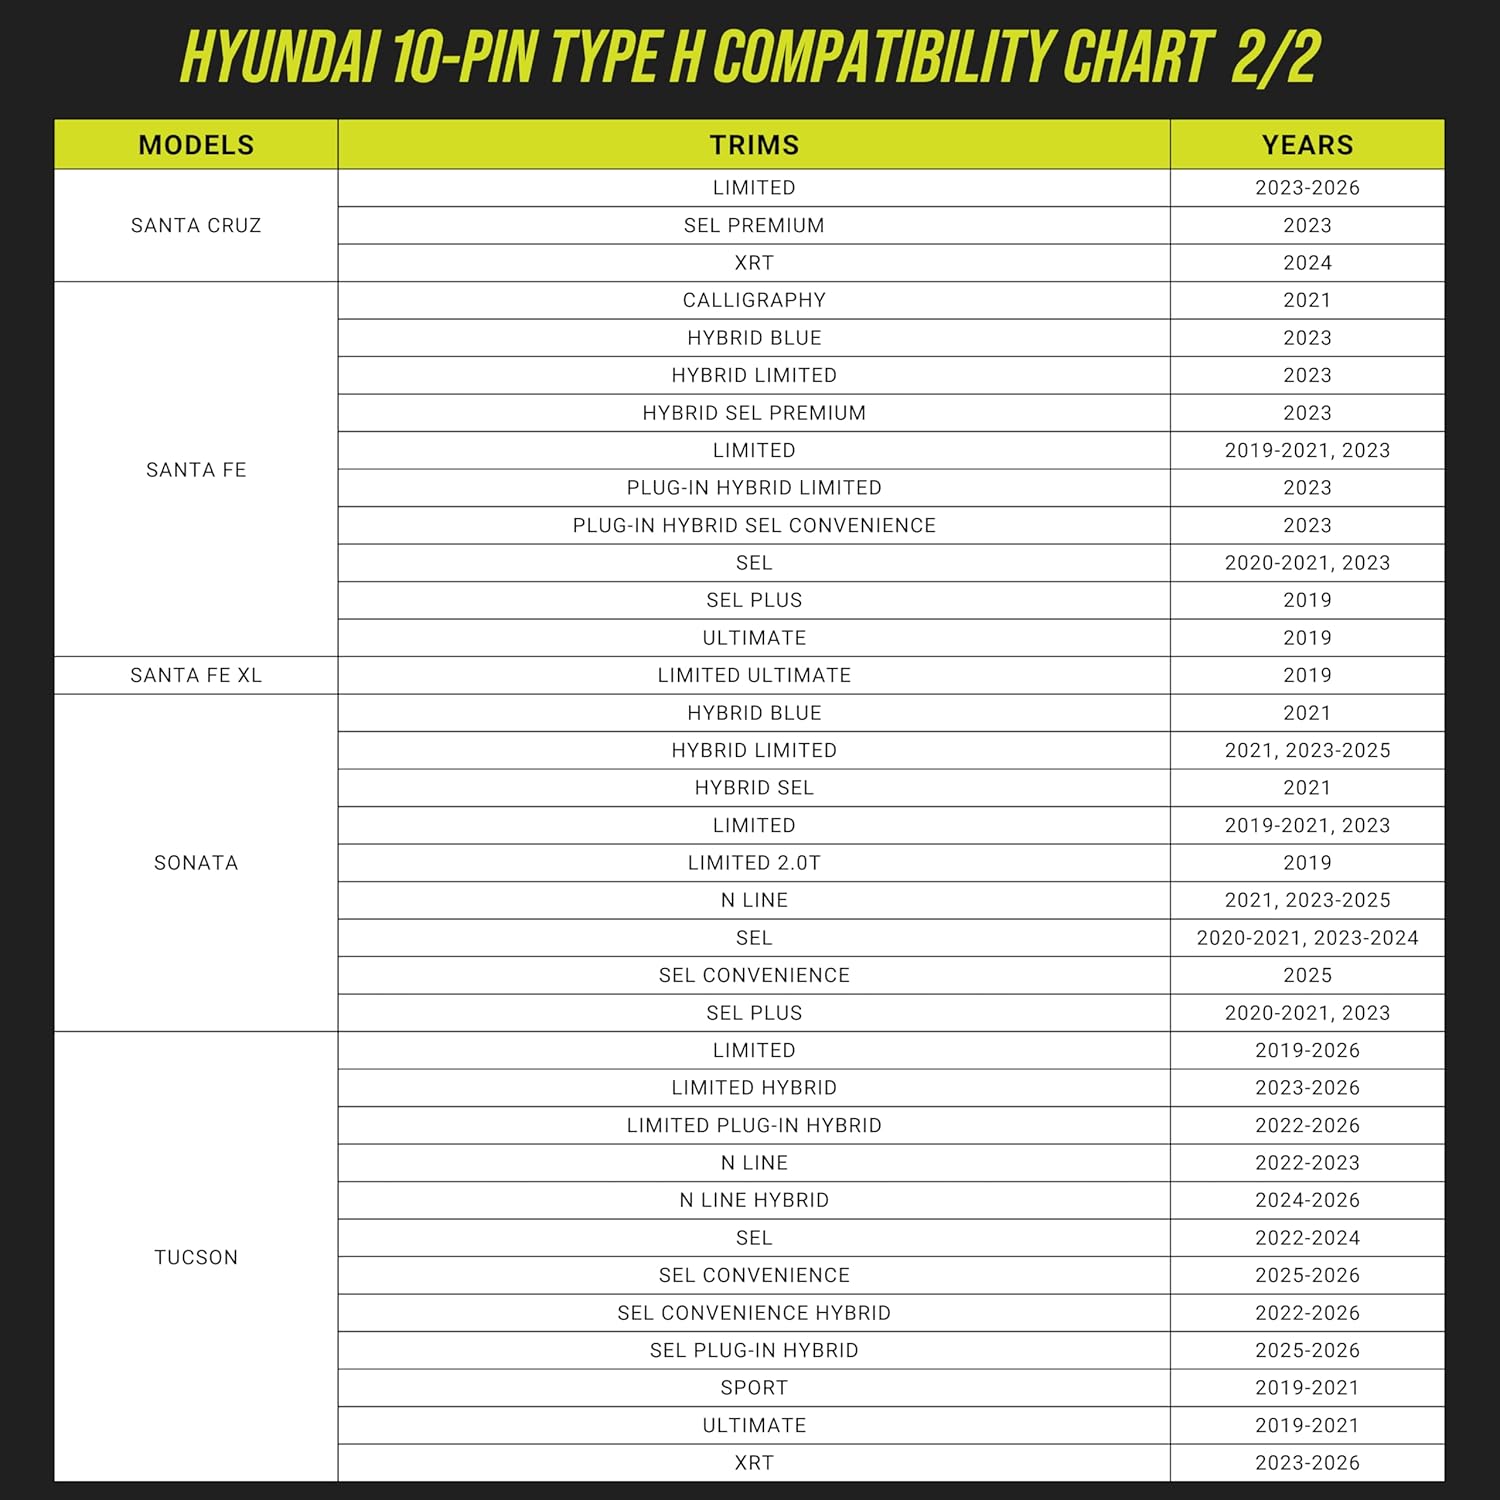
Image: Hyundai 10-pin Type H Compatibility Chart (Part 2 of 2), listing additional models, trims, and years.
3.2. Kia Compatibility Chart

Image: Kia 10-pin Type H Compatibility Chart (Part 1 of 4), listing models, trims, and years.

Image: Kia 10-pin Type H Compatibility Chart (Part 2 of 4), listing additional models, trims, and years.
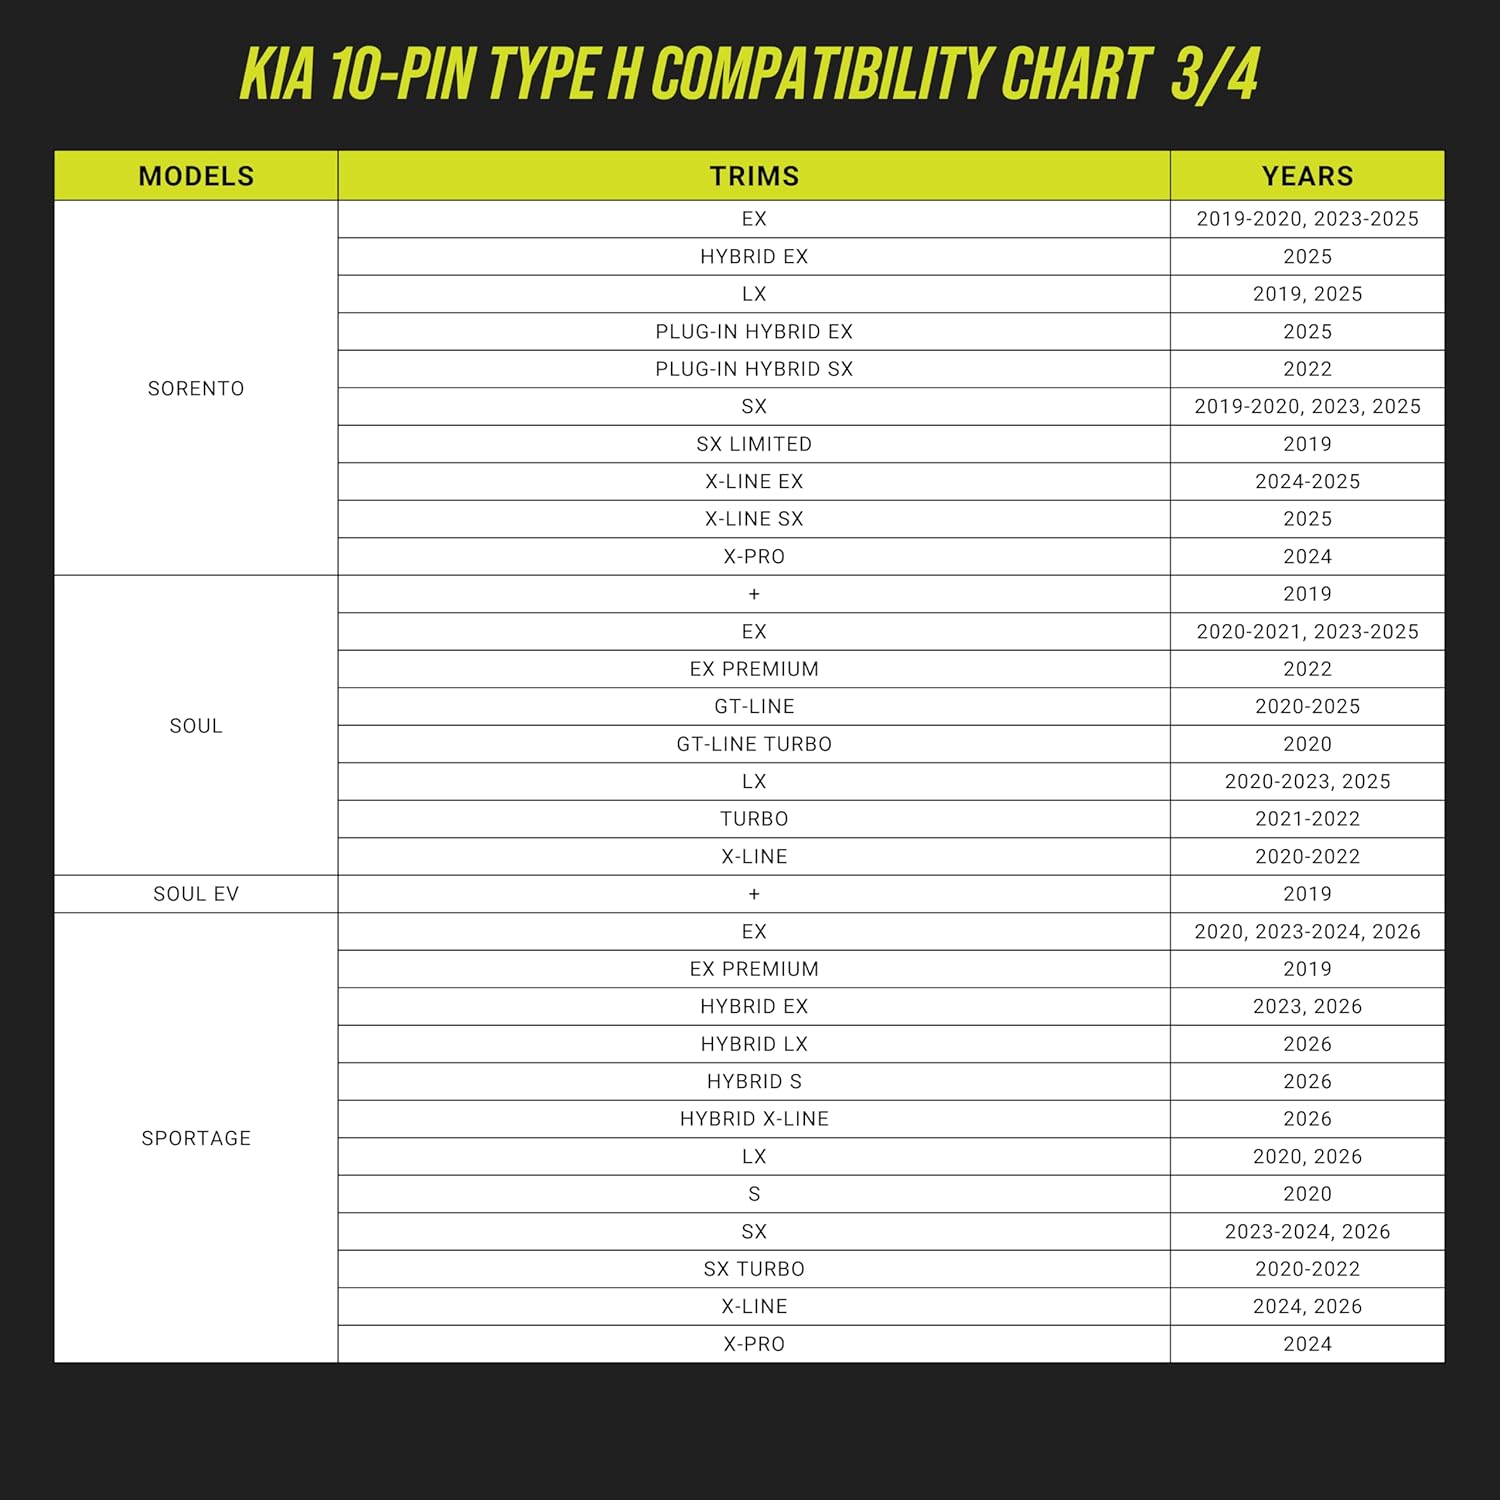
Image: Kia 10-pin Type H Compatibility Chart (Part 3 of 4), listing additional models, trims, and years.

Image: Kia 10-pin Type H Compatibility Chart (Part 4 of 4), listing additional models, trims, and years.
4. الإعداد والتثبيت
The Dongar Dashcam Power Adapter is designed for a fast and easy plug-and-play installation. No permanent modifications to your vehicle's wiring are required.
- حدد موقع الخلفيةview Mirror Wiring: Carefully remove the plastic cover or shroud around your rearview mirror arm to expose the wiring harness. Use the included pry tool to avoid damaging trim.
- افصل الموصل الأصلي: Disconnect the existing wiring connector from the rearview مرآة.
- Connect Dongar Adapter: Plug the vehicle's original wiring connector into one end of the Dongar adapter's 10-pin Type H harness. Then, plug the other end of the Dongar adapter's harness into the rearview مرآة.
- محول آمن: Use the included adhesive tape to mount the adapter in a discreet location, such as behind the rearview mirror or within the headliner. Ensure it is secure and does not obstruct your view.
- Connect Dashcam: Plug your dashcam's USB-C power cable into the USB-C port on the Dongar adapter.
- استبدال الغطاء: Carefully reattach the plastic cover or shroud around the rearview mirror. Ensure all wires are neatly tucked away for a clean, factory-installed look.

Image: Illustration of connecting the Dongar adapter during installation.

Image: A dashcam connected to the Dongar adapter, showing a clean installation.
5. تعليمات التشغيل
The Dongar Dashcam Power Adapter is designed for simple, automatic operation:
- تشغيل / إيقاف تشغيل تلقائي: The adapter powers your dashcam or accessory only when the vehicle's ignition is ON. This prevents battery drain when the vehicle is off.
- No Parking Mode: This adapter is not designed for parking mode or constant power applications. For continuous power, a separate hardwiring kit connected to the fuse box would be required.
- توافق الجهاز: The adapter converts vehicle power to USB-C, providing reliable power for USB-powered dashcams (e.g., Garmin Mini 2, Mini 3, Live, 47, 57, 67W, Vantrue N2 Pro, N4, N5, Fitcam) and other USB-powered devices like radar detectors and GPS units.

Image: A dashcam discreetly installed and powered by the Dongar adapter.
6. المواصفات
| الأجهزة المتوافقة | USB-powered dash cams, radar detectors, GPS |
| نوع الموصل | يو اس بي نوع سي |
| حجم الإدخالtage | DC 12–24V ±2A Max |
| الناتج | 5V±3A, 9V±2A, 12V±1.5A (18W max) |
| قوة التوصيل نوع | 10-pin Type H |
| أبعاد العنصر (الطول × العرض × الارتفاع) | 6 × 3 × 1.5 بوصة |
| وزن العنصر | 2.88 أونصات |
| الشركة المصنعة | Dongar Technologies |
7. استكشاف الأخطاء وإصلاحها
- الجهاز لا يعمل:
- Ensure your vehicle's ignition is ON. The adapter only provides power when the ignition is active.
- Verify that your rearview mirror is auto-dimming or powered. The adapter relies on power from the mirror's wiring.
- Check all connections to ensure they are secure and fully seated.
- Confirm your dashcam or device is compatible with USB-C power and the adapter's output specifications.
- Adapter does not fit:
- Double-check your vehicle's make, model, year, and trim against the compatibility charts in Section 3.
- Visually inspect the wiring connector behind your rearview mirror and compare it to the 10-pin Type H connector on the Dongar adapter.
- الطاقة المتقطعة:
- Ensure the adapter and dashcam cables are not loose.
- Verify that the adapter is securely mounted and not subject to excessive movement.
8. الصيانة
The Dongar Dashcam Power Adapter requires minimal maintenance:
- تنظيف: Keep the adapter and its connections free from dust and debris. Use a soft, dry cloth for cleaning.
- الظروف البيئية: Avoid exposing the adapter to extreme temperatures or excessive moisture.
- فحص الكابلات: Periodically check the USB-C cable and the adapter's harness for any signs of wear or damage. Replace if necessary.