1. المقدمة
This manual provides essential information for the installation, operation, and maintenance of your Apevia ATX-GX850W Galaxy 850W 80+ Gold Certified Semi-Modular Gaming Power Supply. Please read this manual thoroughly before installation and retain it for future reference.

Figure 1: Apevia ATX-GX850W Galaxy 850W Power Supply
The Apevia Galaxy 850W Power Supply is designed to deliver reliable and efficient power to your computer system. It features an 80+ Gold certification for high efficiency, a semi-modular cable design for improved cable management, and various protection mechanisms to safeguard your components.
2. معلومات السلامة
- Always disconnect the power cord from the wall outlet before installing, removing, or cleaning the power supply.
- This power supply is designed for use in personal computers only. Do not use it for any other purpose.
- لا تفتح وحدة إمداد الطاقة. مستوى الصوت مرتفعtagقد تكون هناك مكونات موجودة بالداخل، وفتح الوحدة سيؤدي إلى إبطال الضمان.
- تأكد من التأريض المناسب لمنع حدوث صدمة كهربائية.
- Keep the power supply away from moisture, extreme temperatures, and direct sunlight.
- قم بتثبيت مصدر الطاقة في منطقة جيدة التهوية لمنع ارتفاع درجة الحرارة.
3. محتويات العبوة
تأكد من وجود جميع العناصر في العبوة:
- Apevia ATX-GX850W Galaxy 850W Power Supply Unit
- سلك الطاقة المتردد
- Modular Cable Set (including 20/24pin Main Power, P8(4+4P) ESP 12V, 8(6+2)pin PCI-E, SATA, Peripheral, Floppy connectors)
- مسامير التثبيت
- دليل المستخدم (هذا المستند)
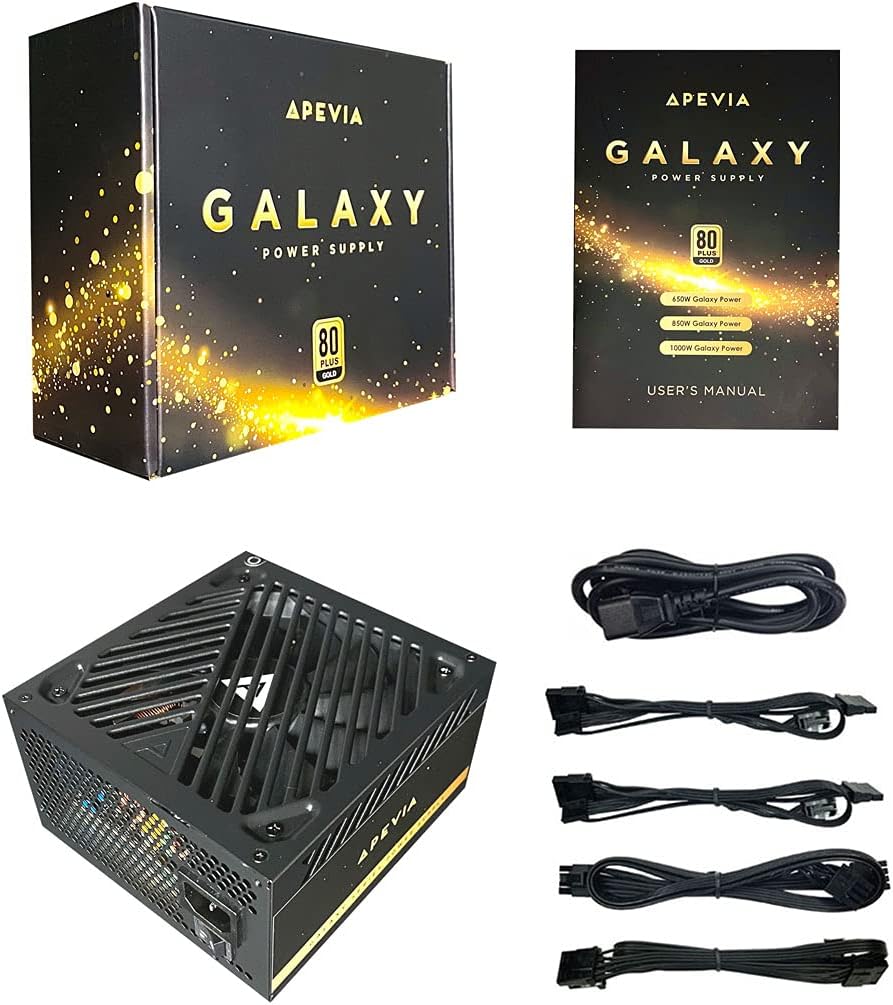
Figure 2: Power Supply Unit, Box, and Included Cables
4. مواصفات المنتج
- 850W 80+ Gold Certified: Ensures high power efficiency (90%+ efficiency) at 20-100% load levels, reducing heat generation and electricity consumption.
- قشرة الفص الجبهي النشطة: Power Factor Correction of 99% for stable power delivery.
- Semi-Modular Design: يسمح بتوصيل الكابلات الضرورية فقط، مما يحسن تدفق الهواء وإدارة الكابلات داخل علبة الكمبيوتر.
- Auto-Thermally Controlled 135mm Fan: Features a quiet black fan that adjusts its speed based on the power supply's temperature, ensuring optimal cooling and reduced noise.
- Heavy Duty Protections: Includes Short-Circuit Protection (SCP), Over-Voltage Protection (OVP), Over-Power Protection (OPP), and Under-Voltage Protection (UVP) to safeguard your system components.
- Double Forward Converter Design: Enhances stability and efficiency.
- التوافق الواسع: Supports ATX 12V 2.3 Version, Dual/Quad Core CPUs, SLI/Crossfire configurations, and Haswell processors.
- Large Japanese Capacitor: Provides enhanced reliability and performance.
- Single +12V Output: Delivers strong, stable power for high-performance components.
- حجم تلقائيtagهـ-التبديل: Automatically switches between 110V and 230V depending on the power grid.
5. دليل التثبيت
5.1 قائمة التحقق من التثبيت المسبق
- تأكد من أن علبة الكمبيوتر الخاصة بك متوافقة مع وحدات تزويد الطاقة من نوع ATX.
- Gather necessary tools: screwdriver, zip ties or cable management straps.
- Unplug your computer from the wall outlet and discharge any residual power by pressing the power button a few times.
5.2 التثبيت المادي
- افتح علبة الكمبيوتر الخاص بك.
- Locate the power supply mounting bay, typically at the top or bottom rear of the case.
- Carefully slide the Apevia ATX-GX850W into the bay, ensuring the fan is oriented correctly (usually facing downwards or inwards, depending on case design).
- قم بتثبيت وحدة التزويد بالطاقة في الهيكل باستخدام براغي التثبيت المرفقة.
5.3 اتصالات الكابلات
The Apevia ATX-GX850W is a semi-modular power supply. Connect only the cables required for your system components. Refer to your motherboard and component manuals for specific connection points.
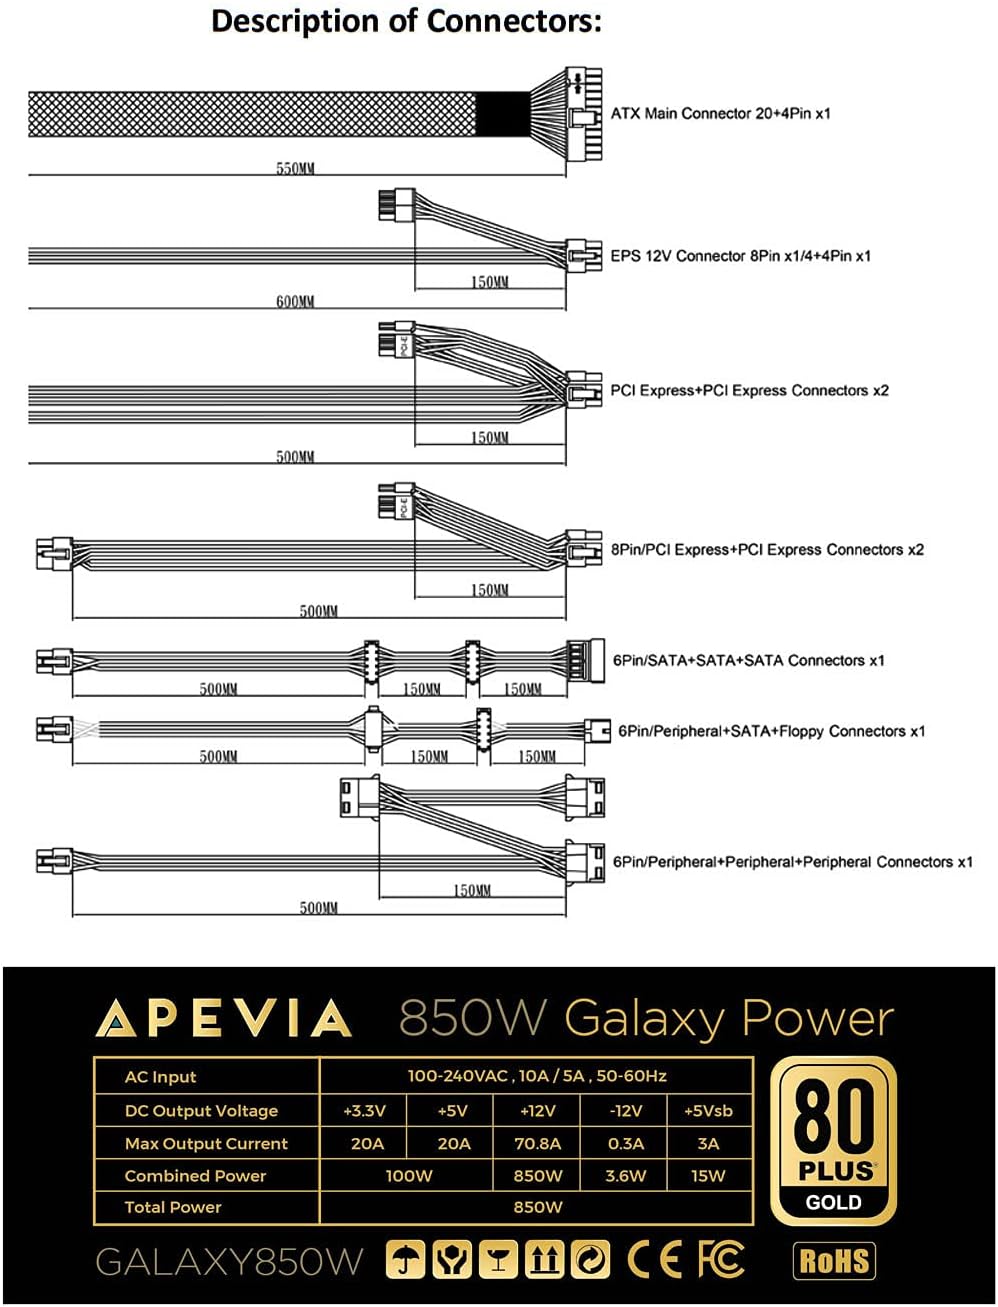
Figure 3: Description of Connectors

Figure 4: Modular Cable Ports
- 20/24-pin Main Power Connector: Connect this to your motherboard. The 24-pin connector can be split into 20+4 pins for motherboards requiring a 20-pin connector.
- P8 (4+4P) EPS 12V Connector: Connect this to your motherboard's CPU power input. The 8-pin connector can be split into 4+4 pins for motherboards requiring a 4-pin connector.
- 8 (6+2)pin PCI-E Connectors: Connect these to your graphics card(s). The 8-pin connector can be split into 6+2 pins for graphics cards requiring a 6-pin connector.
- موصلات ساتا: قم بتوصيلها بأجهزة SATA مثل محركات الأقراص SSD ومحركات الأقراص الصلبة ومحركات الأقراص الضوئية.
- الموصلات الطرفية (Molex): Used for older peripherals or case fans.
- Floppy Connector: Used for legacy floppy drives or some fan controllers.
IMPORTANT: The power supply will not power on simply by connecting the power cord to both the power supply and wall outlet. Ensure that all the power supply cables are properly connected to the PC for it to power on.
5.4 توصيل الطاقة
- Once all internal connections are made, close your computer case.
- Connect the AC power cord to the power supply's input socket.
- قم بتوصيل الطرف الآخر من سلك الطاقة المترددة بمقبس حائط مؤرض.
- Flip the power switch on the back of the power supply to the 'ON' position.

Figure 5: Power Supply Rear Panel with AC Input and Switch
6. تعليمات التشغيل
After successful installation, you can power on your computer. The power supply's 135mm fan will automatically adjust its speed based on the internal temperature, providing efficient cooling while minimizing noise.
To power off your computer, use the operating system's shutdown function. For a complete power cycle, you can also switch off the power supply using the switch on its rear panel after the system has shut down.
7. الصيانة
لضمان الأداء الأمثل وطول عمر مصدر الطاقة الخاص بك:
- تنظيف: Periodically clean the exterior of the power supply and the fan grille to prevent dust buildup. Use compressed air to gently clear dust from the fan and vents. Ensure the power supply is disconnected from the wall outlet before cleaning.
- تهوية: Ensure your PC case has adequate airflow and that the power supply's fan is not obstructed.
- إدارة الكابلات: Proper cable management not only improves aesthetics but also enhances airflow, contributing to better cooling for all components, including the PSU.
8. استكشاف الأخطاء وإصلاحها
8.1 Power Supply Does Not Turn On
- تحقق من سلك الطاقة: Ensure the AC power cord is securely connected to both the power supply and a working wall outlet.
- مفتاح التشغيل: Verify that the power switch on the back of the power supply is in the 'ON' position.
- الاتصالات الداخلية: Double-check all modular cables are firmly connected to both the power supply and your computer components (motherboard, CPU, GPU, drives). A loose connection can prevent the system from powering on.
- مواضع تثبيت اللوحة الأم: Ensure your motherboard is correctly installed with stand-offs to prevent short circuits.
- Faulty Components: If the issue persists, try testing the power supply with a known working system or consult a qualified technician.
8.2 ضوضاء المروحة المفرطة
- تراكم الغبار: Clean the power supply fan and vents as described in the Maintenance section.
- التحميل الزائد: Ensure your system's power requirements do not exceed the 850W capacity of the power supply. High loads can cause the fan to spin faster.
- إعاقة: Check for any cables or objects obstructing the fan's rotation.
9. المواصفات
| ميزة | مواصفة |
|---|---|
| اسم الموديل | المجرة |
| ماركة | Apevia |
| الأجهزة المتوافقة | كمبيوتر شخصي |
| نوع الموصل | ATX, Floppy, PCI-E, SATA |
| انتاج واتtage | 850 واط |
| عامل الشكل | ايه تي اكس |
| طريقة التبريد | هواء (مروحة 135 مم) |
| أبعاد العنصر (الطول × العرض × الارتفاع) | 6.2 × 5.9 × 3.4 بوصة |
| وزن العنصر | 4.6 رطل |
| تصميم مزود الطاقة | شبه معياري |
| عدد المعجبين | 1 |
| الحد الأقصى لحجم الإدخالtage | 230 فولت |
| الحد الأدنى لحجم الإدخالtage | 110 فولت |
| System Bus Connector Type | 24 دبوس |
| رمز المنتج الموحد | 810047130796 |
| رقم الجزء Mfr | ATX-GX850W |
Output Table:
| الناتج | حاضِر |
|---|---|
| +3.3 فولت | 20 أمبير |
| +5 فولت | 20 أمبير |
| +12 فولت | 66 أمبير |
| -12 فولت | 0.3 أمبير |
| +5 فولت | 3A |
10. معلومات الضمان
The Apevia ATX-GX850W Galaxy 850W 80+ Gold Certified Power Supply typically comes with a 3-year manufacturer's warranty. Please retain your proof of purchase for warranty claims. For detailed warranty terms and conditions, refer to the official Apevia webالموقع أو الاتصال بخدمة دعم العملاء الخاصة بهم.
11. الدعم
لمزيد من المساعدة أو الدعم الفني أو view other Apevia products, please visit the official Apevia store: