
1. المقدمة
This manual provides detailed instructions for the installation, operation, and maintenance of your SECULINK 16-Channel 4K/8MP Network Video Recorder (NVR). This NVR is designed to provide a comprehensive security solution, supporting up to 16 channels of 4K (8MP) video recording from ONVIF-compliant IP cameras. It features advanced H.265+ compression, motion detection recording, and P2P remote access for convenient monitoring.
2. انتهى المنتجview
الميزات الرئيسية
- Ultra HD Video: Full 4K (3840x2160P) video viewing and recording on all 16 channels, supporting 8MP/5MP/4MP/3MP/1080p ONVIF IP cameras.
- ضغط H.265+: Enhances bandwidth and storage efficiency, providing smaller file sizes, higher definition, and longer recording times. Supports simultaneous network transmission and playback.
- تسجيل كشف الحركة: Configurable to record only when motion is detected, optimizing storage space.
- الإعداد السهل: Requires a wired connection to your router for operation and manages all connected IP cameras on your network.
- خيارات تخزين متعددة: Supports up to 6TB internal SATA HDD (sold separately) and cloud storage service (sold separately). Backup options include USB flash disk, USB DVR writer, and network.
- الوصول عن بعد عبر بروتوكول P2P: Cloud P2P function for remote viewing on smartphones, tablets, and PCs via the XMeye app.
محتويات الحزمة
- 1x SECULINK 16-Channel Network Video Recorder (NVR1616PF-4K)
- 1 × محول الطاقة
- 1 × ماوس يو اس بي
3. دليل الإعداد
3.1 الاتصالات المادية
Before powering on the NVR, ensure all necessary connections are made.
- قم بتوصيل شاشة: Use an HDMI or VGA cable to connect the NVR to a monitor or TV.
- قم بتوصيل فأرة: قم بتوصيل فأرة USB المرفقة بأحد منافذ USB الموجودة على جهاز NVR.
- إتصال شبكة: Connect the NVR's LAN port to your router using an Ethernet cable. This NVR requires a wired network connection.
- توصيل الطاقة: Connect the power adapter to the NVR's DC 12V input and then plug it into a power outlet.

Figure 3.1: NVR Rear Panel Connections
3.2 Hard Drive Installation (HDD Not Included)
The NVR supports a single SATA hard drive up to 6TB for local storage. Follow these steps to install an HDD:
- Unscrew the top cover of the NVR chassis.
- Connect the SATA data and power cables from the NVR to the corresponding ports on the hard drive.
- قم بتثبيت القرص الصلب على هيكل جهاز تسجيل الفيديو الشبكي باستخدام البراغي المرفقة.
- أعد تركيب الغطاء العلوي وثبته بالمسامير.
After installation, the NVR will typically detect the new HDD. You may need to format the HDD through the NVR's system settings before recording can begin.
3.3 تكوين الشبكة
The NVR connects to your network via an Ethernet cable. Ensure your router is functioning correctly. The NVR will typically obtain an IP address automatically via DHCP. For remote access, ensure your network allows outbound connections for the NVR's P2P service.
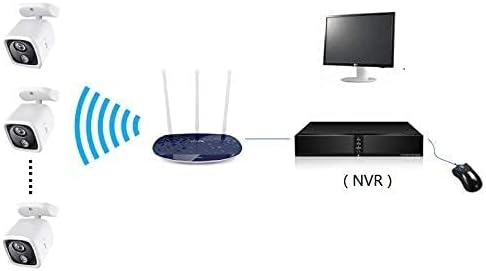
Figure 3.2: NVR Network Connection Diagram
3.4 تكامل الكاميرا
The NVR supports ONVIF-compliant IP cameras. To add cameras:
- Ensure your IP cameras are powered on and connected to the same network as the NVR.
- Access the NVR's main menu using the connected monitor and mouse.
- Navigate to the Camera Management or Channel Setup section.
- The NVR should automatically detect ONVIF cameras on the network. Select and add them, providing credentials if required.
4. تعليمات التشغيل
4.1 التنقل في واجهة المستخدم
Use the connected USB mouse to navigate the NVR's graphical user interface (GUI). Right-click to access the main menu, and left-click to select options or open sub-menus.
4.2 إدارة التسجيل
The NVR offers flexible recording options:
- التسجيل المستمر: التسجيل على مدار الساعة طوال أيام الأسبوع دون انقطاع.
- تسجيل كشف الحركة: Records only when motion is detected by the cameras, saving storage space. Configure motion detection zones and sensitivity in the NVR settings.
- التسجيل المجدول: Set specific times for recording to occur.
These modes can be configured per channel in the NVR's recording settings.

Figure 4.1: Recording Modes
4.3 الوصول عن بعد (P2P)
ل view your cameras remotely:
- تنزيل XMeye قم بتنزيل التطبيق على هاتفك الذكي أو جهازك اللوحي.
- تسجيل حساب وتسجيل الدخول.
- Add your NVR device by scanning the QR code displayed on the NVR's monitor (usually found in the P2P or Cloud settings) or by manually entering the device ID.
- بمجرد الإضافة، يمكنك view بث مباشر وإعادة تشغيل مقاطع فيديو مسجلةtagهـ من أي مكان متصل بالإنترنت.

Figure 4.2: P2P Remote Access
4.4 Video Playback and Backup
لإعادةview تم تسجيل فوtage, access the Playback menu from the NVR's main interface. You can search by time, date, event, or channel. To back up footage, connect a USB flash drive to the NVR's USB port and use the backup function in the menu.
5. الصيانة
5.1 إدارة القرص الصلب
Regularly check the status of your hard drive through the NVR's system settings. Consider backing up critical footage periodically to an external device or cloud storage. If the HDD fails, replace it following the installation steps in Section 3.2.
5.2 تحديثات النظام
التحقق بشكل دوري من الشركة المصنعة website for firmware updates. Keeping your NVR's firmware updated can improve performance, add new features, and enhance security. Follow the provided instructions carefully when performing firmware updates.
5.3 التنظيف
Ensure the NVR unit is kept in a clean, dry, and well-ventilated area. Dust can accumulate and affect performance. Use a soft, dry cloth to clean the exterior of the NVR. Do not use liquid cleaners or aerosols.
6. استكشاف الأخطاء وإصلاحها
- لا يوجد إخراج فيديو على الشاشة:
- Check HDMI/VGA cable connections to both NVR and monitor.
- Ensure the monitor is set to the correct input source.
- Verify the NVR is powered on (power indicator light should be active). - لا يوجد اتصال بالشبكة:
- Ensure the Ethernet cable is securely connected to both the NVR and the router.
- Check if your router is functioning correctly.
- Verify network settings in the NVR's menu (e.g., DHCP enabled). - Cameras Not Displaying/Recording:
- Confirm IP cameras are powered on and connected to the network.
- Check camera IP addresses and ensure they are discoverable by the NVR.
- Verify camera credentials (username/password) are correctly entered in the NVR's camera management.
- Ensure the HDD is installed and formatted correctly for recording. - الوصول عن بعد لا يعمل:
- Ensure the NVR has an active internet connection.
- Verify the P2P function is enabled in the NVR's network settings.
- Check your smartphone/tablet's internet connection.
- Ensure the correct device ID is entered in the XMeye app. - جودة الفيديو رديئة:
- Ensure cameras are set to their highest resolution (e.g., 4K/8MP).
- Check network bandwidth if experiencing lag or pixelation, especially for remote viewعمل.
7. المواصفات
| ميزة | مواصفة |
|---|---|
| رقم الموديل | NVR1616PF-4K |
| عدد القنوات | 16 |
| دقة | 16*4K 8MP |
| مخرج الفيديو | 1x VGA, 1x HDMI |
| مخرج الصوت | 1x ار سي ايه |
| منفذ الشبكة | 1x RJ45 10M/100M |
| منفذ يو اس بي | شنومكس أوسبسنومكس |
| Streaming Specification | أونفيف |
| وضع التسجيل | Manual > Alarm > Motion Detection > Timing |
| بحث الفيديو | Time, Date, Event, Channel Search |
| قوة | تيار مستمر 12 فولت |
| حجم العلبة | 260 مم × 43 مم × 190 مم (10.24 بوصة طول × 7.48 بوصة عرض × 1.69 بوصة ارتفاع) |
| واجهة القرص الصلب | SATA (Max 6TB) |
| برنامج | XMeye |
| تكنولوجيا الاتصال | إيثرنت، HDMI، USB، VGA |
| مدخل الصوت | ميكروفون |
| وزن العنصر | 1.01 كيلوغرام |
8. الضمان والدعم
For warranty information, please refer to the documentation provided with your purchase or contact SECULINK customer support directly. Technical support is available through the manufacturer's official channels. Please visit the SECULINK webموقع إلكتروني لأحدث موارد الدعم والأسئلة الشائعة ومعلومات الاتصال.