aostirmotor A20-1
AOSTIRMOTOR 500W Folding Electric Bike User Manual
الموديل: A20-1
المنتج انتهىview
The AOSTIRMOTOR 500W Folding Electric Bike is designed for adults, featuring 20"x4" fat tires suitable for various terrains. It is equipped with a 36V 13AH removable lithium battery and a powerful 500W brushless motor, offering multiple riding modes for versatile use.

Figure 1: AOSTIRMOTOR 500W Folding Electric Bike (Model A20-1)
الإعداد والتجميع
Your AOSTIRMOTOR electric bike is 95% pre-assembled. Follow the steps below for final assembly.
1. فك العلبة والتعرف على المكونات
Carefully cut the straps and open the box. Gently remove the e-bike and place it on a soft surface to prevent scratches. Identify all included accessories:
- دليل المالك
- Pedals (Left and Right marked with 'L' and 'R')
- المصباح الأمامي
- شاحن
- Assembly Toolkit (includes Allen keys 4, 5, 6 and wrenches 8/10, 13/15)
- الرفرف الأمامي
- مقعد قابل للتعديل
Video 1: How to install the A20/G20 Electric Bike? (Covers unboxing and initial assembly steps)
2. تركيب المقود
Remove all packaging from the bike. Fold the stem up and release the clamp. Remove the screw, washer, and nut. Place the handlebars onto the stem, ensuring they are aligned. Secure the handlebars with the clamp, screw, washer, and nut.
3. Display Installation
Remove the screw from the display clamp. Place the display onto the handlebar and secure it with the clamp and screw. Ensure the display is firmly attached.
4. Saddle Installation
Remove the saddle from its packaging. Insert the saddle post into the bike frame. Adjust to your desired height and tighten the quick-release clamp لتأمين السرج.
5. تركيب العجلة الأمامية
Turn the bike upside down for easier access. Remove the bolt, nuts, and plastic protective cover from the front wheel's disc brake. Align the disc brake with the caliper on the fork. Insert the front wheel into the forks, ensuring the disc brake is correctly seated. Reattach the nuts and tighten them securely using the appropriate wrench (size 15) to ensure the wheel is firmly in place.
6. تركيب الدواسة
Identify the left ('L') and right ('R') pedals. The left pedal threads counter-clockwise, and the right pedal threads clockwise. Insert the left pedal into the left crank arm and turn it counter-clockwise to tighten. Insert the right pedal into the right crank arm and turn it clockwise to tighten. Use a size 15 wrench to fully secure the pedals.
7. Front Fender and Headlight Installation
Remove the bolt and nut from the front of the fork. Slide the front fender through the forks, ensuring the front part is correctly positioned. Feed the bolt through the headlight bracket, then through the fender, and finally through the fork. Secure with the nut on the opposite side. Use an Allen key to tighten the bolt, adjusting the headlight and fender to the proper height and ensuring they do not touch the wheel. Connect the front light plug (red connector) to its corresponding slot.
8. Rear Rack Installation
Locate the mounting points on the rear of the bike frame. Attach the rear rack using the provided bolts and Allen keys. Ensure all screws are tightened securely for stability.
Video 2: How to install the A20/G20 rear rack?
9. Rear Reflector Installation
The red reflector is installed on the back of the saddle post. Loosen the screw on the reflector clamp to adjust its angle to 90 degrees. Secure the reflector clamp around the saddle post and tighten the screw to prevent it from falling off.
تعليمات التشغيل
أوضاع الركوب
The AOSTIRMOTOR A20-1 offers three distinct riding modes:
- وضع مساعدة الدواسة: Provides motor assistance as you pedal, extending your range up to 28+ miles.
- الوضع الكهربائي النقي: Engages the motor via throttle for fully electric propulsion, offering a range of 18+ miles.
- وضع الدراجة العادي: Ride as a traditional bicycle without any electric assistance.
Note: Range varies based on road conditions, weather, rider weight, and other factors.
LCD Display (866-LCD)
The HD LCD display clearly shows essential riding information:
- سرعة
- مستوى الطاقة
- المسافة المقطوعة
- Battery Electricity Level

Figure 2: 36V 13Ah Removable Lithium Battery
صيانة
تضمن الصيانة المنتظمة الأداء الأمثل وطول العمر لدراجتك الإلكترونية.
- العناية بالبطارية: The 36V 13Ah lithium battery is removable and waterproof. Charge it for 4-6 hours. Store the battery in a cool, dry place when not in use.
- ضغط الإطارات: Regularly check and maintain the recommended tire pressure for the 20"x4" fat tires. Proper inflation improves ride quality and prevents punctures.
- نظام الفرامل: Inspect disc brakes for wear and tear. Ensure brake levers are responsive and provide adequate stopping power.
- تزييت السلسلة: Keep the chain clean and lubricated, especially after riding in wet or dusty conditions.
- التفتيش العام: Periodically check all bolts, nuts, and quick-release mechanisms for tightness. Ensure all electrical connections are secure.
استكشاف الأخطاء وإصلاحها
فيما يلي بعض المشكلات الشائعة وحلولها:
- الدراجة لا تعمل: Check if the battery is properly seated and charged. Ensure the power button on the display is pressed.
- المحرك لا يساعد: Verify the riding mode is set to Pedal Assist or Pure Electric. Check battery level.
- صرير الفرامل: Clean the brake rotors and pads. If the issue persists, brake pads may need replacement or adjustment.
- ضوضاء غير عادية: افحص السلسلة والتروس والعجلات بحثًا عن أي عوائق أو أجزاء مفكوكة.
For more complex issues, please refer to the Owner's Manual or contact customer support.
تحديد
| ميزة | مواصفة |
|---|---|
| نوع الدراجة | دراجة كهربائية قابلة للطي |
| المحرك | 500W (Peak 550W) High-Speed Brushless Motor |
| السرعة القصوى | تصل إلى 25 ميلا في الساعة |
| بطارية | بطارية ليثيوم قابلة للإزالة 36 فولت 13 أمبير/ساعة |
| الإطارات | 20"x4" Wearproof Fat Tires |
| التروس | 7-Speed Shimano Transmission |
| مادة الإطار | الألومنيوم |
| نمط الفرامل | القرص |
| وزن العنصر | 74 رطل |
| توصية الوزن الأقصى | 260 رطل |
| الحجم المطوي | 35.4 × 27.6 بوصة |
| الارتفاع الموصى به | 5.2-6.3 قدم |
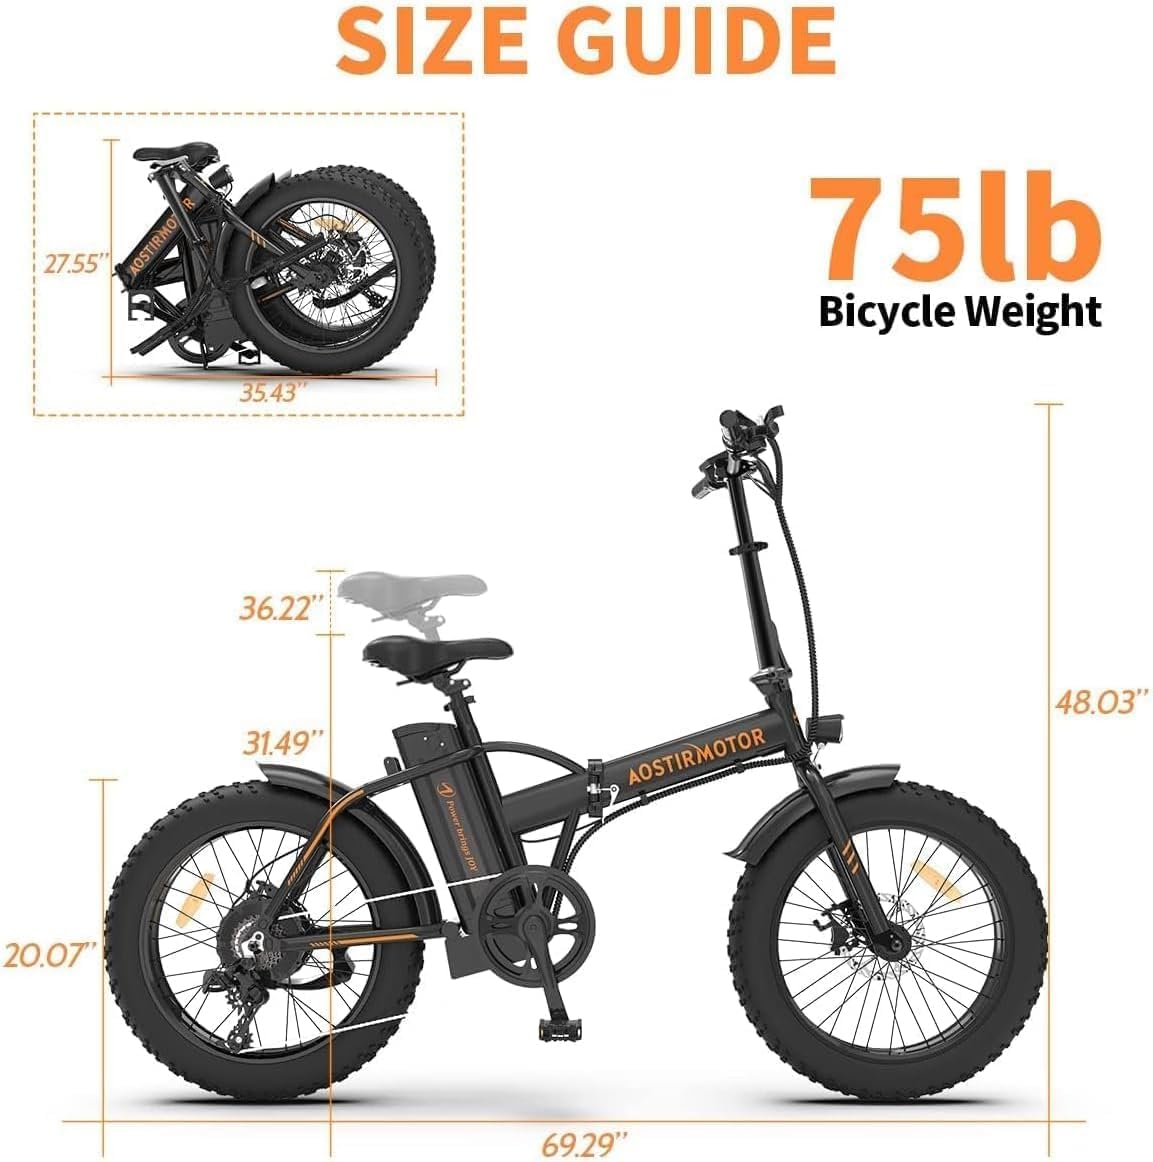
Figure 3: AOSTIRMOTOR Electric Bike Size Guide
الضمان والدعم
All AOSTIRMOTOR E-bikes come with a 365-day warranty covering the battery, motor, controller, display, and other non-wearing parts. Lifetime technical support is also provided.
الأسئلة الشائعة
- How do I finish my assembly? Our electric bikes are 95% pre-assembled. You can finish it with the installation video provided on our product page.
- How to contact the seller? You can find us directly through your order, and we will reply to you as soon as possible within 24 hours. You can also find us by email.
- ما هي سياسة الإرجاع؟ You can download the return policy and terms on our product pages. After receiving the product, please keep the box for 1 month for possible returns.
Ask a question about this manual
Ask about setup, troubleshooting, compatibility, parts, safety, or missing instructions. Manuals+ will review the question and use this page’s manual context to help answer it.