AZZA CSAZ-340F
AZZA CSAZ-340F CELESTA ATX Mid Tower Gaming Case
دليل المستخدم
1. المقدمة
This manual provides comprehensive instructions for the installation, operation, and maintenance of your AZZA CSAZ-340F CELESTA ATX Mid Tower Gaming Case. Please read this manual thoroughly before beginning installation to ensure proper setup and to maximize the performance and longevity of your system components.

الشكل 1: The AZZA CSAZ-340F CELESTA Mid Tower ATX Case, showcasing its design and form factor.
2. معلومات السلامة
- Always disconnect the power supply from the wall outlet before installing or removing any components inside the case.
- Handle all components with care to prevent damage from electrostatic discharge (ESD). Consider using an anti-static wrist strap.
- Keep the case and components away from liquids and excessive moisture.
- تأكد من وجود تهوية مناسبة حول الجهاز لمنع ارتفاع درجة الحرارة.
- Do not attempt to modify the case structure or components, as this may void your warranty and pose safety risks.
- Keep small parts and packaging materials out of reach of children.
3. محتويات العبوة
تأكد من وجود جميع العناصر المدرجة أدناه في الحزمة الخاصة بك:
- AZZA CSAZ-340F CELESTA ATX Mid Tower Gaming Case
- صندوق الملحقات (يحتوي على براغي، وفواصل، وربطات كابلات، وما إلى ذلك)
- دليل المستخدم (هذا المستند)
4. المواصفات
The following table details the technical specifications of the AZZA CSAZ-340F CELESTA case:
| ميزة | مواصفة |
|---|---|
| ماركة | عزة |
| اسم الموديل | CSAZ-340F CELESTA |
| نوع الحالة | البرج الاوسط |
| التوافق مع اللوحة الأم | ATX و Micro-ATX و Mini-ITX |
| لون | أسود |
| مادة | معدن |
| نوع تركيب مصدر الطاقة | التركيب السفلي |
| طريقة التبريد | هواء |
| Fan Size (Included/Supported) | 120mm (Rear included), Supports 120mm/140mm |
| أقصى طول GPU | 320 ملم |
| أقصى ارتفاع لمبرد وحدة المعالجة المركزية | 165 ملم |
| أقصى طول PSU | 160 ملم |
| 3.5" HDD Support | 2 |
| 2.5" SSD Support | 4/6 (depending on configuration) |
| دعم المروحة الأمامية | 3 × 120 ملم أو 3 × 140 ملم |
| أفضل دعم من الجماهير | 2 × 120 ملم أو 2 × 140 ملم |
| دعم المروحة الخلفية | 1 × 120 ملم |
| دعم الرادياتير الأمامي | Up to 280mm/360mm |
| أعلى دعم المبرد | 2 x 120mm (from image) |
| دعم الرادياتير الخلفي | 1 x 120mm (from image) |
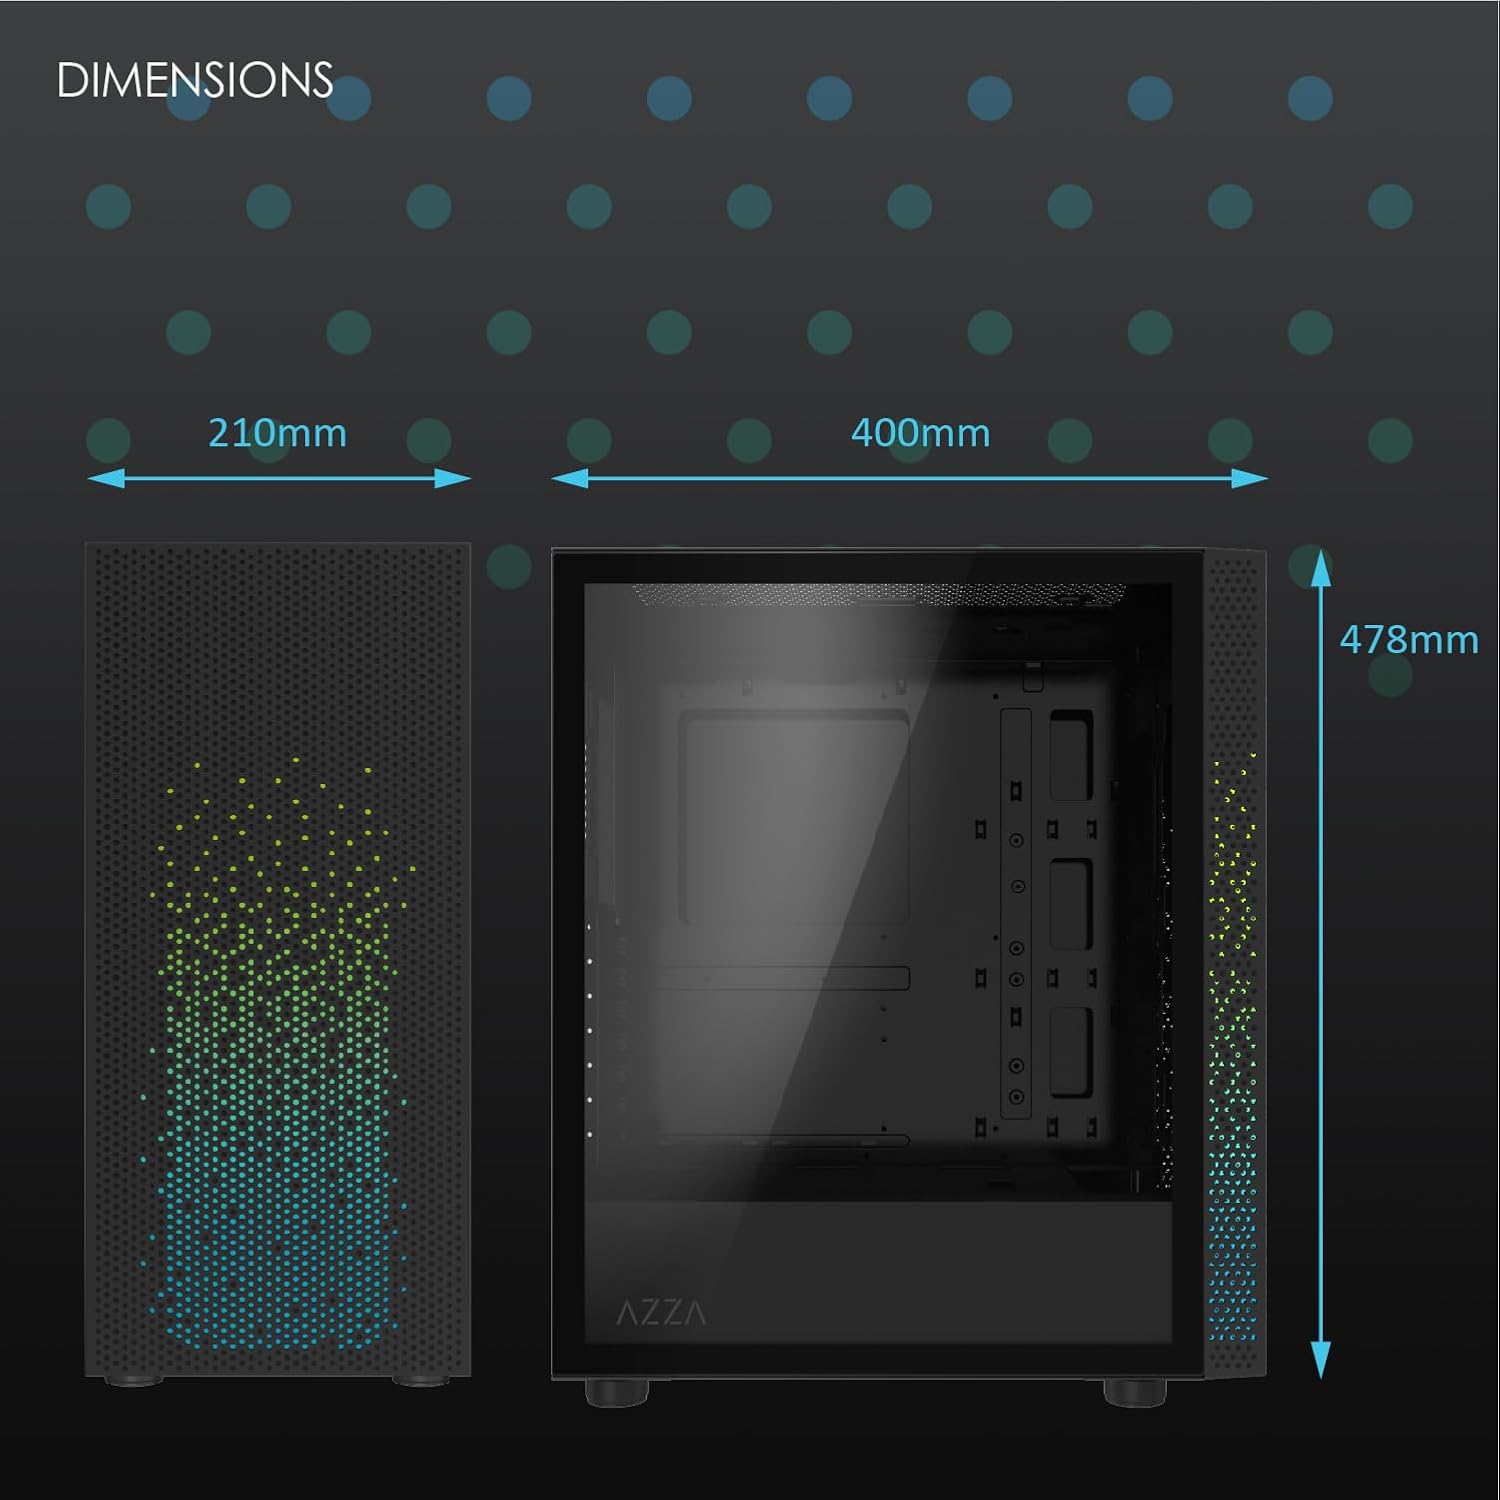
الشكل 2: Physical dimensions of the AZZA CSAZ-340F CELESTA case: 210mm (width), 400mm (depth), 478mm (height).

الشكل 3: Diagram illustrating fan and radiator mounting options for the AZZA CSAZ-340F CELESTA case, including front, top, and rear configurations.

الشكل 4: Internal component support diagram for the AZZA CSAZ-340F CELESTA, showing maximum dimensions for CPU cooler, GPU, and PSU, along with drive bay locations.
5. الإعداد والتثبيت
Follow these steps to install your components into the AZZA CSAZ-340F CELESTA case.
5.1 إعداد القضية
- ضع العلبة على سطح مستوٍ وثابت.
- Remove the side panels. Typically, these are secured with thumbscrews at the rear of the case.
5.2 تركيب اللوحة الأم
- Install the I/O shield (if not pre-installed) into the rear opening of the case.
- Ensure the correct standoffs are installed for your ATX, Micro-ATX, or Mini-ITX motherboard. Adjust or add standoffs as needed using the provided tools.
- قم بوضع اللوحة الأم بعناية على الحوامل، مع محاذاة فتحات البراغي.
- Secure the motherboard with the appropriate screws from the accessory box. Do not overtighten.
5.3 تركيب وحدة إمداد الطاقة (PSU)
- Position the PSU in the bottom rear compartment of the case, ensuring the fan faces downwards (if there's a filtered vent) or upwards.
- قم بتثبيت وحدة تزويد الطاقة في الهيكل باستخدام البراغي المرفقة من الخلف.
- قم بتمرير كابلات الطاقة اللازمة عبر فتحات إدارة الكابلات.
5.4 تثبيت محرك التخزين (HDD/SSD)
- محركات الأقراص الصلبة مقاس 3.5 بوصة: Locate the drive cage. Slide the 3.5" HDDs into the drive trays and secure them, often tool-less or with screws.
- أقراص SSD مقاس 2.5 بوصة: Mount 2.5" SSDs to the dedicated mounting points on the motherboard tray or drive cage using screws.
- Connect SATA data and power cables to the installed drives.
5.5 تثبيت بطاقة الرسومات (GPU)
- قم بإزالة أغطية فتحة PCIe الضرورية من الجزء الخلفي للعلبة.
- Carefully insert your graphics card into the appropriate PCIe slot on the motherboard until it clicks into place.
- قم بتأمين بطاقة الرسوميات بالعلبة باستخدام البراغي.
- Connect any required PCIe power cables from the PSU to the graphics card.
5.6 تركيب مبرد وحدة المعالجة المركزية
Install your CPU cooler according to its specific manufacturer instructions. Ensure it does not exceed the maximum height of 165mm.
5.7 تركيب المروحة والرادياتير
The case supports various fan and radiator configurations:
- أمام: Up to 3 x 120mm or 3 x 140mm fans, or radiators up to 280mm/360mm.
- قمة: Up to 2 x 120mm or 2 x 140mm fans, or 2 x 120mm radiators.
- مؤخرة: 1 x 120mm fan (pre-installed) or 1 x 120mm radiator.
Mount fans and radiators using the appropriate screws and ensure proper airflow direction.
5.8 إدارة الكابلات
استخدم فتحات إدارة الكابلات ونقاط التثبيت خلف لوحة الأم لتوجيه الكابلات وتأمينها. هذا يحسن تدفق الهواء والمظهر العام.
5.9 التجميع النهائي
- Double-check all connections and ensure no cables are obstructing fans.
- Reattach the side panels.
- Connect external peripherals (monitor, keyboard, mouse, etc.) and the power cable.
6. تشغيل النظام الخاص بك
Once all components are installed and connected, you can power on your system. The front panel features power and reset buttons, along with USB and audio ports for convenient access.

الشكل 5: Close-up of the AZZA CSAZ-340F CELESTA's front panel, highlighting the integrated lighting effects.
7. الصيانة
- فلاتر الغبار: Regularly clean the dust filters (if present) to maintain optimal airflow and cooling performance.
- التنظيف الداخلي: Periodically open the case and use compressed air to remove dust from components and fans. Ensure the system is powered off and unplugged before cleaning.
- التنظيف الخارجي: امسحي الأسطح الخارجية بقطعة ناعمة ، دamp قماش. تجنب المواد الكيميائية القاسية.
8. استكشاف الأخطاء وإصلاحها
إذا واجهت مشاكل، فضع في اعتبارك خطوات استكشاف الأخطاء وإصلاحها الشائعة التالية:
- النظام لا يعمل:
- تأكد من توصيل كابل الطاقة بشكل آمن بكل من وحدة تزويد الطاقة ومأخذ الحائط.
- Check that the PSU switch is in the "ON" position.
- Verify all internal power connections (24-pin ATX, 8-pin CPU, PCIe power) are seated correctly.
- Confirm front panel power button cables are correctly connected to the motherboard.
- لا يوجد إخراج للعرض:
- تأكد من توصيل شاشتك ببطاقة الرسومات (وليس بمنافذ الرسومات المدمجة في اللوحة الأم، إلا إذا كنت تستخدم رسومات مدمجة).
- أعد تركيب بطاقة الرسومات في فتحة PCIe الخاصة بها.
- تحقق من اختيار مدخلات الشاشة.
- ارتفاع درجة الحرارة:
- Verify all case fans are spinning and oriented correctly for airflow.
- قم بتنظيف أي مرشحات للغبار والمكونات الداخلية.
- Ensure CPU cooler is properly seated and making good contact with the CPU.
9. الضمان والدعم
للحصول على معلومات الضمان والدعم الفني، يرجى الرجوع إلى موقع AZZA الرسمي webيمكنك زيارة الموقع الإلكتروني أو الاتصال بخدمة عملاء AZZA مباشرةً. احتفظ بإثبات الشراء لتقديم مطالبات الضمان.
أزا الرسمية Webموقع: www.azza.com
Ask a question about this manual
Ask about setup, troubleshooting, compatibility, parts, safety, or missing instructions. Manuals+ will review the question and use this page’s manual context to help answer it.