1. المقدمة
This manual provides detailed instructions for the installation, operation, and maintenance of your OOYCYOO 100A MPPT Solar Charge Controller, model K100A. This device is designed to efficiently manage power flow from your solar panels to your battery bank, ensuring optimal charging and discharge cycles for various battery types including LiFePO4, lithium, AGM, gel, and lead-acid batteries. Please read this manual thoroughly before installation and operation to ensure safe and correct usage.
2. تعليمات السلامة
- Battery Connection First: Always connect the battery to the controller first. Never connect the solar panel array to the controller without a battery connected.
- Inverter/Wind/Alternator/Charger: Never connect any inverter, wind turbine, alternator, or external charger directly into the charge controller.
- حجم البطاريةtage: تأكد من حجم البطاريةtage is sufficient (greater than 9V) before connecting the controller.
- Max Input Power/Voltage: Do not exceed the maximum input power or voltage specified for your controller.
- التثبيت الاحترافي: For complex setups, it is recommended to guide the installation under professionals.
- تهوية: تأكد من وجود تهوية كافية حول وحدة التحكم لمنع ارتفاع درجة الحرارة.
- الماء والغبار: Protect the controller from direct exposure to water, dust, and corrosive environments.
3. مواصفات المنتج
- تقنية إم بي بي تي: Advanced Maximum Power Point Tracking (MPPT) for 15%-25% higher charging efficiency compared to ordinary solar controllers.
- توافق البطارية: Compatible with LiFePO4, lithium, AGM, gel, and lead-acid batteries.
- التعريف التلقائي: Automatically identifies 12V/24V DC system nominal voltage.
- شاشة LCD: Clear LCD display showing real-time data for solar panel voltagالتيار الكهربائي، جهد البطاريةtage/current, load status, and more.
- الحماية الشاملة: Includes overcharge, over-discharge, overload, overheat, reverse polarity, and lightning strike protection functions.
- مخرج يو اس بي: Features 2*USB 5V 2.4A outputs for charging small devices.
- مستشعر درجة الحرارة: External temperature sensor for accurate battery temperature compensation.
- منفذ الاتصالات RS485: For advanced monitoring and control (requires additional display/module).
4. Technical Specifications (Model K100A)
| المعلمة | قيمة |
|---|---|
| تيار الشحن المقدر | 100 أمبير |
| المجلد الاسمي للنظامtage | التعرف التلقائي على 12 فولت/24 فولت تيار مستمر |
| الأعلى. PV Open Circuit Voltage | 96 فولت تيار مستمر |
| 12V Battery System Max. PV Input Power | 1300W (Open Circuit Voltage ≤48V) |
| 24V Battery System Max. PV Input Power | 2600W (Open Circuit Voltage ≤96V) |
| حجم البطاريةtage المدى | 12 فولت/24 فولت |
| محطة الطاقة | 8AWG |
| أبعاد المنتج (الطول × العرض × الارتفاع) | 11.8 بوصة × 7.87 بوصة × 3.95 بوصة (30 سم × 20 سم × 10 سم) |
| وزن | 5.6 رطل (2.54 كجم) |
| نوع العرض | شاشة الكريستال السائل |
| المكونات المضمنة | USB |
5. مكونات المنتجview

This image displays the OOYCYOO MPPT Solar Charge Controller K100A with key components clearly labeled. These include the LCD Display, 5S Reset button, Solar Panel Terminal, Battery Terminal, Load Terminal, 2*USB 5V 2.4A ports, COM (RS485 Communication Port), Remote Temp Sensor input, and mounting holes. The image also highlights the wire gauge compatibility (6 AWG - 10 AWG) for connections.

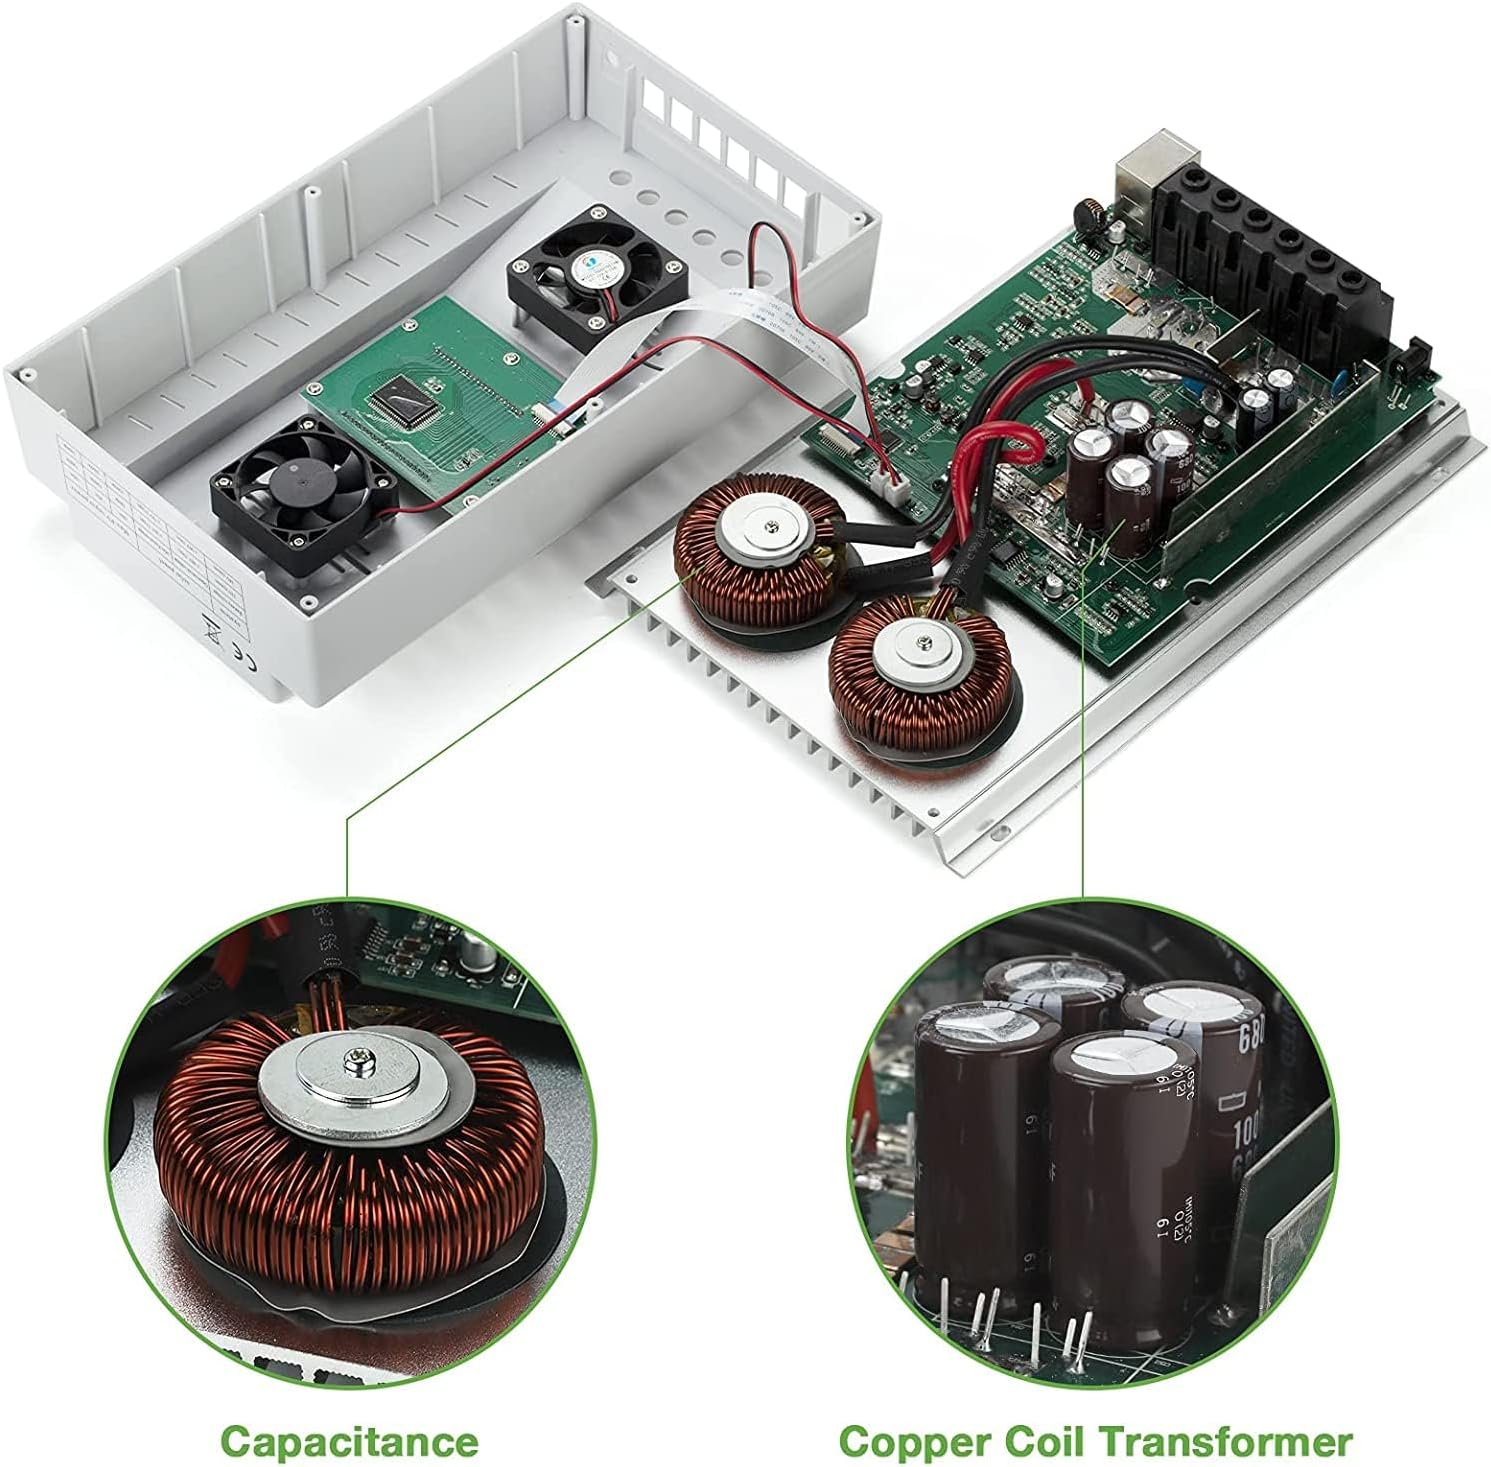
توفر هذه الصورة view of the internal components of the OOYCYOO MPPT Solar Charge Controller K100A, showcasing the Capacitance and Copper Coil Transformer, which are crucial for the controller's efficient operation and power conversion.

This image illustrates the physical dimensions of the OOYCYOO MPPT Solar Charge Controller K100A, showing its length, width, and height, along with a close-up of the USB ports and RS485 communication port. The dimensions are approximately 11.8 inches (height), 7.4 inches (length), and 3.35 inches (width).
6. الإعداد والتثبيت
يُعدّ التركيب الصحيح أمراً بالغ الأهمية لضمان التشغيل الآمن والفعّال لجهاز التحكم بشحن الطاقة الشمسية. اتبع هذه الخطوات بعناية:
6.1 تسلسل التوصيل
- قم بتوصيل البطارية: First, connect the battery to the controller's battery terminals. Ensure correct polarity (+ to + and - to -). The controller will automatically detect the system voltagهـ (12 فولت أو 24 فولت).
- ربط اللوحة الشمسية: Next, connect the solar panel array to the controller's solar panel terminals. Again, ensure correct polarity.
- قم بتوصيل الحمل المستمر: Finally, connect your DC load (e.g., lights, fan) to the controller's load terminals.
مهم: Disconnect the system in the reverse order when uninstalling or performing maintenance: first the load, then the solar panel, and finally the battery.
This diagram illustrates the recommended wiring sequence for the OOYCYOO MPPT Solar Charge Controller K100A. It shows the connection from solar panels (PV Panel) through a breaker to the controller, then from the controller to the battery, and finally to DC loads and an inverter for AC loads. Supported battery types are also listed: Lead-acid (Sealed, Flooded, GEL) and User-defined.
6.2 حجم اللوحة الشمسيةtagالمتطلبات (هـ)
- من اجل نظام 12 فولت: PV Open Circuit Voltage (Voc) should be between 18V and 96V.
- من اجل نظام 24 فولت: PV Open Circuit Voltage (Voc) should be between 36V and 96V.
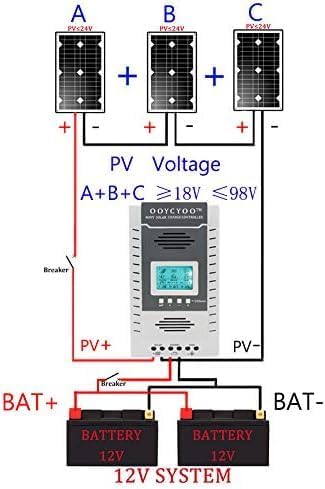
يوضح هذا الرسم البياني السابقample setup for a 12V solar system using the OOYCYOO MPPT Solar Charge Controller K100A. It illustrates three solar panels (A, B, C) connected in series to achieve a PV voltage between 18V and 98V, which then connects to the controller and a 12V battery bank.

يوضح هذا الرسم البياني السابقample setup for a 24V solar system using the OOYCYOO MPPT Solar Charge Controller K100A. It illustrates three solar panels (A, B, C) connected in series to achieve a PV voltage between 36V and 98V, which then connects to the controller and a 24V battery bank.
6.3 التركيب
Mount the controller in a well-ventilated area, away from direct sunlight, high temperatures, and water. Ensure there is sufficient space around the controller for heat dissipation. Use the provided mounting holes to secure the controller to a stable surface.
7. تعليمات التشغيل
The OOYCYOO MPPT Solar Charge Controller features an intuitive LCD display and control buttons for easy operation and monitoring.
7.1 شاشة LCD أكثرview

This image details the LCD display of the OOYCYOO MPPT Solar Charge Controller K100A, showing various real-time data points such as solar panel voltage (PV)، حجم البطاريةtage (BATT), load status (LOAD), charging/discharging faults, battery capacity, ambient temperature, and evening/dawn status. It also highlights the control buttons: Toggle Key, "plus", "minus", and Manual Load Switch. The Network Line Interface Indicator is also shown, with green light indicating battery status and yellow light indicating solar energy charging.
The LCD display provides comprehensive real-time data on one screen, making it convenient to check system status. It shows:
- حجم لوحة الطاقة الشمسيةtage (PV) and Current (Amp)
- حجم البطاريةtage (BATT) and Current (Amp)
- تحميل المجلدtage (LOAD) and Current (Amp)
- Charging Fault and Discharging Fault indicators
- Battery Capacity and Ambient Temperature
- Evening Status, Interval, and Dawn Status
- Load Stop Working Hours, Float Charging Voltagه ، حجم منخفضtagه قطع الاتصال المجلدtagهـ، وجهد منخفضtagإعادة توصيل المجلدtage.
7.2 أزرار تحكم
- تبديل المفتاح: يُستخدم للتنقل بين شاشات العرض المختلفة أو خيارات القائمة.
- "Plus" (+) / "Minus" (-) Buttons: Used to adjust parameters or navigate menu options.
- تبديل التحميل اليدوي: This button can be used to manually open or close the load. Long press this button for 5 seconds to restore factory settings.
- "X" Error/System Failure: If an "X" appears, click this button to troubleshoot or eliminate the error.
7.3 اختيار نوع البطارية
The controller supports various battery types. Refer to the manual's settings section (not detailed here, but typically accessed via the control buttons) to select the appropriate battery type for optimal charging profiles. Options usually include LiFePO4, lithium, AGM, gel, and lead-acid (flooded) batteries.
7.4 Video Demonstration of Operation
This video demonstrates the basic operation and connection of the OOYCYOO MPPT Solar Charge Controller. It shows how to connect the solar panels, battery, and load, and how to monitor the charging and discharging status on the LCD display. The video also illustrates the controller's ability to handle different battery types and its protective functions.
8. الصيانة
تضمن الصيانة الدورية طول عمر جهاز التحكم في شحن الطاقة الشمسية وأدائه الأمثل.
- نظافة: حافظ على وحدة التحكم نظيفة وخالية من الغبار والأوساخ. استخدم قطعة قماش جافة للتنظيف.
- الاتصالات: افحص جميع توصيلات الأسلاك بشكل دوري للتأكد من إحكامها وخلوها من التآكل. فالتوصيلات غير المحكمة قد تتسبب في ارتفاع درجة الحرارة وتلف الأسلاك.
- تهوية: تأكد من عدم سد فتحات التهوية للسماح بتبديد الحرارة بشكل صحيح.
- صحة البطارية: راقب صحة البطارية ومستوى شحنهاtage regularly. Replace batteries if they show signs of degradation.
- الظروف البيئية: Ensure the controller remains within its specified operating temperature and humidity ranges.
9. استكشاف الأخطاء وإصلاحها
This section provides solutions to common issues you might encounter with your OOYCYOO MPPT Solar Charge Controller.
9.1 المشكلات والحلول الشائعة
| مشكلة | السبب المحتمل | حل |
|---|---|---|
| لا يوجد عرض على شاشة LCD | البطارية غير متصلة أو مستوى الصوت منخفضtagهـ؛ عكس القطبية. | تأكد أولاً من توصيل البطارية وأنها تتمتع بجهد كافٍtage (>9V). Check battery polarity. |
| لا يتم الشحن من الألواح الشمسية | Solar panels not connected; low solar panel voltage; reverse polarity; insufficient sunlight. | Check solar panel connections and polarity. Ensure PV Voc is within specified range (18-96V for 12V system, 36-96V for 24V system). Verify adequate sunlight. |
| التحميل لا يعمل | Load not connected; battery low voltage disconnect; overload protection; load switch off. | تحقق من توصيلات الحمل. تأكد من جهد البطاريةtage أعلى من مستوى منخفضtage disconnect setting. Reduce load if overloaded. Press manual load switch to turn on. |
| "X" error displayed | System fault (e.g., overcharge, over-discharge, overload, short circuit). | Identify the specific error code if available. Press the "X" button to clear the error. Check for system faults and rectify them. Consult professional if persistent. |
إذا واجهت مشاكل غير مدرجة هنا أو إذا لم تحل خطوات استكشاف الأخطاء وإصلاحها المشكلة، فيرجى الاتصال بدعم العملاء للحصول على المساعدة.
10. الضمان والدعم
The OOYCYOO 100A MPPT Solar Charge Controller (K100A) comes with a ضمان لمدة 180 يومًا بدون قلق. If you have any questions before or after installation, please email us. Our professional technical team is available to guide you through installation and provide support. We are committed to providing worry-free after-sales service.
For technical assistance or warranty claims, please refer to the contact information provided with your purchase or visit the official OOYCYOO store on Amazon.