
1. المقدمة
The DORHEA ESP32-S NodeMCU Development Board is a versatile 2.4GHz dual-mode WiFi and Bluetooth microcontroller, featuring the ESP-WROOM-32 module. This board integrates a dual-core processor and the CP2102 USB-to-serial chip, enabling stable and fast data transmission via a micro USB interface. It is designed for a wide range of applications, including home automation, wireless industrial control, and wireless positioning systems.
The ESP32-S supports Lua programming, LWIP protocol, and FreeRTOS, offering flexibility for development. It operates in three modes: Access Point (AP), Station (STA), and a combination of both (AP + STA). Its low-power coprocessor allows for continuous monitoring of peripherals while the main CPU is powered down, optimizing energy consumption.

الشكل 1: أمام view of the DORHEA ESP32-S NodeMCU Development Board, showing the ESP-WROOM-32 module, micro USB port, and pin headers.
2. دليل الإعداد
2.1 توصيل اللوحة
Connect the ESP32-S development board to your computer using a micro USB cable. The CP2102 chip facilitates the serial communication required for programming and debugging.
2.2 تثبيت برنامج التشغيل
The CP2102 USB-to-serial chip may require specific drivers for your operating system. These drivers are typically available from the Silicon Labs website. Install them before attempting to program the board.
2.3 إعداد بيئة التطوير
The ESP32-S board is compatible with various development environments, including the Arduino IDE and PlatformIO (within Visual Studio Code). Follow the respective environment's instructions to add ESP32 board support.
- بيئة التطوير المتكاملة Arduino: Install the ESP32 board package through the Boards Manager.
- منصة IO: Configure your project to use the ESP32 framework.
2.4 وضع البرمجة
To upload code to the board, it typically needs to be in programming mode. This is usually achieved by holding down the الحذاء button while initiating the upload process in your IDE, then releasing it once the upload begins. Some environments or board configurations may not require manual button pressing.

الشكل 2: بزاوية view of the ESP32-S development board, showing the ESP-WROOM-32 module and micro USB port.
3. تعليمات التشغيل
3.1 التشغيل الأساسي
Once programmed, the ESP32-S board will execute the uploaded code. The board features two touch buttons: one for إعادة ضبط (labeled EN) and another to enable the module to enter program mode (labeled BOOT).
3.2 WiFi and Bluetooth Modes
The ESP32-S supports three operational modes for wireless communication:
- وضع نقطة الوصول (AP): The ESP32-S acts as a Wi-Fi hotspot, allowing other devices to connect to it.
- STA (Station) Mode: The ESP32-S connects to an existing Wi-Fi network.
- AP + STA Mode: The ESP32-S simultaneously functions as both an Access Point and a Station.
3.3 مخطط توصيل الدبابيس
Refer to the pinout diagram for proper connection of external components and sensors. Understanding the GPIO assignments, power pins, and special functions (ADC, DAC, Touch) is crucial for project development.

الشكل 3: Detailed pinout diagram of the ESP32-S NodeMCU board.
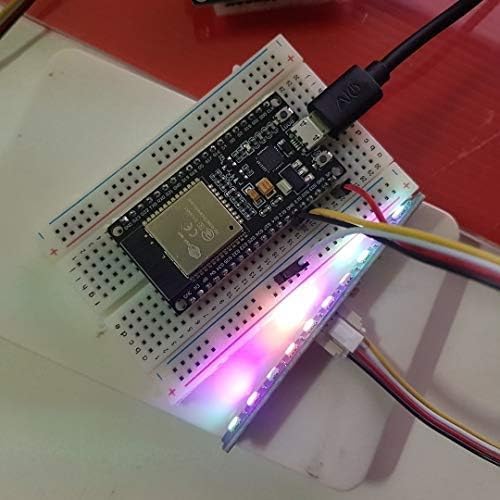
الشكل 4: The ESP32-S development board connected to a breadboard with an LED strip, demonstrating a typical application setup.
4. الصيانة
To ensure the longevity and reliable operation of your ESP32-S development board, follow these general maintenance guidelines:
- التعامل معها بحذر: Avoid dropping the board or subjecting it to excessive physical stress.
- أداء ثابت: Always handle the board in an environment free of static electricity to prevent damage to sensitive components.
- نظافة: حافظ على اللوح خالياً من الغبار والأوساخ والرطوبة. استخدم فرشاة ناعمة وجافة أو هواء مضغوط للتنظيف.
- مزود الطاقة: Ensure a stable and appropriate power supply. The board can draw between 500-600mA instantaneously when connecting to Wi-Fi. Using an inadequate power supply (e.g., some computer USB ports or hubs) may lead to reboots or connectivity issues.
- المجلدtagهـ- اللائحة: While the board can handle input voltages up to 20V, the onboard LDO regulator has limited heat dissipation. If using a higher voltage power supply, consider stepping down the voltage to 5V with a switching regulator before connecting to the VIN pin to prevent overheating and potential failure.
5. استكشاف الأخطاء وإصلاحها
This section addresses common issues encountered during the use of the ESP32-S development board.
5.1 مشاكل اتصال Wi-Fi
- Frequent Disconnections/Reboots: If the board reboots or disconnects from Wi-Fi frequently, especially during connection attempts, check your power supply. The board requires significant current (500-600mA) during Wi-Fi initialization. Ensure your USB port or external power supply can provide sufficient, stable current.
- لا يوجد اتصال واي فاي: Verify your Wi-Fi credentials in the code. Ensure the antenna is not obstructed.
5.2 Programming and Flashing Problems
- Failed Uploads: Ensure the correct COM port is selected in your IDE. If using Arduino IDE, ensure the correct board type (ESP32 Dev Module) is selected. For some setups, you may need to manually hold the الحذاء button during the upload process.
- مشاكل السائق: Confirm that the CP2102 drivers are correctly installed and recognized by your operating system.
- "Could not connect to an Espressif device": This error often indicates a communication problem. Check USB cable, drivers, and ensure the board is in programming mode.
- Memory Loss/Bricking: In rare cases, the flash memory may become corrupted. Attempting to reflash the board with a known working program is the first step. If persistent issues occur, the board may be damaged.
5.3 وظيفة البلوتوث
- البلوتوث لا يعمل: Verify that your code correctly initializes and uses the Bluetooth module. Ensure there are no hardware conflicts with other components connected to the board.
5.4 Silkscreen Error
- Incorrect Pin Label: Be aware that the GPIO pin G33, located between G25 and G32, may be incorrectly marked as G23 on the silkscreen. This is a labeling error only and does not affect the physical pin's functionality.
6. المواصفات

الشكل 5: من أعلى إلى أسفل view of the ESP32-S development board with key features labeled.
| ميزة | التفاصيل |
|---|---|
| المعالج | Dual-core 2.4 GHz Espressif |
| الاتصال اللاسلكي | Wi-Fi (2.4GHz 802.11 b/g/n), Bluetooth |
| USB-to-Serial Chip | CP2102 |
| دعم نظام التشغيل | نظام التشغيل المجاني في الوقت الفعلي |
| سعة تخزين الذاكرة | 4 ميجا بايت |
| أبعاد المنتج (الطول × العرض × الارتفاع) | 1.96 × 1.10 × 0.59 بوصة |
| وزن العنصر | 1.58 أونصات |
| رقم الموديل | 13051-1 |
| لون | 30pin micro |

الشكل 6: جانب view of the ESP32-S development board with dimensions labeled.
7. الضمان والدعم
7.1 معلومات الضمان
Specific warranty details for the DORHEA ESP32-S NodeMCU Development Board are not explicitly provided in the product information. For warranty inquiries, please contact the manufacturer or your point of purchase.
7.2 الدعم الفني
For technical assistance, troubleshooting beyond this manual, or further product information, please refer to the DORHEA brand store or contact their customer support channels. You can often find additional resources and community forums online for ESP32 development boards.