1. انتهى المنتجview
The OOYCYOO 100 Amp MPPT Solar Charge Controller, Model KP60 100, is designed for efficient management of solar power systems. It automatically identifies 12V or 24V battery systems and is compatible with various battery types, including AGM, Sealed, Gel, Flooded, and Lithium. This controller features advanced Maximum Power Point Tracking (MPPT) technology to maximize energy harvest from solar panels, ensuring optimal charging for your battery bank.
Key features include a backlit LCD display for real-time monitoring, enhanced safety protections, and a high DC/DC transfer efficiency of up to 98.7%.

الشكل 1: الجبهة view of the OOYCYOO 100 Amp MPPT Solar Charge Controller, showing the LCD display and connection terminals.
2. تعليمات السلامة
يرجى قراءة جميع التعليمات والتحذيرات بعناية قبل التركيب والتشغيل. قد يؤدي عدم اتباع هذه التعليمات إلى صدمة كهربائية أو حريق أو إصابة بالغة.
- تأكد من أن جميع الأسلاك موصلة بشكل صحيح ومستقطبة بشكل آمن لمنع تلف وحدة التحكم والأجهزة المتصلة بها.
- Always disconnect the solar panel array and battery before installing or adjusting the controller.
- قم بتثبيت وحدة التحكم في منطقة جيدة التهوية، بعيدًا عن المواد القابلة للاشتعال وأشعة الشمس المباشرة.
- Do not disassemble or attempt to repair the controller. Refer to qualified personnel for service.
- استخدم قواطع الدائرة أو الصمامات المناسبة لجميع الوصلات للحماية من التيار الزائد.
- Wear appropriate personal protective equipment, including eye protection and insulated gloves, during installation.
3. مكونات المنتج ووصلاته
The controller features clearly labeled terminals for solar panel input, battery connection, and load output. It also includes a remote temperature sensor port and USB charging ports.

الشكل 2: مفصل view of the controller's LCD display, 5S Reset button, Solar Panel Terminal, Battery Terminal, Load Terminal, USB 5V2A ports, Remote Temp Sensor port, and RS485 Communication Port.
محتويات الحزمة:
- 1 x OOYCYOO 100A MPPT Solar Charge Controller (Model K2500W)
- 1 س استشعار درجة الحرارة
- 1 × دليل المستخدم (الإنجليزية)
4. المواصفات الفنية
The following table outlines the technical specifications for the OOYCYOO 100 Amp MPPT Solar Charge Controller (Model KP60 100).
| المعلمة | مواصفة |
|---|---|
| تيار الشحن المقدر | 100 أمبير |
| المجلد الاسمي للنظامtage | التعرف التلقائي على 12 فولت/24 فولت تيار مستمر |
| 12V System Max. PV Input Power | 1300 واط |
| 24V System Max. PV Input Power | 2600 واط |
| الأعلى. PV Open Circuit Voltagه المركبات العضوية المتطايرة) | 100 فولت تيار مستمر |
| حجم البطاريةtage المدى | 9V ~ 32V |
| Power Terminal Wire Gauge | 10 مقياس سلكي |
| الأبعاد (الطول × العرض × الارتفاع) | 12 × 7.8 × 3.2 بوصة (30.5 × 19.8 × 8.1 سم) |
| وزن | 8.84 رطل (4 كجم) |
| نوع العرض | شاشة الكريستال السائل |
| درجة حرارة التشغيل | ما يصل إلى 45 درجة مئوية (113 درجة فهرنهايت) |
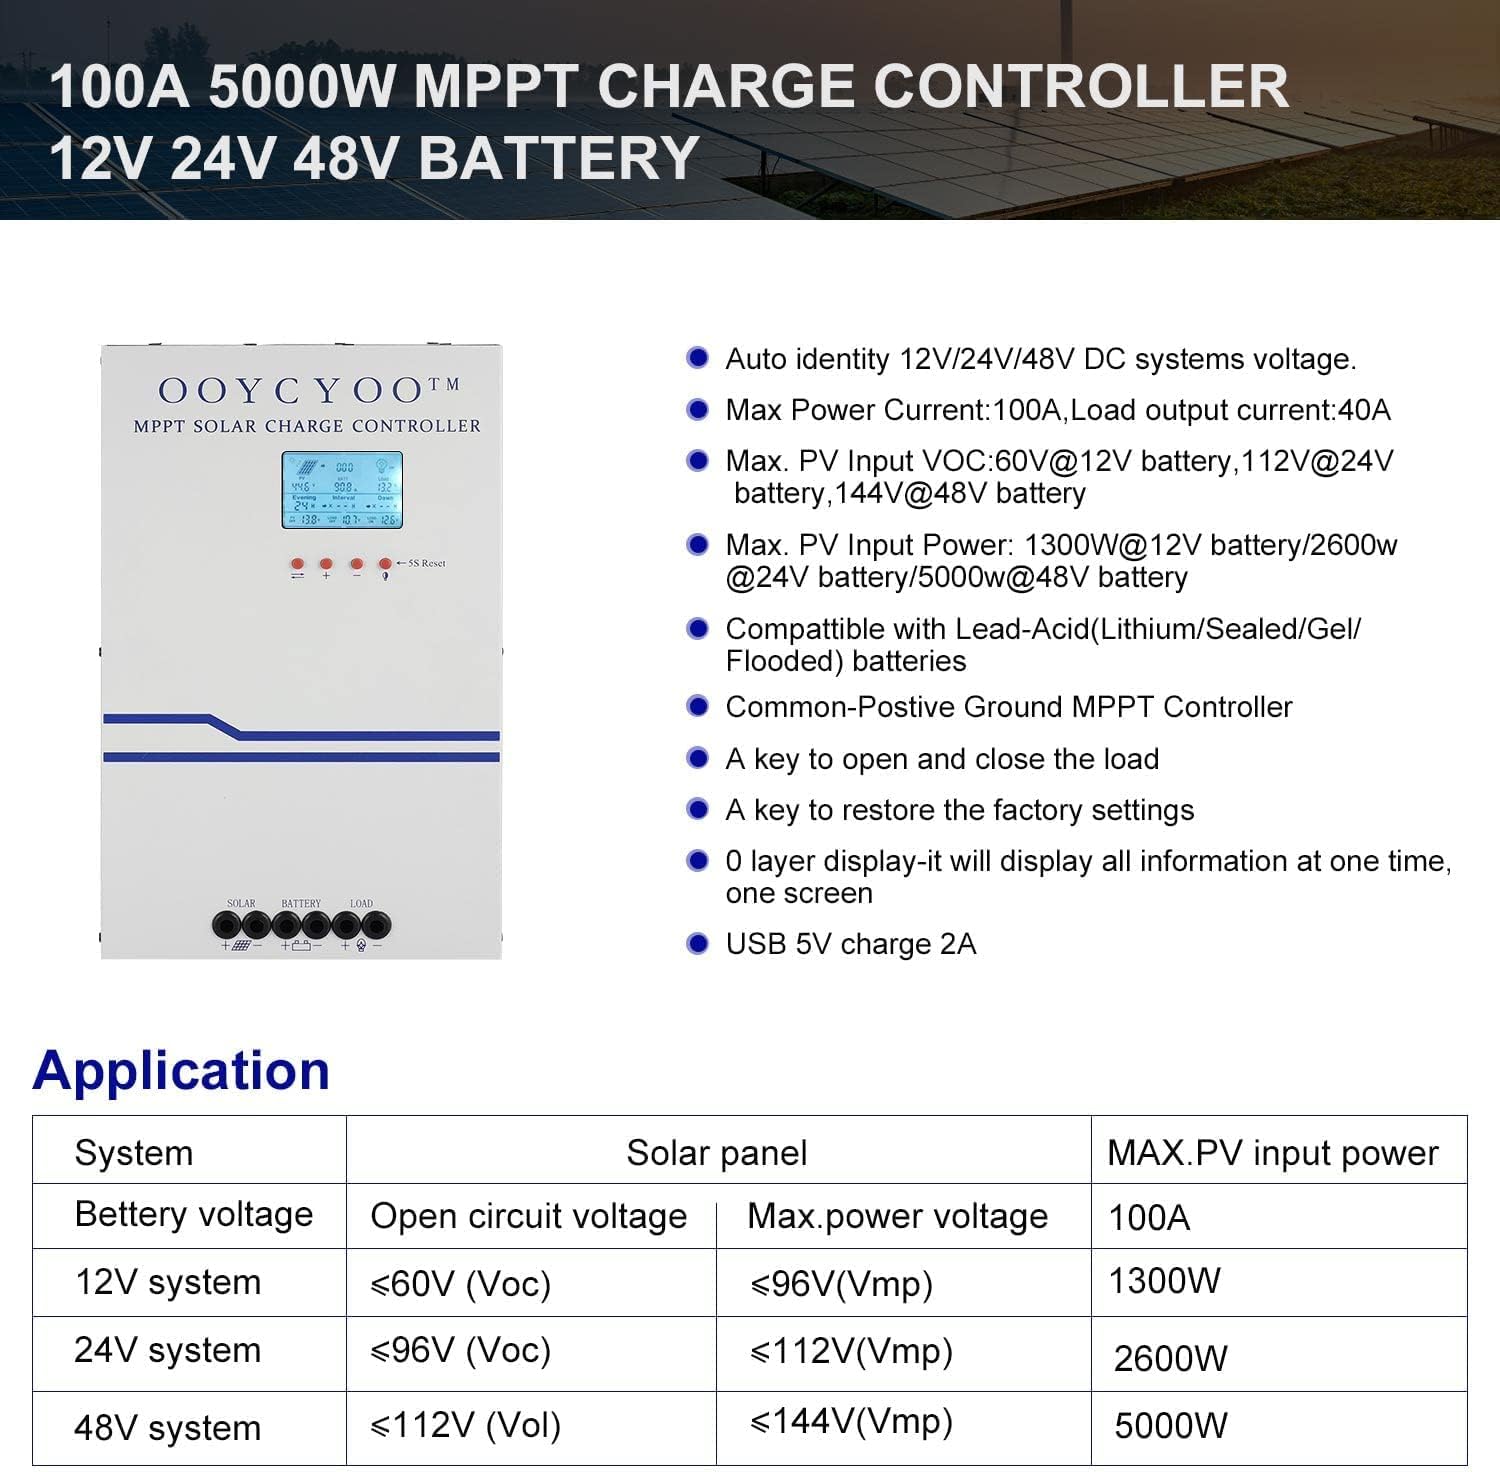
Figure 3: Application table detailing maximum PV input power and voltage for 12V, 24V, and 48V systems.
5. دليل التثبيت
يُعدّ التركيب الصحيح أمراً بالغ الأهمية لضمان التشغيل الآمن والفعّال لجهاز التحكم بشحن الطاقة الشمسية. اتبع هذه الخطوات بعناية:
5.1 تركيب وحدة التحكم
- اختر مكانًا جافًا وجيد التهوية، محميًا من أشعة الشمس المباشرة ودرجات الحرارة العالية والرطوبة.
- Ensure sufficient clearance around the controller for proper airflow, especially around the cooling vents.
- قم بتركيب وحدة التحكم عموديًا على سطح غير قابل للاشتعال باستخدام أدوات التثبيت المناسبة.
5.2 توصيلات الأسلاك
Connect the components in the following order: Battery > Solar Panel > Load. Always ensure correct polarity.
- قم بتوصيل البطارية: Connect the battery cables to the battery terminals on the controller. Ensure the positive (+) and negative (-) terminals are correctly matched. The controller will automatically detect the battery voltagهـ (12 فولت أو 24 فولت).
- ربط اللوحة الشمسية: Connect the solar panel cables to the PV input terminals on the controller. Verify correct polarity. Ensure the open circuit voltage (Voc) of your solar array does not exceed 100VDC.
- توصيل الحمل: Connect your DC load to the load output terminals. Ensure the load current does not exceed the controller's rated load current.
- توصيل مستشعر درجة الحرارة: Plug the remote temperature sensor into its designated port. This sensor helps the controller optimize charging based on battery temperature.
The controller is compatible with various battery types:

Figure 4: The controller supports AGM, Sealed, Gel, Flooded, and Lithium-Iron phosphate batteries for 12V/24V/48V systems.
6. دليل التشغيل
Once installed, the controller will begin operation. The LCD display provides real-time system status and allows for configuration.
6.1 شاشة LCD
The backlit LCD display shows various parameters such as battery voltage, charging current, solar panel voltage, load status, and accumulated energy (KWH). Use the buttons below the display to navigate through the different screens and access settings.
6.2 الإعدادات الأساسية
The controller allows users to set parameters for different battery types (Lithium, LiFePO4, Li(NiCoMn)O2, Flooded, Sealed, Gel). Refer to the on-screen menu for specific adjustments to absorption voltagه ، تعويم المجلدtagالبريد ، والحجم المنخفضtage disconnect settings. A load timer function is also available for controlling DC loads.
6.3 تشغيل مروحة التبريد
The built-in cooling fan activates automatically when the internal temperature exceeds 45°C (113°F) and turns off when the temperature drops below 40°C (104°F). This mechanism ensures optimal performance and extends the lifespan of the controller.
7. الصيانة
Regular maintenance helps ensure the longevity and optimal performance of your solar charge controller.
- تنظيف: Periodically clean the controller's exterior with a dry cloth. Ensure cooling vents are free from dust and debris.
- الاتصالات: Annually inspect all wiring connections for tightness and corrosion. Loose connections can cause overheating and damage.
- بيئة: تأكد من أن بيئة التركيب تظل جافة وجيدة التهوية.
8. استكشاف الأخطاء وإصلاحها
The controller incorporates multiple protection functions to safeguard your system. If an issue arises, check the LCD display for error codes or indicators.
8.1 وظائف الحماية
- حماية الطاقة/التيار الزائد لأنظمة الطاقة الشمسية الكهروضوئية
- حماية من قصر الدائرة في الألواح الكهروضوئية
- حماية القطبية العكسية الكهروضوئية
- حماية من الشحن العكسي الليلي
- حماية البطارية عكس القطبية
- بطارية أكثر من حجمtagالحماية
- حماية ضد تفريغ البطارية
- Battery Overheating, Controller Overheating Protection
- حماية بطارية الليثيوم من درجات الحرارة المنخفضة
- حماية الدائرة القصيرة للحمل
- حماية الحمل الزائد
- TVS المجلد العاليtagه حماية العابرين
8.2 المشكلات الشائعة
- لا الشحن: Check solar panel connections, ensure sufficient sunlight, and verify battery voltagيقع ضمن نطاق التشغيل.
- التحميل لا يعمل: Check load connections, ensure battery voltage أعلى من المجلد المنخفضtage disconnect setting, and verify load timer settings.
- ارتفاع درجة الحرارة: Ensure adequate ventilation around the controller and that cooling vents are clear.
- حجم غير صحيحtagقراءات: Verify all connections are secure and the temperature sensor is properly installed.
If issues persist after checking these points, please contact customer support.
9. الضمان والدعم
The OOYCYOO 100 Amp MPPT Solar Charge Controller is a professional product. For any questions or technical assistance, please contact us directly via email. We are committed to providing prompt support and ensuring your satisfaction.
يرجى الرجوع إلى مستندات الشراء الخاصة بك لمعرفة شروط وأحكام الضمان المحددة.