
1. المقدمة
The MASTECH MS8260E is a versatile 2000-count digital multimeter designed for a wide range of electrical and electronic measurements. It features a large LCD display, non-contact voltage (NCV) detection, and capabilities for measuring AC/DC voltage, AC/DC current, resistance, capacitance, and inductance. This manual provides essential information for the safe and effective operation, maintenance, and troubleshooting of your device.
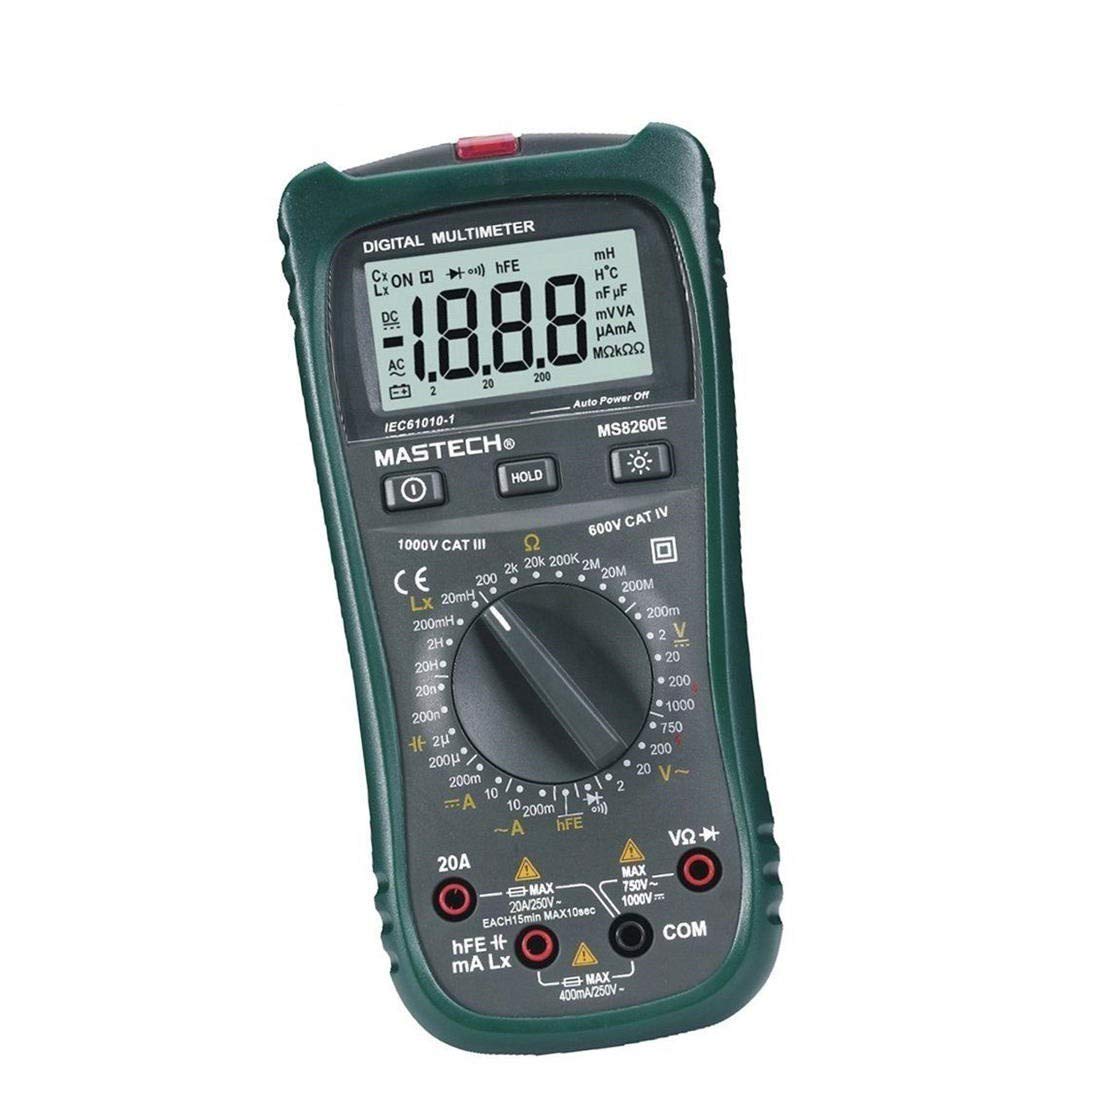
الشكل 1: الجبهة view of the MASTECH MS8260E Digital Multimeter, showing the LCD display, function rotary switch, and input jacks.
2. معلومات السلامة
لضمان التشغيل الآمن للعداد وصيانته، اتبع إرشادات السلامة التالية:
- Read and understand all instructions in this manual before using the meter.
- التزم دائمًا بقوانين السلامة المحلية والوطنية.
- لا تستخدم جهاز القياس إذا بدا تالفًا أو إذا كان العزل الموجود على أسلاك الاختبار متضررًا.
- Observe the input limits for each measurement range to prevent electrical shock or damage to the meter. This meter is rated for CAT.IV 600V.
- توخ الحذر عند العمل مع المجلدtagالجهد الكهربائي أعلى من 30 فولت تيار متردد RMS، أو 42 فولت ذروة، أو 60 فولت تيار مستمر. هذه الفولتياتtagإنها تشكل خطر صدمة.
- افصل الطاقة عن الدائرة الكهربائية دائمًا وقم بتفريغ جميع الأحمال العاليةtage capacitors before making resistance, continuity, diode, or capacitance measurements.
- استبدل البطارية فور ظهور مؤشر انخفاض مستوى البطارية لضمان دقة القراءات.
- لا تقم بتشغيل العداد في بيئات تحتوي على غازات أو أبخرة أو غبار قابل للاشتعال.
3. انتهى المنتجview
The MS8260E multimeter is equipped with several features to facilitate accurate and convenient measurements:
- Large 2000 Counts LCD Display: Provides clear digital readings.
- المدمج في حجم عدم الاتصالtagكاشف (NCV): يكتشف AC voltage greater than 110V without physical contact, indicated by a flash warning.
- وظيفة الاحتفاظ بالبيانات: يقوم بتجميد القراءة المعروضة لتسهيل التسجيل.
- عرض الخلفية: Improves visibility in dimly lit conditions.
- إيقاف التشغيل التلقائي: Conserves battery life by automatically turning off the meter after a period of inactivity.
- مؤشر انخفاض البطارية: Alerts the user when the battery needs replacement.
- إشارة القطبية: Automatically displays negative polarity.
- 30-Range Rotary Switch: Selects various measurement functions including AC/DC voltage, AC/DC current, resistance, capacitance, inductance, diode check, continuity test, and transistor (hFE) check.
4. الإعداد
4.1 تركيب البطارية
The MS8260E requires one 9V battery (NEDA 1604/6F22). To install or replace the battery:
- Ensure the meter is turned off and disconnect all test leads from the input terminals.
- حدد موقع غطاء حجرة البطارية على الجزء الخلفي من العداد.
- قم بفك البراغي المثبتة وإزالة الغطاء.
- Insert the 9V battery, observing the correct polarity.
- أعد تركيب غطاء حجرة البطارية وثبته بالبرغي (البراغي).
4.2 توصيل أسلاك الاختبار
Always connect the black test lead to the "COM" (common) input jack. Connect the red test lead to the appropriate input jack based on the desired measurement:
- للمجلدtage, Resistance, Capacitance, Inductance, Diode, Continuity, and hFE measurements: Connect the red lead to the "VΩCAPHz" jack.
- For Current measurements up to 200mA: Connect the red lead to the "mA" jack.
- For Current measurements up to 10A: Connect the red lead to the "10A" jack.
Ensure test leads are fully inserted into the jacks before taking measurements.
5. تعليمات التشغيل
Turn the rotary switch to the desired function. The meter will display "OL" (Overload) if no input is present or if the input exceeds the range.
5.1 العاصمة المجلدtagالقياس الإلكتروني (DCV)
- Set the rotary switch to the desired DCV range (200mV, 2V, 20V, 200V, 1000V).
- Connect the black test lead to the "COM" jack and the red test lead to the "VΩCAPHz" jack.
- قم بتوصيل أسلاك الاختبار عبر المكون أو الدائرة المراد قياسها، مع مراعاة القطبية.
- اقرأ المجلدtagقيمة e على شاشة LCD.
5.2 أس فولtagالقياس الإلكتروني (ACV)
- Set the rotary switch to the desired ACV range (2V, 20V, 200V, 750V).
- Connect the black test lead to the "COM" jack and the red test lead to the "VΩCAPHz" jack.
- قم بتوصيل أسلاك الاختبار عبر جهد التيار المترددtagالمصدر هـ.
- اقرأ المجلدtagقيمة e على شاشة LCD.
5.3 DC Current Measurement (DCA)
- Set the rotary switch to the desired DCA range (200mA, 10A).
- For measurements up to 200mA, connect the red lead to the "mA" jack. For measurements up to 10A, connect the red lead to the "10A" jack. The black lead connects to "COM".
- افتح الدائرة التي سيتم قياس التيار فيها وقم بتوصيل جهاز القياس على التوالي مع الحمل.
- اقرأ القيمة الحالية على شاشة LCD.
5.4 AC Current Measurement (ACA)
- Set the rotary switch to the desired ACA range (200mA, 10A).
- For measurements up to 200mA, connect the red lead to the "mA" jack. For measurements up to 10A, connect the red lead to the "10A" jack. The black lead connects to "COM".
- افتح الدائرة التي سيتم قياس التيار فيها وقم بتوصيل جهاز القياس على التوالي مع الحمل.
- اقرأ القيمة الحالية على شاشة LCD.
5.5 قياس المقاومة (Ω)
- Set the rotary switch to the desired Ω range (200Ω, 2kΩ, 20kΩ, 200kΩ, 2MΩ, 20MΩ, 200MΩ).
- Connect the black test lead to "COM" and the red test lead to "VΩCAPHz".
- تأكد من فصل التيار الكهربائي عن الدائرة وتفريغ جميع المكثفات.
- Connect the test leads across the resistor or component.
- اقرأ قيمة المقاومة على شاشة LCD.
5.6 Capacitance Measurement (CAP)
- Set the rotary switch to the desired CAP range (20nF, 200nF, 2uF, 200uF).
- Connect the black test lead to "COM" and the red test lead to "VΩCAPHz".
- تأكد من تفريغ المكثف بالكامل قبل توصيل أسلاك الاختبار.
- قم بتوصيل أسلاك الاختبار عبر المكثف.
- اقرأ قيمة السعة على شاشة LCD.
5.7 Inductance Measurement (L)
- Set the rotary switch to the desired Inductance range (20mH, 200mH, 2H, 20H).
- Connect the black test lead to "COM" and the red test lead to "VΩCAPHz".
- Connect the test leads across the inductor.
- Read the inductance value on the LCD display.
5.8 اختبار الصمام الثنائي
- اضبط المفتاح الدوار على رمز الصمام الثنائي.
- Connect the black test lead to "COM" and the red test lead to "VΩCAPHz".
- قم بتوصيل السلك الأحمر بالأنود والسلك الأسود بالكاثود للدايود. جهد أماميtagسيتم عرض انخفاض الجهد (عادةً من 0.5 فولت إلى 0.8 فولت للثنائيات السيليكونية).
- Reverse the leads. The display should show "OL" for a good diode.
5.9 اختبار الاستمرارية
- اضبط المفتاح الدوار على رمز الاستمرارية.
- Connect the black test lead to "COM" and the red test lead to "VΩCAPHz".
- قم بتوصيل أسلاك الاختبار عبر الدائرة أو المكون.
- إذا كانت المقاومة أقل من 30 أوم تقريبًا، فسيصدر صوت الجرس، مما يشير إلى وجود استمرارية.
5.10 Transistor (hFE) Test
- اضبط المفتاح الدوار على وضع hFE.
- Identify the type (NPN or PNP) and pinout (Emitter, Base, Collector) of the transistor.
- Insert the transistor leads into the corresponding sockets in the hFE test socket on the meter.
- Read the hFE (DC current gain) value on the LCD display.
5.11 حجم عدم الاتصالtagكشف (NCV).
- اضبط المفتاح الدوار على وضع NCV.
- Hold the top front part of the meter near the AC voltage source (e.g., an electrical outlet or insulated wire).
- إذا كان AC voltage greater than 110V is detected, the NCV indicator light will flash, and the buzzer may sound.
6. الصيانة
6.1 التنظيف
امسح العداد بالإعلاناتamp cloth and a mild detergent. Do not use abrasives or solvents. Ensure the meter is dry before use.
6.2 استبدال البطارية
When the "BAT" symbol appears on the display, the battery needs to be replaced. Refer to Section 4.1 for battery installation instructions.
6.3 استبدال الصمامات
If the current measurement function fails, the fuse may need replacement. This operation should only be performed by qualified personnel. Refer to the service manual or contact customer support for fuse specifications and replacement procedures.
6.4 التخزين
If the meter is not to be used for an extended period, remove the battery to prevent leakage and damage to the meter. Store the meter in a cool, dry place away from direct sunlight.
7. استكشاف الأخطاء وإصلاحها
| مشكلة | السبب المحتمل | حل |
|---|---|---|
| لا يوجد عرض أو عرض خافت | Low battery; Meter off | Replace battery; Turn on meter |
| تم عرض "OL" | Input exceeds range; Open circuit (for resistance/continuity) | Select higher range; Check circuit connection |
| قراءات غير صحيحة | Low battery; Incorrect range selected; Poor test lead contact | Replace battery; Select appropriate range; Ensure good contact |
| القياس الحالي لا يعمل | فتيل منفوخ | Replace fuse (by qualified personnel) |
8. المواصفات
| دالة القياس | يتراوح | دقة |
|---|---|---|
| المجلد العاصمةtagه (DCV) | 200 مللي فولت، 2 فولت، 20 فولت، 200 فولت، 1000 فولت | ±0.5% (200mV-200V), ±0.8% (1000V) |
| المجلد ACtag(أكف) | 2V ، 20V ، 200V ، 750V | ±0.8% (2V-200V), ±1.2% (750V) |
| تيار مستمر (DCA) | 200 مللي أمبير، 10 أمبير | ±1.5% (200mA), ±2.0% (10A) |
| تيار متردد (ACA) | 200 مللي أمبير، 10 أمبير | ±1.8% (200mA), ±3.0% (10A) |
| المقاومة (Ω) | 200 أوم، 2 كيلو أوم، 20 كيلو أوم، 200 كيلو أوم، 2 ميجا أوم، 20 ميجا أوم، 200 ميجا أوم | ±0.8% (200Ω-2MΩ), ±1.0% (20MΩ), ±5.0% (200MΩ) |
| السعة (كاب) | 20nF, 200nF, 2uF, 200uF | ±4.0% (20nF-2uF), ±5.0% (200uF) |
| المحاثة (لتر) | 20mH, 200mH, 2H, 20H | ±3.0% |
| استمرارية مسموعة | Buzzer sounds at <30Ω | غير متاح |
| اختبار الصمام الثنائي | شنومكما، شنومكسف | غير متاح |
| الترانزستور (hFE) | 0 - 1,000 | غير متاح |
المواصفات العامة:
- عرض: 2000 يعد LCD
- تصنيف السلامة: CAT.IV 600V
- قوة: 9V battery (NEDA 1604/6F22)
- وزن: Approximately 1 kg (including battery)
9. الضمان والدعم
For warranty information, technical support, or service inquiries, please refer to the warranty card included with your product or visit the official Mastech website. Do not attempt to repair the meter yourself, as this may void the warranty and pose safety risks.